
LQ4 into a 3rd Gen/1972 Nova


 10-04-2011, 11:08 PM
#662

Oops went a bit crazy with the jigsaw. Corners notched for tailpipe clearance for the 4-link...

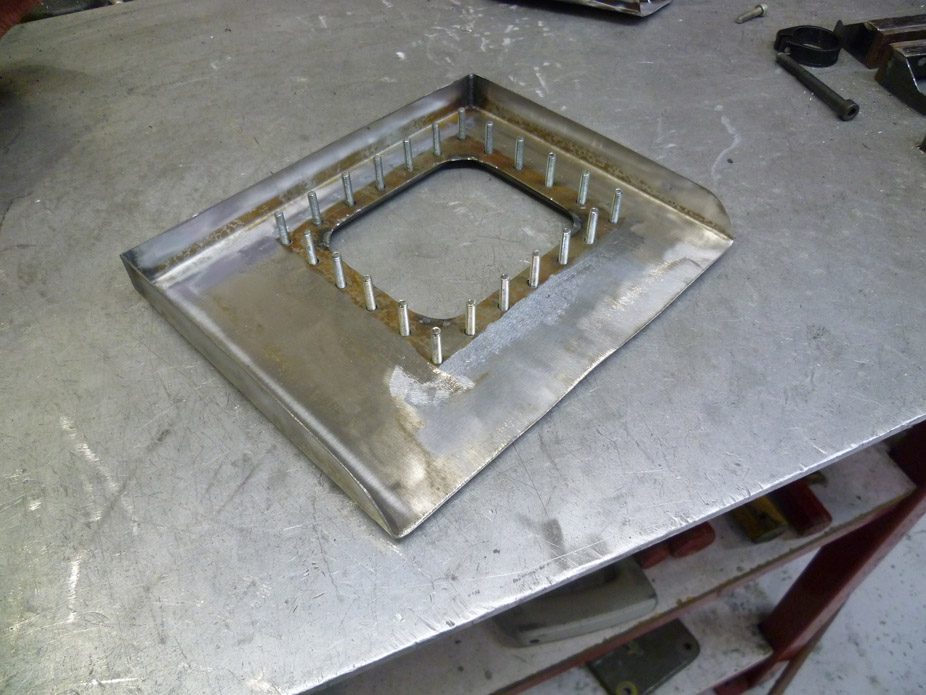
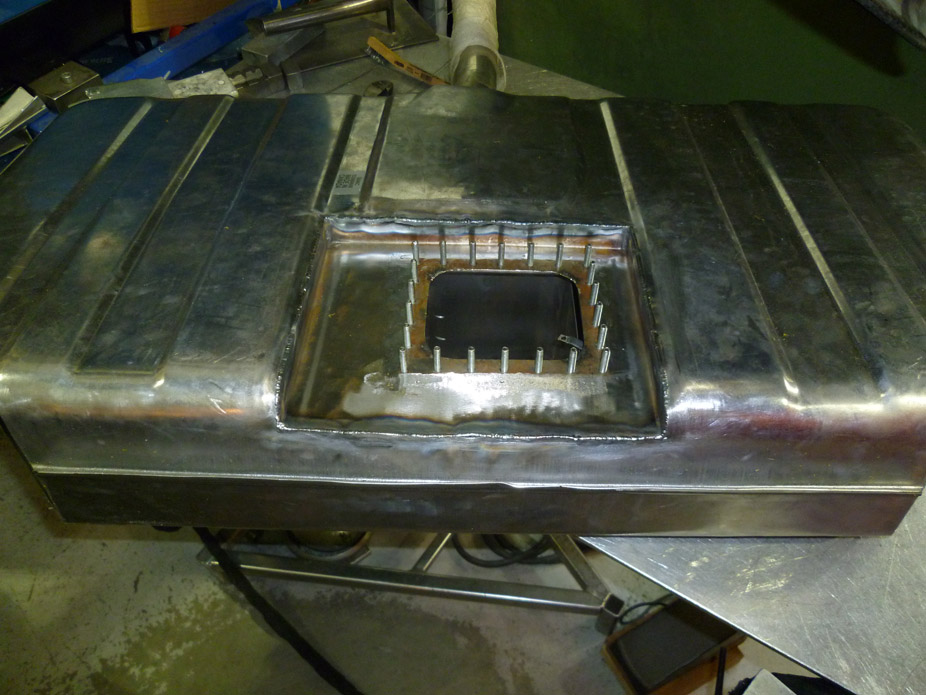
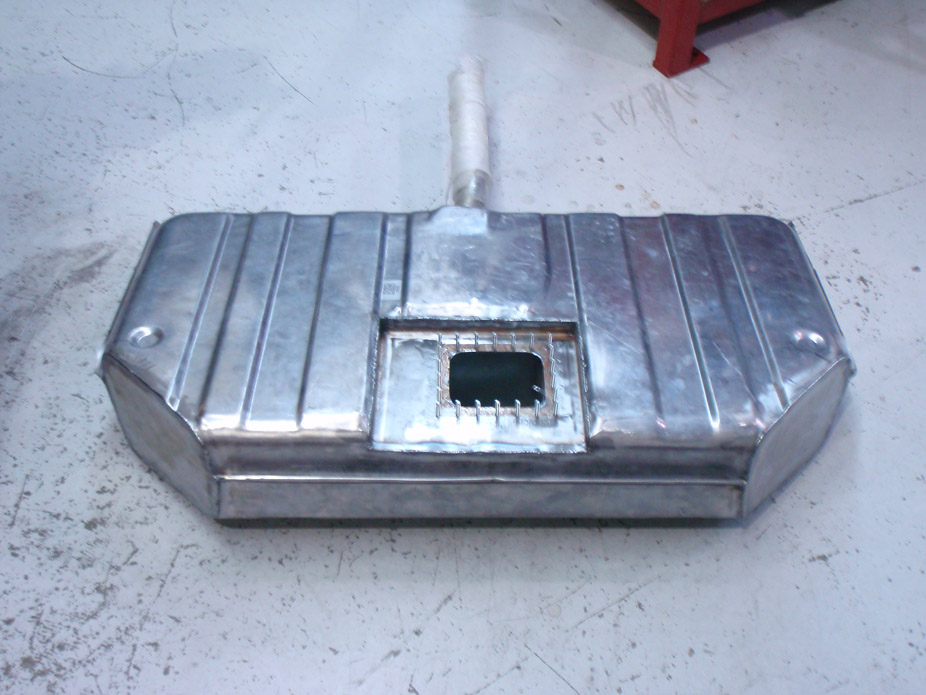
Recessed access panel plate. All studs are actually socket screws which heads are tacked to some 1/8"x3/4" flat stock on the backside, which was then tacked to the sheetmetal, to keep everything rigid and prevent the screws from rotating or pulling through...
Stock-replacement fuel level sender reused...

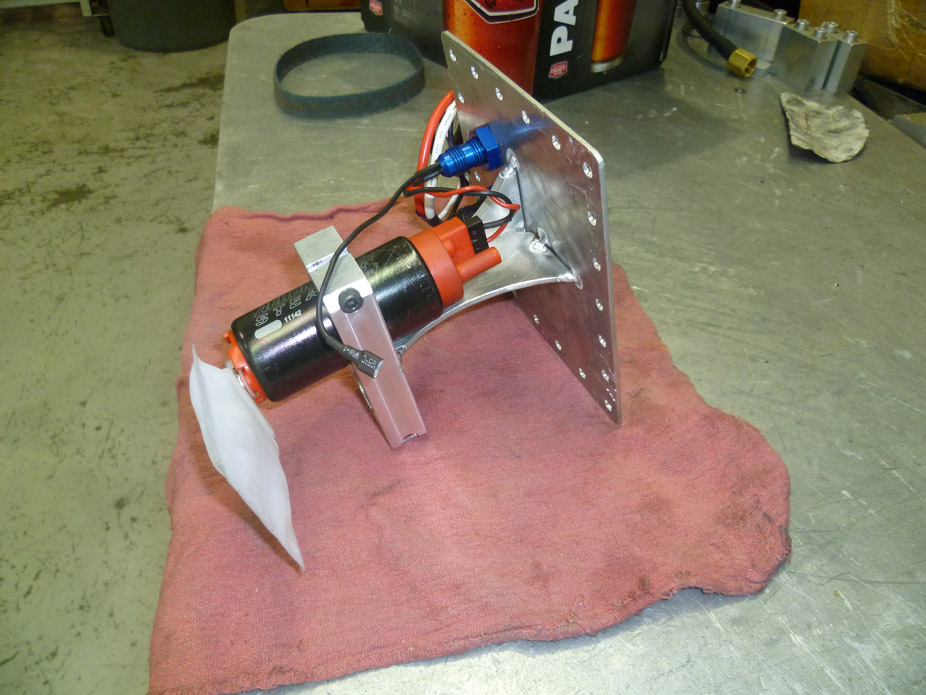
Fuel pump holder drop-in assembly..
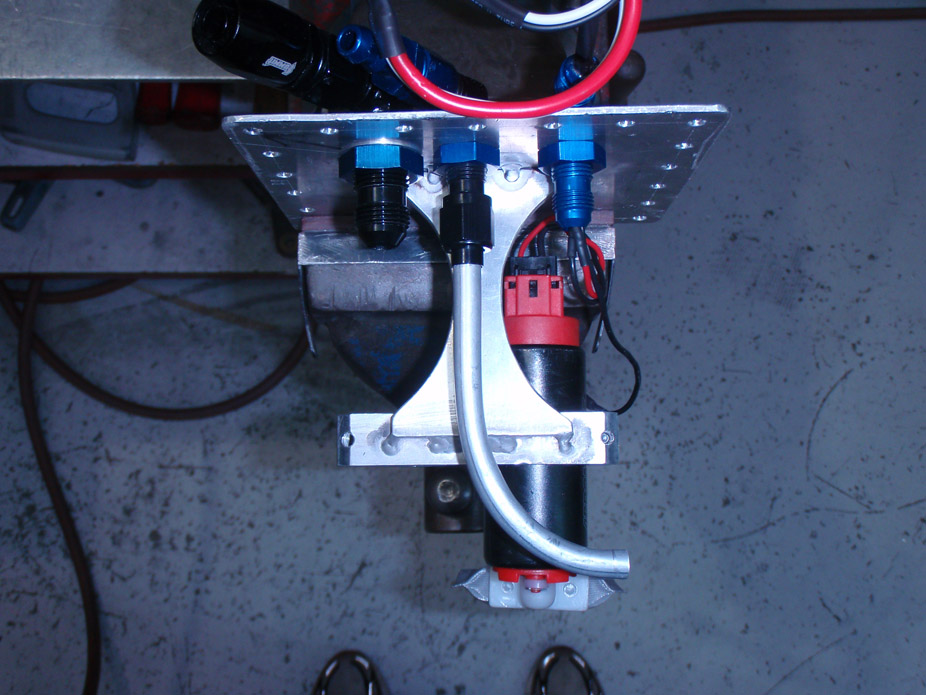
The -8AN bulkhead fitting goes to a hose barb and FI hose to the pump, the -6AN bulkhead fitting goes to a J-shaped 3/8" tube that returns the fuel to the bottom of the sump chamber.

Bulkhead fitting for wires has this gas-friendly caulking/sealant stuff, hopefully that doesn't let anything leak out...

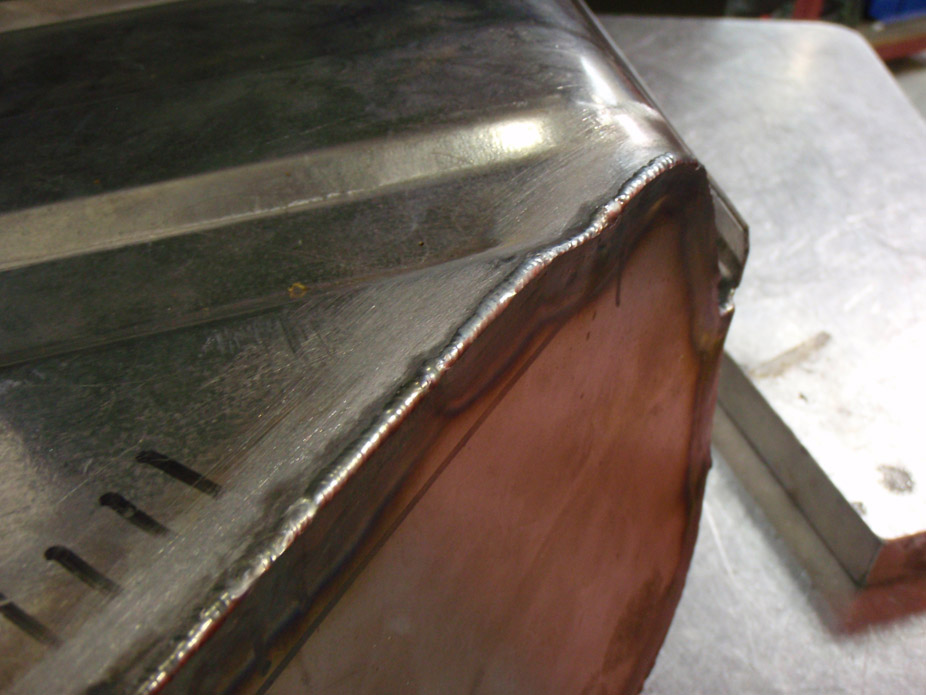
Welding this sheet sucked used 1/16" tungsten, 45A, and 0.035" MIG wire as filler, and had to go slow. Talk about having to develop steady hands and a sensitive pedal foot in a hurry!
20gauge is finicky **** so not the nicest looking weld but should do...

Recessed access panel plate. All studs are actually socket screws which heads are tacked to some 1/8"x3/4" flat stock on the backside, which was then tacked to the sheetmetal, to keep everything rigid and prevent the screws from rotating or pulling through...
Stock-replacement fuel level sender reused...
Fuel pump holder drop-in assembly..
The -8AN bulkhead fitting goes to a hose barb and FI hose to the pump, the -6AN bulkhead fitting goes to a J-shaped 3/8" tube that returns the fuel to the bottom of the sump chamber.
Bulkhead fitting for wires has this gas-friendly caulking/sealant stuff, hopefully that doesn't let anything leak out...
Welding this sheet sucked used 1/16" tungsten, 45A, and 0.035" MIG wire as filler, and had to go slow. Talk about having to develop steady hands and a sensitive pedal foot in a hurry!
20gauge is finicky **** so not the nicest looking weld but should do...
10-05-2011, 04:11 AM
#663
The name for your new fuel tank is "Frankentank"! Looks great and should be easily serviceable. Have you give any thought to sealing the insides of the tank? I took mine to a radiator shop and the used a product called "Red-Kote" They popped a drain plug in my tank, cleaned the tank, and sealed it for $65. Just a little added insurance.
10-05-2011, 10:47 AM
#664

Yea, welding the stock tanks SUCKS!
When I did my install, it was a PITA!
I was able to get .020 welding wire from my work and did like you, set the amps low and got comfortable. Any extra pedal and the base material would start running away, fast!
Looks great though.
How are you going to connect the pump to the AN line???
Are you going to run E85 at all???
10-05-2011, 03:01 PM
#665
i don't know about NC (or  for that matter), but the blend used here in AZ eats tank sealants pretty quickly. we found this out when my buddy's TBI big-blocked M715 Jeep would sputter above idle. he had sealed it a couple years prior, and it began flaking off and clogging the filter. he ended up taking the tank to a shop to be cleaned out, and they recommended not using sealant here for that exact reason.
for that matter), but the blend used here in AZ eats tank sealants pretty quickly. we found this out when my buddy's TBI big-blocked M715 Jeep would sputter above idle. he had sealed it a couple years prior, and it began flaking off and clogging the filter. he ended up taking the tank to a shop to be cleaned out, and they recommended not using sealant here for that exact reason.  10-05-2011, 04:14 PM
#667
i don't know about NC (or for that matter), but the blend used here in AZ eats tank sealants pretty quickly. we found this out when my buddy's TBI big-blocked M715 Jeep would sputter above idle. he had sealed it a couple years prior, and it began flaking off and clogging the filter. he ended up taking the tank to a shop to be cleaned out, and they recommended not using sealant here for that exact reason.
for that matter), but the blend used here in AZ eats tank sealants pretty quickly. we found this out when my buddy's TBI big-blocked M715 Jeep would sputter above idle. he had sealed it a couple years prior, and it began flaking off and clogging the filter. he ended up taking the tank to a shop to be cleaned out, and they recommended not using sealant here for that exact reason.
10-05-2011, 06:24 PM
#668

FroJoe,
Looks great dude. I am interested in the sealant you are using though. Are you using any type of gasket to bolt the top with or the same sealant? Recall any of the names?
thanks,
Jim
Looks great dude. I am interested in the sealant you are using though. Are you using any type of gasket to bolt the top with or the same sealant? Recall any of the names?
thanks,
Jim
10-05-2011, 10:01 PM
#669
I'm a little weary of sealant breaking off, but I'm not ruling it out, just on the fence. Will have to call around locally to get some quotes.
I'm also on the fence for gasket on the bolt-on plate. the gas-friendly sealer stuff I have "cures" somewhat gummy, which is good for a bit of flex for wire movement coming out of the bulkhead fitting. It might work well also as a gasket for the bolt-on plate because it doesn't cure hard.
On a side note, need to change the harness plugs for the injectors from the stock truck mini-Delphi connector to the LS3 style EV6/USCAR. And thus arose some hilarity.. I always knew UPS was a ripoff but, seriously??......
10-06-2011, 11:13 PM
#670
Fuel return diffuser tube..
Welds progressively got smaller and tighter...
Conveniently my best welds on the tank were the last 4" I had left. To put this in perspective, the Sharpie lines are the regular fine-tip Sharpie marker, not a huge marker...

Done! Feels good. Now to get some serious progress done over the long weekend up here in Caaanaada
Welds progressively got smaller and tighter...
Conveniently my best welds on the tank were the last 4" I had left. To put this in perspective, the Sharpie lines are the regular fine-tip Sharpie marker, not a huge marker...
Done! Feels good. Now to get some serious progress done over the long weekend up here in Caaanaada
10-06-2011, 11:16 PM
#671

Ok now start making these and selling them. Im in line First.
Fuel return diffuser tube..
Welds progressively got smaller and tighter...
Conveniently my best welds on the tank were the last 4" I had left. To put this in perspective, the Sharpie lines are the regular fine-tip Sharpie marker, not a huge marker...
Done! Feels good. Now to get some serious progress done over the long weekend up here in Caaanaada
10-12-2011, 05:47 PM
#673
I like the maze you've got going on. Is it all mild steel you're putting in there? Any thoughts about corrosion? Did you look into any other passthrough options for the wiring? Running the wiring through an AN fitting with sealant just makes me uncomfortable - not just sealing, but also the potential for wires to cut/short. Where did you find a fuel-rated wire?
 10-13-2011, 11:15 AM
#675
It is all mild steel... I figure being exposed to gas should keep the surface rust to a minimum.
Have thought of other pass-thru options but none that really sealed the wires all that well other than bulkhead studs (like miniature remote battery bulkhead studs). The fuel-rated wires that came on the harness supplied with the pump run all the way up to the bulkhead fitting, and only connect to new automotive wires where everything is sealed at the exit port of the bulkhead fitting. It's not the ideal system, but I can't foresee the wires rubbing/vibrating/chaffing to wear or cut. also at the entry/exit ends of the bulkhead fittings I used a deburring tool to give the bulkhead fitting i.d. a very nice, smooth round so that there isn't a sharp edge on the aluminum for the wires to possibly get cut on.
The access plate studs are tacked in from behind, not fully welded due to worries about warping the sheet with that much heat going into it, but the studs were a very tight fit.
Still have a couple ideas in my head about gaskets, but before I decide on anything... what are all your ideas?
10-13-2011, 11:36 AM
#676
Use cork for the gasket.
You should be able to get a sheet of cork from McMaster Carr.
I had rubber on mine and it swelled and leaked.
Just my .02 cents.
Also, you can make your own through bulk head studs.
I did for my dual walbro set-up.
What you need is a 1/4" holes through the top plate.
Then, lathe turn a 1/2" dia. piece of nylon.
Put a step on it so that it fits into the 1/4" hole in the top plate.
Drill a through hole for a small 10/32 machine screw.
If you make two of the nylon insets, you can put one on inside and one outside.
Also, you can sandwich a o-ring inbetween if you want.
The machine screw will hold the wires in the side permanently, head inside the tank.
The threads on the outside will then have a nut to secure the screw and then need to make sure you have enough thread to have the machine screw act as a stud.
That way, you can put your connecting power or ground lead on for the power to the pump(s).
This will also work the same for the float level.
10-22-2011, 08:39 PM
#678
Couple small things to update on. Spent most of the afternoon fixing stuff on the daily driver, but got a bit of Nova work done...
Stripped, smoothed, and painted 2nd gen Camaro tilt column, just need a Nova rag joint before it's ready to bolt in (direct bolt in otherwise)...

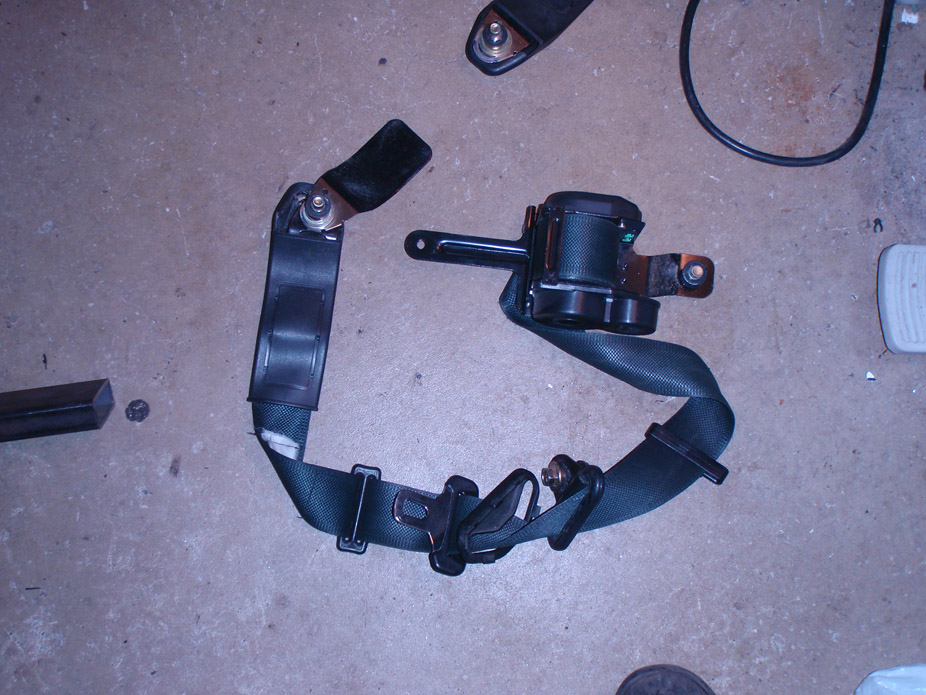
Putting 3 point belts in, no way I'm gonna use the lap belts hah.. got a pair of 240sx front belts for $10, but the ones in my daily driver were in nicer/newer looking condition so swapped them out, here they are. The belt extends reeeeally far so it shouldn't be a problem to have the shoulder loop mount high and back where the stock shoulder strap for the lap belts is anchored...
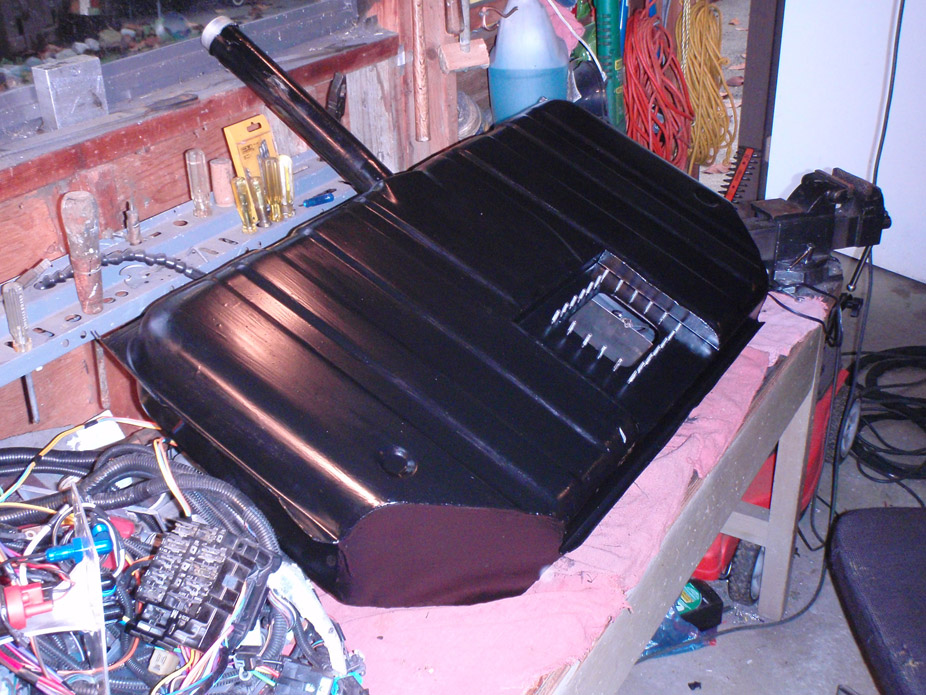
Tank leak tested, seam sealed, and painted...
Still waiting on the damn 4 link, so mocked up the rear end to see exactly how low I could get away with. Here is a little measurement guide to show the room on stock Nova tubs with an 18" wheel and 275 series tire.
I'll end up running the rear at a ride height probably 1-1.5" higher than this, so this setup shows the rear end going slightly into bump. With the 4 link and coilovers there should be 2.5"-3" of bump travel. Funny there is still quite a bit of fenderwell room to go lower, just run out of space between the axle and frame...
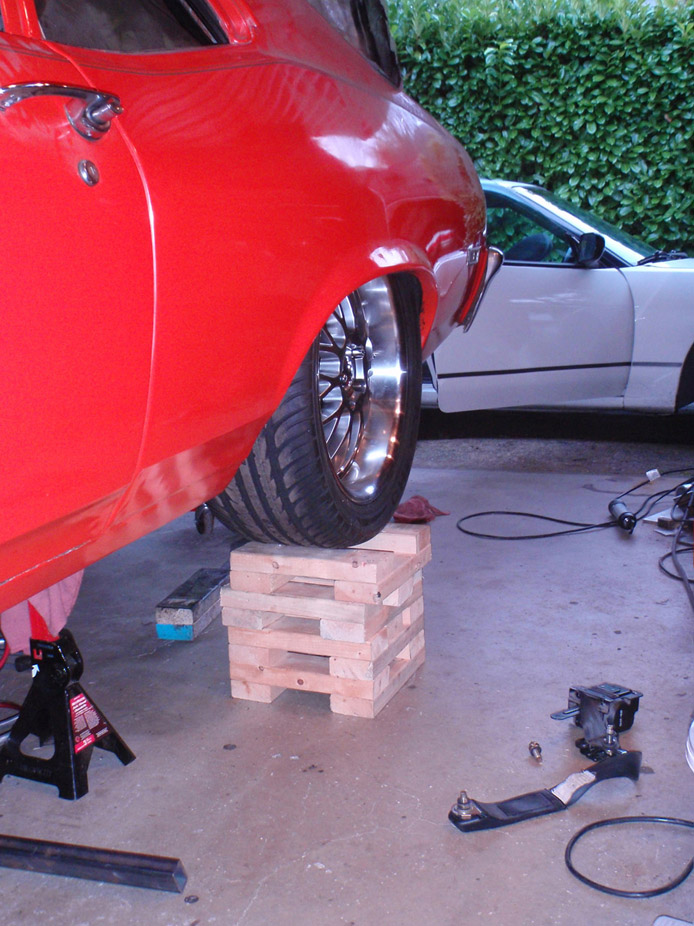
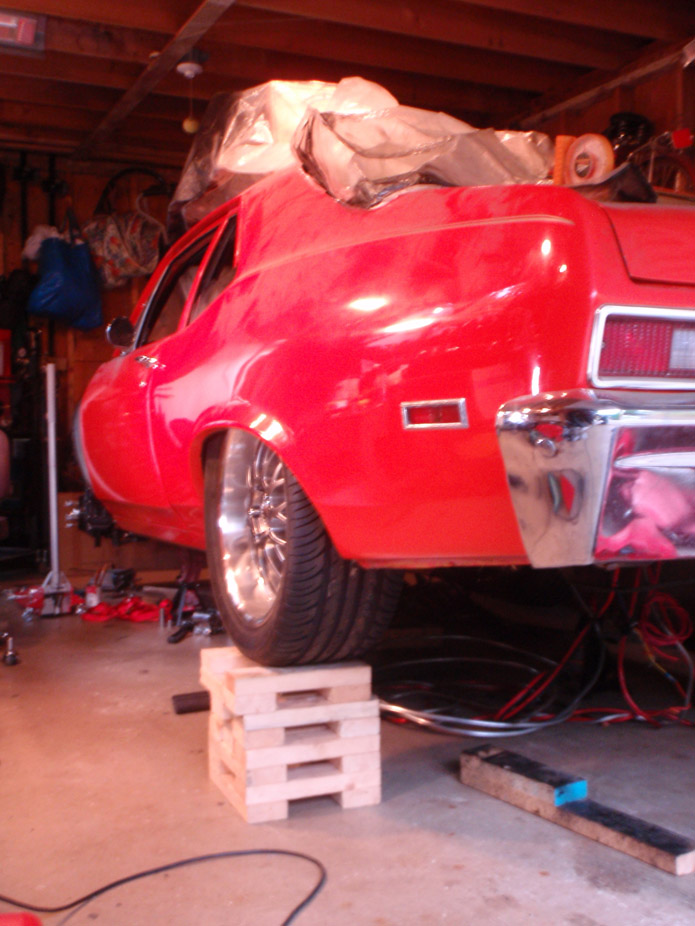

Tucking the rim around 2.5" inch, would ideally like maybe 1" of rim tuck...

About a 1/2" of clearance between the sidewall and the flat, vertical part of the inner fender well..
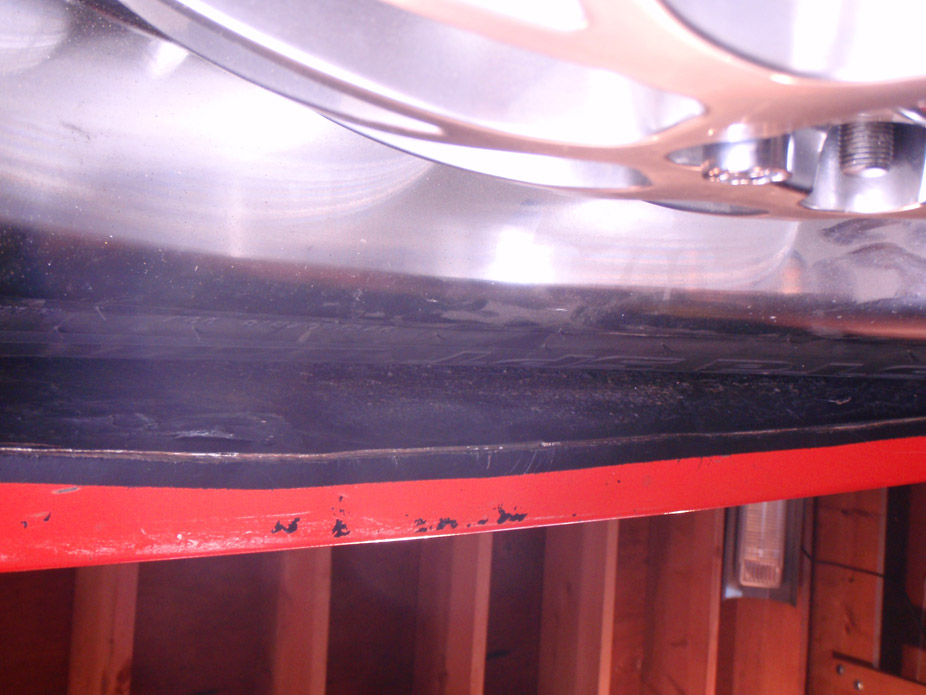
Still about 1.25" clearance between sidewall and inside of inner fenderwell (ruler is about 1.25" wide).
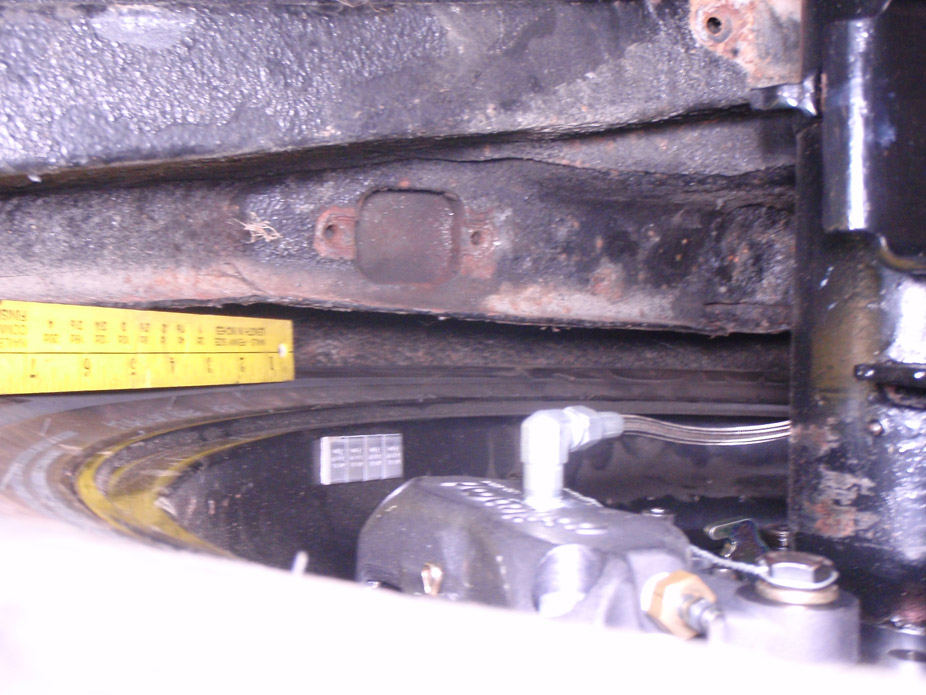
Bad angle, but about 2" of bump travel left until axle bottoms out on framerail. The coilovers will have bumpstops and I will be running the axle about 1.5" lower (further away from framerails) than this.

Stripped, smoothed, and painted 2nd gen Camaro tilt column, just need a Nova rag joint before it's ready to bolt in (direct bolt in otherwise)...
Putting 3 point belts in, no way I'm gonna use the lap belts hah.. got a pair of 240sx front belts for $10, but the ones in my daily driver were in nicer/newer looking condition so swapped them out, here they are. The belt extends reeeeally far so it shouldn't be a problem to have the shoulder loop mount high and back where the stock shoulder strap for the lap belts is anchored...
Tank leak tested, seam sealed, and painted...
Still waiting on the damn 4 link, so mocked up the rear end to see exactly how low I could get away with. Here is a little measurement guide to show the room on stock Nova tubs with an 18" wheel and 275 series tire.
I'll end up running the rear at a ride height probably 1-1.5" higher than this, so this setup shows the rear end going slightly into bump. With the 4 link and coilovers there should be 2.5"-3" of bump travel. Funny there is still quite a bit of fenderwell room to go lower, just run out of space between the axle and frame...
Tucking the rim around 2.5" inch, would ideally like maybe 1" of rim tuck...
About a 1/2" of clearance between the sidewall and the flat, vertical part of the inner fender well..
Still about 1.25" clearance between sidewall and inside of inner fenderwell (ruler is about 1.25" wide).
Bad angle, but about 2" of bump travel left until axle bottoms out on framerail. The coilovers will have bumpstops and I will be running the axle about 1.5" lower (further away from framerails) than this.
Last edited by frojoe; 10-23-2011 at 01:44 PM.
 11-09-2011, 12:05 AM
#680
A friend has been harassing me for updates so here goes, hope this is satisfying enough...
Got a Greddy Profec II B electronic boost controller so spent some time figuring all the vacuum/boost lines and careful/hidden routing...

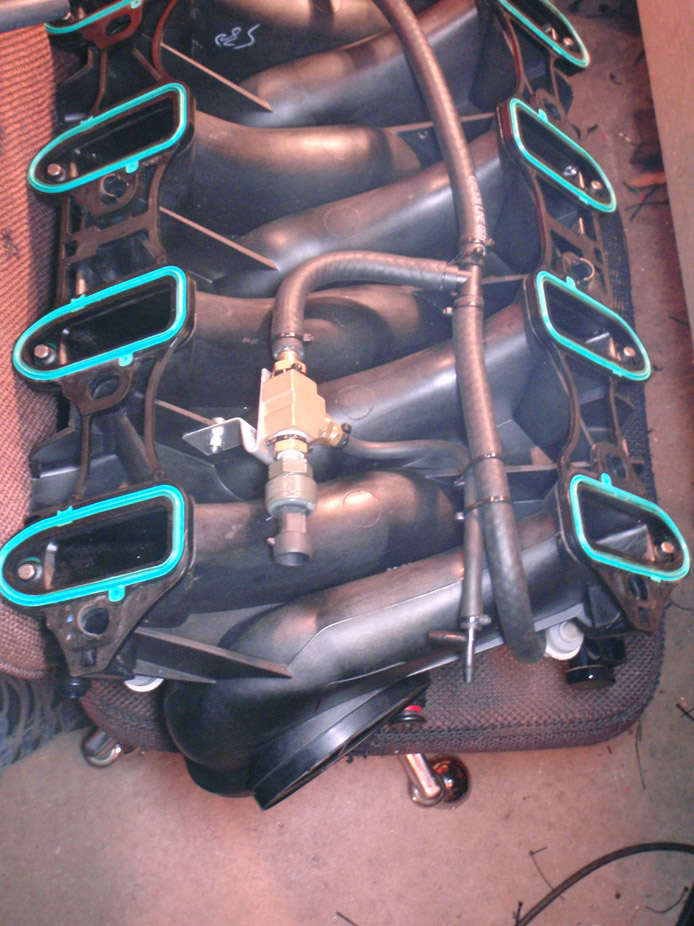
Sneaky little guy is just hiding under there...

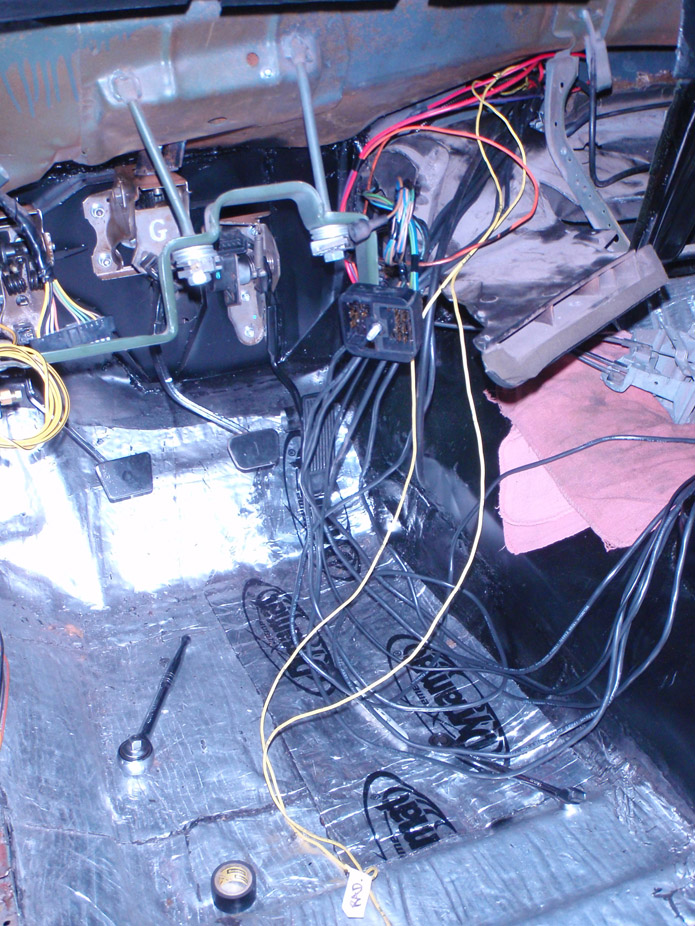
Finalized prettymuch ALL wiring 'cept the tail lights on this damn car, now time to put it all back together...

Looks scary at first. Took me a while to build up the ***** to drill these two 2" holes in the firewall...
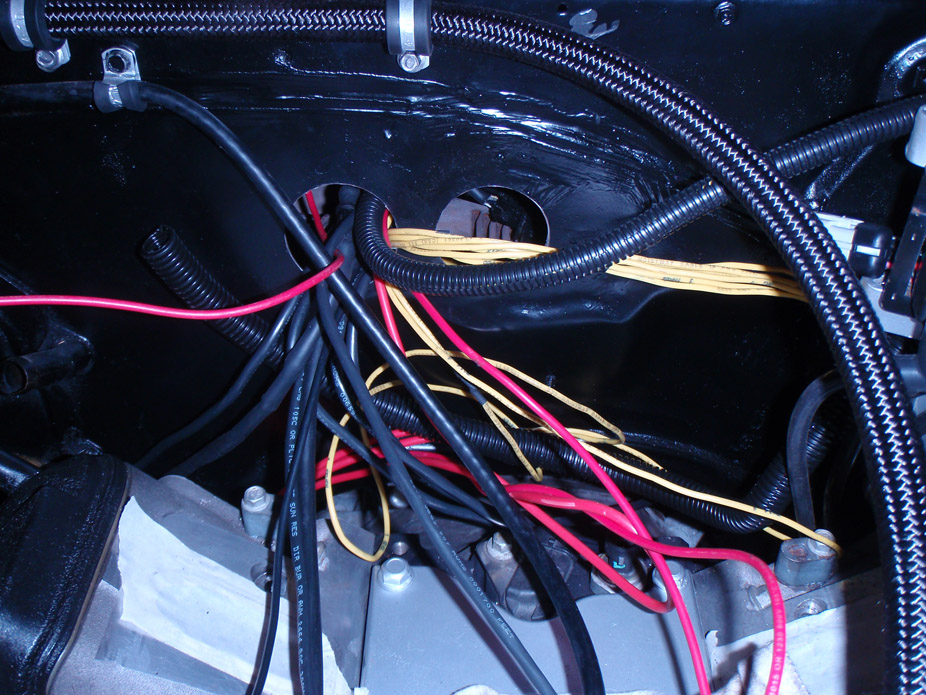
Relocated the fusebox completely inside the cabin of the car so only the lights/start solenoid/BAT+ wires have to pass thru the firewall...
Stuff for the 3 O2 sensors...

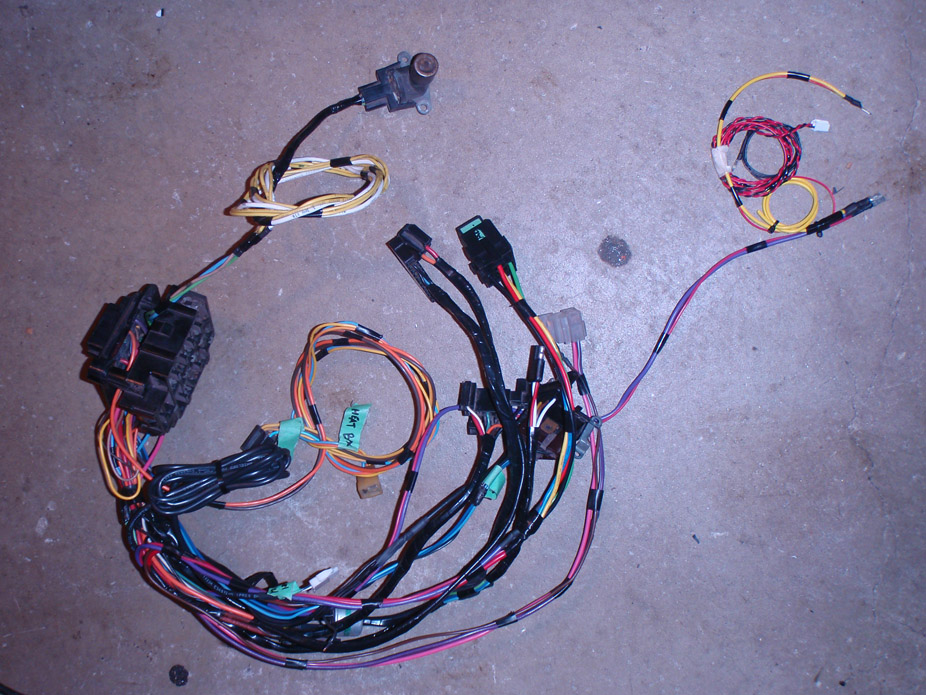
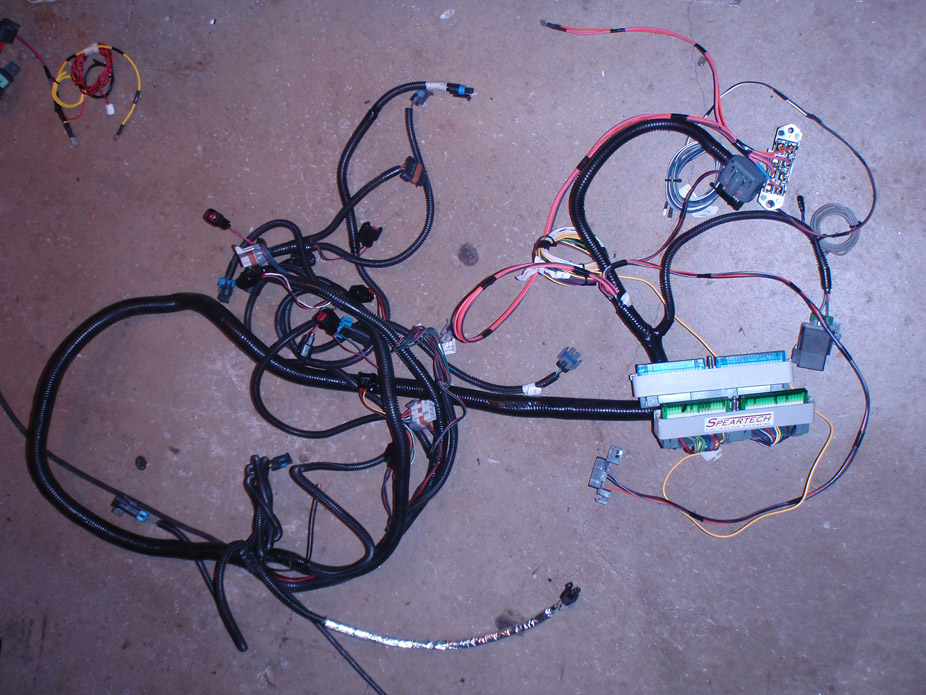
Modified, extended (for some sensors) & cleaned up Speartech Harness...
The end result of all wires passing thru the firewall, still needs a bit of finishing organizational work..

Got a Greddy Profec II B electronic boost controller so spent some time figuring all the vacuum/boost lines and careful/hidden routing...
Sneaky little guy is just hiding under there...
Finalized prettymuch ALL wiring 'cept the tail lights on this damn car, now time to put it all back together...
Looks scary at first. Took me a while to build up the ***** to drill these two 2" holes in the firewall...
Relocated the fusebox completely inside the cabin of the car so only the lights/start solenoid/BAT+ wires have to pass thru the firewall...
Stuff for the 3 O2 sensors...
Modified, extended (for some sensors) & cleaned up Speartech Harness...
The end result of all wires passing thru the firewall, still needs a bit of finishing organizational work..