My plastic bucket mod for dual walbro pumps ...
 03-28-2012, 09:52 AM
#1
Big thanks to MightyMouse and Wes @ ShoMeSpeed for helping me get this done the way i wanted it! 
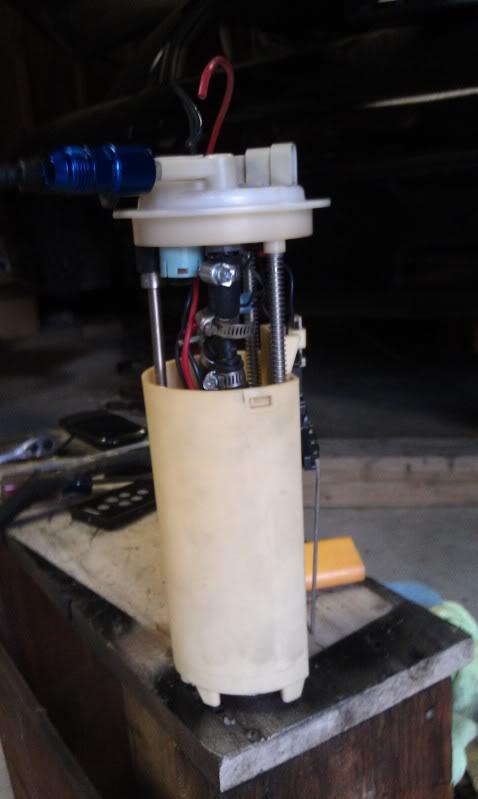
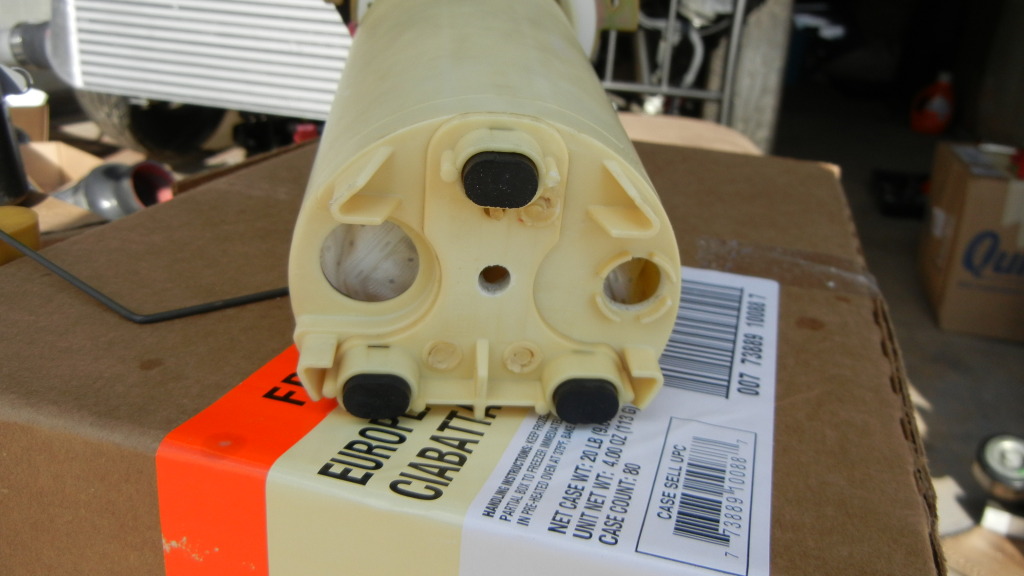
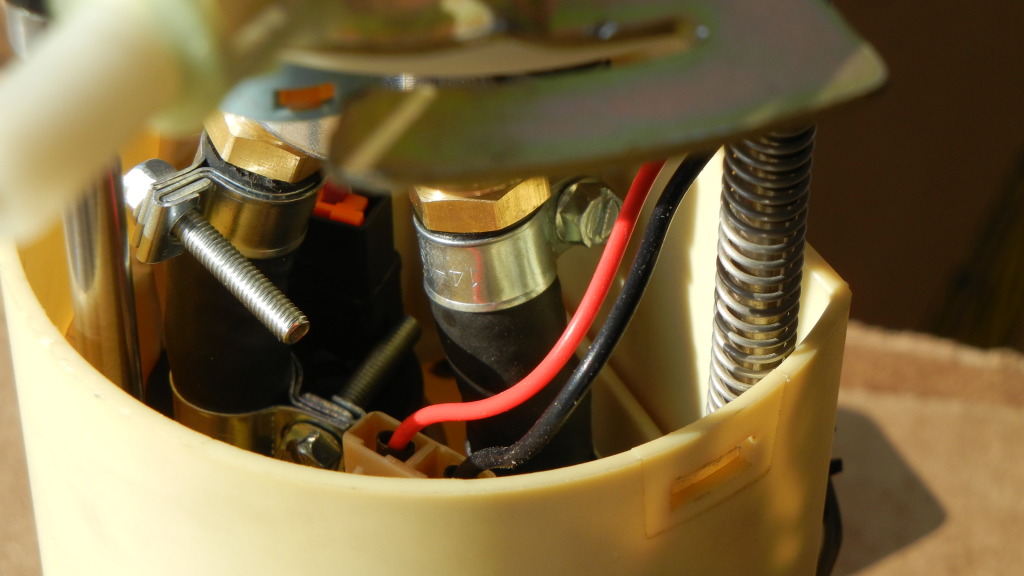
Hey guys, i don't have the mad skills that everyone else seems to but i was happy enough with how this came out that i thought i'd share some pics because i couldn't find much on here for the plastic bucket mod. i didn't know i was going to be posting this up so i will say the only thing i think i neglected to take a pic of was the middle portion of the bucket where the springs come down to. i basically hogged that out and cut off the the bottom of it to bring it flush with the thicker part, creating a bit more room.
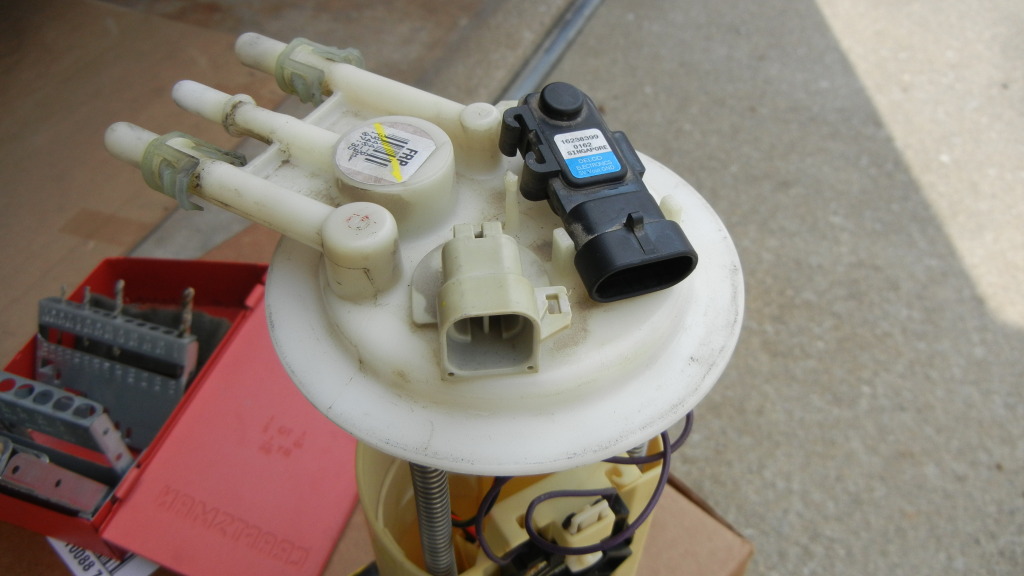
I may end up relocating the vapor pressure sensor to screw in the 90* fitting further so i don't have to create a dimple in the trap door but if i do, it's not much of one. it's just currently sitting too high by about 1/4" for it to sit flush. i still have to get my -8 line and route that.
anyone care to share their -8 hose routing as it comes up over the tank? i'm not dropping the tank completely, just going to lower it slightly by loosening the straps and feeding the line through. thanks.
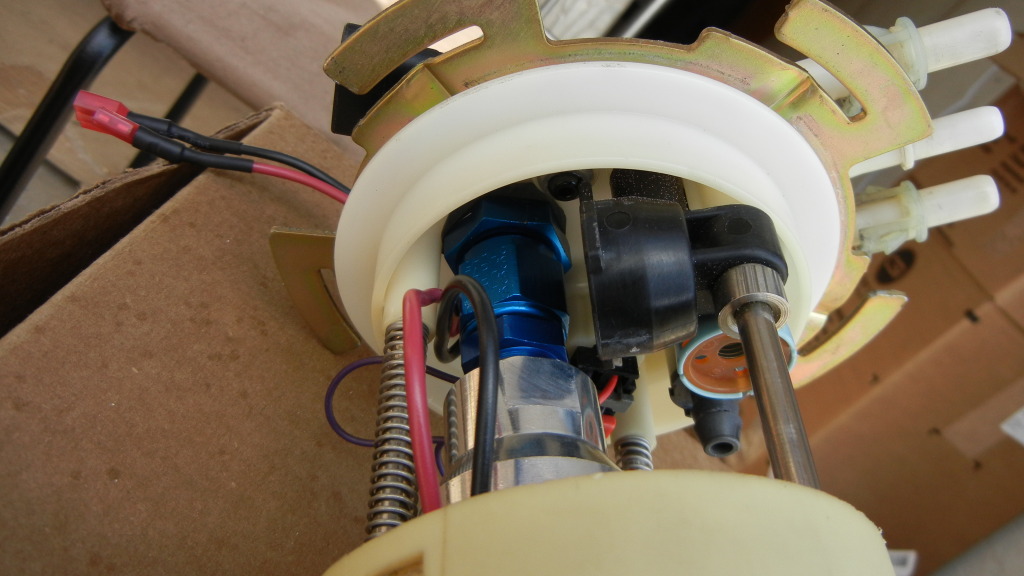
i used a tapered drill bit as i didn't have a standard bit large enough to drill out for the 90* -8 fitting. iirc, i ended up stopping at 11/16" and i was able to thread the fitting in from there for a super tight seal! couldn't have been any better if i planned it that way.......actually if I 'planned' it, it wouldn't have come out right at all! LOL
Support our sponsors! i got a dual walbro kit from ShoMeSpeed and Wes was a GREAT help and i will be running 1 pump full time and the other off of a hobbs switch as i come into boost as recommended by him as well as MightyMouse (Dave Childress) who was also a big help in this between his write ups and several pm's. Thanks guys!!
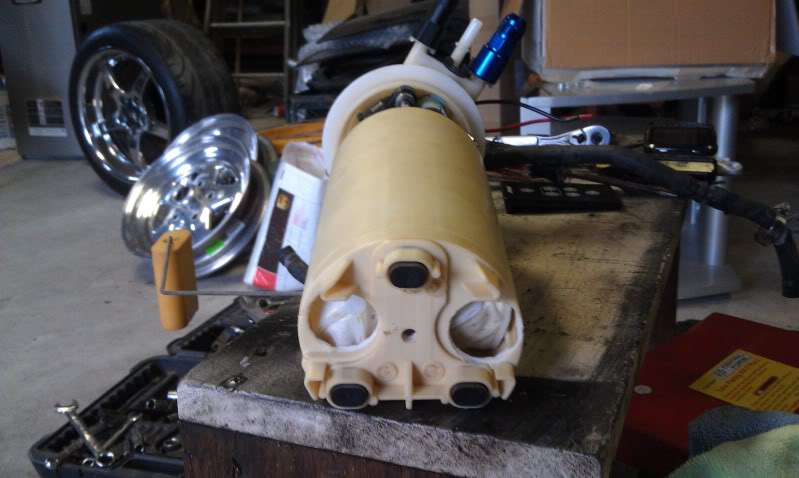
The only concern i have for the whole setup is the socks being folded up inside the bucket. if this becomes a problem, i will either open up the bottom or the side of the base of the bucket for them to poke out through. anyone think this will be an issue feel free to advise.
hope it helps those with the plastic buckets some....
smoothed out the top
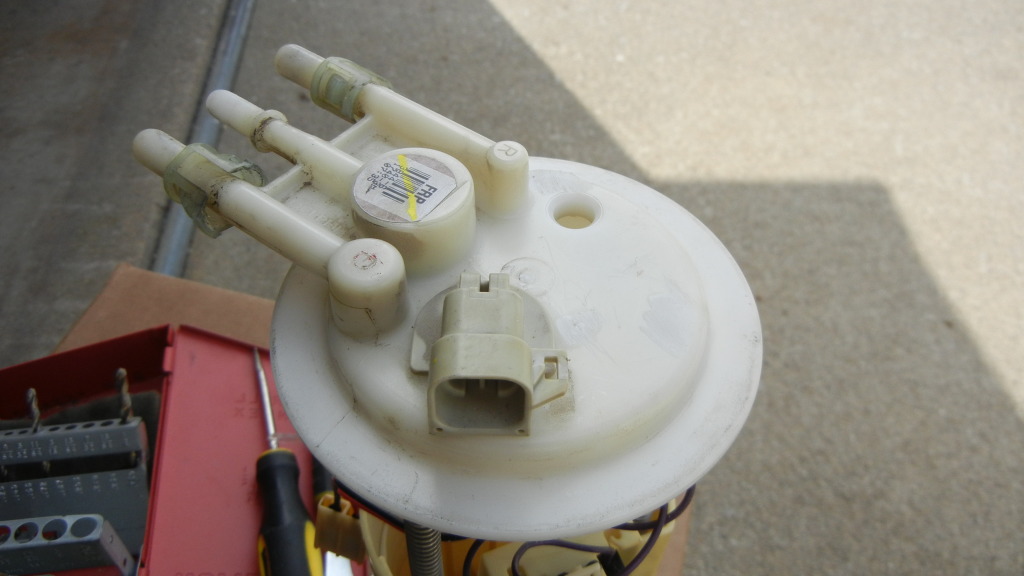
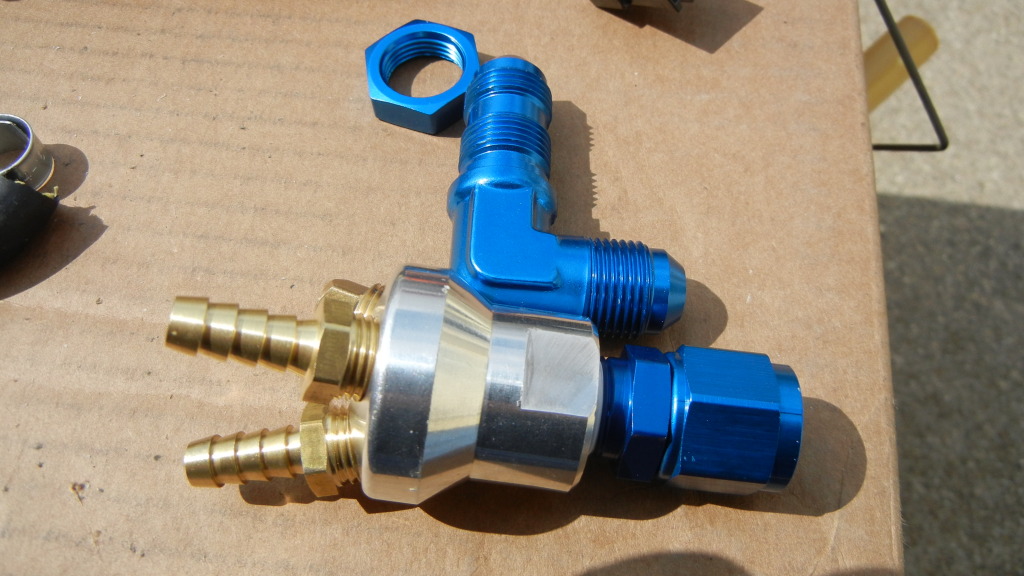
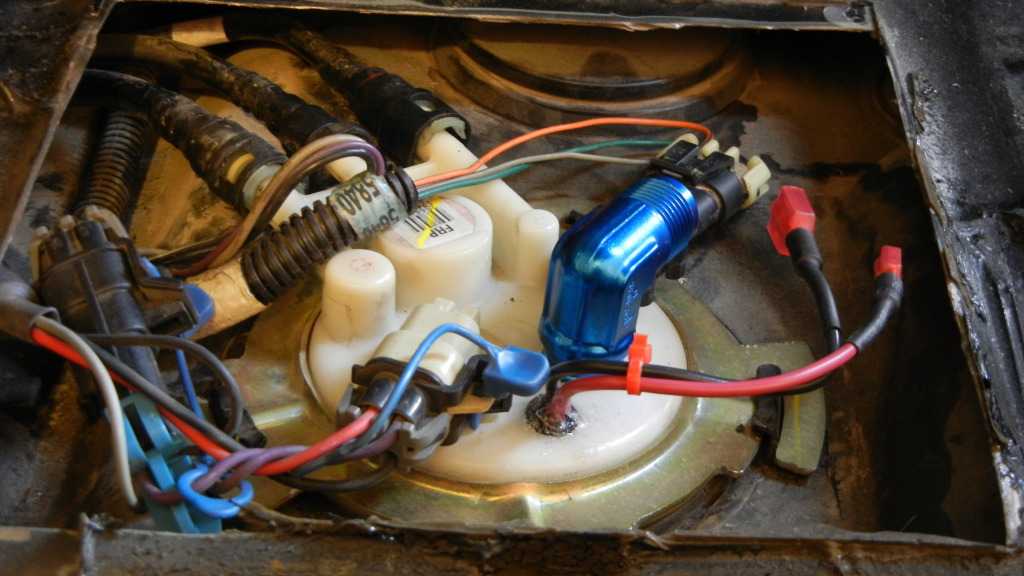
i got the triple air hose fitting that mighty mouse and others have used and plugged one of the openings. i got this for 2 reasons. 1 to make it easy to go with -an fittings from inside out and 2 so i'll have the option for a 3rd pump if i ever need it (which i will switch to a metal '98 baffled tank for). other fittings are a pair of 1/4" npt to 5/16" barbs, -8 90* bulkhead, -8 bulkhead nut, and 3/8" npt to -8 swivel fitting. i recommend getting a nylon washer as well. i used GOOP (not the hand cleaner) on the top side of the bulkhead nut. GOOP is a great oil and fuel resistant sealant that was brought to my attention by mightymouse and the stuff seems pretty awesome.
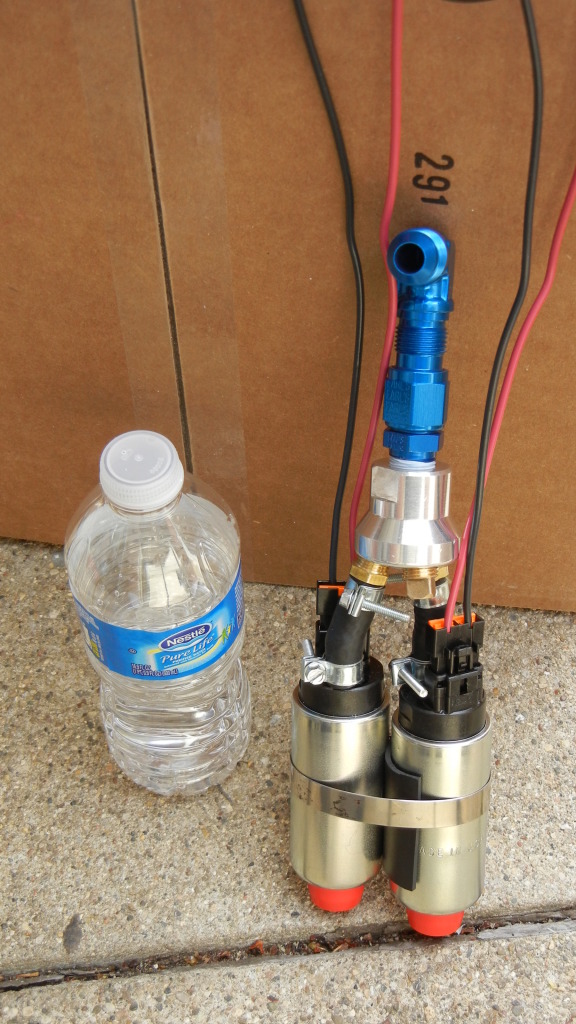
this WILL be a very tight fit from top to bottom! your hose from the pumps to the barbs will be about 2" long tip to tip is all. hose must be efi rated. the pumps are at a staggered height for sock clearance.
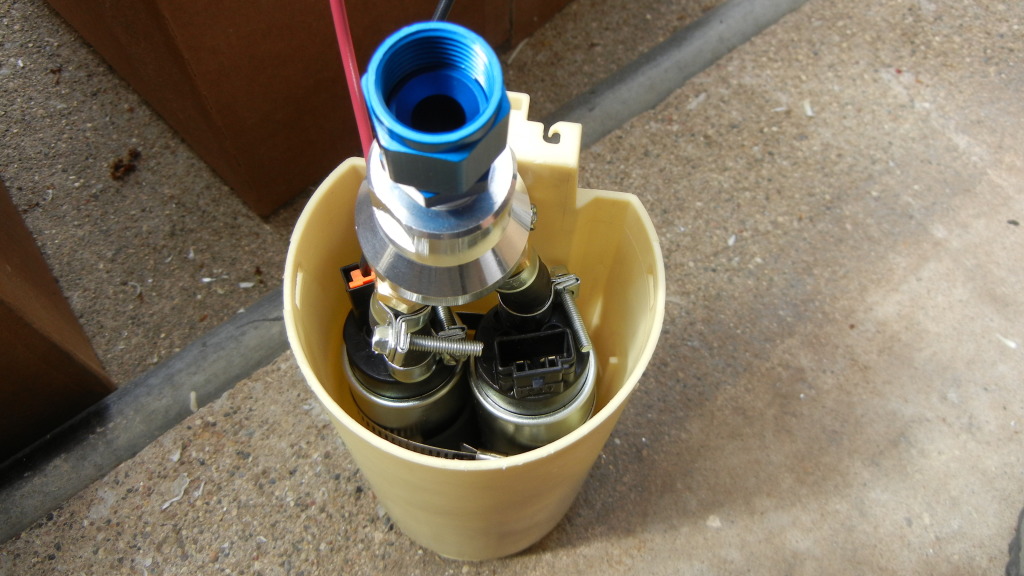
i left the sides completely intact and only opened up the base to keep the baffle affect of the bucket as was intended since the plastic tanks are not, unlike the metal tanks of '98 and ealier
Probably the MOST important step.........find a place where the bulkhead nut has enough room to turn unobstructed when you go to tighten everything up and THEN mark and start to gradually drill your hole for the 90* fitting being sure to stay on center. when assembled, there will be VERY LITTLE ROOM to get a wrench in there to tighten it all up. but it can be done!
drill a hole for your wires, install a grommet just big enough for the wires to pass through and GOOP that up top and bottom. i suggest using the existing hole from the vapor pressure sensor for the wires to pass through and creating a new hole where my wires are passing through for the sensor as it will allow the 90* fitting to thread down further and possibly not have to dimple the trap door. i only have 2 wires coming through the top as my car already had a racetronix pump and hotwire kit so i simply plugged that connector into 1 of the pump. it has probably 10k miles on it the way it was so i trust it to handle the walbro and will simply wire in the other with a relay and 10ga wire along with the hobbs switch.
OR you can delete the vapor pressure sensor as i've just been informed of here... https://ls1tech.com/forums/fueling-i...l#post16138267

Be sure to blow out all the shavings and plastic dust from the drilling and cutting and install. should look about like this......
http://www.youtube.com/watch?v=Otm4RusESNU
Hey guys, i don't have the mad skills that everyone else seems to but i was happy enough with how this came out that i thought i'd share some pics because i couldn't find much on here for the plastic bucket mod. i didn't know i was going to be posting this up so i will say the only thing i think i neglected to take a pic of was the middle portion of the bucket where the springs come down to. i basically hogged that out and cut off the the bottom of it to bring it flush with the thicker part, creating a bit more room.
I may end up relocating the vapor pressure sensor to screw in the 90* fitting further so i don't have to create a dimple in the trap door but if i do, it's not much of one. it's just currently sitting too high by about 1/4" for it to sit flush. i still have to get my -8 line and route that.
anyone care to share their -8 hose routing as it comes up over the tank? i'm not dropping the tank completely, just going to lower it slightly by loosening the straps and feeding the line through. thanks.
i used a tapered drill bit as i didn't have a standard bit large enough to drill out for the 90* -8 fitting. iirc, i ended up stopping at 11/16" and i was able to thread the fitting in from there for a super tight seal! couldn't have been any better if i planned it that way.......actually if I 'planned' it, it wouldn't have come out right at all! LOL
Support our sponsors! i got a dual walbro kit from ShoMeSpeed and Wes was a GREAT help and i will be running 1 pump full time and the other off of a hobbs switch as i come into boost as recommended by him as well as MightyMouse (Dave Childress) who was also a big help in this between his write ups and several pm's. Thanks guys!!
The only concern i have for the whole setup is the socks being folded up inside the bucket. if this becomes a problem, i will either open up the bottom or the side of the base of the bucket for them to poke out through. anyone think this will be an issue feel free to advise.
hope it helps those with the plastic buckets some....
smoothed out the top
i got the triple air hose fitting that mighty mouse and others have used and plugged one of the openings. i got this for 2 reasons. 1 to make it easy to go with -an fittings from inside out and 2 so i'll have the option for a 3rd pump if i ever need it (which i will switch to a metal '98 baffled tank for). other fittings are a pair of 1/4" npt to 5/16" barbs, -8 90* bulkhead, -8 bulkhead nut, and 3/8" npt to -8 swivel fitting. i recommend getting a nylon washer as well. i used GOOP (not the hand cleaner) on the top side of the bulkhead nut. GOOP is a great oil and fuel resistant sealant that was brought to my attention by mightymouse and the stuff seems pretty awesome.
this WILL be a very tight fit from top to bottom! your hose from the pumps to the barbs will be about 2" long tip to tip is all. hose must be efi rated. the pumps are at a staggered height for sock clearance.
i left the sides completely intact and only opened up the base to keep the baffle affect of the bucket as was intended since the plastic tanks are not, unlike the metal tanks of '98 and ealier
Probably the MOST important step.........find a place where the bulkhead nut has enough room to turn unobstructed when you go to tighten everything up and THEN mark and start to gradually drill your hole for the 90* fitting being sure to stay on center. when assembled, there will be VERY LITTLE ROOM to get a wrench in there to tighten it all up. but it can be done!
drill a hole for your wires, install a grommet just big enough for the wires to pass through and GOOP that up top and bottom. i suggest using the existing hole from the vapor pressure sensor for the wires to pass through and creating a new hole where my wires are passing through for the sensor as it will allow the 90* fitting to thread down further and possibly not have to dimple the trap door. i only have 2 wires coming through the top as my car already had a racetronix pump and hotwire kit so i simply plugged that connector into 1 of the pump. it has probably 10k miles on it the way it was so i trust it to handle the walbro and will simply wire in the other with a relay and 10ga wire along with the hobbs switch.
OR you can delete the vapor pressure sensor as i've just been informed of here... https://ls1tech.com/forums/fueling-i...l#post16138267
Be sure to blow out all the shavings and plastic dust from the drilling and cutting and install. should look about like this......
http://www.youtube.com/watch?v=Otm4RusESNU
Last edited by PRAY HRD; 03-29-2012 at 05:03 PM.


 03-29-2012, 05:00 PM
#5
again, much credit goes to MightyMouse and Wes @ ShoMeSpeed, as well as LS1tech.com!!
06-21-2012, 09:53 PM
#7
up in the air if i'm gonna use it or not now. speed inc said they've had issues with some but then you see guys like mighty mouse who've been running them for years now. i've got a few weeks left to decide before i have to commit to one or the other.
Trending Topics
06-21-2012, 10:01 PM
#8

Lonnie has sold well over 1000 DP systems and you don't hear people bitching about them. They work well when made properly.
__________________

Manufacturer / Distributor of Automotive Fuel Systems, Components & Electronics
Please support a Racetronix dealer near you for personalized service.
>WEB SITE<
Manufacturer / Distributor of Automotive Fuel Systems, Components & Electronics
Please support a Racetronix dealer near you for personalized service.
>WEB SITE<
06-23-2012, 08:23 AM
#10
TECH Fanatic
iTrader: (8)
Join Date: Oct 2003
Location: I like BoomBoom !!
Posts: 1,753
Likes: 0
Received 0 Likes
on
0 Posts

I hope you used the correct hose for that. The standard efi rated hose will not hold up to being submerged in gas. The correct hose is SAE 30r10, and is the only hose that can be submerged in gas.

 06-23-2012, 03:51 PM
#16
for anyone who can't tell from the pics, 1 pump sits a tad bit higher than the other to create a little more room for the socks.