
72 Chevelle w/ FAST EZ-EFI, 700R4 and custom accessory drive.
 04-23-2012, 12:12 PM
#1
Launching!
Thread Starter
iTrader: (7)
Join Date: Apr 2012
Posts: 254
Likes: 0
Received 0 Likes
on
0 Posts
Over the next few days I am going to outline my LS swap in my 72 Chevelle Malibu. I will include pictures, parts list and swap details to maybe help other members. I have done my share of research using this site and others and want to thank everyone who has posted their own experience here. You have all been a great help to me, thank you.
My starting point was my Chevelle with 38000 original miles. I am the second owner. It was 99% original when I first purchased it 5 years ago including the paint. I've tried to keep my modifications a bit subdued as I prefer a more original appearence. You can see the motor install is pretty clean looking. It has a 700R4 behind it and 3.55 gears in back.
The motor is a 5.3L with flat top pistons, not a true 5.3HO. I think they came in front wheel drive cars. Topped it with LS1 heads with upgraded parts and the Edelbrock/FAST EZ-EFI. The pulley setup I custom made myself. I will get much more into detail in the following days but I welcome any comments or questions. Thanks for looking.
UPDATE: Please read along as I have since swapped drivetrains, went carb and gone back to EFI. Thanks.
Last edited by fox12303; 06-03-2014 at 08:06 PM.

 04-23-2012, 12:27 PM
#3
Launching!
Thread Starter
iTrader: (7)
Join Date: Apr 2012
Posts: 254
Likes: 0
Received 0 Likes
on
0 Posts
Thank you for your comments. The pulley setup is custom made. I made all the brackets first out of hardwood, then steel. I had a truck setup but didn't like the way it looks in a car, the alternator mounts too high. I also wanted to use the newer mini compressors available. This is an excellent setup but will not work with the factory EFI intakes as the alternator is now in the way.
Sorry I can't be of help at this time with the A/C bracket.
Sorry I can't be of help at this time with the A/C bracket.
 04-23-2012, 09:48 PM
#5
ModSquad
iTrader: (6)
That sure is a real nice ride! Oh, and yeah, we don't like really big, high res pictures on this site. LOL!
04-24-2012, 08:47 AM
#7
Launching!
Thread Starter
iTrader: (7)
Join Date: Apr 2012
Posts: 254
Likes: 0
Received 0 Likes
on
0 Posts
This is an outline of my LS swap. I will give part numbers and any specific issues I had to deal with and how I resolved each of them. First I will say to do your research before attempting this as there is a lot of information out there and while most is helpful, some is misleading. If you haven’t looked at cost of doing a swap you should definitely do that too.
I will start with my engine build, then go into the installation and finish with all the connections. To me the biggest and most costly obstacle was the pulley drive system. I did not like the look of the truck setup nor the aftermarket Quik Performance brackets. So I built my own using as many of the OE parts as possible.
THE ENGINE started as a core out of a ‘01 Silverado with 10k miles. I sold the heads as they were the more desirable non-Castech heads. If you haven’t heard, be aware that some of the Castech heads had coolant leakage issues. This was sort of a budget build as my goal was to get an LS into the car and later build a 6.0/6.2 or a stroker LS as a later date.
The short block was rebuilt using LS6 rods and flat top 5.3HO pistons. Weight matched everything and had the assembly balanced. I believe the pistons are the same as 4.8L pistons as both motors have the same bore but use different cranks. If you look around you may be able to find some GM surplus pistons with rings as I did but be sure to get a matched set. Same goes for the rods. It will make weight matching easier. Everything weighted within 2 grams of each other, pretty good for OEM stuff I think.

For HEADS I found a good set of LS1 heads. Gave them a mild porting and had them milled .025". I then rebuilt them using CompCams 26918 beehive springs and 4705 seat/locaters. I had to turn down the OD of the locaters .050” to fit the spring pockets in the heads better. Used stock keepers and locks. Reused the factory lifters as they had limited miles and new OEM type pushrods. Reused the factory timing chain/gears and ported the oil pump. Camshaft is an OE Z06 roller with .550/.550 lift.
My final compression ratio using .051” thick MLS gaskets was 10.25-1. It’s not as high as you would think because of the smaller 3.780 bore of the 5.3L engine. Having had the heads milled .025” brought the combustion chamber size down to 64cc, higher than I wanted but anymore and I would have had bolt hole alignment or intake sealing issues. Pistons stuck out of the hole an average of .007” so my quench was right where I like it at .045”. The heads combustion chamber is larger than the cylinder bore but I read many people installing LS1 heads on 5.3’s without issue.

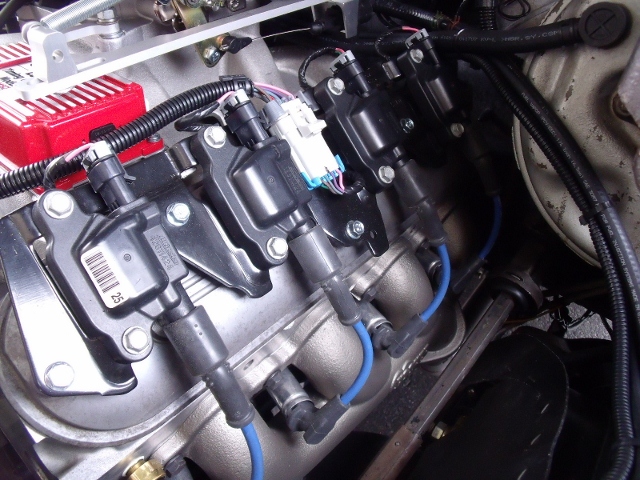
For INDUCTION/IGNITION I went with the 7118 Edelbrock LS1 dual plane carbureted intake with MSD ignition controller. Found a set of new LS6 coils/brackets/wires and reused the original cam/crank sensors. The early motors have the 24x reluctor wheel located at the back of the motor. Cam sensor is also a the rear/top of motor. The MSD box comes with pills to control ignition timing curve and has two specifically for the Z06 camshaft depending on rear axle ration being used.
The exhaust manifolds shown are from 2010 Camaro's. They fit between the frame rails but you have to relocate the brake proprotioning valve. I elected not to do this and ended up using a pair of Hookers new iron exhaust headers. They are very nice and fit perfectly. Photos to be shown later. I have these manifolds for sale if anyone is interested.

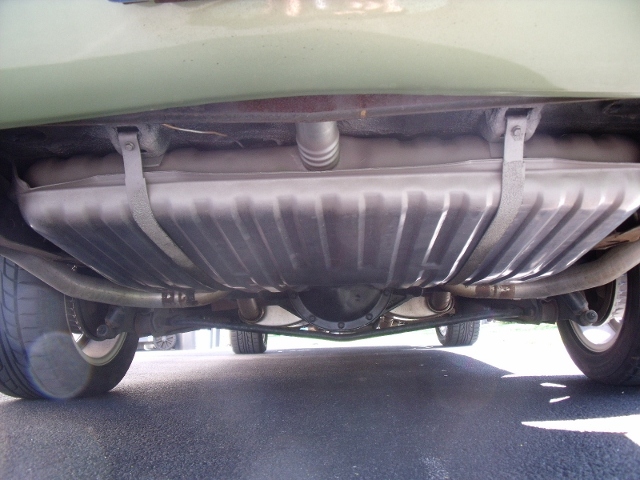
OIL PANS are another area of great interest. I used the GM muscle car pan as a starting point as it is cheap and includes a dipstick that I didn’t have. It does sit low as everyone else says and will end up being swapped for the Holley pan. I cut off the boss at the passenger front of the pan for steering clearance. In the end though I had to remove the grease fittings on the tie rods and weld up the steering stops as they still wanted to hit the pan. I lost a total of about �" steering turn and hasn’t been a problem driving the car. Plenty of clearance everywhere.


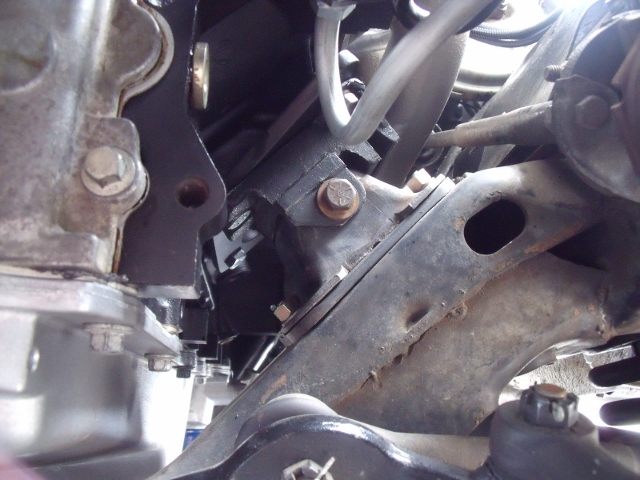
INSTALLATION was next but before that I looked into motor mount conversions. It seems to me not all manufacturers use the same terminology for setback or offset etc…. Stock location to me means that the rear mounting flange of the engine(or the tranny bell housing) is in the same location as when the original motor/tranny setup. This would be zero setback or offset.
I used a set of 1.25” offset meaning that compared to where the stock mounts align, these placed the motor mounts forward 1.25”. If you were to leave your frame mounts in the stock location, the motor would be setback 1.25”. The mounts would be similar to the 969-4592 Trans Dapt kit. I had decided early on that I would re-drill the cross member to locate the frame mounts once I installed the motor so the offset was not relevant. I wanted to keep the mounts forward to give me clearance at the starter and exhaust manifolds.
I modified my stock frame mounts by removing the two ears on them and drilling a new mounting hole. This made the frame mounts interchangable left or right. I had to use �” plate steel between them and the cross member to set engine elevation for proper oil pan clearance. I am not sure how high the engine is compared to stock as I forgot to measure it before I pulled the original motor but I would guess it is no more than �“ higher. It would be good practice to measure from crank centerline to the ground or use an angle gauge as a reference before removing your engine.
My final engine location is .25” forward from its original location. I had to move it slightly forward for heater box clearance to the valve cover. I have factory A/C so this probably would not have been an issue for cars without A/C. If you move the engine forward/back you will have to go with a custom driveshaft. I swapped the tranny last year so I already had a new shaft and .25” isn’t enough to require a new one.

Aside reference to Chevy SB engine mounts. They made two styles: tall/narrow and short/wide. They also made two sets of frame mounts. They are not interchangeable. They both have the same overall height when used together. Most 350 engines used the short/wide mounts and 307 engine used the tall/narrow. I used the tall narrow for my installation. Make sure to use a good aftermarket poly mount as they have an integral lock in them as the cheaper OE ones don’t. If the mount separates the engine won’t lift very far under load.
To be continued…. Please stop back to read more on my swap. Let me know if the photo size is appropriate. Feel free to ask any questions or add your comments good or bad. Maybe you have an idea I can use to make my ride better. Thank you.
I will start with my engine build, then go into the installation and finish with all the connections. To me the biggest and most costly obstacle was the pulley drive system. I did not like the look of the truck setup nor the aftermarket Quik Performance brackets. So I built my own using as many of the OE parts as possible.
THE ENGINE started as a core out of a ‘01 Silverado with 10k miles. I sold the heads as they were the more desirable non-Castech heads. If you haven’t heard, be aware that some of the Castech heads had coolant leakage issues. This was sort of a budget build as my goal was to get an LS into the car and later build a 6.0/6.2 or a stroker LS as a later date.
The short block was rebuilt using LS6 rods and flat top 5.3HO pistons. Weight matched everything and had the assembly balanced. I believe the pistons are the same as 4.8L pistons as both motors have the same bore but use different cranks. If you look around you may be able to find some GM surplus pistons with rings as I did but be sure to get a matched set. Same goes for the rods. It will make weight matching easier. Everything weighted within 2 grams of each other, pretty good for OEM stuff I think.
For HEADS I found a good set of LS1 heads. Gave them a mild porting and had them milled .025". I then rebuilt them using CompCams 26918 beehive springs and 4705 seat/locaters. I had to turn down the OD of the locaters .050” to fit the spring pockets in the heads better. Used stock keepers and locks. Reused the factory lifters as they had limited miles and new OEM type pushrods. Reused the factory timing chain/gears and ported the oil pump. Camshaft is an OE Z06 roller with .550/.550 lift.
My final compression ratio using .051” thick MLS gaskets was 10.25-1. It’s not as high as you would think because of the smaller 3.780 bore of the 5.3L engine. Having had the heads milled .025” brought the combustion chamber size down to 64cc, higher than I wanted but anymore and I would have had bolt hole alignment or intake sealing issues. Pistons stuck out of the hole an average of .007” so my quench was right where I like it at .045”. The heads combustion chamber is larger than the cylinder bore but I read many people installing LS1 heads on 5.3’s without issue.
For INDUCTION/IGNITION I went with the 7118 Edelbrock LS1 dual plane carbureted intake with MSD ignition controller. Found a set of new LS6 coils/brackets/wires and reused the original cam/crank sensors. The early motors have the 24x reluctor wheel located at the back of the motor. Cam sensor is also a the rear/top of motor. The MSD box comes with pills to control ignition timing curve and has two specifically for the Z06 camshaft depending on rear axle ration being used.
The exhaust manifolds shown are from 2010 Camaro's. They fit between the frame rails but you have to relocate the brake proprotioning valve. I elected not to do this and ended up using a pair of Hookers new iron exhaust headers. They are very nice and fit perfectly. Photos to be shown later. I have these manifolds for sale if anyone is interested.
OIL PANS are another area of great interest. I used the GM muscle car pan as a starting point as it is cheap and includes a dipstick that I didn’t have. It does sit low as everyone else says and will end up being swapped for the Holley pan. I cut off the boss at the passenger front of the pan for steering clearance. In the end though I had to remove the grease fittings on the tie rods and weld up the steering stops as they still wanted to hit the pan. I lost a total of about �" steering turn and hasn’t been a problem driving the car. Plenty of clearance everywhere.
INSTALLATION was next but before that I looked into motor mount conversions. It seems to me not all manufacturers use the same terminology for setback or offset etc…. Stock location to me means that the rear mounting flange of the engine(or the tranny bell housing) is in the same location as when the original motor/tranny setup. This would be zero setback or offset.
I used a set of 1.25” offset meaning that compared to where the stock mounts align, these placed the motor mounts forward 1.25”. If you were to leave your frame mounts in the stock location, the motor would be setback 1.25”. The mounts would be similar to the 969-4592 Trans Dapt kit. I had decided early on that I would re-drill the cross member to locate the frame mounts once I installed the motor so the offset was not relevant. I wanted to keep the mounts forward to give me clearance at the starter and exhaust manifolds.
I modified my stock frame mounts by removing the two ears on them and drilling a new mounting hole. This made the frame mounts interchangable left or right. I had to use �” plate steel between them and the cross member to set engine elevation for proper oil pan clearance. I am not sure how high the engine is compared to stock as I forgot to measure it before I pulled the original motor but I would guess it is no more than �“ higher. It would be good practice to measure from crank centerline to the ground or use an angle gauge as a reference before removing your engine.
My final engine location is .25” forward from its original location. I had to move it slightly forward for heater box clearance to the valve cover. I have factory A/C so this probably would not have been an issue for cars without A/C. If you move the engine forward/back you will have to go with a custom driveshaft. I swapped the tranny last year so I already had a new shaft and .25” isn’t enough to require a new one.
Aside reference to Chevy SB engine mounts. They made two styles: tall/narrow and short/wide. They also made two sets of frame mounts. They are not interchangeable. They both have the same overall height when used together. Most 350 engines used the short/wide mounts and 307 engine used the tall/narrow. I used the tall narrow for my installation. Make sure to use a good aftermarket poly mount as they have an integral lock in them as the cheaper OE ones don’t. If the mount separates the engine won’t lift very far under load.
To be continued…. Please stop back to read more on my swap. Let me know if the photo size is appropriate. Feel free to ask any questions or add your comments good or bad. Maybe you have an idea I can use to make my ride better. Thank you.
Last edited by fox12303; 12-28-2013 at 02:39 PM.
Trending Topics
04-25-2012, 09:45 AM
#8
Launching!
Thread Starter
iTrader: (7)
Join Date: Apr 2012
Posts: 254
Likes: 0
Received 0 Likes
on
0 Posts
Before I installed the motor I also considered the sending units for oil and coolant temperature. I wanted to keep my existing dummy lights but gauge senders would use the same modifications I did here. Needed coolant crossovers too since the Edelbrock Intake does not have allow room for the tube to run under it.
For the oil pressure sender I bought a 14mm-1.5 bolt with full threads. Cut it to about 15mm in length I drilled an tapped it for 1/8”-27 NPT. Reuse the washer from the original oil pressure sender if you have it otherwise find an oil drain plug washer that fits.
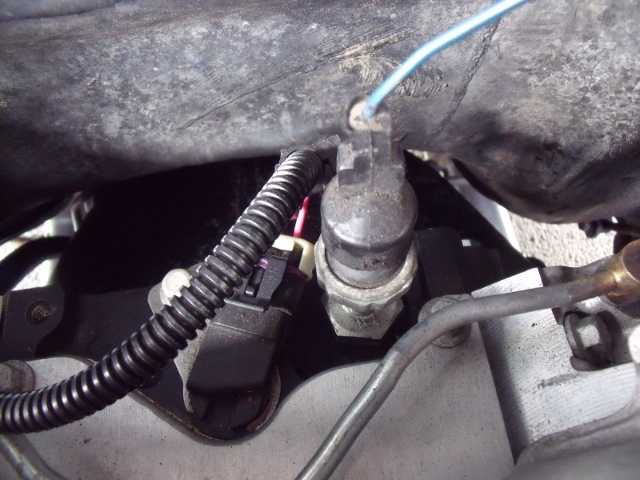
The temp switch was a little more difficult. I found a 363-AM Stewart Warner switch that has �” pipe thread. LS heads have straight 12mm-1.5 ports for the coolant sender. I drilled one head and tapped it for the �” pipe threads. Located it in the drivers side head just like the stock 350 location. I used the passenger side head for the EFI temp sending unit. If you want to eliminate the oil level sensor in the oil pan, buy a 16mm-1.5 full thread bolt and essentially make an oil drain plug. Look at your local parts store and you may find a 16mm plug with washer gasket.

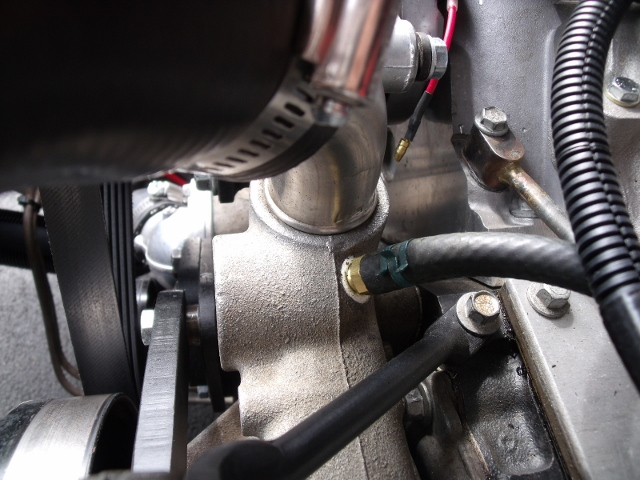
Another item to modify was the coolant crossover tube. I was able to use a truck crossover tube to make both front and rear crossovers rather than buy the GM tube kit that blocks the rear crossover completely. The blocks can be drilled for the tubing. I re-bent the truck tube but you could buy steel tubing from any auto parts store. Either braze or tig weld it together. I drilled the water pump and added a 1/8” pipe fitting for the 1/4" coolant hose connection. Sorry I didn't take pictures of these but you can see a portion of one in the photo below and in the oil pressure switch photo above.
The valley pan was last. I made two 1/4" aluminum plugs and tig welded them to cover up the knock sensor holes. Then I ground the cover flat. If you can tig weld this is an easy and cheap modification. The heat will probably warp the cover a little so try to weld this bolted in place when you mock up your engine. End result looks just like the aftermarkets available.
For the oil pressure sender I bought a 14mm-1.5 bolt with full threads. Cut it to about 15mm in length I drilled an tapped it for 1/8”-27 NPT. Reuse the washer from the original oil pressure sender if you have it otherwise find an oil drain plug washer that fits.
The temp switch was a little more difficult. I found a 363-AM Stewart Warner switch that has �” pipe thread. LS heads have straight 12mm-1.5 ports for the coolant sender. I drilled one head and tapped it for the �” pipe threads. Located it in the drivers side head just like the stock 350 location. I used the passenger side head for the EFI temp sending unit. If you want to eliminate the oil level sensor in the oil pan, buy a 16mm-1.5 full thread bolt and essentially make an oil drain plug. Look at your local parts store and you may find a 16mm plug with washer gasket.
Another item to modify was the coolant crossover tube. I was able to use a truck crossover tube to make both front and rear crossovers rather than buy the GM tube kit that blocks the rear crossover completely. The blocks can be drilled for the tubing. I re-bent the truck tube but you could buy steel tubing from any auto parts store. Either braze or tig weld it together. I drilled the water pump and added a 1/8” pipe fitting for the 1/4" coolant hose connection. Sorry I didn't take pictures of these but you can see a portion of one in the photo below and in the oil pressure switch photo above.
The valley pan was last. I made two 1/4" aluminum plugs and tig welded them to cover up the knock sensor holes. Then I ground the cover flat. If you can tig weld this is an easy and cheap modification. The heat will probably warp the cover a little so try to weld this bolted in place when you mock up your engine. End result looks just like the aftermarkets available.
Last edited by fox12303; 04-26-2012 at 06:53 AM.


 04-26-2012, 08:11 AM
#11
Launching!
Thread Starter
iTrader: (7)
Join Date: Apr 2012
Posts: 254
Likes: 0
Received 0 Likes
on
0 Posts
The biggest obstacle in a swap is the accessory drive system in my opinion. Many of the aftermarket kits are beautiful works of art but are very costly. I needed to build my own on a very small budget and I wanted to be able to reuse as much of the original truck parts as possible. The different factory drives have different offsets and the parts are not interchangeable. The truck has the biggest offset meaning that the distance from the face of the block to where the belt runs is the greatest. The Corvette has the shortest.
The alternator is an OE late 80's Camaro unit but the truck alternator would work as they both have the same bolt locations. The power steering pump is from the same but the truck pump work as well. The A/C compressor is an aftermarket SD7 mini unit the same that most of the aftermarket drives use. And the waterpump is the stock truck pump.
I first mocked up the placement of the components. The alternator ended up being the most difficult as it was 3/4" too far forward when placed in front of the drivers side cylinder head. This is why the aftermarket requires a new balancer and separate pulley. I had to move it up and toward the center of the engine and since I had already decided I would never use the factory EFI intakes so it was not an issue. Though it is not in the ideal location, it works for this type of swap.
Once laid out, I then built the brackets out of a plastic composite. The plastic could be cut, sanded, drilled, bored and routed just like hard wood. Once a full set was made and all pulleys aligned with 1/16", I started to make a set out of steel plate and DOM tubing. Much more difficult to work with if you don't have access to a machine shop.
I spent the better part of two months building this system. I've posted only the one photo of it because I have plans to patent it. No this is not an advertisement or a sales pitch for anything. If you like it and think it would make swapping LS motors into none LS vehicles, post your feedback good or bad.

The cooling system is another area that can be costly to swap over. Here's what I did again on a budget. Even though I say budget I don't make compromises. I plan to drive my car on this years HotRod Power Tour so it has to perform well.
I used my stock small block(SB) radiator and the stock LS truck water pump I already mentioned. You will need a rubber sleeve for the upper hose to go from 1.25 to 1.50". The neck on the pump can be rotated counterclockwise by heating the pump evenly and then use a pipe wrench to gently rotate it into position. The upper hose is made out of a stock SB upper hose and an aluminum hose connector from Speedway Motors. I think they sell the sleeves too as I already had one from years ago.


Get a Corvette water neck and thermostat. It rotates the neck down a little similar to a SB water pump. A truck lower hose fits almost perfectly with only minor trimming. Since the LS pump puts the heater hose connections on the passenger side they hook up easy. I used a 69 Chevelle water valve since I have A/C and mounted it in the stock location on the fender well.


I had already converted the fan to a dual Flex-a-lite setup with variable speed controller and it fits the radiator perfectly. I bet you could install an engine mounted fan as it is 1" smaller than a SB Chevelle's fan but you would have to see where it meets the stock shroud to function properly.
If you are using an f-body pump where the connection comes straight out you could perhaps use the rubber sleeve idea and your stock radiator just as I did above. Just an idea.
The FUEL SYSTEM was next on the check list. I don�t like external pumps so I went with a new tank from Spectra, part number GM34UFI. It includes the sending unit with a Delphi pump. It is a standard intank pump good for 450hp, maybe more. The fitting on the sending unit is not an AN fitting(think it was standard flare) so I soldered on the proper AN steel fitting. You will have to drill the fitting to the proper size tube.

Using Jegs black cloth covered AN line I plumbed the -6 supply line along side the existing line which I reused for the return. I used a 40 micron inline filter AEI-12321 from Aeromotive tucked inside the frame rail. Since my car was originally a 307 I had a 5/16� line originally. Again, solder on an AN fitting to plumb the line to the regulator. You may wish to run -8 or -10 line if you plan to race your car or have over 500hp. Otherwise I think -6 line is fine.
While running the line you may wish to run your wiring too. I ran a 16 gauge power and ground wire wrapped in black nylon mesh covering. The sender has a ground that can be attached to the frame in back like the original but I choose to run an additional ground back to the battery.


BE CAREFUL with open flame around fuel lines. Be sure to blow them out and allow them to dry for a week at least before soldering anything. Again be very careful. Clean the tubing with emery and use flux with silver solder just as you would solder the plumbing in your house.
You can see where and how I plumbed the lines at the regulator and throttle body. Double check all connections when you prime the system and before you attempt to run the engine. The regulator is from FAST 307030 and AutoMeter 2174 fluid filled gauge. I was able to plumb the entire system with a single 20ft role of tubing. The return is not under full pressure so you can use standard fuel injection hose and efi clamps to connect the line to the sending unit. Do not use standard worm gear clamps anywhere, leave those for your radiator hoses.

The alternator is an OE late 80's Camaro unit but the truck alternator would work as they both have the same bolt locations. The power steering pump is from the same but the truck pump work as well. The A/C compressor is an aftermarket SD7 mini unit the same that most of the aftermarket drives use. And the waterpump is the stock truck pump.
I first mocked up the placement of the components. The alternator ended up being the most difficult as it was 3/4" too far forward when placed in front of the drivers side cylinder head. This is why the aftermarket requires a new balancer and separate pulley. I had to move it up and toward the center of the engine and since I had already decided I would never use the factory EFI intakes so it was not an issue. Though it is not in the ideal location, it works for this type of swap.
Once laid out, I then built the brackets out of a plastic composite. The plastic could be cut, sanded, drilled, bored and routed just like hard wood. Once a full set was made and all pulleys aligned with 1/16", I started to make a set out of steel plate and DOM tubing. Much more difficult to work with if you don't have access to a machine shop.
I spent the better part of two months building this system. I've posted only the one photo of it because I have plans to patent it. No this is not an advertisement or a sales pitch for anything. If you like it and think it would make swapping LS motors into none LS vehicles, post your feedback good or bad.
The cooling system is another area that can be costly to swap over. Here's what I did again on a budget. Even though I say budget I don't make compromises. I plan to drive my car on this years HotRod Power Tour so it has to perform well.
I used my stock small block(SB) radiator and the stock LS truck water pump I already mentioned. You will need a rubber sleeve for the upper hose to go from 1.25 to 1.50". The neck on the pump can be rotated counterclockwise by heating the pump evenly and then use a pipe wrench to gently rotate it into position. The upper hose is made out of a stock SB upper hose and an aluminum hose connector from Speedway Motors. I think they sell the sleeves too as I already had one from years ago.
Get a Corvette water neck and thermostat. It rotates the neck down a little similar to a SB water pump. A truck lower hose fits almost perfectly with only minor trimming. Since the LS pump puts the heater hose connections on the passenger side they hook up easy. I used a 69 Chevelle water valve since I have A/C and mounted it in the stock location on the fender well.
I had already converted the fan to a dual Flex-a-lite setup with variable speed controller and it fits the radiator perfectly. I bet you could install an engine mounted fan as it is 1" smaller than a SB Chevelle's fan but you would have to see where it meets the stock shroud to function properly.
If you are using an f-body pump where the connection comes straight out you could perhaps use the rubber sleeve idea and your stock radiator just as I did above. Just an idea.
The FUEL SYSTEM was next on the check list. I don�t like external pumps so I went with a new tank from Spectra, part number GM34UFI. It includes the sending unit with a Delphi pump. It is a standard intank pump good for 450hp, maybe more. The fitting on the sending unit is not an AN fitting(think it was standard flare) so I soldered on the proper AN steel fitting. You will have to drill the fitting to the proper size tube.
Using Jegs black cloth covered AN line I plumbed the -6 supply line along side the existing line which I reused for the return. I used a 40 micron inline filter AEI-12321 from Aeromotive tucked inside the frame rail. Since my car was originally a 307 I had a 5/16� line originally. Again, solder on an AN fitting to plumb the line to the regulator. You may wish to run -8 or -10 line if you plan to race your car or have over 500hp. Otherwise I think -6 line is fine.
While running the line you may wish to run your wiring too. I ran a 16 gauge power and ground wire wrapped in black nylon mesh covering. The sender has a ground that can be attached to the frame in back like the original but I choose to run an additional ground back to the battery.
BE CAREFUL with open flame around fuel lines. Be sure to blow them out and allow them to dry for a week at least before soldering anything. Again be very careful. Clean the tubing with emery and use flux with silver solder just as you would solder the plumbing in your house.
You can see where and how I plumbed the lines at the regulator and throttle body. Double check all connections when you prime the system and before you attempt to run the engine. The regulator is from FAST 307030 and AutoMeter 2174 fluid filled gauge. I was able to plumb the entire system with a single 20ft role of tubing. The return is not under full pressure so you can use standard fuel injection hose and efi clamps to connect the line to the sending unit. Do not use standard worm gear clamps anywhere, leave those for your radiator hoses.
Last edited by fox12303; 09-20-2012 at 07:21 AM.
 04-26-2012, 10:59 PM
#14
Launching!
Thread Starter
iTrader: (7)
Join Date: Apr 2012
Posts: 254
Likes: 0
Received 0 Likes
on
0 Posts
To answer capdown above, the alternator can't be moved as it will hit the cylinder head. Unfortunately this does limit its application, only for those who choose to use an aftermarket carb style intake. To place the alternator in the ideal location which would be in front of the driver side cyl-head, it also has to be moved forward 5/8". This is what all of the expensive aftermarket setups do and the reason they include a hub style harmonic balancer with seperate pulley.
Thank you for your comments. I like the pictures of both your rides.
Thank you for your comments. I like the pictures of both your rides.
04-28-2012, 02:46 AM
#15

Ok,i see you answered the ?? about the alternator location,but I really like your set up and would love to make it work with the ls1 style intake and the up and forward turbo headers,,any reason you cant "reclock" the alternator so that you can fab a new bracket so its not blocking the Throttle body.
or
maybe relocate the alternator to here
would this(pic) clear the up and forward headers,,,your opinion
or
maybe relocate the alternator to here
would this(pic) clear the up and forward headers,,,your opinion
04-28-2012, 09:21 AM
#17
Launching!
Thread Starter
iTrader: (7)
Join Date: Apr 2012
Posts: 254
Likes: 0
Received 0 Likes
on
0 Posts
tta656, that position may be possible. My goal was to make a low cost drive system that kept the compoenants inboard, closer to the engine, rather than hang them out to the sides. And one that could use low cost replacement parts or the truck accessories that come with your typical pullout engine.
The down side is that I am limiting the usefullness of my drive system. If the demand were great enough I may see if I can make a bracket to do what you are asking. The power steering pump would have to be changed to a remote resevoir style which would drive the cost up.
It would be possible to use the compressor and tensioner brackets with the truck alternator/power steering brackets if you don't mind the high mount with your LS EFI manifold.
The tall/narrow engine mount application would be 72 Chevelle with 307 engine. Remember that the overall height is the same for both style mounts. But I have read where people have modified the taller(wide) frame mount to use it with the tall(narrow) engine mount. This raises the engine approxiamtely 3/8" which is about the average amount most swaps need for oil pan clearance at the crossmember.
I don't have any experience with turbo headers on the LS motor so I could not even suggest that they would or would not clear.
I hope I have answered your questions and let me know if I can be of any additional help. Thank you.
Last edited by fox12303; 04-29-2012 at 04:54 AM.
04-28-2012, 12:06 PM
#18
Launching!
Thread Starter
iTrader: (7)
Join Date: Apr 2012
Posts: 254
Likes: 0
Received 0 Likes
on
0 Posts
You have to use an adapter when installing an 700R4/TH350 with your LS motor as the crankshaft does not protrude out the back of the engine the same as your typical SBC. There is a differance of about .400". At first I went with the flat GM flexplate, crank spacer and longer bolts. A good option but after educating myself on the differances in other aftermaket kits I settled on Advance Adapters 712500A kit. It comes with a standard dished LS flexplate that is drilled to fit the 10 3/4" bolt circle of the earlier transmissions as well as standard LS trannys(except for 4L80E/4L85E). It also includes standard flexplte bolts and adapter to extend the pilot bore of the crankshaft which aligns and supports the torque convertor. I unfortunately did not take a picture of this before I unstalled the motor. The benefit of using this style kit is if you decide to change you tranny to a computer controlled unit down the road, you will not have to get a new flexplate. Downside to this kit is the flexplate is not SFI approved. But, Hughes and TCI both sell these style parts/kits.

Unfortunately I had to shim the starter to quiet the noise while cracking. After removing the flexplate dust shield and watching while the engine was running I could see the ring gear on the flexplate had a high spot on it. I don't recommend doing this but you can grind the flexplate teeth while the motor is running. Just be very careful. Using an angle grinder, slowly touch off on the teeth from the passenger side of the car. Hold the grinder steady and allow it to just touch the high spot without applying much if any pressure. I still had to use a .060" shim to completely quiet down the starter.
Unfortunately I had to shim the starter to quiet the noise while cracking. After removing the flexplate dust shield and watching while the engine was running I could see the ring gear on the flexplate had a high spot on it. I don't recommend doing this but you can grind the flexplate teeth while the motor is running. Just be very careful. Using an angle grinder, slowly touch off on the teeth from the passenger side of the car. Hold the grinder steady and allow it to just touch the high spot without applying much if any pressure. I still had to use a .060" shim to completely quiet down the starter.
04-28-2012, 12:32 PM
#19

I see you are using the Spectra fuel tank. There have been numerous reports of the motor stalling when going around a corner with less than a 1/2 tank of fuel. Have you encountered any of these problems?
04-28-2012, 01:53 PM
#20
Launching!
Thread Starter
iTrader: (7)
Join Date: Apr 2012
Posts: 254
Likes: 0
Received 0 Likes
on
0 Posts
Yes, maybe? Stalled when I had 3 maybe 4 gallons of gas in it when I went around an entrance loop to a highway. I immediately stopped and added another 4-5 gallons. No problem at that point. It was not until recently I learned of the fuel starvation issue here on the forum. Below is my reply to another member after that discovery.
__________________________________________________ ____________________________________
I spoke with Spectra yesterday(4/26/2012) about the fuel starvation issue. They said it was most common with the Camaro tank and the Chevelle tank does use the same baffle. They have since updated the baffle by adding a secondary baffle within the original to control fuel slosh which is the root cause of the fuel starvation. They also stated that the pumps would sometimes prematurely fail due to an internal defect. They recommended using ACDelco AP-381 as a replacement as they are made by a differant vendor than the supplied Delphi unit in their tanks.
I am currently pursing a replacement tank since I am still covered under their one year warranty. My Chevelle did stall once on a hard corner when I had less than 1/4 tank of gas.
Recommend that if purchasing one of these tanks you remove the sending unit and check for the second baffle before using it to be certain you have the revised tank. If you do not see the second baffle try and take pictures of the inside baffle. Also take a picture of the label on top of the tank. Save the label off the box along with your original receipt/invoice. Keep all this info together in case you have a warranty issue.
Ultimately it may mean you need to keep the tank a minimum 1/4 full at all times. This is good practice anyway. Otherwise I believe it is a good quality piece at a reasonable price.
Last edited by fox12303; 04-29-2012 at 04:59 AM.