LS2 GTO front mount single low budget turbo, keeping A/C
 09-07-2012, 11:43 PM
#1
Launching!
Thread Starter
Join Date: Jan 2012
Location: Davisburg, MI
Posts: 205
Likes: 0
Received 0 Likes
on
0 Posts

One person anyway wants to see what I'm doing so that's enough excuse to start a thread I think. 2005 LS2 M6 GTO. Modest goal of adding a hundred horse to the wheels without affecting driveability or comfort. 5-6psi of boost with lots of ebay parts. Not moving the battery and I'm keeping A/C. I can't believe how much of the budget went to mandrel bends.
DNA GT45 69mm turbo T4 1.05AR
44mm wastegate
50mm BOV
27"x9"x4" intercooler
Modified truck manifold
2.25" crossover
3.5" downpipe
3" cold side tubing
60lb Siemans Deka injectors
Deatschwerks DW65C fuel pump
EFI Live

DNA GT45 69mm turbo T4 1.05AR
44mm wastegate
50mm BOV
27"x9"x4" intercooler
Modified truck manifold
2.25" crossover
3.5" downpipe
3" cold side tubing
60lb Siemans Deka injectors
Deatschwerks DW65C fuel pump
EFI Live
Last edited by ACCLR8N; 07-05-2013 at 08:25 PM.
 09-08-2012, 12:16 AM
#2
Launching!
Thread Starter
Join Date: Jan 2012
Location: Davisburg, MI
Posts: 205
Likes: 0
Received 0 Likes
on
0 Posts
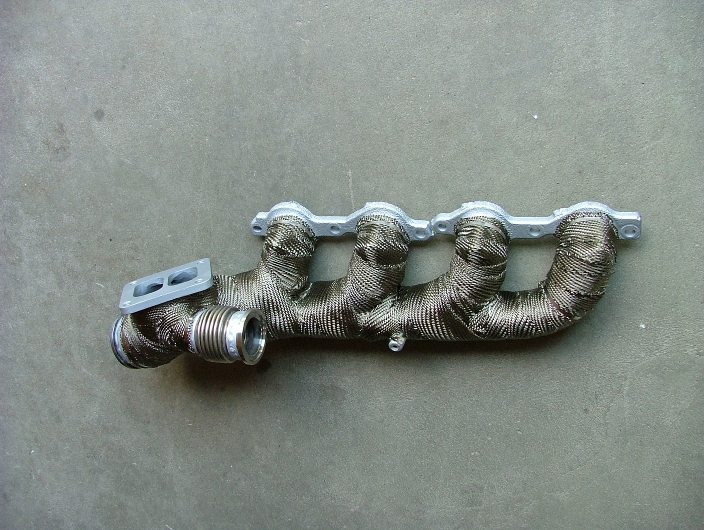
Started with the very common flipped passenger truck manifold. Sch40 mild steel weld el welded on to support the T4 flange. The nodular cast iron manifold have very low thermal expansion so I went with the heavy wall mild steel to better match it. The flange was positioned to allow room for an air filter.
The particular manifold I used is from a 2008 5.3L pickup 12616288. If I did another one I'd consider using the Trailblazer SS 12600527 manifold. It is tighter to block providing an extra 11mm for downpipe. The negative is the exit is more downward making it harder to turn up to the flange.
The particular manifold I used is from a 2008 5.3L pickup 12616288. If I did another one I'd consider using the Trailblazer SS 12600527 manifold. It is tighter to block providing an extra 11mm for downpipe. The negative is the exit is more downward making it harder to turn up to the flange.
Last edited by ACCLR8N; 09-15-2012 at 08:33 AM. Reason: casting numbers
 09-08-2012, 12:36 AM
#4
Launching!
Thread Starter
Join Date: Jan 2012
Location: Davisburg, MI
Posts: 205
Likes: 0
Received 0 Likes
on
0 Posts
Thanks
I'm using the GTO driver's side manifold on the passenger side with a spacer exiting low and forward. The spacer provides clearance between the manifold exit and the motor mount bracket. The spacer is a 3/8 header flange with small ports so I could match it to the manifold.
I'm using the GTO driver's side manifold on the passenger side with a spacer exiting low and forward. The spacer provides clearance between the manifold exit and the motor mount bracket. The spacer is a 3/8 header flange with small ports so I could match it to the manifold.
 09-08-2012, 09:37 AM
#7
Launching!
Thread Starter
Join Date: Jan 2012
Location: Davisburg, MI
Posts: 205
Likes: 0
Received 0 Likes
on
0 Posts
Thank you. I'll be running 93 octane pump gas. Keeping it simple.
Crossover is 2.25" mild steel again. Ceramic baked on paint and DEI Titanium wrap. The pipes have been ovaled slightly for more clearance. After moving the starter harness behind the compressor and over the motor mount I was able to snake the exhaust from the passenger side around the front of the mount. The exhaust is not under the compressor. The second driver's side piece is a pretty simple L going up into the merge above the alternator. There is going to be a big notch in the skid plate for the passenger side to exit. The whole mess is higher than the low point on the skid plate, but well bellow the radiator hoses and wiring across the front.
Crossover is 2.25" mild steel again. Ceramic baked on paint and DEI Titanium wrap. The pipes have been ovaled slightly for more clearance. After moving the starter harness behind the compressor and over the motor mount I was able to snake the exhaust from the passenger side around the front of the mount. The exhaust is not under the compressor. The second driver's side piece is a pretty simple L going up into the merge above the alternator. There is going to be a big notch in the skid plate for the passenger side to exit. The whole mess is higher than the low point on the skid plate, but well bellow the radiator hoses and wiring across the front.
Trending Topics
09-08-2012, 11:59 AM
#9
TECH Regular
iTrader: (21)

Join Date: Apr 2005
Location: WISCONSIN
Posts: 492
Likes: 0
Received 0 Likes
on
0 Posts
Love the build.
5-6lbs I do not think it is worth. Granted I do not know much on the ls2's My forged ls1 has prc 5.3 heads 10.3 to 1 compression and I am running 16lbs on a f1c. It loves it. 93 pump gas with only 14 degrees timing and meth for cooling.
5-6lbs I do not think it is worth. Granted I do not know much on the ls2's My forged ls1 has prc 5.3 heads 10.3 to 1 compression and I am running 16lbs on a f1c. It loves it. 93 pump gas with only 14 degrees timing and meth for cooling.

 09-08-2012, 10:11 PM
#12
Launching!
Thread Starter
Join Date: Jan 2012
Location: Davisburg, MI
Posts: 205
Likes: 0
Received 0 Likes
on
0 Posts
I'm not planning on even taking the valve covers off. At the moment the wastegate only has 4psi spring in it. I'll ramp it up a couple more but the plan is to keep it under 600 crank HP. Stock clutch is doomed but the rest of the drivetrain is expected to survive on this street car. I can't afford to go any faster.
I'm not doing this because I felt the car was slow. I'd like it to be as fast at a lower RPM. I don't like red lining my vehicles. Plus I've always just wanted a turbo car.
I'm not doing this because I felt the car was slow. I'd like it to be as fast at a lower RPM. I don't like red lining my vehicles. Plus I've always just wanted a turbo car.
Last edited by ACCLR8N; 09-08-2012 at 10:20 PM.
09-08-2012, 10:57 PM
#14
Launching!
Thread Starter
Join Date: Jan 2012
Location: Davisburg, MI
Posts: 205
Likes: 0
Received 0 Likes
on
0 Posts
The ugly: The pinch between the frame and the truck manifold required severe ovaling of the downpipe. This ate up a lot time for me. To protect the steering rack the pipe is wrapped and has a SS heat shield bolted to it. On the body, I removed the frame brace mount and took a Ford wrench to the rearmost crush wrinkle to maximize space.
09-08-2012, 11:47 PM
#16
Launching!
Thread Starter
Join Date: Jan 2012
Location: Davisburg, MI
Posts: 205
Likes: 0
Received 0 Likes
on
0 Posts
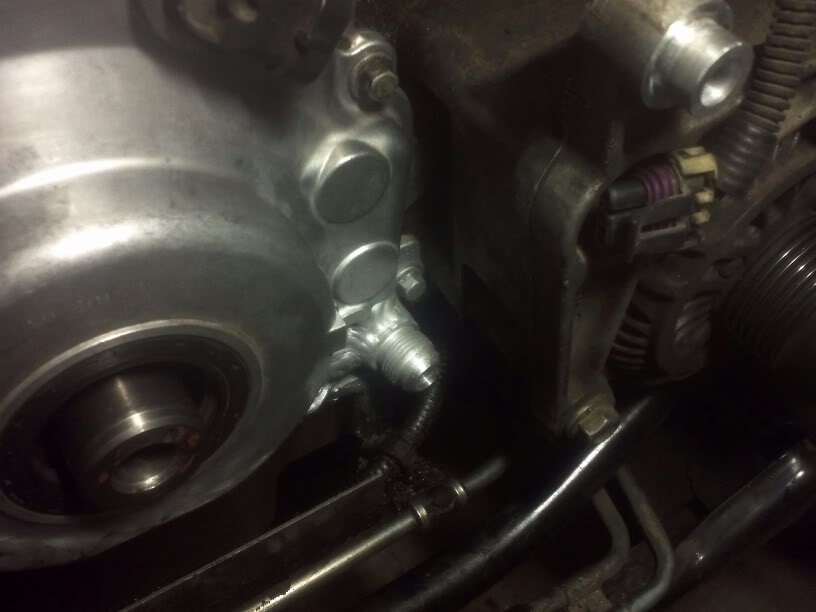
I used the existing plugged port at the rear of the pan for my supply oil. It's metric M14 x 1.5 thread. The Russel fitting I got was very loose and was never going to seal on the threads. I had to find a Teflon washer that was thicker than the flange of the adjacent mounting bolt. The washer took some whittling to make it fit. Eventually it provided a sealing face for the fitting to tighten against. No leaks so far. -4AN line.
I botched the oil drain. It is in a bad location. It should be much further rearward. To keep it away from the manifold, two holes were drilled so the -10AN line passes through the frame rail with a couple grommets. It has the reflective heat sheathing and makes a big U going behind motor mount in picture. It should have gone straight into pan rear of the motor mount.
I botched the oil drain. It is in a bad location. It should be much further rearward. To keep it away from the manifold, two holes were drilled so the -10AN line passes through the frame rail with a couple grommets. It has the reflective heat sheathing and makes a big U going behind motor mount in picture. It should have gone straight into pan rear of the motor mount.

 09-14-2012, 10:42 PM
#20
Launching!
Thread Starter
Join Date: Jan 2012
Location: Davisburg, MI
Posts: 205
Likes: 0
Received 0 Likes
on
0 Posts
The position of the turbo flange interfered with the power steering lines. I can't imagine how Holden decided it was cheaper/faster/easier to leave the system routed to the right side and turn the lines around and send them back to the left for our LHD market. I ended up tossing the pressure line altogether and flipped the cooler around. The cooler was able to mount backwards on the original brackets. Every piece was molested or outright replaced. Aeroquip power steering lines and fittings were back ordered so I went with Russel. I prefer the Aeroquip stuff.

Last edited by ACCLR8N; 09-14-2012 at 10:56 PM.