
Need help/thoughts: Pinning ATI Balancer
 02-01-2013, 02:11 PM
#1
Teching In
Thread Starter
iTrader: (2)
Join Date: Feb 2009
Location: Kokomo, IN
Posts: 18
Likes: 0
Received 0 Likes
on
0 Posts
I purchased a crank pinning kit from Bluvette1. It is the front pinning kit, not the side pinning kit. Looks like this... http://imgur.com/ODVy3hX
I cannot figure out how to make this work with an aftermarket ATI Balancer. I could be just blind or a moron.. thats cool.. but could someone help me figure this out? Have any of you used this kit with an ATI Balancer?
I emailed Bob at Brute and he said it should work and sent me the instructions. In the instructions it says to pull the stock balancer off, install the aftermarket balancer, and then pin it by putting the bolt through and drilling to the correct depth.
My problem is, the neck is too skinny for the jig to fit inside. The 'neck' of the ati balancer is too long for the drill bit to even come close to touching the crank if it were to sit on the outside...
Here are a few pictures for reference. I took a shot of the back of the balancer to show the length of the 'neck' (dont know what else to call it). I put the jig on the back of it to show that its width.
http://imgur.com/67oXrUz
http://imgur.com/yULA1m4
Here it is sitting on top of the front of the balancer (yes, the jig is upside down, just wanted to show that it doesnt slide down it to sit flush with the crank if it were on there)
http://imgur.com/LKOPGtN
And lastly a picture of the jig sitting inside the pully if the pulley was mounted up on the balancer. The little ridge of the jig fit nice an snug in there but again, the drill bit itself would need to be like 4 times a long if I were to have to drill all the way down that 'neck' / tube.
http://imgur.com/0sIHy4W
Again, thanks for any thoughts, comments, or if you want to call me an idiot for missing something silly... im cool with that. Need different pictures? ask.
Thanks!
 02-01-2013, 02:25 PM
#2
TECH Resident
iTrader: (7)
Join Date: Apr 2007
Location: STL, Mo
Posts: 954
Likes: 0
Received 0 Likes
on
0 Posts

Install the dampener like you normally would if you weren't going to pin it.
Install the the tool on to the front of the crank with the longer bolt provided.
Measure the length of the pin and tape off the bit so that the width of the tool and length of the pin are combined to give you the correct depth for the pin.
start drilling. That tool will hold the bit where it needs to be.
02-01-2013, 04:02 PM
#3
Im helping him with this build. excuse my crude drawing, but i hate macs, and i cant find god damn MS Paint on my GF macbook pro. lol.. so i had to use an internet equivalent.
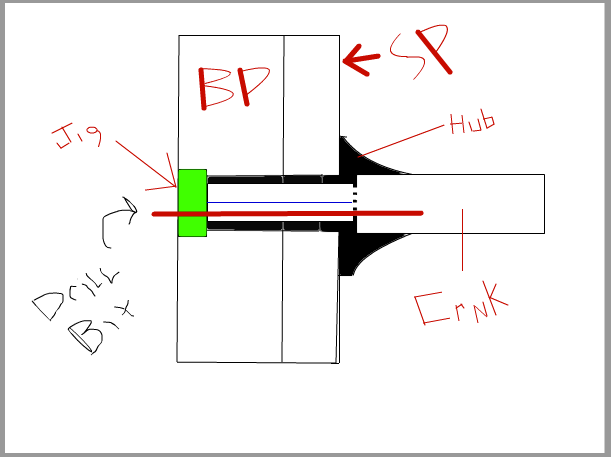
the blue line that runs in the middle of the hub represents the amount of distance the drill bit has to go. its about 4" or so of where the drill bit will be "free floating." basically the jig fits in the blower pulley (BP), but it will hit the end of the balancer assembly hub or the Serpentine Pulley (SP) (i cant remember which), but regardless of what it hits it will not allow it to mount to the crank like i thought its supposed to go. it seems kind of goofy they would design it where the actual jig doesnt mount to the crank itself, and make you use a ridiculously long drill bit... . is this how this type of fixture is supposed to work? if so, how the hell do you get your fingers inside that hub to place the pin and hammer it in. I dont see how this pin kit will work with an ATI balancer.
the blue line that runs in the middle of the hub represents the amount of distance the drill bit has to go. its about 4" or so of where the drill bit will be "free floating." basically the jig fits in the blower pulley (BP), but it will hit the end of the balancer assembly hub or the Serpentine Pulley (SP) (i cant remember which), but regardless of what it hits it will not allow it to mount to the crank like i thought its supposed to go. it seems kind of goofy they would design it where the actual jig doesnt mount to the crank itself, and make you use a ridiculously long drill bit... . is this how this type of fixture is supposed to work? if so, how the hell do you get your fingers inside that hub to place the pin and hammer it in. I dont see how this pin kit will work with an ATI balancer.
02-01-2013, 09:34 PM
#5
I pinned from the front because it was said to be stronger and less likely to shear the pins.
I would do it that way. The diagram below indicates the front pinning method.
If you get curious how I did it, you can youtube, ATI damper pinning and I should pop up with the vid. of how I did it. its not that bad.
I would do it that way. The diagram below indicates the front pinning method.
If you get curious how I did it, you can youtube, ATI damper pinning and I should pop up with the vid. of how I did it. its not that bad.

Trending Topics
02-02-2013, 01:18 PM
#8

I have used this exact kind of kit on an ATI dampner so let me ask this question first. When the balancer is full installed how far does the center hub stick out past the end of the crank snout where the bolt threads are? Mine sit out maybe 1/4 in or so just like stock and then just put the jig up to it and bolt it down. The back side of the jig has a small shoulder dosent it? Thats so that both inner and outter shoulders rest on the crank and pulley hob. I dont get where your coming up with 4in of free space as that would simply cause the bit to walk and break off. BOT you will be drilling on two different flat levels so the jig must be dead on top of both of them when drilling. I dont remember the ATI part # but its what came with the old Vortech supercharger kits when they were sold. Worked like a charm for me using a right angle air drill to work with.
02-02-2013, 01:43 PM
#9
With the way your saying, does the actual damper need to be unbolted from the balancer hub? We havent got the old one off yet. The crank bolt is being a bitch. Even with a breaker bar and a pipe on top of that its not coming loose, i dont wanna break the bolt off. So that's the problem were facing now. Yes the jig has a shoulder. For some reason i remember there being quite of bit of space between the the end of the hub and the end of the crank. From the way we were lookin at it, it looked like the jig would have to fit in the hub to mate to the crank in order for it to work. Let us get this bitch stock balancer off and get the ATI one installed and see what the jig looks like on it. Maybe Im just not picturing it correctly.
02-02-2013, 02:00 PM
#10
On The Tree
iTrader: (2)
Join Date: Aug 2008
Location: Western New York
Posts: 152
Likes: 0
Received 0 Likes
on
0 Posts
I machined a second keyway in the ATI hub and double keyed it 180 to each other with the ATI side pinning kit. I still can't understand why people go with the front kit.
02-03-2013, 11:39 AM
#12
Teching In
Thread Starter
iTrader: (2)
Join Date: Feb 2009
Location: Kokomo, IN
Posts: 18
Likes: 0
Received 0 Likes
on
0 Posts
Thanks for the replies so far. Much appreciated. Here is a video to hopefully show the spacing issues.
http://www.youtube.com/watch?v=IYYhx...ature=youtu.be
http://www.youtube.com/watch?v=IYYhx...ature=youtu.be
02-03-2013, 07:19 PM
#13
I understand now, yeah mine just fit inside the hub all the way down. Maybe get a machinist to chuck it up in a lathe and have it turned down to fit. Get a pair of calipers and see how much needs to be turned off and go from there. Thats the only way I see it working. GL.
02-03-2013, 11:35 PM
#15
for that not to fit as described in the video...either the damper is not right of the pinning kit is not right . Mine fell right into my ATI damper and I put my cracnk pulley bolt in to hold it and drilled. I had to drill further than what the procharger instructions said.
Last edited by I8UR4RD; 02-03-2013 at 11:44 PM.
02-04-2013, 07:34 AM
#16
I dunno. Its the balancer that came off my car when i had my procharger(namos bought my kit) Im the one describing what the problem is in the video. I didnt have issues with my pin kit because i went from.the side. Well just take the damper and jig to the local machine shop and tell em we need it to fit inside there. Prolly b like $15-20
02-05-2013, 12:30 PM
#17
Teching In
iTrader: (62)
Join Date: Jan 2002
Location: South Side Chicago
Posts: 20
Likes: 0
Received 0 Likes
on
0 Posts

When I installed my Procharger on my stock engine I did the side pin and double pinned it. When I took the engine apart for my stroker I noticed both pins were sheared. You will never have that problem with the front pin kit. I now have over a thousand HP and zero issues.
 02-27-2013, 04:10 PM
#19
Well i talked him into do a cam so we haven't put the damper back on yet. But, we did have the jig put on a lathe and now it fits inside the hub and lines up where its supposed to. I think Itll work fine now. Ill update when i get it on. Probably sometime next week hopefully. His car has been a slow process.