
Finally Done...New CETA & !Side Mold (56k watchout)
 03-30-2006, 04:41 PM
#1
TECH Fanatic
Thread Starter
iTrader: (9)

Join Date: Apr 2005
Location: ATL/Savannah Georgia
Posts: 1,395
Likes: 0
Received 0 Likes
on
0 Posts
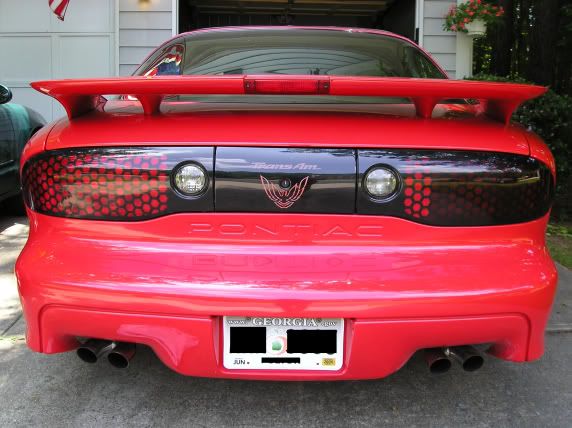
well some of you might have seen my pics from where my CETA bumper went wrong. I tried doin it outside and keepin it covered with a plastic tarp while drying but i had a run in with a dog. Some of the paint in one of the corners also started to run.
heres the original primer done outside:

that just didnt work out...so off goes the plastic...


This worked much better and I bought better paint. Heres the before and after comparison:
before:

after:

before:

after:

before:
after:

and the side molding gone:

its very glossy, almost as glossy as the taillights/center section. I waited a week and cleaned the new paint then used swirl remover and waxed it hardcore. Came out great.
Next up is stainless decals!
heres the original primer done outside:
that just didnt work out...so off goes the plastic...
This worked much better and I bought better paint. Heres the before and after comparison:
before:
after:
before:
after:
before:
after:
and the side molding gone:
its very glossy, almost as glossy as the taillights/center section. I waited a week and cleaned the new paint then used swirl remover and waxed it hardcore. Came out great.
Next up is stainless decals!
Last edited by JAvenger007; 03-30-2006 at 05:27 PM.

 03-30-2006, 05:23 PM
#3
TECH Fanatic
Thread Starter
iTrader: (9)
Join Date: Apr 2005
Location: ATL/Savannah Georgia
Posts: 1,395
Likes: 0
Received 0 Likes
on
0 Posts
yea im swappin to chrome ZO6s soon hopefully. !4x4 mod needs to be next.
i tried not to rush the second time and it was worth it. Took about half a day to prep, paint, and clear coat.
i tried not to rush the second time and it was worth it. Took about half a day to prep, paint, and clear coat.
 03-30-2006, 05:49 PM
#5
TECH Regular
iTrader: (2)
Join Date: Jul 2002
Location: NW Burbs, IL
Posts: 460
Likes: 0
Received 0 Likes
on
0 Posts

Great work! 
I'd love to do something like that to my car, but NBM doesn't go well with that appearance mod. Oh, and stainless badges rock. I got mine from dragon and get comments all the time.
I'd love to do something like that to my car, but NBM doesn't go well with that appearance mod. Oh, and stainless badges rock. I got mine from dragon and get comments all the time.
Trending Topics
03-30-2006, 06:29 PM
#9
TECH Fanatic
Thread Starter
iTrader: (9)
Join Date: Apr 2005
Location: ATL/Savannah Georgia
Posts: 1,395
Likes: 0
Received 0 Likes
on
0 Posts
i used duplicolor acrylic, i think was the name. It comes in the bigger cans for $5. Sandable primer from the same brand. And it took about 8 coats of gloss black and 6 coats of clear coat. The clear is also duplicolor.
Its a pretty decent quality but if i could of gotten my hands on something nicer, i would have. For example, a nice gloss black auto mix with a gravity gun would be nice.
Its a pretty decent quality but if i could of gotten my hands on something nicer, i would have. For example, a nice gloss black auto mix with a gravity gun would be nice.


 04-24-2006, 11:04 PM
#17
TECH Resident
Join Date: Aug 2005
Location: SW Florida
Posts: 821
Likes: 0
Received 0 Likes
on
0 Posts
how hard is it to get the rear bumper off and how do you do it? I am planning on doing my bumper this summer but want to take it off to do it...is it hard to get the bumper back on and aligned right?
04-25-2006, 02:15 AM
#18
TECH Fanatic
iTrader: (1)
Join Date: Jul 2005
Location: houston tx
Posts: 1,244
Likes: 0
Received 0 Likes
on
0 Posts
Originally Posted by JAvenger007
well some of you might have seen my pics from where my CETA bumper went wrong. I tried doin it outside and keepin it covered with a plastic tarp while drying but i had a run in with a dog. Some of the paint in one of the corners also started to run.
heres the original primer done outside:
that just didnt work out...so off goes the plastic...
This worked much better and I bought better paint. Heres the before and after comparison:
before:
after:
before:
after:
before:
after:
and the side molding gone:
its very glossy, almost as glossy as the taillights/center section. I waited a week and cleaned the new paint then used swirl remover and waxed it hardcore. Came out great.
Next up is stainless decals!
04-25-2006, 07:34 PM
#19
TECH Fanatic
Thread Starter
iTrader: (9)
Join Date: Apr 2005
Location: ATL/Savannah Georgia
Posts: 1,395
Likes: 0
Received 0 Likes
on
0 Posts
young gun-
you just unbolt the bumper and then bolt it back up. Its just plastic so theres really no aligning for it. Theres 4 10mm bolts inside (one on each corner and one on each side below fender) and a bunch of clips on the bottom and under the taillights (which you have to remove). Theres also some phillips screws in the fender wells and bolts inside the wells for the ends of the bumper. Basically just remove the lights and the trunk carpet/spare tire and then observe where the bumper is connected. When in doubt look for a bolt. None of it is glued so just look for bolts/clips. Goodluck.
you just unbolt the bumper and then bolt it back up. Its just plastic so theres really no aligning for it. Theres 4 10mm bolts inside (one on each corner and one on each side below fender) and a bunch of clips on the bottom and under the taillights (which you have to remove). Theres also some phillips screws in the fender wells and bolts inside the wells for the ends of the bumper. Basically just remove the lights and the trunk carpet/spare tire and then observe where the bumper is connected. When in doubt look for a bolt. None of it is glued so just look for bolts/clips. Goodluck.