
Painting the interior plastic trim?
 04-15-2006, 07:03 PM
#1
TECH Resident
Thread Starter
iTrader: (1)

Join Date: Jul 2004
Location: Henderson, NC
Posts: 854
Likes: 0
Received 0 Likes
on
0 Posts
I know I saw a post on here somewhere that showd pics of a blackinterior with silver painted trim panels etc.
I looked through about `10 pages and couldnt; find it anywhere.
If you have painted the interior trim peices.. * around the air conditioning and radio, the door handles area, the shifter center console area etc..*
Could you please pm me a how-to instructions thing?
I think I remember them saying you need to use like 220 grit sandpaper to roughen them up, then just use vinyl,plastic spray paint? I want to make it silver To match the exterior vinyls I added. Then what do you put on after the silver? a clear coat spray of something?
Should I get this stuff at like wal-mart in a crafts section or know of a better place like home depot or something?
Thanks for your time.
I looked through about `10 pages and couldnt; find it anywhere.
If you have painted the interior trim peices.. * around the air conditioning and radio, the door handles area, the shifter center console area etc..*
Could you please pm me a how-to instructions thing?
I think I remember them saying you need to use like 220 grit sandpaper to roughen them up, then just use vinyl,plastic spray paint? I want to make it silver
To match the exterior vinyls I added. Then what do you put on after the silver? a clear coat spray of something? Should I get this stuff at like wal-mart in a crafts section or know of a better place like home depot or something?
Thanks for your time.
 04-15-2006, 09:58 PM
#2
TECH Enthusiast
iTrader: (5)
Join Date: Oct 2005
Location: Denver
Posts: 676
Likes: 0
Received 0 Likes
on
0 Posts
I did all that jazz inmy Grand Am. You dont need to sand anything since it already is a rough surface. Wash them all REALLY well with dish soap to get ALL of the armorall etc off.
I usually did a basecoat like silver or primer. In your case Id do a primer coat to allow the silver to stick a little bit better. I really only needed 2 coats. Silver covers really nicely. Do a coat let it dry, do another coat let it dry and see how it looks. If it needs another coat then do it up. Let it dry and do a clear coat (I did gloss on my Grand Am). I did 2 coats of clear as well. Just make sure to tack wrag it as well before you do the primer.
As long as the surface isnt contaminated and the coats are able to dry properly you shouldnt have a problem. I wouldnt use the paint in the crafts section of walmart. Use the stuff in the modeling area. Model paint works AWESOME...again dont use crafts paint.
04-15-2006, 10:12 PM
#3
TECH Addict
iTrader: (17)

Join Date: Dec 2002
Location: Hanover, MD
Posts: 2,190
Likes: 0
Received 0 Likes
on
0 Posts

Originally Posted by ecko70
I did all that jazz inmy Grand Am. You dont need to sand anything since it already is a rough surface. Wash them all REALLY well with dish soap to get ALL of the armorall etc off.
I usually did a basecoat like silver or primer. In your case Id do a primer coat to allow the silver to stick a little bit better. I really only needed 2 coats. Silver covers really nicely. Do a coat let it dry, do another coat let it dry and see how it looks. If it needs another coat then do it up. Let it dry and do a clear coat (I did gloss on my Grand Am). I did 2 coats of clear as well. Just make sure to tack wrag it as well before you do the primer.
As long as the surface isnt contaminated and the coats are able to dry properly you shouldnt have a problem. I wouldnt use the paint in the crafts section of walmart. Use the stuff in the modeling area. Model paint works AWESOME...again dont use crafts paint.
I usually did a basecoat like silver or primer. In your case Id do a primer coat to allow the silver to stick a little bit better. I really only needed 2 coats. Silver covers really nicely. Do a coat let it dry, do another coat let it dry and see how it looks. If it needs another coat then do it up. Let it dry and do a clear coat (I did gloss on my Grand Am). I did 2 coats of clear as well. Just make sure to tack wrag it as well before you do the primer.
As long as the surface isnt contaminated and the coats are able to dry properly you shouldnt have a problem. I wouldnt use the paint in the crafts section of walmart. Use the stuff in the modeling area. Model paint works AWESOME...again dont use crafts paint.
Bryan
04-15-2006, 10:27 PM
#4
TECH Enthusiast
iTrader: (5)
Join Date: Oct 2005
Location: Denver
Posts: 676
Likes: 0
Received 0 Likes
on
0 Posts
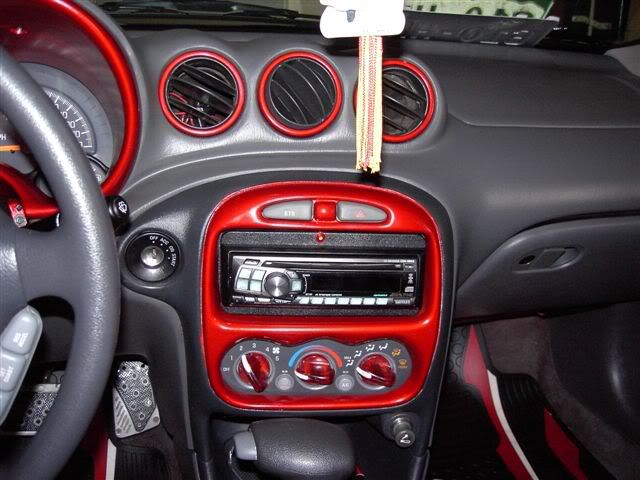
Either way it will come out fine. I did not sand mine at all and it came out pretty darn good looking. If you want that smooth look then sand away. Let me see if I can get some pictures.
Here we go
Here we go
04-15-2006, 10:31 PM
#5
TECH Enthusiast
iTrader: (5)
Join Date: Oct 2005
Location: Denver
Posts: 676
Likes: 0
Received 0 Likes
on
0 Posts
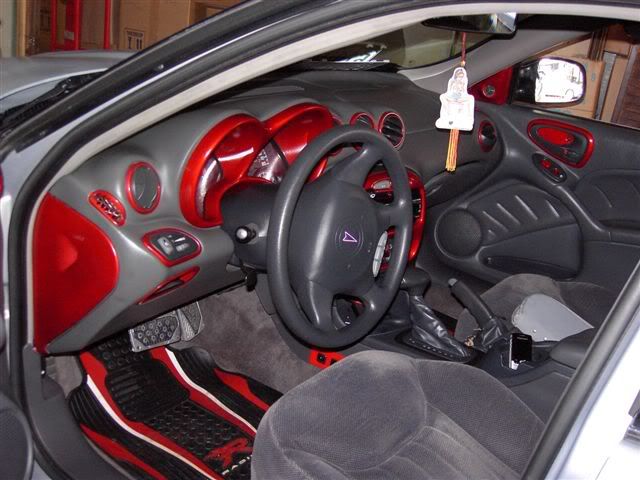
I changed it back to black which looks SO much better.
Ok and I will agree with Par...I had to sand for the black because I didnt want any red.
It does look better

Ok and I will agree with Par...I had to sand for the black because I didnt want any red.
It does look better
04-15-2006, 10:53 PM
#7

I am about to do this to my own car.
Here is what I am going to do. First, clean the plastic with a strong cleaner that doesnt leave any residue. Then wet sand with 600 grit or higher sandpaper, as I will be using laquer which dries very thin. In my experience, anything lower than 600 and you will see scratches with laquer. They lady and the paint store gave me adhesion promoter, which I`ll use after sanding. I`ll then apply the laqeur in very thin coats.
I would only use hobby paints if you are planning to use flat black or silver. Hobby paints are usually enamel, and are thick and very transparent. Unless you are going to use Tamiya or Testor`s "Custom Laquer" series paints, I would steer clear of hobby/model paints.
Trending Topics
04-16-2006, 08:58 AM
#8
TECH Resident
Thread Starter
iTrader: (1)
Join Date: Jul 2004
Location: Henderson, NC
Posts: 854
Likes: 0
Received 0 Likes
on
0 Posts
So if I want that grainy look/pebble then don't sand it.. The adhesion promotor.. I should use that below the primer? 1 coat primer, 2 coats paint, 2 coats clear?
Haha. I can see it now lol.. Now is when I wish I had a beater car to test this on first )
Haha. I can see it now
lol.. Now is when I wish I had a beater car to test this on first )
04-16-2006, 09:08 AM
#9
TECH Addict
iTrader: (17)
Join Date: Dec 2002
Location: Hanover, MD
Posts: 2,190
Likes: 0
Received 0 Likes
on
0 Posts
Originally Posted by Dentalguy
So if I want that grainy look/pebble then don't sand it.. The adhesion promotor.. I should use that below the primer? 1 coat primer, 2 coats paint, 2 coats clear?
Haha. I can see it now lol.. Now is when I wish I had a beater car to test this on first )
Haha. I can see it now
lol.. Now is when I wish I had a beater car to test this on first )Bryan
04-16-2006, 11:00 AM
#10
Teching In

Join Date: Apr 2006
Posts: 17
Likes: 0
Received 0 Likes
on
0 Posts
Please take my advice on this as I just did this to my car. You can sand and still keep some of the grain which looks great. Follow these steps my friend.
Supplies
5 x Dupli color GM silver
1 x dupli color adhesion promoter
1 x dupli color sandable primer(works good because it's a black primer)
4 x dupli color cleart coat
7 x 220 grit sand paper
7 x 600 grit sand paper
7 x 1200 grit sand paper
Procedure
1 - wash all of the trim pieces, soapy water will do
2 - start sanding with 220, usually takes about 30 min, follow with 600(about 10-15 minutes), and then 1200 (about 10 minutes)
3 - when all the sanding is done go and wash the pieces again, wash them well this time
4 - get some rubbing alcohol and wipe down the pieces with that, this will remover all the **** that the water and soap didnt get
5 - apply 2 thin coats of adhesion promoter
6 - apply 2-3 thin coats of primer
7 - THIS IS IMPORTANT - apply 6-7 thin coats of silver, yes, i said 6-7. Silver is a very transparent color and even when you think you're done painting, you're not really done, you'll notice afterwards trust me. USE 6-7 thin coats.
8 - Let them dry for 24 hours, and keep them in a place where no dust will get on them, very lightly wipe them off when you're ready, and add 4-5 coats of clear, 3 coats will look very glossy and shinny but that's because it will be wet. 5 coats is your best bet and will give you more protection against scratches and the likes.
9 - let it dry for 48 hours(trust me)
You're done! Take your time and apply the paint and clear in 15 minute incriments, the adhesion promoter should be sticky when applying the primer, and the primer should be sticky when applying the paint. Don't expect to start and get this done in one day, it take a few days of prep work and a weekend to paint and let the paint dry for the clear. Good luck
04-16-2006, 11:00 AM
#11
Originally Posted by parbreak
I use a professional adhesion promoter called Bulldog
Bryan
Bryan
Cool. That is the same stuff they gave me at the paint store. Using this stuff, how hard is it to scratch the paint off once it dries? This is really a concern of mine. It`s gonna suck if it starts coming off and you can tell that its painted.
04-16-2006, 12:23 PM
#12
TECH Addict
iTrader: (17)
Join Date: Dec 2002
Location: Hanover, MD
Posts: 2,190
Likes: 0
Received 0 Likes
on
0 Posts
If you prep and by prep I mean at least sand a little and clean the pieces well, that paint will never come off unless abused. I have been using Bulldog for about 3-4 years now and mix it in EVERYTHING I use from primer to base coat to clearcoat. Not only is it an adhesion promoter for the initial primer coat, but it's also a "tie coat" which means it provides a chemical bond between subsequent layers of base and clear. For instance, most paint companies will recommend that you apply clearcoat within 45-60 minutes of the base coat so that the clear will adhere to a non-cured base for a chemical bond. With Bulldog you could and I have waited a week or more before clearing and there is no sanding needed.
Bryan
parbreak
Bryan
parbreak
04-16-2006, 12:34 PM
#13
Banned
iTrader: (92)
Join Date: Sep 2004
Location: Atlanta
Posts: 7,757
Likes: 0
Received 0 Likes
on
0 Posts
Definately with parbreak on this one. You need to sand the pieces first. The devil is in the details. A slick surface is a must... just like if you're painting a car or polishing metal. The majority of work is in the sanding. The better the sanding, the better the finished product.
If you did one piece the lazy way (no sanding) and left the grain, and the other spending 4 times the amount of effort.... You'd see immediately.
Also, try not to paint everything. Too much paint can be, well...too much. ~Joshua
If you did one piece the lazy way (no sanding) and left the grain, and the other spending 4 times the amount of effort.... You'd see immediately.
Also, try not to paint everything. Too much paint can be, well...too much. ~Joshua
04-16-2006, 01:12 PM
#14
TECH Addict
iTrader: (17)
Join Date: Dec 2002
Location: Hanover, MD
Posts: 2,190
Likes: 0
Received 0 Likes
on
0 Posts
Here's something you guys may find interesting concerning sanding and painting interior pieces. Did you know that the plastic pieces can be sanded to such a fine degree that you can actually polish them.

This one is not in pristine condition anymore as I have pulled a few molds from it(you can see resin drips, etc), but basically when it was first done, it shined like clearcoat. Doesn't make for a very appealing finish as it's basically just dark gray but nonetheless anything's possible if you experiment a little.
Bryan
04-16-2006, 01:15 PM
#15
Banned
iTrader: (92)
Join Date: Sep 2004
Location: Atlanta
Posts: 7,757
Likes: 0
Received 0 Likes
on
0 Posts
Originally Posted by parbreak
Here's something you guys may find interesting concerning sanding and painting interior pieces. Did you know that the plastic pieces can be sanded to such a fine degree that you can actually polish them.
Doesn't make for a very appealing finish as it's basically just dark gray but nonetheless anything's possible if you experiment a little.
Bryan
Doesn't make for a very appealing finish as it's basically just dark gray but nonetheless anything's possible if you experiment a little.
Bryan
04-16-2006, 06:34 PM
#16
TECH Resident
Thread Starter
iTrader: (1)
Join Date: Jul 2004
Location: Henderson, NC
Posts: 854
Likes: 0
Received 0 Likes
on
0 Posts
I guess my only real concern about the painting, is if at a later date I wanted to remove the paint and go back to the stock color. Guess its a do or die sorta thing. I'll have to really make sure I want to do this Ill post another forum request asking for someoen to post pics of their silver and black interior
Ill post another forum request asking for someoen to post pics of their silver and black interior