
Motor mount plates
 06-11-2007, 01:41 PM
#1
Launching!
Thread Starter
iTrader: (9)
Join Date: May 2007
Location: Hattiesburg, MS
Posts: 215
Likes: 0
Received 0 Likes
on
0 Posts

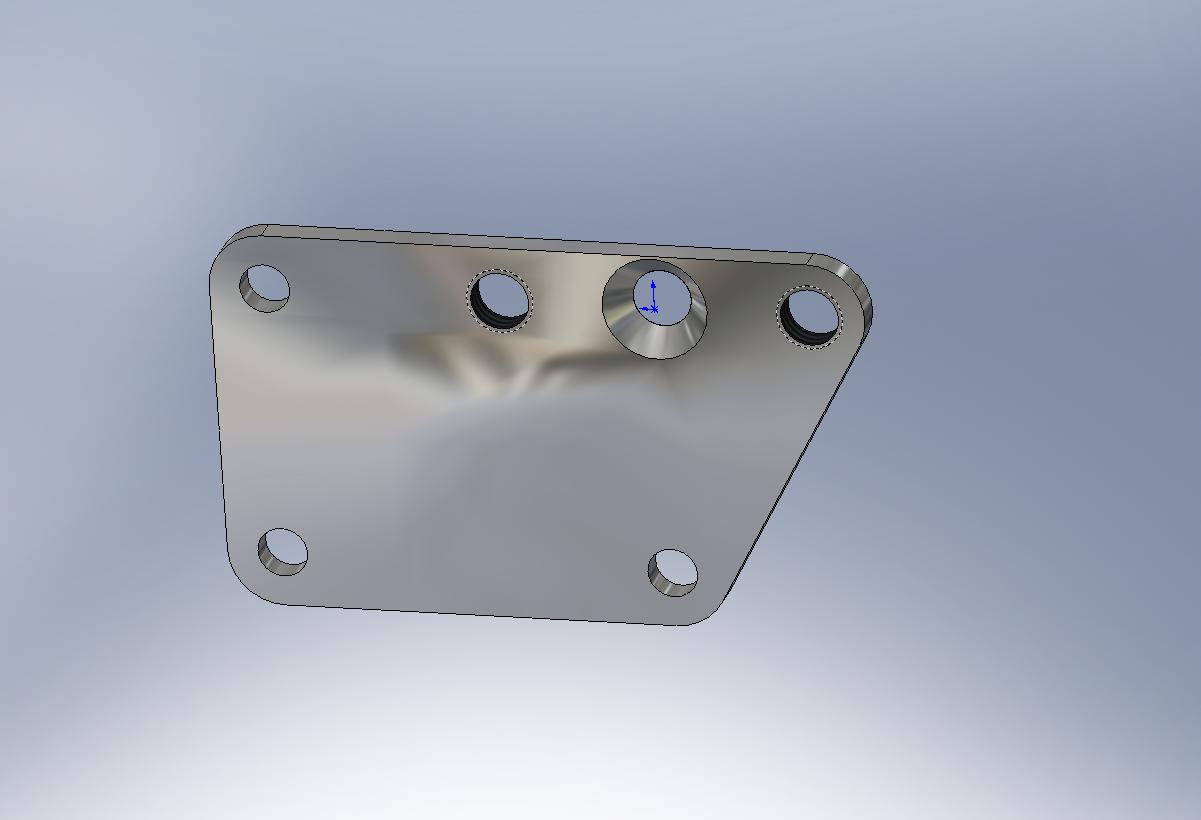
I found this mount on the sticky. My questions are typed on the pic. Are the two holes that say countersink supposed to be tapped and the one between the two countersunk. That's the way i see it on the s&p mount plate. Also the dimension was cut off the side. is the distance supposed to be 3.125" on this.
Ok I don't know how to attach images. Someone give me their email so i can send the pic then attach it for me.
Thanks,
Eric
Ok I don't know how to attach images. Someone give me their email so i can send the pic then attach it for me.
Thanks,
Eric
 06-11-2007, 04:35 PM
#3
If your talking about the spacing between the upper and lower holes.. yes it is 3.125, this is the same spacing as on the Block mounting bosses.
The one that is stated as to be contersinked.. is so you can thread a bolt or stud in it to mount the motor mount. If using a bolt from the rear.. the hex head will come into contact with the block and therefor if you contersink it and use a flat/taper headed bolt, it will clear.
There are other option, just be creative on how you build them and check to make sure they are strong enough and all clears.
06-11-2007, 05:50 PM
#4
Staging Lane
iTrader: (2)
Join Date: Dec 2006
Location: Long Beach, CA
Posts: 79
Likes: 0
Received 0 Likes
on
0 Posts
Yea, like bczee said, as long as they clear and fit, you should be ok. You can find dimensions on the LS1 conversion manual that GM sells. Here is a sample of the adapter that I made using the template here as a starting point.
06-12-2007, 03:24 PM
#5
Launching!
Thread Starter
iTrader: (9)
Join Date: May 2007
Location: Hattiesburg, MS
Posts: 215
Likes: 0
Received 0 Likes
on
0 Posts
Thanks guys. I started on them today. Got a question... What size bolts go into the ls block. I know the old block had 3/8" bolts. I know it's metric just not sure what size. also how long do the studs need to be. How long do the bolts need to be that go in the block. My plate is 1/4". I wish I knew how to attach images. I would attach a pic of my plate that I started.
06-12-2007, 03:30 PM
#6

all hardware is m10. reccommended 30-35mm long or bolts going into block.
if you tap the plates for the sbc mount, use 18-20 mm length.
for the countersink bolt (flathead bolt) use a 35-40mm length, since they measure from the top of head and not bottom like hex.
the angle on the countersinkis 90 deg.
i recommend copying that 3d model where only one hole is countersunk and the two for the sbc mount are tapped (m10 preferrably)
i made mine just like that 3d model, but i had to use an 82 deg countersink (standard) because i dont have 90 deg (metric). the plate fits fine. i just had to drop the countersink deeper
if you like ill send you a pdf of my autocad dwg that i used. dims and everything
06-12-2007, 05:00 PM
#7
Staging Lane
iTrader: (2)
Join Date: Dec 2006
Location: Long Beach, CA
Posts: 79
Likes: 0
Received 0 Likes
on
0 Posts
Hey earthquake, if you want to upload a photo:
1.) click on "go advanced"
2.) click on "manage attachments" at the very bottom
3.) upload your photos (must be less than 100kb, I think), you may have to use a photo editor.
4.) Open the uploaded photo and copy the web address - Example: "https://ls1tech.com/forums/newreply.php"
6.) Paste the web address on your message.
5.) Place "[IMG]" in front of the web address and "[/IMG]" at the end of the address with no spaces.
6.) Your Done!
Trending Topics
06-13-2007, 07:34 AM
#8
Launching!
Thread Starter
iTrader: (9)
Join Date: May 2007
Location: Hattiesburg, MS
Posts: 215
Likes: 0
Received 0 Likes
on
0 Posts
Got pics. The plates are not finished yet. Still need to countersink the one hole between the tapped holes. What size holes did you guys drill for the plate. for my studs I just tapped it 3/8" and I will put 3/8" studs in it since it's free.. I will have to go get some metric bolts to bolt the plate up.
06-13-2007, 03:03 PM
#9
i used all m10 stuff. i used a conversion chart to find what size drill bit to use. worked out TIGHT. very snug clearances no play. itll perform good. unfortunately my sbc mount have a rib on the back of them so the ears are going to be bent down when i torque them.