
How to install headers
 07-03-2007, 12:52 AM
#1
On The Tree
Thread Starter
iTrader: (4)

Join Date: May 2007
Location: Denton, TX
Posts: 175
Likes: 0
Received 0 Likes
on
0 Posts
This is my guide to installing headers.
Tools Needed
Little wrench with 10mm fitting.
Long wrench with 10mm fitting.
Breaker(torque) bar (Bar that will go over the wrench to apply more pressure)
Your choice of lubricant to break the bolts AKA WD-40. Or PB blaster.
2 Jack stands.
A jack. (i used a 2 1/4 ton jack to get the car nice and high)
Wood. (Thick wood) to put under the jack stands for more height and to jack the car up higher.
If you're changing spark plugs with this, a Spark plug wrench fitting.
3' fitting
I needed a swivel joint, you may not.. may have just been the tools we used
A 15 mm fitting.
An 11 mm fitting
A 7mm fitting (for heat shields if room is needed)
2 (i used 24") 02 extensions for your 02 sensors
(Optional whether you buy new gaskets or not, some people choose to re-use their old ones)
If changing spark plugs you'll probably need some boot protector and something i can't think of right now for the threads of the spark plug (i'm not an ACE on spark plugs so i'll leave that for someone else to tell me, i had my friend do them so i'm not including how to do them in this write up)
You NEED a friend to help you, i promise it goes so much smoother
A lot of time and patience. All can go smooth if you don't run into problems.
Things to do first.
1. You want to make sure your E-Brake is on. If you're a manual, put it in first gear and turn the car off. For you auto guys, Park. E-brake.
2. Next, disconnect the negative cable from the battery.
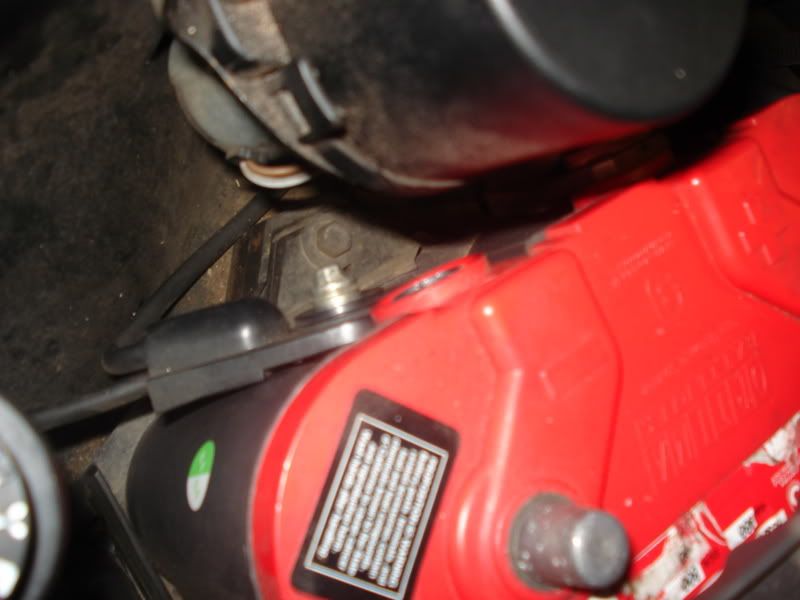
I put a picture up for the sake of remembering to disconnect the DAMN battery, please don't kill yourself.
Lets get started
3. Jack the car up nice and high so you can have some room... I'm assuming everyone here knows how to jack their car up so i won't go into too much detail other than jack the car up (left or right) whichever you choose but then stabilize the other side with the exact jack height of the opposite side. This is for stability and safety. Once you think you have plenty of room to work with leave the jack under or near where you placed the jack stand for safety.
Also... you really should test the car out before you go ahead and get under the car... hit the jack stands a couple of times, move the car around, make sure you're not going to get crushed by your transmission.
4. Time to get the rusted *** Y pipe off. I believe you'll need your 15 mm and 10 mm for the majority of this work. If you prefer use the WD-40/PB blaster. Spray the bolt and nut of the clamp that connects the Y pipe to your I and spray the header bolts and nuts so they can have some time to soak up. Get your 15mm and take that clamp off that is connected to your I-pipe and move the clamp down the I, out of the way...
5. Disconnect the driver side piping. (the flatter pipes).. Since your Cat is connected separately i recommend just removing those bolts first, so you're not disconnecting so much weight all at the same time. Next get the passenger side. There are bolts and support that is connected to your Y-pipe towards the passenger side, you're going to want to go ahead and take these bolts off and support brackets, i believe it's like 4 or 5 bolts. While you're doing this disconnect the 02 sensor behind the passenger side Cat.
6. Now you want to completely disconnect the header and the Y-pipe so get your 15 mm take the three nuts off that connect to the header and Y. While you're doing this be careful because once the y-pipe is disconnected from the headers there will be a lot of weight coming down on your I-pipe so you want to be sure to pull the pipes apart as soon as you get those nuts off.
ON a side note.... There are 4 02 sensors that you will need to be disconnecting so get a wrench (preferably one without teeth) and get those suckers off.
7. Disconnect the drivers side catalytic converter. Simple enough, same as the Y-pipe to the header, use a 15mm to get the 3 nuts off.. and be careful while you're doing it because if you're not and you use TOO much muscle and not enough WD-40, this can happen
8. Now this is the optional part but recommended to do while you're in there. Changing the spark plugs (i was told that you NEED to get the spark plugs out to get the headers out but i'm not 100% sure so don't take my word for it)
First you want to take off your spark wires, just give them a good tugging (all 8 of them)... and then proceed to take out the spark plugs.
Spark plug Wires ^^^
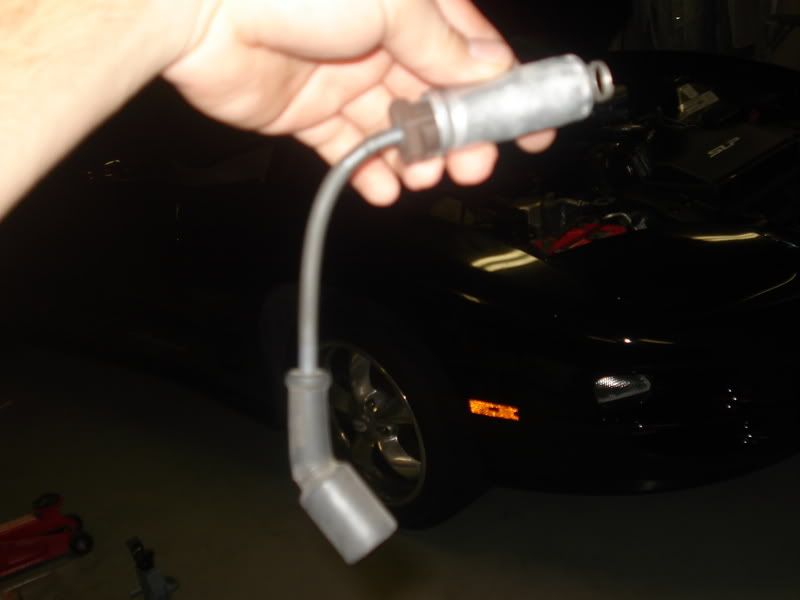
9. After you went through hell getting that 8th spark plug out on the passenger side... you want to go ahead and get all of the EGR and Air fitting **** out of your way. Unbolt that stuff and put it aside if you're going to re-use it, and if not... you could probably make a great beer bong out of the tubing although not recommended.

Here's an air fitting ^^, i didnt have EGR **** so i can't get you and pictures sorry.
10. Now it's the fun time, use your PB blaster/WD-40 on all of those header bolts after you pry them out a bit, it will help. Get your 10mm and your breaker(torque) bar. (you might want to lower the car for this portion because all of the bolts on the drivers side are done from the top of the car however if you're 7 feet tall you should be good. Get all 6 of those bolts undone and make sure you have a friend holding the drivers side header as you unscrew the last one as you don't want to mess some **** up.
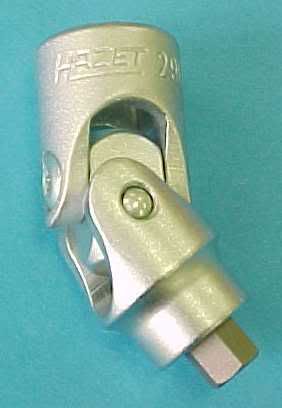
11. I personally got all four bolts on the passenger side undone from the top of the car, but i don't think it's humanly possible to do that for the 5th and 6th but try it out. Once again jack the car up, go through your safety kicking.. and get up in to that 5th and 6th despicable bolt... For this I personally needed a wrench extension and a swivel joint, for all of you who do not know what that is... here.
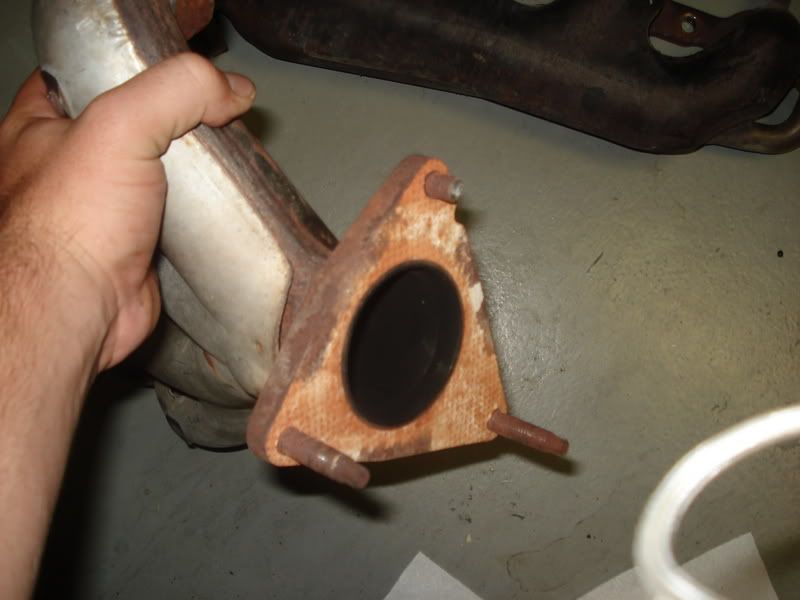
Once you finally go through that hell hole of a process you have done it, you've successfully undone your stock headers. Give yourself a pat on the back.. and take a breather. While you're taking your breather look at your old gaskets and see if you'd rather not re-use those. I know I didn't.
12. Now, your car is jacked up high, you have a friend on call, have your friend hand you the passenger side headers while you're under the car... MOST headers passenger side fit like a damn glove, it's easy, simple, and painless, but the hard part is holding it up there while your friend gets the gaskets on and puts the bolts in at the same time. When my friend and i did this, we started putting the first and last bolts in first, and tightened them up but not all the way, i've heard it's more effective to do the bolts from the inside and work your way outside after the headers are stable. So put 3 and 4 in, screw them in nice and good On a side note if you're reusing your old bolts then you want to clean the **** out of the threads, i used a knife to get most of that junk out, fingernails work, goo gone, whatever works for you. After 3 and 4, get 5 and 2, and then bolt in 1 and 6. Make sure they're nice and tight. IMPORTANT! in a couple of weeks after you've run the ***** off of your car feeling the unexplored power, your bolts will begin to loosen themselves due to heat, so after a week re-tighten those ******* good because you don't want to blow a gasket.
Make sure your headers have good clearance with your K-member, i know i didnt and i'll pay for that, and if your headers are hitting your K-member you may want to check out this write up. https://ls1tech.com/forums/generation-iii-external-engine/500407-egr-air-o2-sensors-motor-tranny-mount-faq.html You may need motor mounts or the headers you bought aren't a good fit. I know that i'll be installing motor mounts soon because i fucked up and i don't get clearance of my k-member with my QTP's passenger side.
13. Now you want to install the Drivers side headers, once again i've heard you need to disconnect the steering linkage so your headers will have room to get up in there, did it and had no problems. To do that you need to put in your keys and turn them so you can unlock your steering wheel and wheels.... here's a picture, you'll need an 11mm and a lot of muscle and patience, and a 10m to let the steering linkage adjust.
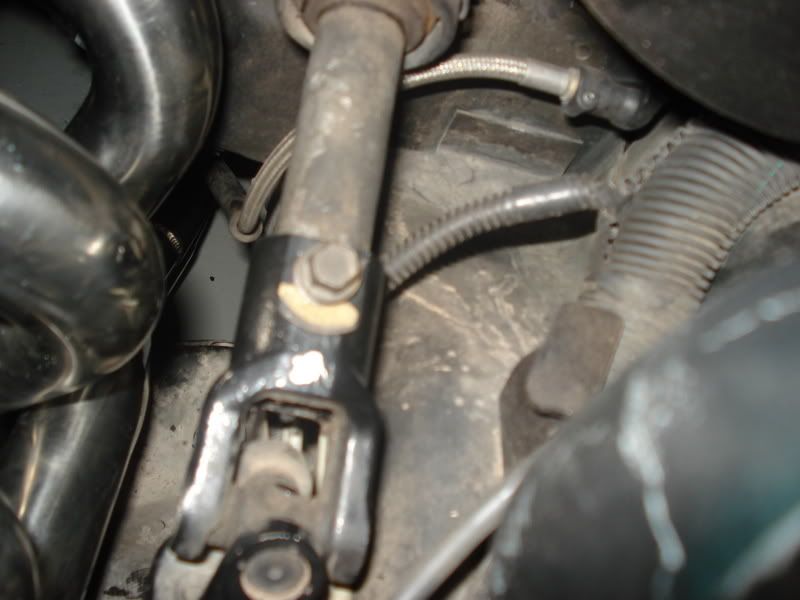
Loosen that first ^^^^
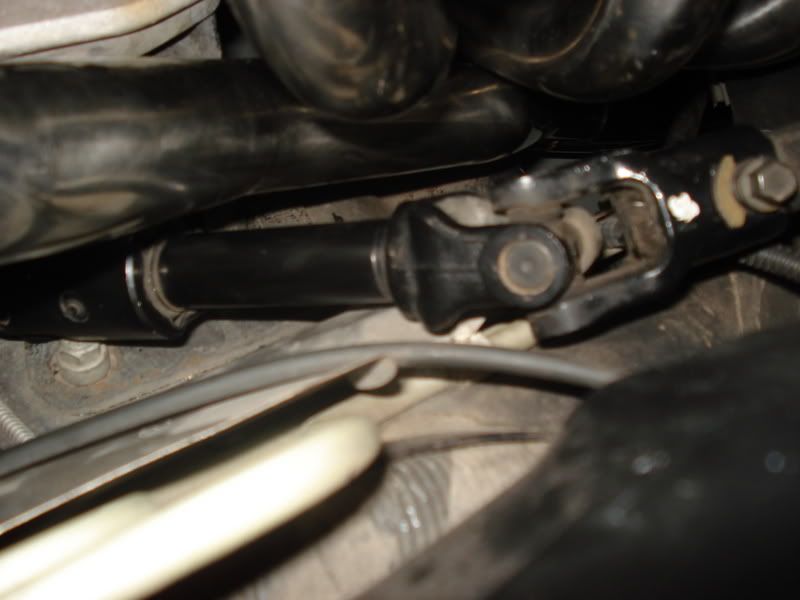
put that up against the frame.
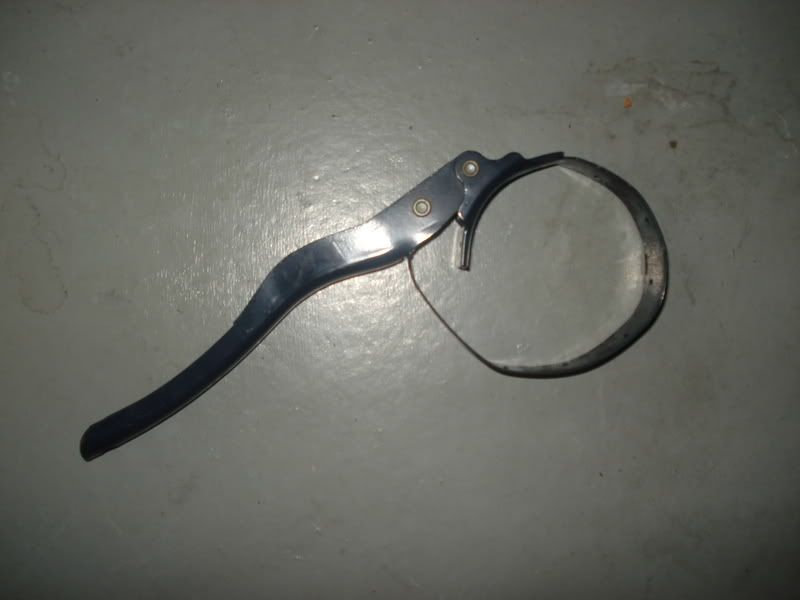
14. Now take your oil filter off, make sure you have a bucket or something under it to catch the oil coming from your oil filter, you'll just lose the oil that's already in your filter, so don't worry too much. Here's the tool you need. (we used this, unless you have bear claws i think you'll need it too)
After you get that off, this is the tricky part.
Tools Needed
Little wrench with 10mm fitting.
Long wrench with 10mm fitting.
Breaker(torque) bar (Bar that will go over the wrench to apply more pressure)
Your choice of lubricant to break the bolts AKA WD-40. Or PB blaster.
2 Jack stands.
A jack. (i used a 2 1/4 ton jack to get the car nice and high)
Wood. (Thick wood) to put under the jack stands for more height and to jack the car up higher.
If you're changing spark plugs with this, a Spark plug wrench fitting.
3' fitting
I needed a swivel joint, you may not.. may have just been the tools we used
A 15 mm fitting.
An 11 mm fitting
A 7mm fitting (for heat shields if room is needed)
2 (i used 24") 02 extensions for your 02 sensors
(Optional whether you buy new gaskets or not, some people choose to re-use their old ones)
If changing spark plugs you'll probably need some boot protector and something i can't think of right now for the threads of the spark plug (i'm not an ACE on spark plugs so i'll leave that for someone else to tell me, i had my friend do them so i'm not including how to do them in this write up)
You NEED a friend to help you, i promise it goes so much smoother
A lot of time and patience. All can go smooth if you don't run into problems.
Things to do first.
1. You want to make sure your E-Brake is on. If you're a manual, put it in first gear and turn the car off. For you auto guys, Park. E-brake.
2. Next, disconnect the negative cable from the battery.
I put a picture up for the sake of remembering to disconnect the DAMN battery, please don't kill yourself.
Lets get started
3. Jack the car up nice and high so you can have some room... I'm assuming everyone here knows how to jack their car up so i won't go into too much detail other than jack the car up (left or right) whichever you choose but then stabilize the other side with the exact jack height of the opposite side. This is for stability and safety. Once you think you have plenty of room to work with leave the jack under or near where you placed the jack stand for safety.
Also... you really should test the car out before you go ahead and get under the car... hit the jack stands a couple of times, move the car around, make sure you're not going to get crushed by your transmission.
4. Time to get the rusted *** Y pipe off. I believe you'll need your 15 mm and 10 mm for the majority of this work. If you prefer use the WD-40/PB blaster. Spray the bolt and nut of the clamp that connects the Y pipe to your I and spray the header bolts and nuts so they can have some time to soak up. Get your 15mm and take that clamp off that is connected to your I-pipe and move the clamp down the I, out of the way...
5. Disconnect the driver side piping. (the flatter pipes).. Since your Cat is connected separately i recommend just removing those bolts first, so you're not disconnecting so much weight all at the same time. Next get the passenger side. There are bolts and support that is connected to your Y-pipe towards the passenger side, you're going to want to go ahead and take these bolts off and support brackets, i believe it's like 4 or 5 bolts. While you're doing this disconnect the 02 sensor behind the passenger side Cat.
6. Now you want to completely disconnect the header and the Y-pipe so get your 15 mm take the three nuts off that connect to the header and Y. While you're doing this be careful because once the y-pipe is disconnected from the headers there will be a lot of weight coming down on your I-pipe so you want to be sure to pull the pipes apart as soon as you get those nuts off.
ON a side note.... There are 4 02 sensors that you will need to be disconnecting so get a wrench (preferably one without teeth) and get those suckers off.
7. Disconnect the drivers side catalytic converter. Simple enough, same as the Y-pipe to the header, use a 15mm to get the 3 nuts off.. and be careful while you're doing it because if you're not and you use TOO much muscle and not enough WD-40, this can happen
8. Now this is the optional part but recommended to do while you're in there. Changing the spark plugs (i was told that you NEED to get the spark plugs out to get the headers out but i'm not 100% sure so don't take my word for it)
First you want to take off your spark wires, just give them a good tugging (all 8 of them)... and then proceed to take out the spark plugs.
Spark plug Wires ^^^
9. After you went through hell getting that 8th spark plug out on the passenger side... you want to go ahead and get all of the EGR and Air fitting **** out of your way. Unbolt that stuff and put it aside if you're going to re-use it, and if not... you could probably make a great beer bong out of the tubing although not recommended.
Here's an air fitting ^^, i didnt have EGR **** so i can't get you and pictures sorry.
10. Now it's the fun time, use your PB blaster/WD-40 on all of those header bolts after you pry them out a bit, it will help. Get your 10mm and your breaker(torque) bar. (you might want to lower the car for this portion because all of the bolts on the drivers side are done from the top of the car however if you're 7 feet tall you should be good. Get all 6 of those bolts undone and make sure you have a friend holding the drivers side header as you unscrew the last one as you don't want to mess some **** up.
11. I personally got all four bolts on the passenger side undone from the top of the car, but i don't think it's humanly possible to do that for the 5th and 6th but try it out. Once again jack the car up, go through your safety kicking.. and get up in to that 5th and 6th despicable bolt... For this I personally needed a wrench extension and a swivel joint, for all of you who do not know what that is... here.
Once you finally go through that hell hole of a process you have done it, you've successfully undone your stock headers. Give yourself a pat on the back.. and take a breather. While you're taking your breather look at your old gaskets and see if you'd rather not re-use those. I know I didn't.
12. Now, your car is jacked up high, you have a friend on call, have your friend hand you the passenger side headers while you're under the car... MOST headers passenger side fit like a damn glove, it's easy, simple, and painless, but the hard part is holding it up there while your friend gets the gaskets on and puts the bolts in at the same time. When my friend and i did this, we started putting the first and last bolts in first, and tightened them up but not all the way, i've heard it's more effective to do the bolts from the inside and work your way outside after the headers are stable. So put 3 and 4 in, screw them in nice and good On a side note if you're reusing your old bolts then you want to clean the **** out of the threads, i used a knife to get most of that junk out, fingernails work, goo gone, whatever works for you. After 3 and 4, get 5 and 2, and then bolt in 1 and 6. Make sure they're nice and tight. IMPORTANT! in a couple of weeks after you've run the ***** off of your car feeling the unexplored power, your bolts will begin to loosen themselves due to heat, so after a week re-tighten those ******* good because you don't want to blow a gasket.
Make sure your headers have good clearance with your K-member, i know i didnt and i'll pay for that, and if your headers are hitting your K-member you may want to check out this write up. https://ls1tech.com/forums/generation-iii-external-engine/500407-egr-air-o2-sensors-motor-tranny-mount-faq.html You may need motor mounts or the headers you bought aren't a good fit. I know that i'll be installing motor mounts soon because i fucked up and i don't get clearance of my k-member with my QTP's passenger side.
13. Now you want to install the Drivers side headers, once again i've heard you need to disconnect the steering linkage so your headers will have room to get up in there, did it and had no problems. To do that you need to put in your keys and turn them so you can unlock your steering wheel and wheels.... here's a picture, you'll need an 11mm and a lot of muscle and patience, and a 10m to let the steering linkage adjust.
Loosen that first ^^^^
put that up against the frame.
14. Now take your oil filter off, make sure you have a bucket or something under it to catch the oil coming from your oil filter, you'll just lose the oil that's already in your filter, so don't worry too much. Here's the tool you need. (we used this, unless you have bear claws i think you'll need it too)
After you get that off, this is the tricky part.
Last edited by Relapse; 07-03-2007 at 10:25 PM.
 07-03-2007, 12:53 AM
#2
On The Tree
Thread Starter
iTrader: (4)
Join Date: May 2007
Location: Denton, TX
Posts: 175
Likes: 0
Received 0 Likes
on
0 Posts
15. Now to put that wood you have to use. We used truck jack stands (higher than car stands to do this. I put 3 pieces of wood on top of the jack that i was jacking up to get the stands high enough for the clearance i needed on the drivers side header. Once again make sure you do it equally, jack it up about 3 notches and then compensate for the other side... Get it as high as you think you'll need, like i said i used 3 pieces of wood to jack it high enough with TRUCK jack stands at the highest notch they had (i didn't feel safe on the last notch but i wasn't under there but 3 hours until i figured out how the puzzle worked with my QTPs... At first i tried going more horizontal and trying more force, and then i tried doing the twisting pipes **** with my QTPs, all unsuccessful maneuvers... You want to be able to get your headers to where the collector is vertical going up into the slot where the old headers used to be, REMEMBER, VERTICAL is the way to do it, not horizontal, once they are completely vertical maneuver them up to where they need to be bolted down, and since it was pretty hard for them to fall out after i had gotten them in the right place, i went ahead and lowered the car for safety, and so i could reach the bolt into the 6th slot with my hands to keep it stable, once again you want to tighten the bolts up 1 and 6, not completely, but snug with the gaskets on... then bolt 3 and 4, very tight, 5 and 2, then 1 and 6, go over the bolts one final time to make sure they're all snug, and you have now put on both of your headers.
16. Now connect the front 02 sensors and the 02 sensor 24" extensions, ( i needed 24"s) and zippy tie them to some place that they won't be dangling around in. Also dont forget to take off your rear 02 sensors, they're simple to get off, and i used electric tape over the rear fittings so they didnt get any water up in them and short something, and also zippy tie those somewhere if necessary.
17. Screw in your front 02 sensors into your new headers.
18. If you bought a Y pipe, now is the time to put it on, use your clamps and maneuver the new Y- into your I and clamp that sucker down nice and tight
19. Reconnect the steering linkage (muscle.. patience) and be sure to tighten this bolt again.
20. If you're replacing your spark plugs, like i said i'm no expert but i believe you put the right coating on the new threads and a boot protector for the top of it. and you don't put too much pressure on the spark plug (there's a pressure wrench that you use i believe) BUT LIKE I SAID, I don't know spark plugs so someone can write up how to do that and i'll link you later.
21. Reconnect the spark wires.
22. Reconnect anything electrical you might have taken off, go over the bolts once more, make sure everything is firm and tightly on.
23. Reconnect the negative battery cable.
24. Put the oil filter back on nice and snug.
25. Turn that bitch on and throw your damn SES codes!
I hope that this write up is accurate and helpful to anyone installing headers. If there is anything wrong or inaccurate about this write up please PLEASE do not hesitate to send me a message and i will edit this write up.
Last edited by Relapse; 07-03-2007 at 01:17 AM.
 07-03-2007, 11:36 AM
#5
TECH Fanatic
iTrader: (2)

Join Date: Jul 2004
Location: Greensburg,PA
Posts: 1,882
Likes: 0
Received 0 Likes
on
0 Posts
sorry but I stopped reading this write up at the 6th line, when I saw your tool list. not allot of experienced mechanical people are going to use your write when they think you think anti seize breaks bolts loose. I would suggest you replace that with maybe pb blaster or something, just my .02
07-03-2007, 11:46 AM
#6
TECH Apprentice
iTrader: (2)
Join Date: Aug 2006
Location: OKC, OK & Hatteras Island, NC
Posts: 310
Likes: 0
Received 0 Likes
on
0 Posts
Originally Posted by Relapse
Breaker bar (Bar that will go over the wrench to apply more pressure)
07-03-2007, 11:51 AM
#7
12 Second Club

Join Date: Oct 2005
Posts: 189
Likes: 0
Received 0 Likes
on
0 Posts
nice work.
I was installed my LT's before 6 month ,11 hours total work
http://www.cardomain.com/ride/2426429/5
I was installed my LT's before 6 month ,11 hours total work
http://www.cardomain.com/ride/2426429/5