
AC Compressor Relocation--One approach
 12-18-2007, 08:47 PM
#1
Staging Lane
Thread Starter

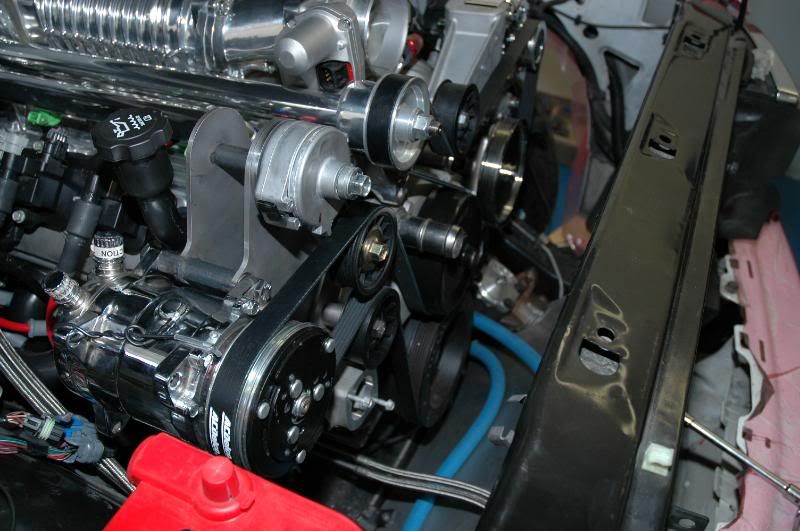
The stock AC compressor (5.3 GMC Envoy engine) was causing me a couple of issues in my 535iS BMW swap.
First, space down at the frame rail was at a premium and hose routing looked like it was going to be challenging. So I looked at moving the original compressor up top. That meant finding a six-groove pulley instead of the stock 4-groove. I discovered that the 4.2 liter 6 cylinder Trailblazer/Envoy engine uses basically the same compressor but with a six groove pulley. But mounting it on the engine still looked tough.
Second, I've heard conflicting info about using the newer variable displacement compressors with older AC systems. So that led to exploring the standard aftermarket Sanden 508 style compressor.
With the help of my buddy Ken, who happens to be a design engineer, we came up with a bracket that mounts the compressor, an idler pulley and a tensioner.
We got access to actual General Motors CAD drawings of the engine and then designed our brackets to match. Ken also figured out that the tensioner should be mounted between the compressor and the crank pulley instead of where we had it in an early prototype.
The version shown in the attached photos has the correct position for an LS2 crank pulley and waterpump. I swapped those pieces and an LS2 manifold to get hood clearance.
The brackets are aluminum, cut by a waterjet, with aluminum tube spacers. We did have to spot-face a couple of places to get the proper belt alignment.
I've seen several posts where others have been wrestling with this same issue. If there's interest, we might produce these for LS1 Camaro, LS1/LS6 Corvette and the LS2 (which has a slightly different pulley spacing from the LS1).
BTW, the photo also shows a custom alternator and PS pump bracket that uses the stock BMW PS pump with a later serpentine pulley.
The Geezer


Trending Topics
12-20-2007, 11:53 AM
#8
Staging Lane
Thread Starter
Hey Bimmer Tech,
The third photo in the original post shows some of the rear support. Maybe these next pix will show it a little better. I also have an animated FEA that shows where the stresses are but it's too big to post here. I'll try to get it on our web site.
The Geezer
The third photo in the original post shows some of the rear support. Maybe these next pix will show it a little better. I also have an animated FEA that shows where the stresses are but it's too big to post here. I'll try to get it on our web site.
The Geezer
12-20-2007, 06:36 PM
#11
Launching!
iTrader: (1)
Join Date: Jun 2003
Location: Orlando, FL
Posts: 256
Likes: 0
Received 0 Likes
on
0 Posts
Hey Bimmer Tech,
The third photo in the original post shows some of the rear support. Maybe these next pix will show it a little better. I also have an animated FEA that shows where the stresses are but it's too big to post here. I'll try to get it on our web site.
The Geezer
The third photo in the original post shows some of the rear support. Maybe these next pix will show it a little better. I also have an animated FEA that shows where the stresses are but it's too big to post here. I'll try to get it on our web site.
The Geezer
 Even better that you know where the stresses are! Nice job!
 12-20-2007, 07:31 PM
#13
TECH Resident

Join Date: Dec 2001
Location: Lexington Park, MD
Posts: 922
Likes: 0
Received 0 Likes
on
0 Posts

Great job on the brackets. My A/C is now sitting in the corner of my garage  I would have had to notch my Jeep's frame to keep it and decided it wasn't worth the effort. I rarely used it last summer anyway.
I see you did the LS2 intake swap. I'm debating on going that route myself. I have the same same engine combo as you. Mine is out of a '05 Envoy. Are you planning on using the DOD? After inspecting my OEM harness I found out that it was disabled from the factory. I wasn't going to use that either though. I just ordered heads, cam, "normal" lifters, etc to bump power up a bit.
When is yours going into the car? I'll be starting my swap next week
I would have had to notch my Jeep's frame to keep it and decided it wasn't worth the effort. I rarely used it last summer anyway. I see you did the LS2 intake swap. I'm debating on going that route myself. I have the same same engine combo as you. Mine is out of a '05 Envoy. Are you planning on using the DOD? After inspecting my OEM harness I found out that it was disabled from the factory. I wasn't going to use that either though. I just ordered heads, cam, "normal" lifters, etc to bump power up a bit.
When is yours going into the car? I'll be starting my swap next week
12-20-2007, 07:58 PM
#14
Staging Lane
Thread Starter
To answer a couple of your responses:
non-advertising vendor contact info removed by Admin.
To philntx, that blower looks wicked. We first had the tensioner where you do but our research says that the best place is between the AC and the crank pulley even though GM has done it both ways.
To 99blackSS, my engine is also a 2005 Envoy and as far as I know the DOD is still active. I plan to leave the engine pretty much stock other than the manifold swap. It's been in and out of the car several times but the plan is to put it in for good over the holidays. Good luck with your Jeep. Be sure to post your progress.
12-21-2007, 03:41 PM
#15
TECH Resident
Join Date: Dec 2001
Location: Lexington Park, MD
Posts: 922
Likes: 0
Received 0 Likes
on
0 Posts
Interesting. So you have the harness wiring that goes into the connector at the back of the intake? Mine didn't and I thought it was weird because it was supposed to be a complete OEM harness. I found out from asking around on the Envoy forums that some of them weren't active in the harness because of "exhaust sound issues" on the early production run vehicles. Apparently the exhaust piping has to be fabricated a certain way or else it sounds like crap in V4 mode. The engineers hadn't figured that out in time for production. I found that amusing. I could easily add the 4 or 5 wires to the ECM C2 connector, but for a rock crawler, I don't think it would help my mileage much
I'll definitely take lots of pics Again, great fab job on the brackets.
I'll definitely take lots of pics
Again, great fab job on the brackets. To answer a couple of your responses:
non-advertising vendor contact info removed by Admin.
To philntx, that blower looks wicked. We first had the tensioner where you do but our research says that the best place is between the AC and the crank pulley even though GM has done it both ways.
To 99blackSS, my engine is also a 2005 Envoy and as far as I know the DOD is still active. I plan to leave the engine pretty much stock other than the manifold swap. It's been in and out of the car several times but the plan is to put it in for good over the holidays. Good luck with your Jeep. Be sure to post your progress.
12-22-2007, 10:42 PM
#16
I really like the look of that setup and if the price is reasonable, I'll be quite interested in a LS1 F-body set.
How much do Sanden compressors go for? I do like where you were going with the TrailBlazer idea, since those compressors are cheap at junkyards!
How much do Sanden compressors go for? I do like where you were going with the TrailBlazer idea, since those compressors are cheap at junkyards!
12-25-2007, 06:20 PM
#17
TECH Apprentice
Join Date: May 2006
Location: Kansas City metro area
Posts: 360
Likes: 0
Received 0 Likes
on
0 Posts
You can get a Sanden 508 compressor for around $200. I am ready to buy your brackets and engineer them for my LS1 with F-Body accessories, right now. I have my Sanden compressor just waiting. Please PM me.
 01-01-2008, 08:40 AM
#19
On The Tree
Join Date: Dec 2007
Location: Harrison Arkansas
Posts: 108
Likes: 0
Received 0 Likes
on
0 Posts
Someone on here gave me a link to a vendor that sold some VERY inexpensive steel A/C and Alternator brackets for high mounts.
Darn if I can find them. My son deleted all of our favorites in I.E. on accident.
They were very inexpensive and I wish someone would let us know again where they were. It will be much appreciated.
Darn if I can find them. My son deleted all of our favorites in I.E. on accident.
They were very inexpensive and I wish someone would let us know again where they were. It will be much appreciated.
01-01-2008, 09:10 PM
#20
Staging Lane
Thread Starter
Thought you might like to see a couple of pix of the engine and trans actually in the car (hopefully for the last time).
Had the engine running with the LS2 intake and the new front accessory drive system. Had a little stumble and rough idle and was afraid the injectors might be too big for the 5.3. I checked one more time for vacuum leaks and found a manifold fitting I hadn't capped. Closed that up and everything smoothed right out.
AC compressor has about an inch clearance at the strut tower. Coil pack clears the master cylinder reservoir by about a 1/4". Passenger exhaust pipe clears a control arm cover after some massaging with a BFH.
Driveshaft is ordered. Radiator is ordered. One mistake was not finishing the PS hose mods before putting the engine back in. I can get to all the fittings but it's a struggle. ECM/TCM and the Envoy fuse box should fit just above the battery. I'll make some kind of quick connect to move them when replacing the battery. Or, this could be the excuse I need to move the battery to the trunk.
Having the engine in for the final time is a major milestone but now it seems like I'm starting the project all over to finalize the fuel lines, the drive-by-cable-drive-by-wire combo, AC lines, trans cooler lines, etc., etc., etc. But, figuring stuff out is part of the fun.
The Geezer