
HOW TO: Stand alone nitrous fuel system
 06-14-2008, 08:40 PM
#1
TECH Enthusiast
Thread Starter
iTrader: (19)

Join Date: Dec 2006
Location: Lynchburg, Va
Posts: 516
Likes: 0
Received 0 Likes
on
0 Posts

:I AM NOT RESPONSIBLE FOR ANYTHING THAT HAPPENS TO YOU OR YOUR CAR IN DOING THIS, THIS IS FOR RACING PURPOSES ONLY:
ok so far i have the parts list... to do it the way i am, you will need the following:
4- 3/8" NPTx 3/8 barb
1- 3/8" NPT to 1/8" NPT bushing (for the gauge)
1- 3/8" NPT to 1/4" NPT bushing (to reduce it so you can use the 1/4 barb)
2- 1/2" NPT x 1/4" barb
1- Holley Blue electric pump part # 12-802-1
1- FPR SHOULD come in the box with the pump
1- fuel pressure gauge ( i used MR gasket # 1561 from Autozone)
1- fuel filter i used Autzone part # 3330 (has 3/8" outlet & inlet)
2- packs of worm clamps for 3/8" hose
1- pack of worm clamps for 1/4" hose
4- different colors of wire NO LESS than 14 ga. i used 12ga
1- pack of 12-14 ga. bolt ground terminals
1- pack of female connectors for the relay
1- 30 amp relay
2ft- 3/8" fuel line
5ft or so- 1/4" fuel line
1 tube of 5 minute Epoxy
now my issue on finding a part was when i had to get a 1/4" barb on the solenoid...homedepot didnt have any so i made a rigged up one with a 1/2" to 1/8" NPT adapter, 1/8" NPT female/female union, and a 1/2"x 1/4" barb... this CAN be done less than 200, and with parts from Autozone and homedepot
now you may ask what is the epoxy for, thats what all the people here use on the Nitrous kits. i haven't had not the slightest leak since i switched over and it eliminates the chance of getting Teflon tape stuck in the system. when you go to disassemble it just heat it up slightly and it comes right out. just an FYI...if you dont like to do so, then by all means substitute everywhere i use epoxy and use Teflon tape. i got held up looking for the parts, SO i am gonig to start doing this tomorrow and post pics up in an article type post thanks guysOK! so here goes!
BEFORE YOU GET STARTED!you need a GOOD ammount of different sockets, extensions and nut driver bits for a drill, drill bits,a drill and a few other things NOW go ahead and assemble the fittings into the pump and regulator, you need 2 of the 3/8" barbs for the pump, now for the regulator, on 3/8" barb, the 3/8 to 1/4 npt bushing, the 1/4 NPT 1/4" barb, and the 3/8" to 1/8" npt bushing, to assemble these you put epoxy on the first few threads then screw them in and tighten them up just like you would do with Teflon tape or paste. basically your doing the same thing as you would with any other fittings and teflon, but this way your 99.9% sure there wont be any leaks, if you do find a leak take the part off, empty all gas and heat it up with a lighter or torch and it will thread right back out, but im sure you wont have that problem
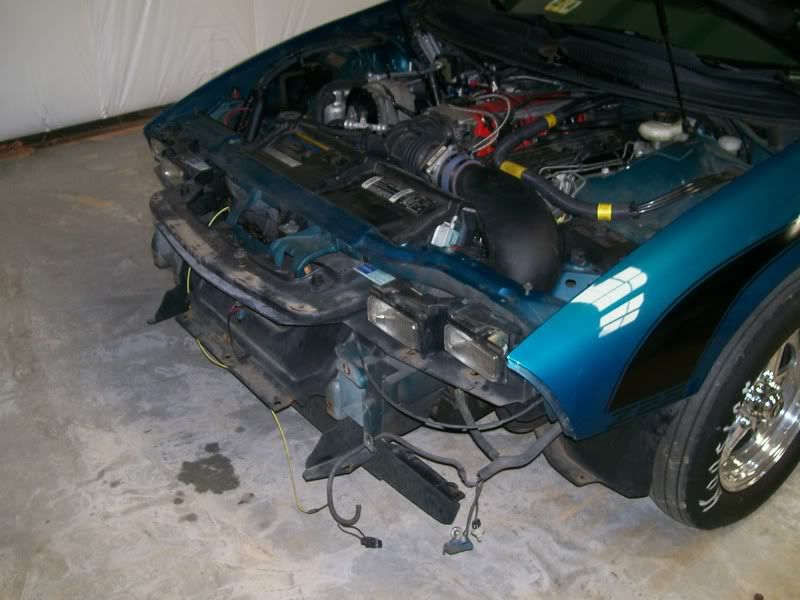
step 1: remove the front bumper,and bumper support bar, there are quite a few plastic expanding clips and 4 hidden bolts (4 7mm bolts right under the headlights one under each) the rest you should be able to see and remove with ease. (yes the bottom beauty covers have to be removed)it helps to have a friend remove the bumper with you, but i removed and re installed mine pretty easy. (now would also be a good time to delete the bumper bar for weight savings) when your done it should look like this:
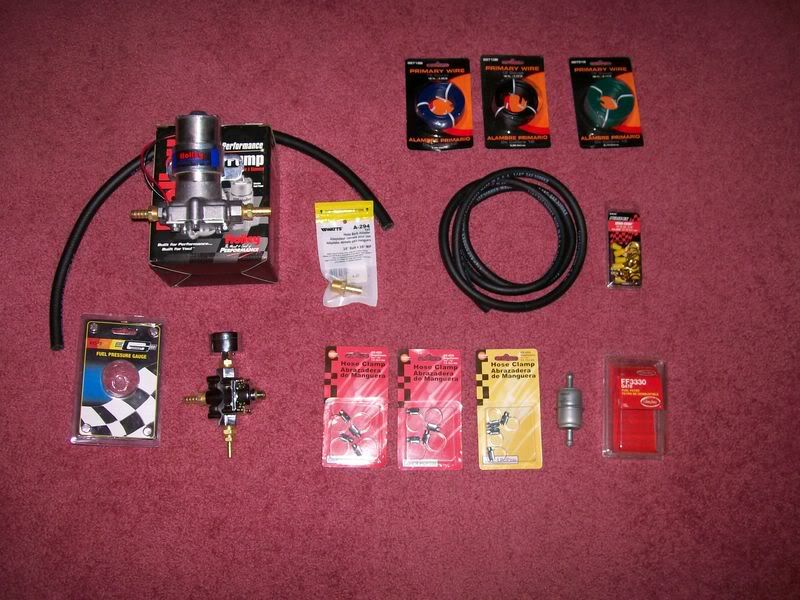
Step 2: gather all your parts, this is all i have listed in the above post (vacuum fitting isnt there yet nor the vacuum tubing):
Step 3: MOUNT THE PUMP! i chose to place mine where the frame rail is, right in front of my cold air intake filter. i drilled a 1/8" pilot hole on both sides of the bracket and use 2 3/8" head sheet metal bolts and they do their job
HERE HERE and
step 4: MOUNT THE REGULATOR! i affixed mine to the radiator support via 2 self tapping sheet metal 8mm head screws HERE where the gauge could face up to ease setting fuel pressure. you MAY or may not be able to mount yours right here due to the variance of the CAI kits for our cars. mine was a little closer to the intake than i wanted so i marked the spot, heated it up and used a 3/8" extension to put a small bend in it to clear the hose (i rolled the plastic out like rolling bread out, so it didnt just leave a small mark in it)
HERE
HERE
and HERE
step 5:connect the pump to the regulator. i used my 3/8" fuel line here, 2 worm clamps and about 1.5ft of line. clamp it down and rock out!
Step 6: remove the washer Resivor. there will be 4 push clips in the resivor, an electrical connector to the pump and a nose for the fluid. disconnect these and tie them up out of the way. NOW grab a torch and the last 3/8 barb (like used in the pump), remove the pump from the resivor and all fluid still in it, pull the rubber bushing out also. now the fun part, turn the torch on and light it up,on LOW, heat the small hole up where the pump mounted just enough thats its mailable, use your 3/8" threaded barb and while the plastic is soft, push the fitting into the hole softly and thread it in 1/2 way just like you would do in any other material. now dont waste any time, thread the barb BACK out and let the plastic cool for about 5 minutes. when its cool to the touch, mix up a some more 5 min. epoxy, put a good amount on the fitting and thread it in a little ways, let it sit for about 30 seconds (to let the epoxy cure so its not so thin). after a few seconds have gone by, thread it the rest of the way in, then mix some more epoxy and put a good amount on top where the fitting was just threaded in. MAKE SURE ALL SURFACES YOU PUT EXOXY ARE CLEAN! it SHOULD look like this HERE
HERE
Step 7:connect the pump to the resivor (from now on refered to as the tank) use about 2 ft or so 3/8" line and 2 worm clamps DO NOT OVER TIGHTEN THE CLAMPS! DOING SO WILL DAMAGE THE LINE AND CAUSE LEAKS LATER ON DOWN THE LINE! anywhere the hoses hit a metal edge that was sharp or could cause wear, i sliced a vacuum hose (11/32" i think) down the middle and put a few dabs of epoxy on the inside to aid in holding it on the metal like THIS
HERE
HERE
step 8:run the lines to the solenoid from the regulator, i cut a 2" slit in the factory fuel line convoluted tubing and ran it through where it passes right over the ABS box and out to the motor, i used about 3.5ft to accomplish this and used 2 smaller clamps on each fittingHERE HERE HERE and HERE
now for the wiring use THIS diagram use a MINIMUM of 14 ga. wire, although i recommend 12 ga. and the corresponding butt connectors, and bolt grounds. heat shrink all connections or electrical tape but i recommend heat shrink and weather tight butt connectors all available to you through advanced, auto zone or napa
...bolt everything up and set your fuel pressure!
Step 9: setting fuel pressure. to do so get a few feet of 1/4" line, disconnect the line from the solenoid, put it into the fill side of the tank, loosen up the lock nut on the regulator that locks the hex keyed screw tight, use the hex wrench that fits to turn the screw. now switch the kit on and watch the gauge and set to desired pressure (the kit you use will have a recommended fuel pressure that corresponds to your jetting KEEP IN MIND IF YOU HAVE AN EFI KIT YOU WILL NEED TO BUY JETS TO USE LOWER FUEL PRESSURE!!!! jets are not expensive and if you try to use the EFI fuel side jet you will be really lean and this CAN CAUSE DAMAGE TO YOUR MOTOR!!!
now bolt everything up, jet everything accordingly (speak to your kit supplier for jet settings) and go have some fun, the beauty of this is that you can put 116 or 110 in the stand alone tank so when you spray the car you will be less likely to detonate and wont have to run the risk of running the rails dry, leaning out your motor an having a backfire! im sure i missed something so i will update as i find missing stuff. keep the tank full and you wont have a problem with fuel pickup,
ok so far i have the parts list... to do it the way i am, you will need the following:
4- 3/8" NPTx 3/8 barb
1- 3/8" NPT to 1/8" NPT bushing (for the gauge)
1- 3/8" NPT to 1/4" NPT bushing (to reduce it so you can use the 1/4 barb)
2- 1/2" NPT x 1/4" barb
1- Holley Blue electric pump part # 12-802-1
1- FPR SHOULD come in the box with the pump
1- fuel pressure gauge ( i used MR gasket # 1561 from Autozone)
1- fuel filter i used Autzone part # 3330 (has 3/8" outlet & inlet)
2- packs of worm clamps for 3/8" hose
1- pack of worm clamps for 1/4" hose
4- different colors of wire NO LESS than 14 ga. i used 12ga
1- pack of 12-14 ga. bolt ground terminals
1- pack of female connectors for the relay
1- 30 amp relay
2ft- 3/8" fuel line
5ft or so- 1/4" fuel line
1 tube of 5 minute Epoxy
now my issue on finding a part was when i had to get a 1/4" barb on the solenoid...homedepot didnt have any so i made a rigged up one with a 1/2" to 1/8" NPT adapter, 1/8" NPT female/female union, and a 1/2"x 1/4" barb... this CAN be done less than 200, and with parts from Autozone and homedepot
now you may ask what is the epoxy for, thats what all the people here use on the Nitrous kits. i haven't had not the slightest leak since i switched over and it eliminates the chance of getting Teflon tape stuck in the system. when you go to disassemble it just heat it up slightly and it comes right out. just an FYI...if you dont like to do so, then by all means substitute everywhere i use epoxy and use Teflon tape. i got held up looking for the parts, SO i am gonig to start doing this tomorrow and post pics up in an article type post thanks guysOK! so here goes!
BEFORE YOU GET STARTED!you need a GOOD ammount of different sockets, extensions and nut driver bits for a drill, drill bits,a drill and a few other things NOW go ahead and assemble the fittings into the pump and regulator, you need 2 of the 3/8" barbs for the pump, now for the regulator, on 3/8" barb, the 3/8 to 1/4 npt bushing, the 1/4 NPT 1/4" barb, and the 3/8" to 1/8" npt bushing, to assemble these you put epoxy on the first few threads then screw them in and tighten them up just like you would do with Teflon tape or paste. basically your doing the same thing as you would with any other fittings and teflon, but this way your 99.9% sure there wont be any leaks, if you do find a leak take the part off, empty all gas and heat it up with a lighter or torch and it will thread right back out, but im sure you wont have that problem
step 1: remove the front bumper,and bumper support bar, there are quite a few plastic expanding clips and 4 hidden bolts (4 7mm bolts right under the headlights one under each) the rest you should be able to see and remove with ease. (yes the bottom beauty covers have to be removed)it helps to have a friend remove the bumper with you, but i removed and re installed mine pretty easy. (now would also be a good time to delete the bumper bar for weight savings) when your done it should look like this:
Step 2: gather all your parts, this is all i have listed in the above post (vacuum fitting isnt there yet nor the vacuum tubing):
Step 3: MOUNT THE PUMP! i chose to place mine where the frame rail is, right in front of my cold air intake filter. i drilled a 1/8" pilot hole on both sides of the bracket and use 2 3/8" head sheet metal bolts and they do their job
HERE HERE and
step 4: MOUNT THE REGULATOR! i affixed mine to the radiator support via 2 self tapping sheet metal 8mm head screws HERE where the gauge could face up to ease setting fuel pressure. you MAY or may not be able to mount yours right here due to the variance of the CAI kits for our cars. mine was a little closer to the intake than i wanted so i marked the spot, heated it up and used a 3/8" extension to put a small bend in it to clear the hose (i rolled the plastic out like rolling bread out, so it didnt just leave a small mark in it)
HERE
HERE
and HERE
step 5:connect the pump to the regulator. i used my 3/8" fuel line here, 2 worm clamps and about 1.5ft of line. clamp it down and rock out!
Step 6: remove the washer Resivor. there will be 4 push clips in the resivor, an electrical connector to the pump and a nose for the fluid. disconnect these and tie them up out of the way. NOW grab a torch and the last 3/8 barb (like used in the pump), remove the pump from the resivor and all fluid still in it, pull the rubber bushing out also. now the fun part, turn the torch on and light it up,on LOW, heat the small hole up where the pump mounted just enough thats its mailable, use your 3/8" threaded barb and while the plastic is soft, push the fitting into the hole softly and thread it in 1/2 way just like you would do in any other material. now dont waste any time, thread the barb BACK out and let the plastic cool for about 5 minutes. when its cool to the touch, mix up a some more 5 min. epoxy, put a good amount on the fitting and thread it in a little ways, let it sit for about 30 seconds (to let the epoxy cure so its not so thin). after a few seconds have gone by, thread it the rest of the way in, then mix some more epoxy and put a good amount on top where the fitting was just threaded in. MAKE SURE ALL SURFACES YOU PUT EXOXY ARE CLEAN! it SHOULD look like this HERE
HERE
Step 7:connect the pump to the resivor (from now on refered to as the tank) use about 2 ft or so 3/8" line and 2 worm clamps DO NOT OVER TIGHTEN THE CLAMPS! DOING SO WILL DAMAGE THE LINE AND CAUSE LEAKS LATER ON DOWN THE LINE! anywhere the hoses hit a metal edge that was sharp or could cause wear, i sliced a vacuum hose (11/32" i think) down the middle and put a few dabs of epoxy on the inside to aid in holding it on the metal like THIS
HERE
HERE
step 8:run the lines to the solenoid from the regulator, i cut a 2" slit in the factory fuel line convoluted tubing and ran it through where it passes right over the ABS box and out to the motor, i used about 3.5ft to accomplish this and used 2 smaller clamps on each fittingHERE HERE HERE and HERE
now for the wiring use THIS diagram
use a MINIMUM of 14 ga. wire, although i recommend 12 ga. and the corresponding butt connectors, and bolt grounds. heat shrink all connections or electrical tape but i recommend heat shrink and weather tight butt connectors all available to you through advanced, auto zone or napa ...bolt everything up and set your fuel pressure!
Step 9: setting fuel pressure. to do so get a few feet of 1/4" line, disconnect the line from the solenoid, put it into the fill side of the tank, loosen up the lock nut on the regulator that locks the hex keyed screw tight, use the hex wrench that fits to turn the screw. now switch the kit on and watch the gauge and set to desired pressure (the kit you use will have a recommended fuel pressure that corresponds to your jetting KEEP IN MIND IF YOU HAVE AN EFI KIT YOU WILL NEED TO BUY JETS TO USE LOWER FUEL PRESSURE!!!! jets are not expensive and if you try to use the EFI fuel side jet you will be really lean and this CAN CAUSE DAMAGE TO YOUR MOTOR!!!
now bolt everything up, jet everything accordingly (speak to your kit supplier for jet settings) and go have some fun, the beauty of this is that you can put 116 or 110 in the stand alone tank so when you spray the car you will be less likely to detonate and wont have to run the risk of running the rails dry, leaning out your motor an having a backfire! im sure i missed something so i will update as i find missing stuff. keep the tank full and you wont have a problem with fuel pickup,
Last edited by ZeeTwentyFate; 06-16-2008 at 11:14 AM.
 06-14-2008, 08:40 PM
#2
TECH Enthusiast
Thread Starter
iTrader: (19)
Join Date: Dec 2006
Location: Lynchburg, Va
Posts: 516
Likes: 0
Received 0 Likes
on
0 Posts
added bonus:i decided to make a vent tube setup...all i did was buy 3 ft of vacuum line and a 90 deg fitting, drilled 2 holes and epoxied it in the top and blocked off the vent hole in the tank cap to prevent fuel overflow under the hood. so i ran the vent tube out to the bottom under the nose HERE HERE and HERE
HERE HERE and HERE  06-15-2008, 09:33 AM
#4
TECH Enthusiast
Thread Starter
iTrader: (19)
Join Date: Dec 2006
Location: Lynchburg, Va
Posts: 516
Likes: 0
Received 0 Likes
on
0 Posts
i have a WOT switch, a Mallory 685 and all that good stuff. look at the diagram, you wore up the nitrous just like you usually would, then the 12v+ sorce that turns the kit on, you just tap in to that so it comes on when you flip the switch to turn the kit on. not when the kit activates. you want it on a sec or two before that so it can build pressure
06-15-2008, 03:31 PM
#5
great job. i didn't get a chance yet to go all the way through your how to, but have a question. In my web site is a couple fuel system how-tos for the Vette and the F-bod, two different methods to use without going stand alone tank. Yours is a great idea for those wanting a stand alone tank and on a budget (most of us are, lol). I would love to host your how-to and add it to my web site and would be very helpful and insight full to those upgrading the fuel system and want a complete offering of ways to go about upgrading. So, the question I have, even though it's now public property (no copyright), can I host/use it on my site and you will get credit as the author. One thing that happens once it's on my site is copyright protection and disclaimer protection should someone burn their car down, god forbid. Anyway, one thing i did notice was your method for adding the fitting for the tank, there may be a better idea, a dedicated tank fitting, you can see one in my fuel write up (though this will up the cost, but an option maybe). let me know what ya think, thanks.
Fuel System Upgrade How -To(s)
Robert
Fuel System Upgrade How -To(s)
Robert
06-15-2008, 04:12 PM
#6
12 Second Club
iTrader: (33)
Join Date: Jan 2005
Location: winter springs, fl
Posts: 2,584
Likes: 0
Received 0 Likes
on
0 Posts
im guessing this is for a drag only car, dont know how that plastic tank would hold up in a front end crash with fuel in it.
great idea for thinking outside the box
great idea for thinking outside the box

Trending Topics
06-16-2008, 10:16 AM
#8
TECH Enthusiast
Thread Starter
iTrader: (19)
Join Date: Dec 2006
Location: Lynchburg, Va
Posts: 516
Likes: 0
Received 0 Likes
on
0 Posts
nope, sometimes i DD mine jsut drive careful. but if you were to get hit a spark would not ignite the 116 or 110 very easily unless you got hit hard enough to catch on fire
06-16-2008, 12:51 PM
#10
TECH Addict
iTrader: (25)

Join Date: Nov 2004
Location: Garden City, KS
Posts: 2,529
Likes: 0
Received 0 Likes
on
0 Posts
dude that is an awesome idea......a few questions though....
Safety? How safe is it really???
and
is it ok to just have a snap on plastic cap on a FUEL container, or would it be better to fab up something to make it a screw on cap??
oh, and
About how much did you have wrapped up into this thing????
Safety? How safe is it really???
and
is it ok to just have a snap on plastic cap on a FUEL container, or would it be better to fab up something to make it a screw on cap??
oh, and
About how much did you have wrapped up into this thing????
06-16-2008, 02:44 PM
#11
TECH Enthusiast
Thread Starter
iTrader: (19)
Join Date: Dec 2006
Location: Lynchburg, Va
Posts: 516
Likes: 0
Received 0 Likes
on
0 Posts
i have less than 200 in it lol. 4 trips to the parts store...but all in all it is safe, the snap on seal seals really good actually, b4 i filled it i blew into the container through my fabbed up vent tube, and it made me blue in the face before it popped off, however like you i am going to fab up a screw on cap later. just to be on the safe side i had thought about those plastic pipe caps that you use on PVC pipe that turn the thumb nut and it expands but haven't decided yet all in all i have about 180 in it though and thats better than replacing a stock fuel pump, cause im still tickin on my 150k pump but it was starting to see its days with 30# injectors and 150 shot coming off the rails
but it was starting to see its days with 30# injectors and 150 shot coming off the rails
06-16-2008, 02:45 PM
#12
TECH Enthusiast
Thread Starter
iTrader: (19)
Join Date: Dec 2006
Location: Lynchburg, Va
Posts: 516
Likes: 0
Received 0 Likes
on
0 Posts
oh and the safety thing, if you run 116 you have to basically hit it with a torch to get it to light... so a wreck wouldnt be all that bad IF it happened. and if you do like i didnt and leave the bumper support in then you shoul be ok just BE CAREFUL!
06-16-2008, 02:58 PM
#13
TECH Resident
iTrader: (5)

Join Date: Nov 2001
Location: around
Posts: 885
Likes: 0
Received 0 Likes
on
0 Posts

Nice write up.
You don't have to remove the bumper cover to take out the wiper res.
116 will lite just like any fuel with a spark.
that cap will not pop off by itself.
Why tap it from the top? Worried about fuel sloth and having dry pickup?
Did you mention to clean the res first?
Does the fuel filter flow well?
You don't have to remove the bumper cover to take out the wiper res.
116 will lite just like any fuel with a spark.
that cap will not pop off by itself.
Why tap it from the top? Worried about fuel sloth and having dry pickup?
Did you mention to clean the res first?
Does the fuel filter flow well?
06-16-2008, 04:14 PM
#15

I have seen this done before for methanol for a FI setup, and as convenient as the tank is, it's not the safest setup. I am sure that if you were to take a car to the track and the inspector were to notice what you have done, they won't let you run it. There is no rollover vent on the tank, and the tank is not designed to hold a combustable fuel.
Nice idea though, if one of the sponsors could make an alum tank that would fit/attach in place of the washer tank you'd have a legal setup that would get teh job done, unfortunately the cost of said tank would pretty much kill the idea I think.
Nice idea though, if one of the sponsors could make an alum tank that would fit/attach in place of the washer tank you'd have a legal setup that would get teh job done, unfortunately the cost of said tank would pretty much kill the idea I think.
06-16-2008, 04:33 PM
#16
11 Second Club
iTrader: (20)
Join Date: Oct 2006
Location: Virginia
Posts: 3,131
Likes: 0
Received 0 Likes
on
0 Posts
I have seen this done before for methanol for a FI setup, and as convenient as the tank is, it's not the safest setup. I am sure that if you were to take a car to the track and the inspector were to notice what you have done, they won't let you run it. There is no rollover vent on the tank, and the tank is not designed to hold a combustable fuel.
Nice idea though, if one of the sponsors could make an alum tank that would fit/attach in place of the washer tank you'd have a legal setup that would get teh job done, unfortunately the cost of said tank would pretty much kill the idea I think.
Nice idea though, if one of the sponsors could make an alum tank that would fit/attach in place of the washer tank you'd have a legal setup that would get teh job done, unfortunately the cost of said tank would pretty much kill the idea I think.
06-17-2008, 01:42 AM
#20
Staging Lane

Join Date: Feb 2007
Posts: 52
Likes: 0
Received 0 Likes
on
0 Posts
I might have missed it but don't you need a return line back to the fuel tank from the reg. like a normal fuel system? If not could somone explain why not? When you arm the system wouldn't it build to much presure before you spray if it was on for any time?