When you click on links to various merchants on this site and make a purchase, this can result in this site earning a commission. Affiliate programs and affiliations include, but are not limited to, the eBay Partner Network.
This thread will be a recap of the past year with my 1989 camaro, along with sharing all the ups and downs of the build from here on!
May 31, 2015 - I finally did it, I bought a 1989 camaro rs for $700 in Ft Pierce Florida! with a 700r4 and a worn out 305 somehow we were able to drive it the two hours home.
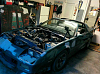
From that day on the car went through a complete tear down and this is how it sits 366 days later
I call this car "minwage" because that is what it is being built off of. Through highschool I have worked Hundreds of hours to buy parts for it, and have gone on many junkyard/craigslist adventures!
Current plans for the car -
Fully rebuilt lt1, new rings, bearings, etc. CC503, Alex's springs/hardened pushrods, aluminum heads, shorty headers, full borla catback, Stock t56 until funds allow a rebuild, very minimal interior (dash, rubber floor, roll bar, etc.) I want a racecar feel while holding onto certain comforts. Possible air ride..? stripped and painted black, then wrapped (worked at a car wrap shop for awhile) and much more to come!
Here is the general finished product idea I made in photoshop the other night
Bought a 1995 lt1 out of a firebird with wiring for $450 from a guy who lived 2 miles away.
Stripped the whole thing down and everything checks out. Bought a flexhone online and did the cylinders myself!
In goes my Christmas present! cc503
With the shortblock complete I am now waiting on my heads from the machine shop, should get those back next week and the engine will go through final assembly. Next I will send off the pcm for tuning, start the wiring, and drop it all in! First time in over a year since this car has been driven. Hopefully this gives you just enough info to have you guys interested, I will update regularly! Feel free to ask questions and pitch in advice!
So cool to see a younger person actually do the work and put in the wrench time rather than buying it built or having a self entitled attitude. Great job man! Keep us updated!
Look what I picked up from the machine shop today! Stock heads, shaved down, valves bumped up to 2.02 intake 1.5 exhaust. Alex springs, I want to say trickflow guideplates but not completely sure. The machine shop I use always does great work.
You may want to swap those guide plates for adjustables.
Looks like they didn't do any port or chamber work. It would be worth going over all the sharp edges and cast flashing you may find in the CC or flow areas and knocking them down. My heads were ported by LE, so I really only had to focus on the pistons. But, knocking down the edges on the piston and combustion chamber of the head will help prevent pre-detonation.
Those 2.02 valves certainly shroud up to the CC walls too. Not sure how comfortable you are taking the CC walls out a bit (to match the bore of the cylinder using a head gasket as the guide). But it would help improve flow.
I don't think either is anything to worry about honestly, but it'd be a couple things I would address before installing the heads. Since they're already off and all. But, I'm one of those "well since I'm already here, I might as well........" guys. That's how I went from a head gasket replacement to a cammed 355 LE2 with forged pistons/rods full machine work build. LOL.
The guide plates, I've heard that they don't always line the rocker on the valve just right, so you may run into that issue.
I'm putting them on as is and running from there, everything has been measured and remeasured so I think I should be good. the 2.02 valves are what came with the heads in my box o' parts I bought from someone so I went with those instead of stock size. If i leave a few hp on the table so be it but I don't want to risk doing anything to these heads. machine work gets expensive lol.
Heads are on, tomorrow I'll slap on the oil pan and we will get this bad boy painted! Think I'm going to go with a red block/heads with a black intake, red stripes and red fuel rails.
Wow its been awhile since I've posted on this thread! Sorry about that, getting ready for college has taken over and I have not been able to work on the car much. I have made some progress though!
Engine is finally painted! Along with the intake, the stripes came out perfectly on top.
Today I just have a few small goals, with all the work needed its nice to break it down day by day. Oil pan will go on, pilot bearing will be replaced, and the flywheel will be mounted. The last "big" purchase I need for the car are the headers, from reading around here and thirdgen.org I see a lot of people using hedman with success. If anyone has any part numbers or suggestions feel free to post!
IMHO whatever brand header you get, have them ceramic coated. I have always used Jet Hot. They actually sell most header brands/model which saves you shipping headers to them if purchased somewhere else.
I did get Hedman long tubes for my 70 Torino 302 car from them. IMHO Headman are not "top shelf" as the $ may reflect but I had no fitment issues with them. I have also sent two other sets of headers to them for coating for other cars, one my LT1.
Get a "D" port header to match your heads
That is the one issue I keep running into when trying to buy headers, hedman are in my budget, but can't find a D port shorty for the third gen camaro anywhere! I would like to do shorties for clearance, but if someone can show me a longtube that would work better I'd go for it.
always challenges when transplanting a different engine platform in a car. I don't have a F-body so not familiar with what long tube headers are available for LT1/4 F-body but I am sure there are a few others that will advise.
This thread will be a recap of the past year with my 1989 camaro, along with sharing all the ups and downs of the build from here on!
May 31, 2015 - I finally did it, I bought a 1989 camaro rs for $700 in Ft Pierce Florida! with a 700r4 and a worn out 305 somehow we were able to drive it the two hours home.
From that day on the car went through a complete tear down and this is how it sits 366 days later
I call this car "minwage" because that is what it is being built off of. Through highschool I have worked Hundreds of hours to buy parts for it, and have gone on many junkyard/craigslist adventures!
Current plans for the car -
Fully rebuilt lt1, new rings, bearings, etc. CC503, Alex's springs/hardened pushrods, aluminum heads, shorty headers, full borla catback, Stock t56 until funds allow a rebuild, very minimal interior (dash, rubber floor, roll bar, etc.) I want a racecar feel while holding onto certain comforts. Possible air ride..? stripped and painted black, then wrapped (worked at a car wrap shop for awhile) and much more to come!
Here is the general finished product idea I made in photoshop the other night
Bought a 1995 lt1 out of a firebird with wiring for $450 from a guy who lived 2 miles away.
Stripped the whole thing down and everything checks out. Bought a flexhone online and did the cylinders myself!
In goes my Christmas present! cc503
With the shortblock complete I am now waiting on my heads from the machine shop, should get those back next week and the engine will go through final assembly. Next I will send off the pcm for tuning, start the wiring, and drop it all in! First time in over a year since this car has been driven. Hopefully this gives you just enough info to have you guys interested, I will update regularly! Feel free to ask questions and pitch in advice!
you should hit up thirdgen.org, there is a guy on there called dynodon who specializes in shorty headers. I used them on my 87 iroc with the same swap you are working on and they are works of art.
Good luck on the build, its a blast to drive when you are done, trust me.
I used the 400 grit 4inch bore full hone. It is more expensive compared to the half hones they sell at enginehones.com but the whole cylinder is even and looks fresh outta the factory! Because it's an iron block I didn't go with a super hard material, whatever their basic cutting stone is is the one I used.
you should hit up thirdgen.org, there is a guy on there called dynodon who specializes in shorty headers. I used them on my 87 iroc with the same swap you are working on and they are works of art.
Good luck on the build, its a blast to drive when you are done, trust me.
I've heard about him and it's nothing but good reviews, does he still make headers? If so are they pretty affordable?

 06-01-2016, 03:29 PM