Ram Air Hood 1999 Trans Am
 05-12-2014, 08:11 AM
#1
Teching In
Thread Starter

Join Date: Apr 2014
Posts: 18
Likes: 0
Received 0 Likes
on
0 Posts
I have a 1999 trans am which originally did not have ram air, now the previous owner installed the new hood but the alignment is off a little to the left and a finger gap between the headlamp and hood (too far up). My father and I cant find anyway to fix it, how could I do that?

 05-12-2014, 06:02 PM
#4
Teching In
Thread Starter
Join Date: Apr 2014
Posts: 18
Likes: 0
Received 0 Likes
on
0 Posts
I will post some pics as soon as I can but that will probably be tomorrow. Its hard to describe. Basically the hood is too far up and too far right, thats the only way too describe it. I was using the headlamps as a way too describe the gaps that have been caused by the incorrect alignment of the hood
05-12-2014, 08:14 PM
#6
Staging Lane
iTrader: (2)
Join Date: Jan 2013
Location: Johnstown Pa
Posts: 67
Likes: 0
Received 0 Likes
on
0 Posts
Here are some directions from my hood builder hope this helps
remove the covers (2 phillips head screws in the rear while in the down position), then turn the lights on to pop them up (turn switch back to parking lights to not drain your battery), then remove the 4 phillips head screws from the plastic bezel around each light to get that off, then you'll have access to the 2 remaining screws for the cover. Put them back in the down position once the cover and bezel are removed.
Once all the levels are set, then you can tackle the headlight covers. They may already sit pretty close without any adjustment, but I always prefer to get the seams perfect for clearance and appearance. With the hood latched shut and the lights in the down position, place the covers on top of the lights, aligning the screw holes in the rear so you'll be able to see how it would sit if they were mounted. It's probably easiest to do one cover at a time of course. At this point the cover may sit above/below the hood line, or the gaps may me inconsistent. You'll see a few small white-headed rubber bumpstops... I usually crank them down first and concentrate on the gaps before doing the levels. If you have inconsistent gaps, you'll want to locate the tiny torx-bit screws on top of the headlight bracket. It's pretty self-explanatory... once you loosen them, the bracket will slide in whatever direction you like. Just be careful not to loosen them by more than a half turn at a time, otherwise they'll be too loose and slide forward, and you'll lose your starting position. If you need to close a gap on one side or the other, loosen the 2 or 3 screws on that side a small amount and press the bracket in the direction required. This is difficult to explain this way, but once you get into it, you'll see what I'm talking about. Once you make any adjustments, just place the cover back on and line it up with the rear screw mounting holes to check the gap. This just makes it much easier than reinstalling everything and hoping it's aligned properly every time. It can sometimes take some trial and error to get the gaps just right. Be sure to leave a bit of room at the rear so it doesn't rub against the hood when turning the lights on. If the cover is sitting two low in certain areas, this is when you can raise the little white bumpstops to get it level with the hood. Once everything is lined up, go ahead and reinstall the cover by turning the lights on, installing the 2 front screw for the cover, then the plastic bezel, and finally lowering the lights and reinstalling the two rear screws
Trending Topics
 05-14-2014, 08:19 AM
#9
Teching In
Thread Starter
Join Date: Apr 2014
Posts: 18
Likes: 0
Received 0 Likes
on
0 Posts
Yea, its not too noticeable but when I see the hood every day and see it just off like that it, I make a bigger deal out of it thinking its more noticeable than it really is, if that makes sense
05-14-2014, 09:03 AM
#10
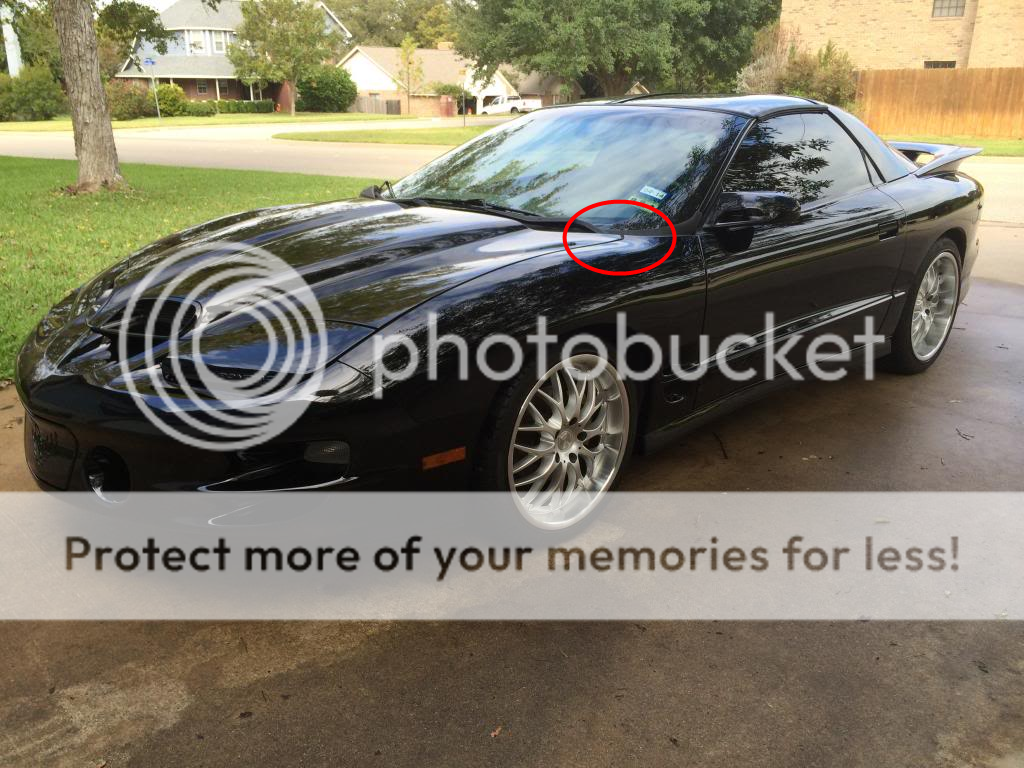
From the looks of the lines, it may be pushed a bit too far back. Take some pictures of where the rear corners of the hood meet the fenders. Maybe even some side profile pictures by the fenders and nose. Doing it through words and pictures can get a bit aggravating, haha! If I lived near you I could help you get it knocked out in no time, but I guess we'll just have to do our best on here! 
Here is my factory WS6 hood that I put on my T/A. The headlights may look a little tight in the inner corners by the hood, but I think it's just the color of the car and the camera lighting. I used my best friend's factory WS6 car to guide me in my fitment and it came out great.
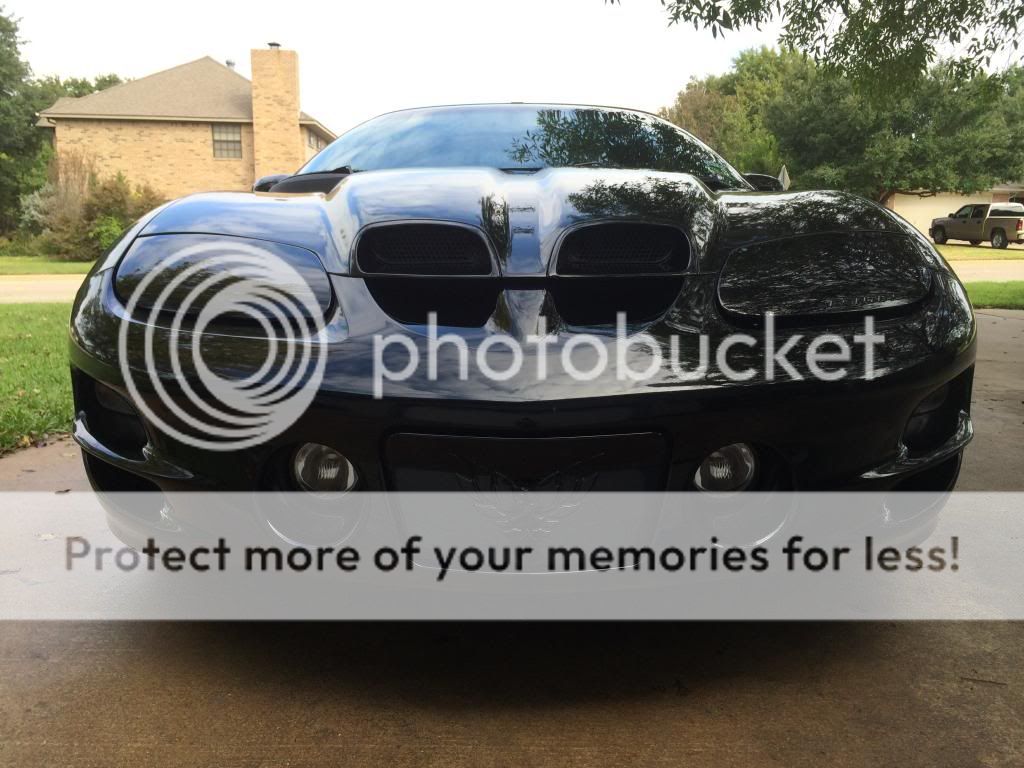
This is the corner I was talking about. Make sure that the lines are matched up and the hood isn't pushed too far back.
Here is my factory WS6 hood that I put on my T/A. The headlights may look a little tight in the inner corners by the hood, but I think it's just the color of the car and the camera lighting. I used my best friend's factory WS6 car to guide me in my fitment and it came out great.
This is the corner I was talking about. Make sure that the lines are matched up and the hood isn't pushed too far back.
Last edited by TechCam97; 05-14-2014 at 09:10 AM.
05-14-2014, 02:22 PM
#11
Teching In
Thread Starter
Join Date: Apr 2014
Posts: 18
Likes: 0
Received 0 Likes
on
0 Posts
From the looks of the lines, it may be pushed a bit too far back. Take some pictures of where the rear corners of the hood meet the fenders. Maybe even some side profile pictures by the fenders and nose. Doing it through words and pictures can get a bit aggravating, haha! If I lived near you I could help you get it knocked out in no time, but I guess we'll just have to do our best on here!
Here is my factory WS6 hood that I put on my T/A. The headlights may look a little tight in the inner corners by the hood, but I think it's just the color of the car and the camera lighting. I used my best friend's factory WS6 car to guide me in my fitment and it came out great.
This is the corner I was talking about. Make sure that the lines are matched up and the hood isn't pushed too far back.
05-14-2014, 03:12 PM
#13
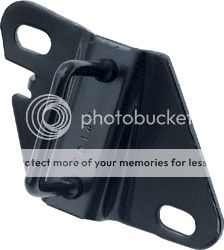
Yes, I would definitely nudge it down a bit. It would be easiest with two people. When I did mine, I removed the hood striker from the front of the hood:
I then removed the two hydraulic hood struts and set them aside. After that I just barely loosened the two bolts on each side of the rear hood bracket where the bracket meets the hood. When I say barely, I mean barely, haha! I would loosen them a bit and then grip the hood and pull, gradually increasing the strength of my pull. When I had the bolts loose enough that I could move the hood, but it wouldn't move on its own, then I would start with the fitting. I took the striker off so I wouldn't have to keep popping the hood to loosen or tighten the bolts. After that just work your way down to the front. I made sure the rear lines matched up with the fenders, then checked the side gaps all the way down, and then checked the headlights and front bumper. All of the panels have bolts or nuts/washers and you can tweak them a little bit to help the overall shape come through. It takes a while, but if you are patient you will start to see progress and it becomes easier! Make sure your four hood bump stops are good as well, they help with the elevation of the hood when it is all the way closed. If those are broken or missing, it's really hard to get the hood to sit right. Hope this helps!
I then removed the two hydraulic hood struts and set them aside. After that I just barely loosened the two bolts on each side of the rear hood bracket where the bracket meets the hood. When I say barely, I mean barely, haha! I would loosen them a bit and then grip the hood and pull, gradually increasing the strength of my pull. When I had the bolts loose enough that I could move the hood, but it wouldn't move on its own, then I would start with the fitting. I took the striker off so I wouldn't have to keep popping the hood to loosen or tighten the bolts. After that just work your way down to the front. I made sure the rear lines matched up with the fenders, then checked the side gaps all the way down, and then checked the headlights and front bumper. All of the panels have bolts or nuts/washers and you can tweak them a little bit to help the overall shape come through. It takes a while, but if you are patient you will start to see progress and it becomes easier! Make sure your four hood bump stops are good as well, they help with the elevation of the hood when it is all the way closed. If those are broken or missing, it's really hard to get the hood to sit right. Hope this helps!
05-14-2014, 04:29 PM
#14
Staging Lane
iTrader: (2)
Join Date: Jan 2013
Location: Johnstown Pa
Posts: 67
Likes: 0
Received 0 Likes
on
0 Posts
Here is the rest of the instruction's this is before you do the covers and some of what is mentioned about the bumper cover should not apply to you as I have a super hawk hood and fittment with bumper is super crucial....good luck hope it helps
Now is when I bolt the hood to the hinges. Don't bother installing the latch and lever yet, just finger tighten the hinge bolts until they're secure, but allowing for some movement of the hood. Then you can lower the hood to get an idea of how it sits. There are two guide tabs on the hinge assembly that can be a real pain... but you'll just basically have to do some trial and error to get them to feed into the upper portion of the hinge properly when lowering the hood. Once lowered, you should still be able to move the hood in any direction you need to align it to the fenders and bumper cover. I do leave a bit of extra material on the front edge of the hood, so if it appears to be too tight to the bumper cover, you can shave down some of the material on the front edge to get it to sit properly into the bumper. Over time, the soft plastic bumper and the plastic push pins that mount it stretch under their own weight... and more-so if the car has ever been bottomed out on a parking block or something of that sort... that's why build it with a bit of extra material, to compensate for any sagging of the bumper. Once you've got the fender and bumper seams aligned uniformly, go ahead and torque the hinge bolts down to keep the hood in alignment. Now you can go ahead and install the struts and the u-bolt latch (you can leave the lever for last or install it now if you prefer). The latch piece has slotted holes, so it's best to finger-tighten the bolts and lower it into the receiver slowly, watching it feed into the receiver, so you know if it needs to move left or right, then you can tighten the bolts. It may not lock into the receiver yet, but that's okay for now. Next step is setting the levels right. I first crank all 4 rubber bumpstops (2 behind headlights, 2 in between) all the way down to not interfere with the hood yet. If the level is a bit high or a bit low at the front of the hood, you'll want to adjust the latch receiver mechanism first. It's held to your secondary core support with two 13mm bolts into slotted holes. That gives you about 2 inches of vertical adjustment. Use that to set the level of the nose of the hood with the bumper. Once again, if there's any interference, you can sand down the edges a bit to fit the bumper's contours. After that is set, then you can use the bumpstops to make the fine adjustments at the front corners of the hood.
Now is when I bolt the hood to the hinges. Don't bother installing the latch and lever yet, just finger tighten the hinge bolts until they're secure, but allowing for some movement of the hood. Then you can lower the hood to get an idea of how it sits. There are two guide tabs on the hinge assembly that can be a real pain... but you'll just basically have to do some trial and error to get them to feed into the upper portion of the hinge properly when lowering the hood. Once lowered, you should still be able to move the hood in any direction you need to align it to the fenders and bumper cover. I do leave a bit of extra material on the front edge of the hood, so if it appears to be too tight to the bumper cover, you can shave down some of the material on the front edge to get it to sit properly into the bumper. Over time, the soft plastic bumper and the plastic push pins that mount it stretch under their own weight... and more-so if the car has ever been bottomed out on a parking block or something of that sort... that's why build it with a bit of extra material, to compensate for any sagging of the bumper. Once you've got the fender and bumper seams aligned uniformly, go ahead and torque the hinge bolts down to keep the hood in alignment. Now you can go ahead and install the struts and the u-bolt latch (you can leave the lever for last or install it now if you prefer). The latch piece has slotted holes, so it's best to finger-tighten the bolts and lower it into the receiver slowly, watching it feed into the receiver, so you know if it needs to move left or right, then you can tighten the bolts. It may not lock into the receiver yet, but that's okay for now. Next step is setting the levels right. I first crank all 4 rubber bumpstops (2 behind headlights, 2 in between) all the way down to not interfere with the hood yet. If the level is a bit high or a bit low at the front of the hood, you'll want to adjust the latch receiver mechanism first. It's held to your secondary core support with two 13mm bolts into slotted holes. That gives you about 2 inches of vertical adjustment. Use that to set the level of the nose of the hood with the bumper. Once again, if there's any interference, you can sand down the edges a bit to fit the bumper's contours. After that is set, then you can use the bumpstops to make the fine adjustments at the front corners of the hood.
05-14-2014, 05:56 PM
#15
Makes perfect sense. I have a son who is exactly the same way. Every little flaw, vibration, noise, is amplified in his mind until he drives me crazy. I finally told him no more mods until he can accept a little imperfection here and there. Thank God he drives a CTS-V. If he were driving my 'chicken, he'd be in the looney bin by now.
05-14-2014, 06:49 PM
#16
TECH Addict
iTrader: (1)

Join Date: Apr 2012
Location: Ellijay, GA
Posts: 2,769
Likes: 0
Received 0 Likes
on
0 Posts
something else you may want to adjust is the rubber bump stop just behind the passenger headlight that holds that corner of the hood up (the one that the PO of my car replaced with the bolt seen in the attached picture), it looks like it's adjusted to far up and that will throw off how things appear to line up a little and this is one of those things where a little is a lot.
05-14-2014, 11:03 PM
#18
Teching In
Thread Starter
Join Date: Apr 2014
Posts: 18
Likes: 0
Received 0 Likes
on
0 Posts
Makes perfect sense. I have a son who is exactly the same way. Every little flaw, vibration, noise, is amplified in his mind until he drives me crazy. I finally told him no more mods until he can accept a little imperfection here and there. Thank God he drives a CTS-V. If he were driving my 'chicken, he'd be in the looney bin by now.