
VHT Nite Shades Write Up (Installation, Preparation)


Thread Starter
12 Second Club
iTrader: (3)
Joined: Apr 2005
Posts: 894
Likes: 0
From: Toms River, NJ
After all my searching I came up with limited information leaving me to fend for myself, lol so I decided to make history and do a quick write up on the application, installation, preparation, emancipation proclimation of VHT Nite Shades. And for those who search for Night Shades boom this is now included in that search.  N' Joy.
Difficulty: Easy
Time: 1-2 hours application. (A lot of downtime waiting for it to dry.) + 6 Hours for final dry.
Tools needed:
(2) Cans VHT Nite-Shade (summit racing)
** Note: 2 Cans are recommended so that you dont run out in mid project, however you may not need the 2nd can, the amount used varys per application. In situation, I used both to the last drop. I'd say play it safe for the extra $10. **
(1) 3m Scuff Pad (advance auto)
(1) Can Clear Coat (BIG_MIKE Suggests Duplicolor Truck/SUV Clear Coat, the generic crap I used started to fade in about a year, so apply generous coats and use quality stuff! Let me know if you've used anything you'd recommend for long lasting shine.) ... lol I sounded like a bad infomercial.
(1) Windex / Similar Product
(1) Microfiber (recommended but not mandatory)
Steps:
1) Remove parts to be blacked out.
2) Clean all parts with windex and microfiber.
3) Scuff with 3M Scuff pad to prep surface.
4) Wipe excess dust with microfiber.
5) Place 2-piece items side by side, (ie taillights, passenger side corners... etc.)
6) Spray even short bursts across both items as if they were one item to ensure even coating.
7) Wait until the Nite Shades becomes tacky and repeat until desired darkness is reached ( I used about 6, but coat thickness varies, so dont use that as a gauge.)
8) Upon completion of Nite Shades wait about 30 minutes for it to semi-dry, then begin to apply clear coat spray. *Note: When I applied the first coat, I lost most gloss of the nite shades, dont be discouraged, wait til tacky and apply again, repeat until shine is restored.*
9) Wait roughly 6 hours before putting parts back in their original place on vehicle.
10) Drool at your finished job and await mass compliments.
FINISHED PRODUCT:
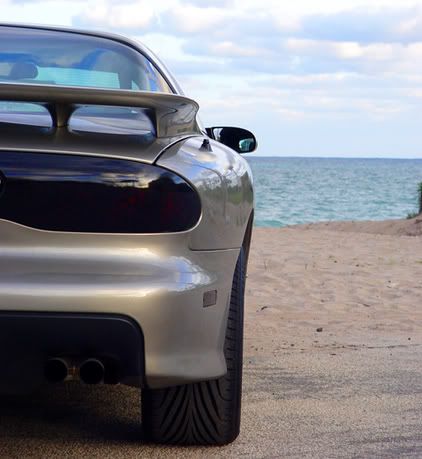
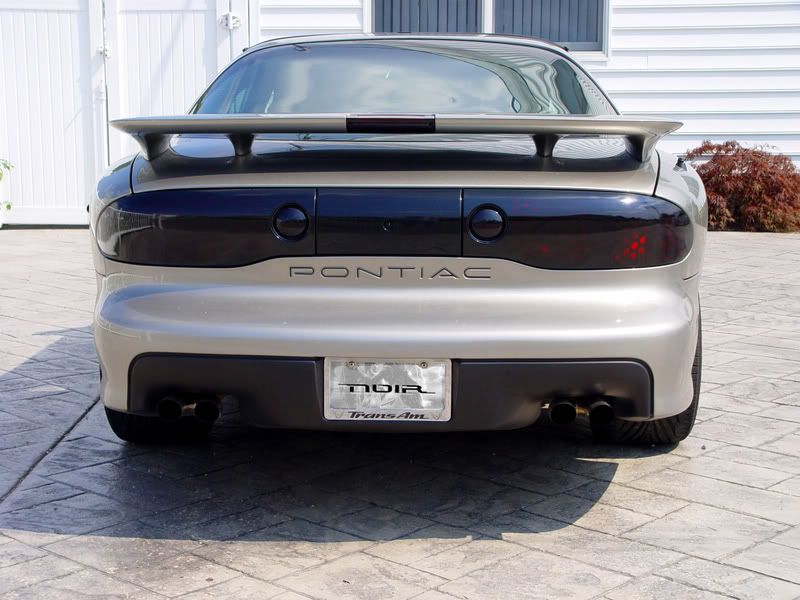
[This shot shows that the stockers still show through in the right lighting, but can also seem BLACK as well.]
Hope this helps everyone. If you have any questions, please feel free to ask. Or if you think I should change something in this write-up let me know, just drop me a PM.
- - - - - - -
Update [6/05/07]: My tails started to orange peel on the top sections where the sun hits the most. So after a little over a year this stuff starts to go in direct sunlight and all day outdoor exposure. Maybe a better clear coat would help next time around. I'll be repainting them again soon.
N' Joy.Difficulty: Easy
Time: 1-2 hours application. (A lot of downtime waiting for it to dry.) + 6 Hours for final dry.
Tools needed:
(2) Cans VHT Nite-Shade (summit racing)
** Note: 2 Cans are recommended so that you dont run out in mid project, however you may not need the 2nd can, the amount used varys per application. In situation, I used both to the last drop. I'd say play it safe for the extra $10. **
(1) 3m Scuff Pad (advance auto)
(1) Can Clear Coat (BIG_MIKE Suggests Duplicolor Truck/SUV Clear Coat, the generic crap I used started to fade in about a year, so apply generous coats and use quality stuff! Let me know if you've used anything you'd recommend for long lasting shine.) ... lol I sounded like a bad infomercial.
(1) Windex / Similar Product
(1) Microfiber (recommended but not mandatory)
Steps:
1) Remove parts to be blacked out.
2) Clean all parts with windex and microfiber.
3) Scuff with 3M Scuff pad to prep surface.
4) Wipe excess dust with microfiber.
5) Place 2-piece items side by side, (ie taillights, passenger side corners... etc.)
6) Spray even short bursts across both items as if they were one item to ensure even coating.
7) Wait until the Nite Shades becomes tacky and repeat until desired darkness is reached ( I used about 6, but coat thickness varies, so dont use that as a gauge.)
8) Upon completion of Nite Shades wait about 30 minutes for it to semi-dry, then begin to apply clear coat spray. *Note: When I applied the first coat, I lost most gloss of the nite shades, dont be discouraged, wait til tacky and apply again, repeat until shine is restored.*
9) Wait roughly 6 hours before putting parts back in their original place on vehicle.
10) Drool at your finished job and await mass compliments.
FINISHED PRODUCT:
[This shot shows that the stockers still show through in the right lighting, but can also seem BLACK as well.]
Hope this helps everyone. If you have any questions, please feel free to ask. Or if you think I should change something in this write-up let me know, just drop me a PM.
- - - - - - -
Update [6/05/07]: My tails started to orange peel on the top sections where the sun hits the most. So after a little over a year this stuff starts to go in direct sunlight and all day outdoor exposure. Maybe a better clear coat would help next time around. I'll be repainting them again soon.
Last edited by NOIR; May 21, 2007 at 12:01 PM.


looks really good, personally I would have gone with the covers ( I dont like the reverse lights) but it looks fantastic , good writeup too BTW
also how much VHT did you actually end up using
also how much VHT did you actually end up using


Trending Topics
Thread Starter
12 Second Club
iTrader: (3)
Joined: Apr 2005
Posts: 894
Likes: 0
From: Toms River, NJ
sticky lol sounds good to me. free promotion for my music too  www.goddlee.com ooh yeah !
i ended up using 2 whole cans, ran out at the very end of the last coat on one tail light. sprayed what was left on the end and it ran EVER so slightly. hardly noticeable but i know its there. lol but that 2nd can just BARELY made it.
the reason i didnt want to use the covers is because i heard they melt to the lights plus they seem much dimmer.
lol sounds good to me. free promotion for my music too www.goddlee.com ooh yeah !i ended up using 2 whole cans, ran out at the very end of the last coat on one tail light. sprayed what was left on the end and it ran EVER so slightly. hardly noticeable but i know its there. lol but that 2nd can just BARELY made it.
the reason i didnt want to use the covers is because i heard they melt to the lights plus they seem much dimmer.
Last edited by SaintNJ; Feb 3, 2006 at 04:28 PM.

Added this to the Appearance Hall of Fame. Thanks for the write-up!
https://ls1tech.com/forums/showthread.php?p=4148559
https://ls1tech.com/forums/showthread.php?p=4148559


My sidemarkers and third brake light are VHT. I put 3-4 coats on each. My taillights have AVS covers. Click the images below for larger pictures.
Daytime
Lights Off:


Lights On:


Brakes On:
Nighttime
Lights On:


Brakes On:
Sorry about the quality of the night pictures. When I use the night setting on my camera it's supposed to be on a tripod, but since I don't have a tripod I have to set on the ground in weird places to take a picture.
Daytime
Lights Off:


Lights On:


Brakes On:

Nighttime
Lights On:


Brakes On:

Sorry about the quality of the night pictures. When I use the night setting on my camera it's supposed to be on a tripod, but since I don't have a tripod I have to set on the ground in weird places to take a picture.
Last edited by komik; Feb 3, 2006 at 07:17 PM. Reason: Added one more picture


Thread Starter
12 Second Club
iTrader: (3)
Joined: Apr 2005
Posts: 894
Likes: 0
From: Toms River, NJ
i was told not to buff/sand the nite shades at all. so i dont want to be responsible for anyone screwin up the job, lol. i guess at your own risk you could try it.
thanks tho, hope this write up is helpful for you all. i know i coulda used it when i did it.
and if komik's pix arent enough, let me know. ill try to snag a few shots this coming week. but the light shines through fine. at night u cant even tell theyre blacked out unless my lights are off.
thanks tho, hope this write up is helpful for you all. i know i coulda used it when i did it.
and if komik's pix arent enough, let me know. ill try to snag a few shots this coming week. but the light shines through fine. at night u cant even tell theyre blacked out unless my lights are off.

Originally Posted by ArcticZ28
Might want to add the optional wet sand and buff to the end of the process if people want the "smooth as glass" look.
Have you tried this yet? If you have, can you post this process aswell, thanks.
TECH Addict
iTrader: (5)
Joined: Jan 2004
Posts: 2,458
Likes: 0
From: Miami, Fl. - Hurricane Highway
Looks awesome, definetly a great write-up. I already got the black out kit for my front turn signals and foglights. Now just need to darken the side-markers and the Taillights.
-Joel
-Joel