
GPS antenna and SWI-Jack ?
 05-25-2010, 02:21 PM
#1
Teching In
Thread Starter
Join Date: Oct 2009
Location: Whittier CA
Posts: 29
Likes: 0
Received 0 Likes
on
0 Posts
Hey guys, I'm going to install a Clarion NX400 double din radio soon and I reading through the install guide and I was wondering where is the best place to mount the GPS antenna and if it has to face a certain direction. I was thinking about running it up the passenger side pillar and mounting it to the top corner of the wind shield.
And on the SWI-Jack, I was wondering where should the power for it come from. I wasn't sure if I should tie into the power for the radio or somewhere else. Any help would be great. Thanks
And on the SWI-Jack, I was wondering where should the power for it come from. I wasn't sure if I should tie into the power for the radio or somewhere else. Any help would be great. Thanks

 05-25-2010, 04:28 PM
#3
TECH Fanatic
iTrader: (24)
Join Date: Nov 2001
Location: Dallas, TX
Posts: 1,126
Likes: 0
Received 0 Likes
on
0 Posts


Instructions (in case you need them)
05-25-2010, 05:30 PM
#5
Yes, I was going to run it up the A pillar, then I was thinking about mounting it on the trunk lid (I have a convertible) then I said screw it and threw it on top of the head unit, until I was going to have more time. It's been working fine for over a year.
05-25-2010, 07:36 PM
#6
You can put the GPS antenna under the dash pad on one of the two keyhole-shaped metal plates near the outer edges. This gives the antenna its magnetic mount and a decent ground plane for improved reception. The plastic dash pad doesn't affect reception at all but provides for a completely hidden installation. It is easy to route the cable up from the head unit so the whole installation can be done in about 15 minutes. In my car, I have the satellite radio antenna on the left and the GPS antenna on the right... the left side gets slightly more consistent reception because it is less likely to be blocked by roadside trees and other obstructions. If you are installing only a GPS antenna then the left side will be just a little better.

05-27-2010, 01:29 AM
#7
Teching In
Thread Starter
Join Date: Oct 2009
Location: Whittier CA
Posts: 29
Likes: 0
Received 0 Likes
on
0 Posts
Thanks everyone for the help. Ill try putting it under the dash pad, that looks like a really good spot for it. Ill post pics of the install when I do it Im just waiting on the bezel.
Trending Topics
05-27-2010, 12:05 PM
#8
TECH Enthusiast
iTrader: (15)
Join Date: Jan 2010
Location: Lawrence, KS
Posts: 552
Likes: 0
Received 0 Likes
on
0 Posts
You can put the GPS antenna under the dash pad on one of the two keyhole-shaped metal plates near the outer edges. This gives the antenna its magnetic mount and a decent ground plane for improved reception. The plastic dash pad doesn't affect reception at all but provides for a completely hidden installation. It is easy to route the cable up from the head unit so the whole installation can be done in about 15 minutes. In my car, I have the satellite radio antenna on the left and the GPS antenna on the right... the left side gets slightly more consistent reception because it is less likely to be blocked by roadside trees and other obstructions. If you are installing only a GPS antenna then the left side will be just a little better.
How do you get that pad up?
05-27-2010, 12:40 PM
#9
It's really quite simple and quick once you've done it before. Allow about 30 minutes to remove and replace it the first time. It takes only half that time once you're familiar with where the clips are located.
- Remove your t-tops.
- Remove the two screws at the top of the a-pillar trim on each side and pull off the trim. A gentle twisting motion will help release the clips holding it on.
- Gently pry up the upper dash pad. It is held in place by a combination of clips and squares of Velcro. Work carefully because the plastic tends to get brittle with age. Also use caution with the edges - they are very sharp (...he says as he types with only 9 fingers).
Replacement is the reverse of installation. There are a couple of locating pins on the dash pad that have to be lined up with the holes in the dash but once you have it lined up it just presses into place.
05-27-2010, 01:10 PM
#11
You're right - in most cases the GPS satellite signal is strong enough that antenna placement isn't critical. But for those who live in places where signal might get interruptions (in cities among tall buildings or even on the "canopy" roads in Florida) placing it on a metal surface for ground plane and with as little as possible above it will give the best reception.
"gps antennae"??? You have more than one antenna?
"gps antennae"??? You have more than one antenna?
05-27-2010, 03:00 PM
#12
TECH Enthusiast
iTrader: (15)
Join Date: Jan 2010
Location: Lawrence, KS
Posts: 552
Likes: 0
Received 0 Likes
on
0 Posts
It's really quite simple and quick once you've done it before. Allow about 30 minutes to remove and replace it the first time. It takes only half that time once you're familiar with where the clips are located.
- Remove your t-tops.
- Remove the two screws at the top of the a-pillar trim on each side and pull off the trim. A gentle twisting motion will help release the clips holding it on.
- Gently pry up the upper dash pad. It is held in place by a combination of clips and squares of Velcro. Work carefully because the plastic tends to get brittle with age. Also use caution with the edges - they are very sharp (...he says as he types with only 9 fingers).
Replacement is the reverse of installation. There are a couple of locating pins on the dash pad that have to be lined up with the holes in the dash but once you have it lined up it just presses into place.
- Remove your t-tops.
- Remove the two screws at the top of the a-pillar trim on each side and pull off the trim. A gentle twisting motion will help release the clips holding it on.
- Gently pry up the upper dash pad. It is held in place by a combination of clips and squares of Velcro. Work carefully because the plastic tends to get brittle with age. Also use caution with the edges - they are very sharp (...he says as he types with only 9 fingers).
Replacement is the reverse of installation. There are a couple of locating pins on the dash pad that have to be lined up with the holes in the dash but once you have it lined up it just presses into place.
Last question, I promsie
 05-27-2010, 03:09 PM
#13
You want to remove the headliner? Or you want to know if it's more work to position the GPS antenna in the headliner?
Removing the headliner takes a bit of work but isn't necessary for a GPS antenna. You can remove the a-pillar trim from one side, run the antenna wire up under it, and just tuck the antenna inside the leading edge of the headliner without pulling the whole thing down. A little Velcro or 2-sided tape will keep it from sliding around. This location doesn't give you any ground plane and takes almost as long to complete (you have to remove the a-pillar trim anyway and you also have to remove the passenger side knee panel and kick panel to route the antenna wire from the HU to the a-pillar).
Removing the headliner takes a bit of work but isn't necessary for a GPS antenna. You can remove the a-pillar trim from one side, run the antenna wire up under it, and just tuck the antenna inside the leading edge of the headliner without pulling the whole thing down. A little Velcro or 2-sided tape will keep it from sliding around. This location doesn't give you any ground plane and takes almost as long to complete (you have to remove the a-pillar trim anyway and you also have to remove the passenger side knee panel and kick panel to route the antenna wire from the HU to the a-pillar).
05-27-2010, 03:15 PM
#14
TECH Enthusiast
iTrader: (15)
Join Date: Jan 2010
Location: Lawrence, KS
Posts: 552
Likes: 0
Received 0 Likes
on
0 Posts
You want to remove the headliner? Or you want to know if it's more work to position the GPS antenna in the headliner?
Removing the headliner takes a bit of work but isn't necessary for a GPS antenna. You can remove the a-pillar trim from one side, run the antenna wire up under it, and just tuck the antenna inside the leading edge of the headliner without pulling the whole thing down. A little Velcro or 2-sided tape will keep it from sliding around. This location doesn't give you any ground plane and takes almost as long to complete (you have to remove the a-pillar trim anyway and you also have to remove the passenger side knee panel and kick panel to route the antenna wire from the HU to the a-pillar).
Removing the headliner takes a bit of work but isn't necessary for a GPS antenna. You can remove the a-pillar trim from one side, run the antenna wire up under it, and just tuck the antenna inside the leading edge of the headliner without pulling the whole thing down. A little Velcro or 2-sided tape will keep it from sliding around. This location doesn't give you any ground plane and takes almost as long to complete (you have to remove the a-pillar trim anyway and you also have to remove the passenger side knee panel and kick panel to route the antenna wire from the HU to the a-pillar).
 . But my headliner's edges are torn to hell... typical wear and tear I guess?
05-27-2010, 03:49 PM
. But my headliner's edges are torn to hell... typical wear and tear I guess?
05-27-2010, 03:49 PM
#15
1. Remove the t-tops.
2. Open the hatch.
3. Remove the sun visors.
4. Remove the dome lamp housing.
5. Remove the a-pillar trim panels.
6. Remove the cargo area side trim panels.
7. Loosen the seat belt escutcheons.
8. Slide the seat belt downward.
9. Remove the push-in retainers from the headliner panel.
10. Pull on the headliner panel in order to remove the panel from the roof panel.
11. Slide the seat belt through the seat belt slots.
12. Remove the headliner panel from the car through the hatch opening.
05-27-2010, 04:01 PM
#16
TECH Enthusiast
iTrader: (15)
Join Date: Jan 2010
Location: Lawrence, KS
Posts: 552
Likes: 0
Received 0 Likes
on
0 Posts
1. Remove the t-tops.
2. Open the hatch.
3. Remove the sun visors.
4. Remove the dome lamp housing.
5. Remove the a-pillar trim panels.
6. Remove the cargo area side trim panels.
7. Loosen the seat belt escutcheons.
8. Slide the seat belt downward.
9. Remove the push-in retainers from the headliner panel.
10. Pull on the headliner panel in order to remove the panel from the roof panel.
11. Slide the seat belt through the seat belt slots.
12. Remove the headliner panel from the car through the hatch opening.
2. Open the hatch.
3. Remove the sun visors.
4. Remove the dome lamp housing.
5. Remove the a-pillar trim panels.
6. Remove the cargo area side trim panels.
7. Loosen the seat belt escutcheons.
8. Slide the seat belt downward.
9. Remove the push-in retainers from the headliner panel.
10. Pull on the headliner panel in order to remove the panel from the roof panel.
11. Slide the seat belt through the seat belt slots.
12. Remove the headliner panel from the car through the hatch opening.
06-28-2010, 12:25 AM
#17
Teching In
Thread Starter
Join Date: Oct 2009
Location: Whittier CA
Posts: 29
Likes: 0
Received 0 Likes
on
0 Posts
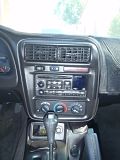
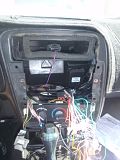
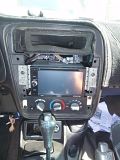
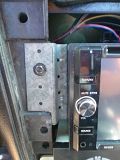
hey guys so I got my trim piece finally and got my radio installed and everything is hooked up. The only problem I ran into is I got a little confused with the SWI-Jack. My question is what cable do I hook the SWI-Jack too. I know the green wire from the SWI-Jack goes to something Im just not sure what and where it is. and here are some pics of the install.
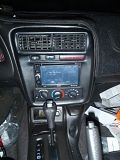


Last edited by p8ntballkid090; 06-28-2010 at 12:32 AM.
06-28-2010, 07:14 AM
#18
The green wire connects to the dark blue wire in the factory harness (not the harness adapter) at pin 14 of the white connector. There are two dark blue wires in that connector - you want the one that has blank spaces on either side not the one that's between a yellow and a light blue wire.