HOW TO: Rebuild front turn signal sockets, no cutting/splicing required
 10-12-2015, 08:30 AM
#1

I posted this on a V6 forum a while back but decided I should repost it here as well.
As we all know, the fbodies love to burn, melt, or otherwise destroy their front signal sockets and end up needing new ones. Of course, that means chopping off your factory socket, splicing on a new one, etc etc...
Actually, there is a way to avoid doing all that and replace just the melted parts while leaving the factory wires intact. And it only takes 5-10 minutes
First off, the replacement socket can be gotten at Autozone or Advance Auto. Part number 85881 - standard GM socket. Their computer will say that it doesn't fit these cars, but their computer is stupid. Trust me, I replaced both sockets on my Camaro with these and they are just fine
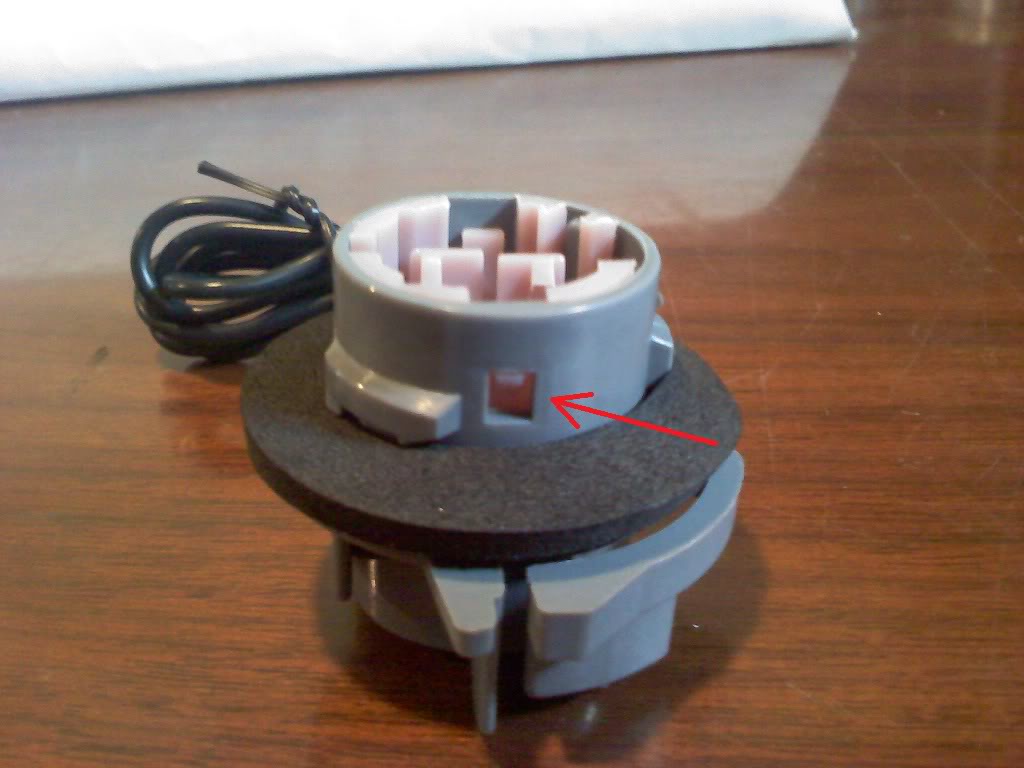
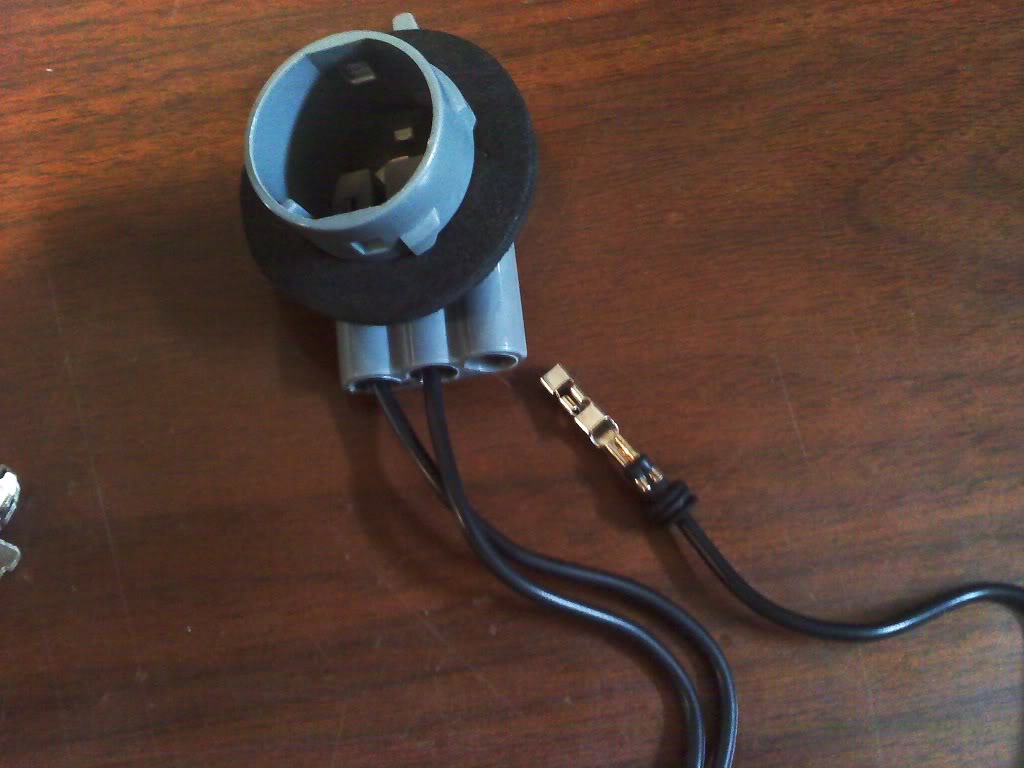
First step is to disassemble the new socket. There are a couple tabs that hold the insert in place. Push them in and the center section pops out.
And you'll be left with this:
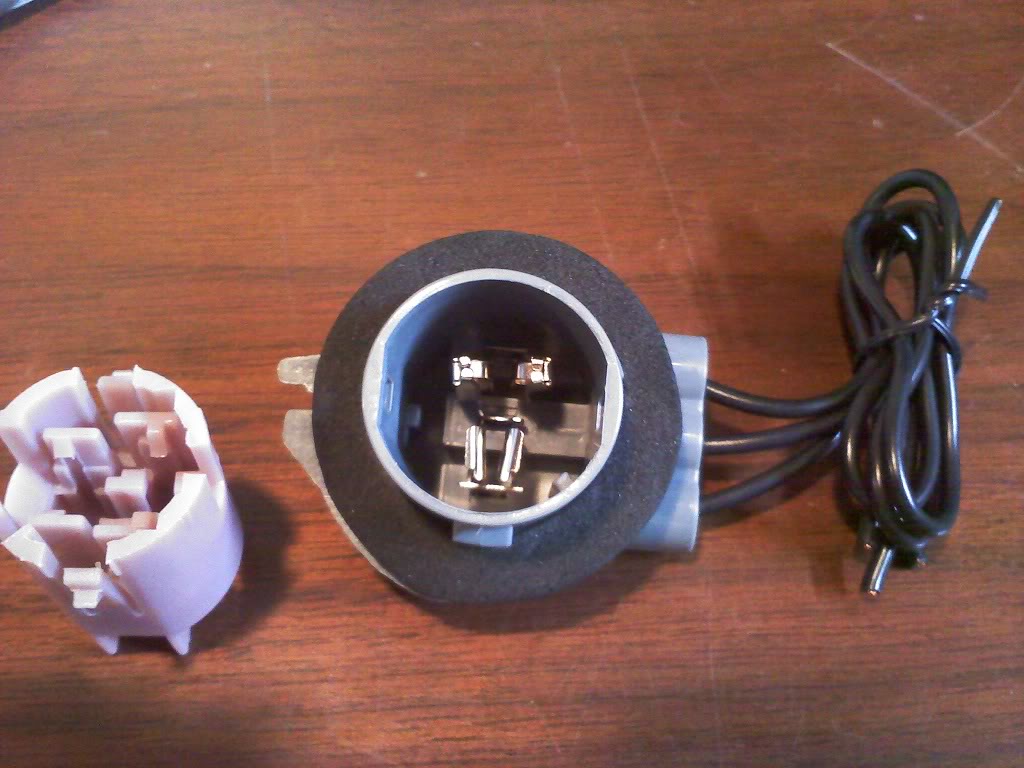
Those pins just plug in to the lower part where the wires go in. Pull all 3 of them out (I used needle nose pliers to get a hold of them) and put them back in the center plastic section where they belong. You can't really mix them up as they fit only one way.
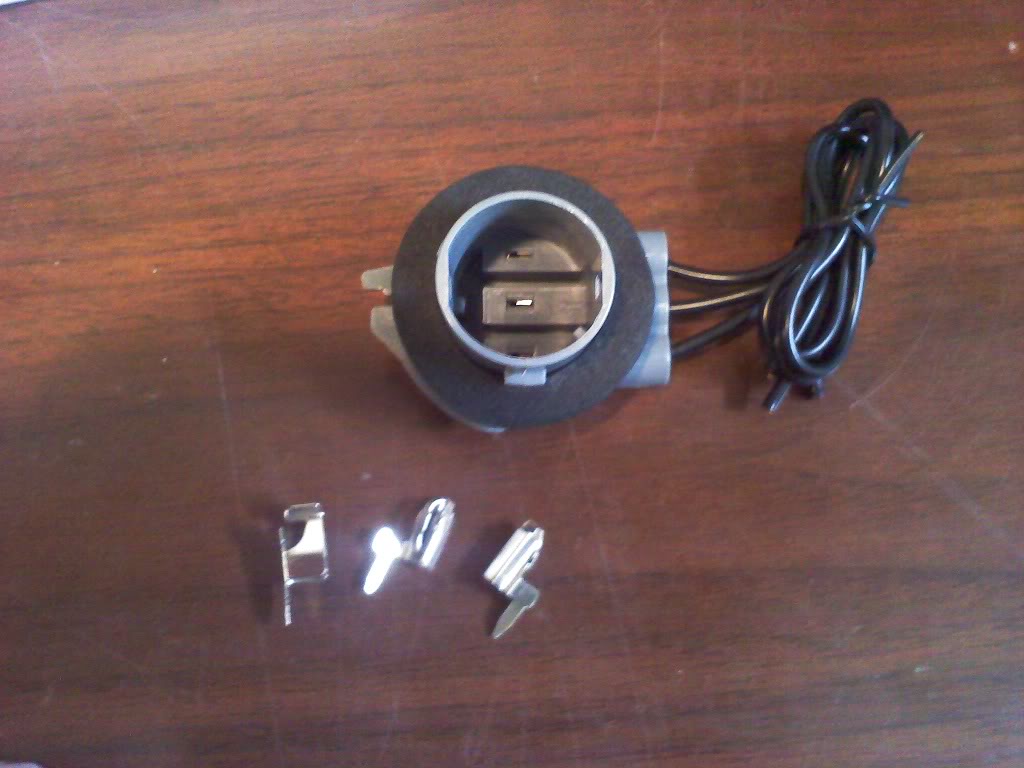
With the socket disassembled this far, the wires just pull straight out of the lower socket housing. Pull all 3 of them out.
Now repeat the process on your current fried socket as best as you can. Don't worry about destroying the old socket, it's shot anyway. Just make sure that you don't damage the wires. Take note of the order of the wires in the old socket housing.
Now push the wires in the new lower housing in the correct order. Then just line up the new center section with the connectors in it, and press it in until it clicks in place. Voila, done!
Hope this helps some of you. I really should have posted this a long time ago.
As we all know, the fbodies love to burn, melt, or otherwise destroy their front signal sockets and end up needing new ones. Of course, that means chopping off your factory socket, splicing on a new one, etc etc...
Actually, there is a way to avoid doing all that and replace just the melted parts while leaving the factory wires intact. And it only takes 5-10 minutes
First off, the replacement socket can be gotten at Autozone or Advance Auto. Part number 85881 - standard GM socket. Their computer will say that it doesn't fit these cars, but their computer is stupid. Trust me, I replaced both sockets on my Camaro with these and they are just fine
First step is to disassemble the new socket. There are a couple tabs that hold the insert in place. Push them in and the center section pops out.
And you'll be left with this:
Those pins just plug in to the lower part where the wires go in. Pull all 3 of them out (I used needle nose pliers to get a hold of them) and put them back in the center plastic section where they belong. You can't really mix them up as they fit only one way.
With the socket disassembled this far, the wires just pull straight out of the lower socket housing. Pull all 3 of them out.
Now repeat the process on your current fried socket as best as you can. Don't worry about destroying the old socket, it's shot anyway. Just make sure that you don't damage the wires. Take note of the order of the wires in the old socket housing.
Now push the wires in the new lower housing in the correct order. Then just line up the new center section with the connectors in it, and press it in until it clicks in place. Voila, done!
Hope this helps some of you. I really should have posted this a long time ago.


 10-13-2015, 10:00 AM
#3
The stock socket should be a little different, but the procedure is the same and the parts are compatible. I believe the stock socket has the pins integral to the insert.
This should be a sticky, as it is in some of the other vehicle specific sections.
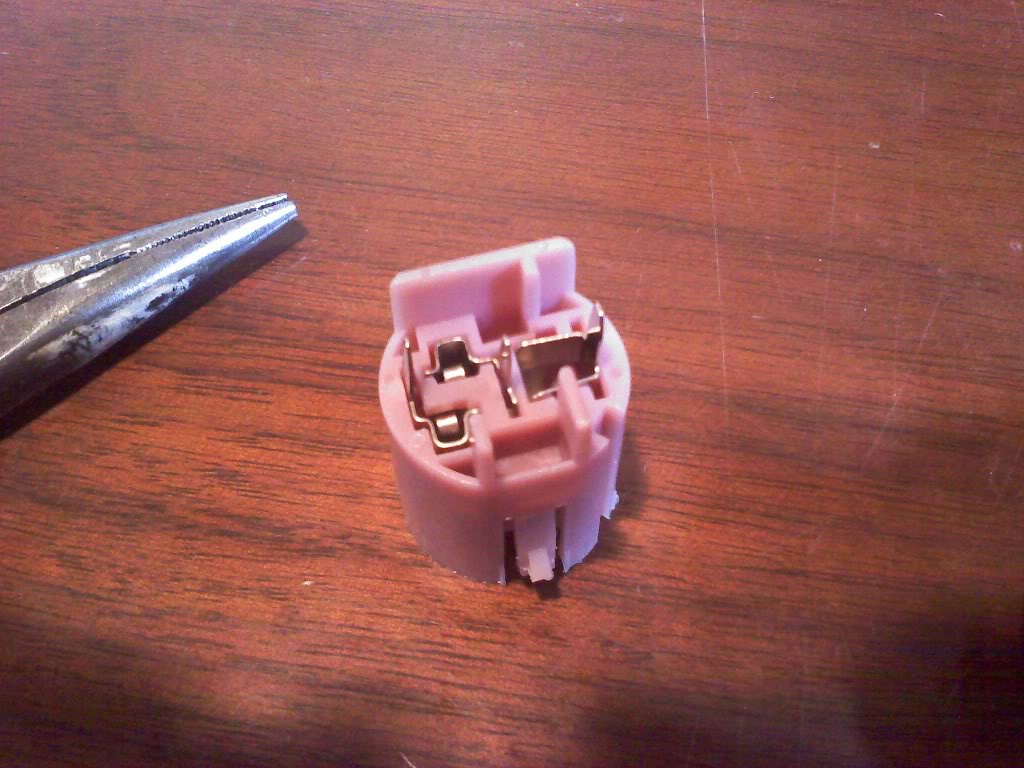
This thread shows the stock insert with the integral pins:
https://ls1tech.com/forums/pontiac-f...et-repair.html
The individual pieces can also be had separately from Mouser or other suppliers. No need to get the whole socket. Details can be found in this thread:
https://ls1tech.com/forums/general-m...ng-insert.html
This should be a sticky, as it is in some of the other vehicle specific sections.
This thread shows the stock insert with the integral pins:
https://ls1tech.com/forums/pontiac-f...et-repair.html
The individual pieces can also be had separately from Mouser or other suppliers. No need to get the whole socket. Details can be found in this thread:
https://ls1tech.com/forums/general-m...ng-insert.html
Last edited by wssix99; 10-13-2015 at 10:21 AM.
10-13-2015, 11:11 AM
#4
I couldn't tell if the pins were part of the insert or not, mine was too roasted to be able tell. The plastic all just fell apart so it appeared the pins were the same way. All started with a simple bulb change, ended up having to redo the whole socket!
I figured given how the sockets are usually pretty screwed up that it you'd need basically the entire thing. I didn't know you could get just the innards. One of my sockets I probably could have done that, but the other I don't think that would have worked out. But, it was a lot quicker to run to the local Autozone and grab a socket, and it was only 8 bucks anyway.
I figured given how the sockets are usually pretty screwed up that it you'd need basically the entire thing. I didn't know you could get just the innards. One of my sockets I probably could have done that, but the other I don't think that would have worked out. But, it was a lot quicker to run to the local Autozone and grab a socket, and it was only 8 bucks anyway.
10-13-2015, 05:42 PM
#5
I'm wrong. I have a surplus insert and the pins do come out. It's hard to do, though. The Delphi insert is exactly like the one you pictured, except its tan and appears to be a different type of plastic. It will be interesting to see how your aftermarket one holds up and if its more durable than the stock plastic.
Delphi actually made a high temp version of the insert, which... we were not blessed with. I looked in to procuring some high temps a long time ago, but it quickly became obvious that you could buy a lifetime's worth of regular inserts for much less than just one of the high temp ones. (Even if they could be had, I could only find places who would look in to doing bulk purchases of them.)
Delphi actually made a high temp version of the insert, which... we were not blessed with. I looked in to procuring some high temps a long time ago, but it quickly became obvious that you could buy a lifetime's worth of regular inserts for much less than just one of the high temp ones. (Even if they could be had, I could only find places who would look in to doing bulk purchases of them.)
Last edited by wssix99; 10-14-2015 at 07:17 AM.
Trending Topics
08-31-2016, 04:51 PM
#8
TECH Enthusiast

Join Date: Apr 2011
Posts: 505
Likes: 0
Received 0 Likes
on
0 Posts
The bulbs jiggle a little and this causes them to dim. This is def an issue with the socket, right?
08-31-2016, 09:12 PM
#10
I really dont' know how a 1157 socket is put together though. Those are the "twist lock" bulbs.
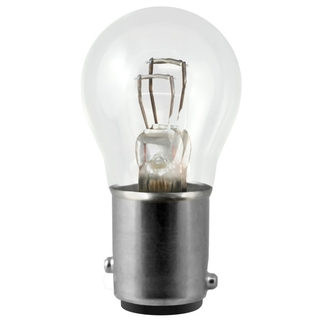
Sometimes to fix those sockets all you have to do is clean the contacts and pull them upward/outward a bit with some pliers (lights off of course) to put some tension back in them. Of course, if the socket is dried/cracked/burnt then replacing it would likely be best, but no idea how they're put together in comparison.
Sometimes to fix those sockets all you have to do is clean the contacts and pull them upward/outward a bit with some pliers (lights off of course) to put some tension back in them. Of course, if the socket is dried/cracked/burnt then replacing it would likely be best, but no idea how they're put together in comparison.
09-01-2016, 03:15 PM
#11
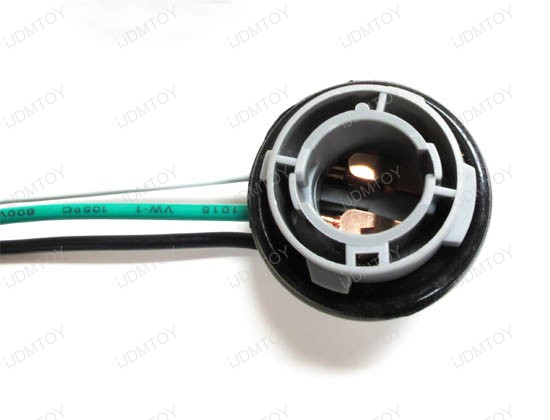
There are also insert style sockets for the 1157 bayonet bulb, so if your car has them the procedure for dissembling the socket should be the same, but the insert would be a different part number: https://www.powerandsignal.com/docs/...g.pdf#page=284
12-10-2016, 05:34 PM
#12
Teching In

Join Date: Nov 2016
Posts: 10
Likes: 0
Received 0 Likes
on
0 Posts
Just did the change out and you are exactly right. I bought the new sockets at AutoZone and they worked perfectly. My old front sockets were roasted, and to fix that from ever happening again, I am now using LEDs for all four flashers on the corners.
Had to change out the flasher to a grounded version:
<non-sponsor link removed>
Had to change out the flasher to a grounded version:
<non-sponsor link removed>
Last edited by wssix99; 12-11-2016 at 12:17 PM. Reason: non-sponsor link