


'70 Nova LY6/TH400 6.0VVT
Quote from your attachment: I continued with my treatment and I graduated from college, bald as the day I was born.
That's impressive that you were able to finish graduate engineering while sick. I don't think I could have done that since I tried engineering while healthy and switched to business.
Another quote from your attachment: I didn't look half bad!
My wife tells me if I put a paper bag over my head, I would improve my looks. I'll have to try and shave my head!
Thanks for posting that.
Congrats on your 5 year!
This past July has been 5 years for me. Although, mine was about as easy as you can get. I am not really a survivor, except for surviving the surgery to remove my kidney. I had renal cell carcinoma. Once the kidney was gone I was good to go. The only cool thing was that I found the cancer myself. I am an ultrasound tech & I was scanning myself and found it. I said "oh ****" when I saw it.
Congrats again!!
Thread Starter
Joined: Apr 2010
Posts: 2,816
Likes: 86
From: Instagram @chevyhotrodder
Thanks all for the comments and well wishes. We are having a big party this weekend to mark the occasion.
crosstrainiing - That is quiet a story finding your own cancer! But I gotta tell you, whether you like it or not you ARE a survivor. Don't cut yourself short. Not only did you give up an organ to survive, but you and your family experienced the fear and uncertainty of diagnosis that transform a person's perspective. Having gone through it and now living assumably healthy beyond cancer, you are an inspiration to others that need to see examples of how cancer can be overcome. Thanks for sharing your story! I think it's just incredible to have found it yourself.
I have been volunteering with the American Cancer Society for years now and do regular public speaking, sharing my story to motivate volunteers. I've met many, many survivors and caregivers with many different experiences. I am often bewildered at the survivors who either do not want to be recognized or feel they are somehow not a survivor because their treatment wasn't as difficult as some. What you don't realize is that every survivor is a source of hope for others. Every survivor has a credible story about how cancer changed thier life.
Thanks. That is great that you are giving back, sharing your story, and spreading a positive message to others. You are an inspiration to others & I am sure it is greatly appreciated.
Keep up the great work in life & on your car.
Keep up the great work in life & on your car.
Thread Starter
Joined: Apr 2010
Posts: 2,816
Likes: 86
From: Instagram @chevyhotrodder
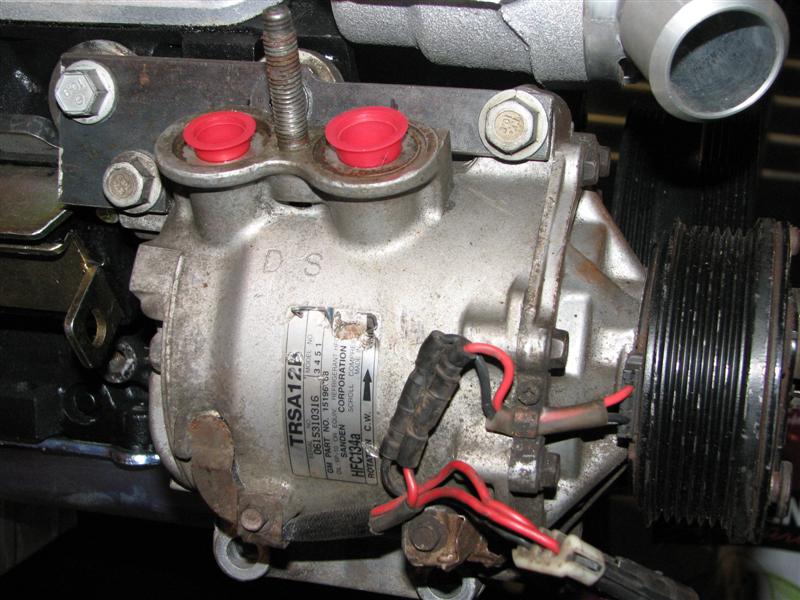
Since I'm no longer lifting the engine, I need to come up with a solution for low mount accessories. The Trailblazer 5.3/6.0 compressor (TRSA12B or Sanden 3451) will no longer fit in the OEM location because the unflipped adapters interfere with the compressor case. This is a real bummer because it's a very compact fixed displacement scroll compressor and has great port locations. Rather than cut my losses, I am going to try out something new. I really like this compressor, so I did some more research to see if I could find a six rib pulley/clutch that would allow me to move the compressor forward. Sure enough, the Trailblazer 4.2 has a TRSA12 compressor Sanden 3450 that uses a six rib pulley. That compressor is completely different from the 3451 and in fact mounts on the other side of the block, but I decided to take a gamble that the pulleys would be interchangeable. $30+shipping got me a 3450 clutch assembly from Jensen Auto.
First, off with the original pulley. This required removing the retaining nut, then a snap ring, then a 3-jaw puller.

It came off easily, exposing the electromagnet behind it.

Here is the Sanden 3451 four rib pulley on the left and the Sanden 3450 six rib pulley on the right. As far as I can tell the hubs were identical and the bearings the same (although my new pulley came with a fresh aftermarket bearing).

You can see the overall dimensions are the same. The belt rib patterns are centered on eachother.

I pressed the new pulley on and we're in business.


The pulley is an integral component of the clutch assembly. One surface of the pulley engages with the hub when the electromagnet is energized. The gap between the two needs to be right or it will not engage properly. This requires an appropriate shim at the hub. I *think* the appropriate gap is somewhere between 0.010-0.020in, but do not know for sure. I got this number from a video off Youtube. I have not measured mine yet. The eyecrometer says it's about 0.015.
My plan is to make some custom brackets to mount the compressor in a forward position, still notching the frame for clearance. The brackets will need at least one idler to get the belt routing to work. I'm a bit disappointed to be putting this compressor on the same belt as the other accessories, but apparently it works okay for others so I wont sweat it. The important thing is I'm having fun doing detective work and that is what this swap was for in the first place.
First, off with the original pulley. This required removing the retaining nut, then a snap ring, then a 3-jaw puller.
It came off easily, exposing the electromagnet behind it.
Here is the Sanden 3451 four rib pulley on the left and the Sanden 3450 six rib pulley on the right. As far as I can tell the hubs were identical and the bearings the same (although my new pulley came with a fresh aftermarket bearing).
You can see the overall dimensions are the same. The belt rib patterns are centered on eachother.
I pressed the new pulley on and we're in business.
The pulley is an integral component of the clutch assembly. One surface of the pulley engages with the hub when the electromagnet is energized. The gap between the two needs to be right or it will not engage properly. This requires an appropriate shim at the hub. I *think* the appropriate gap is somewhere between 0.010-0.020in, but do not know for sure. I got this number from a video off Youtube. I have not measured mine yet. The eyecrometer says it's about 0.015.
My plan is to make some custom brackets to mount the compressor in a forward position, still notching the frame for clearance. The brackets will need at least one idler to get the belt routing to work. I'm a bit disappointed to be putting this compressor on the same belt as the other accessories, but apparently it works okay for others so I wont sweat it. The important thing is I'm having fun doing detective work and that is what this swap was for in the first place.
Last edited by -TheBandit-; Oct 26, 2011 at 12:10 PM.
Clint I have to say you are one determined individual. Thats what I like about you, you have a goal and you stick with it till the end. I on the other hand try some simple solutions and if it doesnt work out I scrap it and try something different all together. In the end you will have this car just like you want it.
Thread Starter
Joined: Apr 2010
Posts: 2,816
Likes: 86
From: Instagram @chevyhotrodder
Thanks Tony. I am stupidly determined, that's for sure. It is costing me a lot of time and money, but I hope the results will be worth it. This stuff to me is the fun part of having a car - figuring out how to make things work. The irony is I'm not ending up with anything much different from what others have done. I will probably be a year or more behind you, futureuser, and others that have done pretty much the same swap starting around the same time. All I'll have to show for it is low mount accessories, factory AC and an overdone Guldstrand mod. Oh well I'm having fun doing it.
LS1 Tech Stories
The Best V8 Stories One Small Block at Time

Gas Monkey Built a 6-Wheel Ferrari Testarossa With a Corvette LT4 Engine
Verdad Gallardo
7 Most Reliable High-Performance Engines GM Has Ever Built
Verdad Gallardo
Amazing '71 Camaro Restomod Is Modern Muscle Car Under the Skin
Verdad Gallardo
6 Common C5 Corvette Failures and What's Involved In Repairing Them
Pouria Savadkouei
Retro Modern Bandit Pontiac Trans AM Comes With Burt Reynolds' Autograph
Verdad Gallardo
Top 10 Greatest Cadillac V Series Performance Models Ever, Ranked
Pouria Savadkouei
Top 10 Most Powerful Chevy Trucks Ever Made!

Hennessey's New Supercharged Silverado ZR2 Has 700 HP
Verdad Gallardo
Coachbuilt N2A Anteros Is an LS2-Powered C6 Corvette In Italian Clothes
Verdad Gallardo Thread Starter
Joined: Apr 2010
Posts: 2,816
Likes: 86
From: Instagram @chevyhotrodder
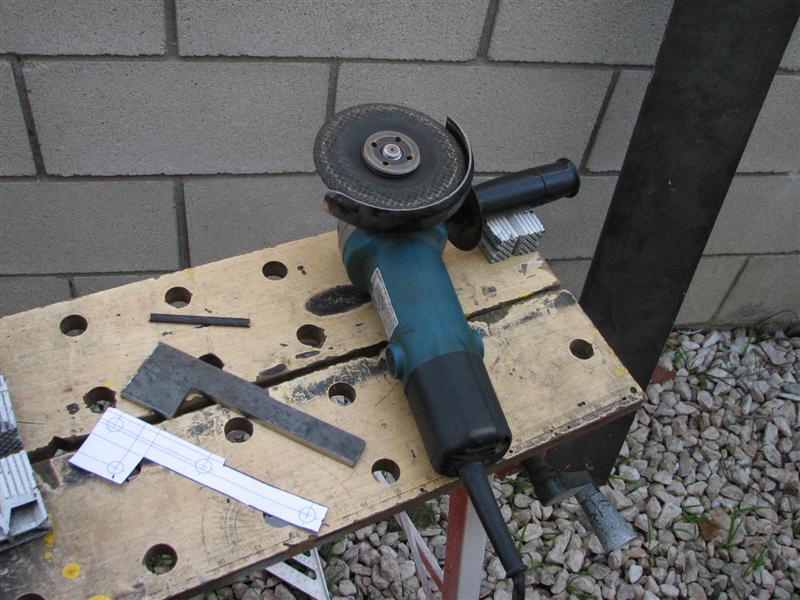
I started making one of a few brackets for mounting the AC compressor. I drew it up in CAD and printed it to scale, laid it on a piece of 1/4" and marked it out before cutting it with an angle grinder and cutoff wheel. I have a mill, but this takes no setup time and turned out fine.

After center punching locations through my printout, I drilled the holes and countersunk one using a 45 degree router bit. With a bit of hardware including some makeshift spacers, here it is installed.

This design has several issues. First, the countersunk screw attaching this to the engine is captured behind the outlet port of the compressor. For removal and installation, any fittings attached to the port would have to be removed to get to this screw, so freon would be lost. The other issue here is that with the compressor moved forward to run on the six rib belt, the forward port is now in line with the heater fittings on the waterpump. I'm not sure yet if I can get an adapter block and set of ac fittings/bends to get around this.


If I continue down this path, the plan is to add another bracket at the bottom attaching to the three holes in the side of the block and incorporating one or two idler pulleys.
After center punching locations through my printout, I drilled the holes and countersunk one using a 45 degree router bit. With a bit of hardware including some makeshift spacers, here it is installed.
This design has several issues. First, the countersunk screw attaching this to the engine is captured behind the outlet port of the compressor. For removal and installation, any fittings attached to the port would have to be removed to get to this screw, so freon would be lost. The other issue here is that with the compressor moved forward to run on the six rib belt, the forward port is now in line with the heater fittings on the waterpump. I'm not sure yet if I can get an adapter block and set of ac fittings/bends to get around this.
If I continue down this path, the plan is to add another bracket at the bottom attaching to the three holes in the side of the block and incorporating one or two idler pulleys.
Thread Starter
Joined: Apr 2010
Posts: 2,816
Likes: 86
From: Instagram @chevyhotrodder
Still scratching my head a bit about the AC, I decided to try my hand at bending plate around a pole to get a nice radius. For a makeshift tool, I used a piece of 1-1/2 x 1/2 steel bar that I think used to be a finger for an engine stand. It has a hole at each end. I used some bolts through those holes as spacers, then clamped it with woodworkers clamps to a 3-1/2" OD pole set into the concrete in my garage.

I used a digital angle finder to match the angle of the "strap" with the angle of the pole.

Then I inserted a piece of 3-1/2" wide 12 gauge steel and carefully bent it by hand to the desired angle. Prior to bending I made sure the piece was perpendicular to the pole using the same angle finder.


The resulting part has a nice smooth radius and will make a nice bottom corner to my frame notch. I will make one for each side.

That's it for now.
I used a digital angle finder to match the angle of the "strap" with the angle of the pole.
Then I inserted a piece of 3-1/2" wide 12 gauge steel and carefully bent it by hand to the desired angle. Prior to bending I made sure the piece was perpendicular to the pole using the same angle finder.
The resulting part has a nice smooth radius and will make a nice bottom corner to my frame notch. I will make one for each side.
That's it for now.
Last edited by -TheBandit-; Nov 21, 2011 at 04:26 PM.

TECH Apprentice
Joined: Jul 2011
Posts: 393
Likes: 0
Awesome! Love it when people use what they have on hand to get the job done!
With that countersunk bolt could you change that out to a stud that you could put a nut on instead so you don't have to pull your compressor lines?
With that countersunk bolt could you change that out to a stud that you could put a nut on instead so you don't have to pull your compressor lines?
Is there anyway you could delete the middle bolt up top and incorporate the front bolt into the lower bracket? Vintage air has adapters that should work with this compressor to allow the use of their hoses which have several angles to choose from. Another option is a hose and hydraulics business. They can pretty much make any end you will need for minimal money. Since you will prolly end up with custom length hoses it might be worth a try and see what they could come up with.
Thread Starter
Joined: Apr 2010
Posts: 2,816
Likes: 86
From: Instagram @chevyhotrodder
Unfortunately there's so little room between the outlet boss and the bracket that even a stud with a jam nut wouldn't fit there. I will continue to rack my brain about it. I don't want to eliminate that fastener because I need some upper support, but I can think of a few other ways that might be better for attaching things, so I'll think about it.
I did find a great thread where someone bought an unmachined compressor block from Docs Blocks and brazed tubes to it in the coniguration they wanted. This happens to be the same compressor body as what I've got. I may go this route if I can make things fit.
http://67-72chevytrucks.com/vboard/s....php?p=4723601

Teching In
Joined: Jan 2011
Posts: 2
Likes: 0
Hi Clint,
You're an inspiration for sure. Love your determination . I'm doing a 70 Nova, L92 swap and was wondering if your headers clear the crossmember. Mine will not allow me to install pipes without hitting. I ordered an X-Factor crossmember for extra clearance but still have a problem on the pass side. No way to get a pipe past the crossmember, so I measured header angle with car on the ground and found left header at 0 degrees and right angles up at the rear 4.7 degrees. What a bummer. I'll have to call Dougs on Tues. Have you checked yours yet. I'm hoping I got a defective set and that they will take care of it. Also, I went with dirty dingo mounts and a Moroso pan with a rack steering kit. All seems to clear very well. Keep up the thread. It's a great help to all.
You're an inspiration for sure. Love your determination . I'm doing a 70 Nova, L92 swap and was wondering if your headers clear the crossmember. Mine will not allow me to install pipes without hitting. I ordered an X-Factor crossmember for extra clearance but still have a problem on the pass side. No way to get a pipe past the crossmember, so I measured header angle with car on the ground and found left header at 0 degrees and right angles up at the rear 4.7 degrees. What a bummer. I'll have to call Dougs on Tues. Have you checked yours yet. I'm hoping I got a defective set and that they will take care of it. Also, I went with dirty dingo mounts and a Moroso pan with a rack steering kit. All seems to clear very well. Keep up the thread. It's a great help to all.

TECH Senior Member


Joined: Jul 2009
Posts: 8,034
Likes: 663
Clint,
Glad to see you at it. I missed the last few updates some how. I like your "eyecrometer" I got a chuckle out of it. LOL I am willing to bet you will have your LY6 running WAY before before mine is. LOL. Keep up the great work.
Jim
Glad to see you at it. I missed the last few updates some how. I like your "eyecrometer" I got a chuckle out of it. LOL I am willing to bet you will have your LY6 running WAY before before mine is. LOL. Keep up the great work.
Jim

Teching In
Joined: Dec 2007
Posts: 8
Likes: 0
From: Huntington Beach, Ca.
I did that with my hooker headers on a 67 chevelle to get clearance, good tip!
Clint, hey man where are you at? You stuck in the Nova somewhere? I was browsing around and found some fittings you might find useful for the compressor. Here is the link: http://www.nostalgicairparts.com/air...degree-773.php
Hope all is well and Santa was good to you!!! Merry Christmas!!!
Hope all is well and Santa was good to you!!! Merry Christmas!!!
Thread Starter
Joined: Apr 2010
Posts: 2,816
Likes: 86
From: Instagram @chevyhotrodder
Hi Clint,
You're an inspiration for sure. Love your determination . I'm doing a 70 Nova, L92 swap and was wondering if your headers clear the crossmember. Mine will not allow me to install pipes without hitting. I ordered an X-Factor crossmember for extra clearance but still have a problem on the pass side. No way to get a pipe past the crossmember, so I measured header angle with car on the ground and found left header at 0 degrees and right angles up at the rear 4.7 degrees. What a bummer. I'll have to call Dougs on Tues. Have you checked yours yet. I'm hoping I got a defective set and that they will take care of it. Also, I went with dirty dingo mounts and a Moroso pan with a rack steering kit. All seems to clear very well. Keep up the thread. It's a great help to all.
You're an inspiration for sure. Love your determination . I'm doing a 70 Nova, L92 swap and was wondering if your headers clear the crossmember. Mine will not allow me to install pipes without hitting. I ordered an X-Factor crossmember for extra clearance but still have a problem on the pass side. No way to get a pipe past the crossmember, so I measured header angle with car on the ground and found left header at 0 degrees and right angles up at the rear 4.7 degrees. What a bummer. I'll have to call Dougs on Tues. Have you checked yours yet. I'm hoping I got a defective set and that they will take care of it. Also, I went with dirty dingo mounts and a Moroso pan with a rack steering kit. All seems to clear very well. Keep up the thread. It's a great help to all.
Clint, hey man where are you at? You stuck in the Nova somewhere? I was browsing around and found some fittings you might find useful for the compressor. Here is the link: http://www.nostalgicairparts.com/air...degree-773.php
Hope all is well and Santa was good to you!!! Merry Christmas!!!
Hope all is well and Santa was good to you!!! Merry Christmas!!!
My wife is awesome though. I woke up Christmas morning to find this under the tree:

It doesn't look like much in the boxes, but that is a Texas Speed VVT-2 camshaft, PRC dual springs, chromoly pushrods and phase limiter.
 I about wet myself when I opened the package. I couldn't believe my wife had bought such an expensive present. I had told her a while back this was the leading candidate for my build and she did the homework to contact TSP and get the kit. Immediately I thought back to that Comp Cams tech bulletin about the phaser change. There was no way she would know what phaser I had to order the right cam core. Here is the tech buleltin for those not familiar; you NEED to order the rigth cam for your phaser or your cam timing will be off by 13 degrees: http://www.cpgnation.com/.../1501d12...-comp4-133.pdf
So I rushed out to the garage and removed the VVT electromagnet from the timing cover to take a peek inside. This was a great way to get in to see the phaser part number without having to pull the crank pulley and timing cover.


My phaser is PN 12606358 which is the "newer" style and uses Comps -189 core. Fortunately this is the core TSP sold to my wife, so I'm in good shape

I have done some work on the frame notching, but I'm not quite ready to share that. Hope to have something to show this week. Hope everyone has had a great Holiday and good luck heading into the new year!