


'70 Nova LY6/TH400 6.0VVT
Chances are, at a dealer that sells lots of corvettes, you might find one laying around the shop or in a trash can, if the mechanics haven't taken them home. There is no protocol on what they have to do with it once it's removed.
Thread Starter
Joined: Apr 2010
Posts: 2,816
Likes: 86
From: Instagram @chevyhotrodder
Thanks for the info futureuser. I'll ask around and see what I can find.
Today I spent about $70 on compressor fittings from Docs Blocks. I want to have them on hand so I can measure for fitup. I could have gotten away with spending less, but I picked up two options for the suction side. One is a 90 degree that hugs the compressor and exits toward the front. The other is a straight-out adapter. I don't know yet how I'll route my ac lines, so this will give me some options. Fitment with the control arm and frame may dictate I go one way or another.
AC0141 seal $0.85
AC0142 seal $1.11
AA2209 discharge, right angle with tube exiting toward front of compressor $19.47
AA2210 suction, right angle with tube exiting toward front of compressor $25.97
AA0739 suction, straight adapter $xx.xx
Last edited by -TheBandit-; Feb 10, 2012 at 09:43 AM.
Thread Starter
Joined: Apr 2010
Posts: 2,816
Likes: 86
From: Instagram @chevyhotrodder
Wow man, that is really nice of you. You certainly don't need to donate it to me though; let me send you some $s. How did you come across it? I'll send you a PM. Very generous offer - thank you!
Thread Starter
Joined: Apr 2010
Posts: 2,816
Likes: 86
From: Instagram @chevyhotrodder
Getting started on the passenger side. First I drilled a new mounting hole between the original two in the frame stand so I could move the bolt back. Ignore the cut lines drawn up on the frame - they are old lines from months ago when I was planning on lifted, forward adapters and a different compressor.

Here is the frame stand bolted to the motor mount. It doesn't quite fit because the back of the compressor hits near the top forward mounting bolt. It will need to trimmed back a little which will make the forward mounting hole unusable.

After a lot of measurements I marked up the frame for cutting. It is the same dimensions as the driver's side, except the finished depth is 4" from the front of the crossmember instead of 3.5" (I cut 4-1/8" back for material thickness allowance). If I were not using setback mounts, I could have gotten away with a 3.5" depth on this side and no modifications to the frame stand. This 4" depth is scaring the crap out of me. It's a huge cut. I really hope it holds up.


From all my measurements it looks like I will not be able to use the lower rear mounting hole on the AC compressor. It appears it will interfere with the LCA perch in this mounting position. But I'm going to wait until the engine is back in before I cut it off, just in case I'm wrong.
Here is the frame stand bolted to the motor mount. It doesn't quite fit because the back of the compressor hits near the top forward mounting bolt. It will need to trimmed back a little which will make the forward mounting hole unusable.
After a lot of measurements I marked up the frame for cutting. It is the same dimensions as the driver's side, except the finished depth is 4" from the front of the crossmember instead of 3.5" (I cut 4-1/8" back for material thickness allowance). If I were not using setback mounts, I could have gotten away with a 3.5" depth on this side and no modifications to the frame stand. This 4" depth is scaring the crap out of me. It's a huge cut. I really hope it holds up.
From all my measurements it looks like I will not be able to use the lower rear mounting hole on the AC compressor. It appears it will interfere with the LCA perch in this mounting position. But I'm going to wait until the engine is back in before I cut it off, just in case I'm wrong.
They have some kind of fancy racing pedal design upgrade package for the new vettes. It is a dealer installed package. So sometimes they just take off the old pedals. A buddy of mine at the dealer gave me one, and as I recall I only paid about $45 or so for mine new, so it's not a big deal. It is imo, MUCH easier to work with compared to the truck or van pedal.
Thread Starter
Joined: Apr 2010
Posts: 2,816
Likes: 86
From: Instagram @chevyhotrodder
Another likely option that has been in my mind from day 1 is firewall downtubes or something like the Hotchkiss handle bars that incorporate a cross tube. I have a tube bender (well two actually lol) and could make something like that, but with the factory AC there is almost no room to tie into the firewall on the passenger side.
I've also thought about adding some box tubing along the backside of the crossmember where the brakelines run currently, but I don't want to rob any space from the steering, headers or oil pan.
This weekend I made a little progress toward boxing this back in, but no pictures yet. I hope to get it done in the next few days so I can figure out my next steps.
LS1 Tech Stories
The Best V8 Stories One Small Block at Time

6 Common C5 Corvette Failures and What's Involved In Repairing Them
Pouria Savadkouei
Retro Modern Bandit Pontiac Trans AM Comes With Burt Reynolds' Autograph
Verdad Gallardo
Top 10 Greatest Cadillac V Series Performance Models Ever, Ranked
Pouria Savadkouei
Top 10 Most Powerful Chevy Trucks Ever Made!

Hennessey's New Supercharged Silverado ZR2 Has 700 HP
Verdad Gallardo
Coachbuilt N2A Anteros Is an LS2-Powered C6 Corvette In Italian Clothes
Verdad Gallardo
Awesome K5 Blazer Restomod Comes With C7 Corvette Power
Verdad Gallardo
10 Camaros You Should Never Buy

10 LS Engine Myths That Refuse to Die
Verdad Gallardo
Teching In
Joined: Oct 2009
Posts: 17
Likes: 0
From: Western Australia
Clint,
What a great read. I'm 3.5 years into a LY6/6L90E into a Holden WB One tonner in Western Australia, I'm still fighting with fitment issues with headers, sump, accessories etc. Congrats on the 5 yrs. To cope with that and starting a family, I'm impressed with how much you have achieved. The issues I face over here are, GM / Holden never released the LY6 over here so no tuning expertise on VVT. I just spent $1500 on some headers that were supposed to fit, but they wont clear ths starter motor mounting on the bellhousing of the 6L90e something else that's foreign out here. I'm nutting my way through, but it's good to see I'm not alone.
Keep up the good work.
Cheers,
Barra.
Thread Starter
Joined: Apr 2010
Posts: 2,816
Likes: 86
From: Instagram @chevyhotrodder
Barra, thanks for the post. I can't imagine the additional challenge of being over there where some of these parts aren't available, but then again you guys have a lot of cool stuff that we don't have access too (I'd love to have a modern Ute for example!). I hope everything works out okay for you. The LSx VVT system isn't THAT complicated and I'm sure many of the same tuning methodologies. In the meantime you're fortunate to have access to this great resource and LSx community in the states just as we're fortunate to have you. Have you posted your build anywhere? I'd love to read about it.
Update: The passenger side frame notch is now boxed back in. I was hoping to do better welding this round, but it didn't turn out the way I'd hoped. Fitment was pretty good, but I still burned through in a couple places and had to do more start-stops than I wanted to prevent that from happening. If I've ever given anyone crap about their welds, I apologize as I still have a lot to learn about and need practice. Here are some pics:
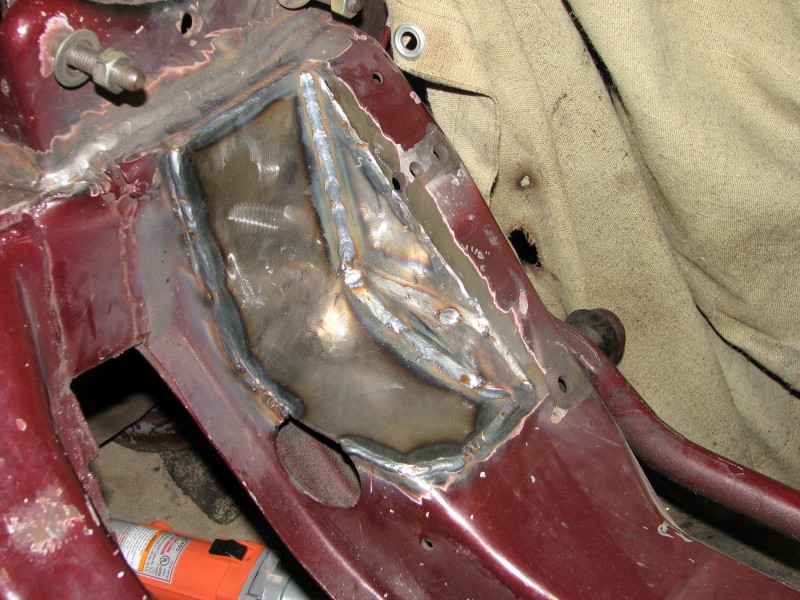


Update: The passenger side frame notch is now boxed back in. I was hoping to do better welding this round, but it didn't turn out the way I'd hoped. Fitment was pretty good, but I still burned through in a couple places and had to do more start-stops than I wanted to prevent that from happening. If I've ever given anyone crap about their welds, I apologize as I still have a lot to learn about and need practice. Here are some pics:

Your welds look fine! As long as they are strong the rest can be beautified with some grinding and filling. After my LS experience is finally to an end I am going to save up for a TIG welder and a plasma torch. Of course I will need some thorough training on the TIG. I may even go back to school for it. Glad to see you progressing through! It wont be too long and the Nova will have some real power to motivate it.
Teching In
Joined: Oct 2009
Posts: 17
Likes: 0
From: Western Australia
Clint,
Check this link out
http://www.proutes.com/forum/showthr...rra-s-WB-tunna
It's my build thread on an Aussie Ute forum. I've still got a ways to go though.
cheers,
Barra.
Check this link out
http://www.proutes.com/forum/showthr...rra-s-WB-tunna
It's my build thread on an Aussie Ute forum. I've still got a ways to go though.
cheers,
Barra.
Thread Starter
Joined: Apr 2010
Posts: 2,816
Likes: 86
From: Instagram @chevyhotrodder
tony you're going to have a lot of fun with that TIG, lucky dog! I don't plan on grinding any of these welds down - no reason to take away strength especially down here where no one is going to see it. Are they strong enough? Time will tell.
Barra, thanks for the link! I'll take a look.
Mini update because I felt like doing more tonight. I've been wanting to make some kind of flywheel holder because I know cranking down the VVT cam phaser bolt is going to take a lot of umph. There is a great tool out there from Kent Moore / SPX Specialty Tools J-42386-A that bolts to the starter flange area and holds the flywheel with interfacing teeth. It runs about $80 new. Here's a picture:

I've been keeping my eyes peeled for a used one for a while, but nothing has come up. So I've decided to go ahead and make one. I started with a piece of 1/4" steel scrap and traced the teeth of the flywheel against it. Then I made a bunch of cuts with a thick cutoff wheel as shown.


With a bit of trimming I had a whole bunch of teeth. As you can see mytooth spacing was anything but perfect, so I cut it down to just a few teeth and trimmed to fit. Here is what I ended up with.


The mesh isn't perfect, but I think it will do the job nicely. The next step will be figuring out how to connect this to the starter flange. Honestly I have no plan for that yet - I am just sorta winging it here. I think between the welder, the cutoff wheel and the scrap bin I can cobble something useful together. I just hope I don't end up stripping any flywheel teeth!
Barra, thanks for the link! I'll take a look.
Mini update because I felt like doing more tonight. I've been wanting to make some kind of flywheel holder because I know cranking down the VVT cam phaser bolt is going to take a lot of umph. There is a great tool out there from Kent Moore / SPX Specialty Tools J-42386-A that bolts to the starter flange area and holds the flywheel with interfacing teeth. It runs about $80 new. Here's a picture:
I've been keeping my eyes peeled for a used one for a while, but nothing has come up. So I've decided to go ahead and make one. I started with a piece of 1/4" steel scrap and traced the teeth of the flywheel against it. Then I made a bunch of cuts with a thick cutoff wheel as shown.
With a bit of trimming I had a whole bunch of teeth. As you can see mytooth spacing was anything but perfect, so I cut it down to just a few teeth and trimmed to fit. Here is what I ended up with.
The mesh isn't perfect, but I think it will do the job nicely. The next step will be figuring out how to connect this to the starter flange. Honestly I have no plan for that yet - I am just sorta winging it here. I think between the welder, the cutoff wheel and the scrap bin I can cobble something useful together. I just hope I don't end up stripping any flywheel teeth!
Last edited by -TheBandit-; Mar 1, 2012 at 11:11 PM.
Thread Starter
Joined: Apr 2010
Posts: 2,816
Likes: 86
From: Instagram @chevyhotrodder
Got a package yesterday - a set of Hotchkis 1.5" drop leafs with a rate that's "matched" to work well with the 600lb/in springs I'm putting up front. I found these "used" for a reasonable price. The previous owner put them on his Camaro for mock-up, but never drove the car with them, so everything is fresh. He also threw in some 1/2" aluminum lowering blocks, but I don't plan to use them. If I decide to go lower, I'll use steel blocks.

Great idea on the flywheel lock. I could have used it last night. I was trying to remove the harmonic balancer by hand and the crank kept turning on me. I didnt want to use an impact but I had no choice. If I would have had this tool I could have used the other method.
The spring set up looks good! One thing my spring guy told me is to trash the lower rubbers. He said I would be ok to run the top rubber as an insulator but to run both the top and bottom I was asking for trouble with any kind of power. Are you using the stock style spring saddles? I bought a thicker bottom plate with shock mounts for added security along with a little thicker u-bolt.
The warmer weather seems to have lit a fire under you. I think in April you will be at least running. Best of luck to ya!!
Thread Starter
Joined: Apr 2010
Posts: 2,816
Likes: 86
From: Instagram @chevyhotrodder
How are you going to get the damper back on without some means of holding the flywheel? I figure this holder will be good for removing and installing/torquing the cam phaser bolt, flywheel to crank bolts, flywheel to torque converter bolts, and damper bolt. You can get the Kent Moore tool for around $80-90 if you search online or maybe borrow one from a local dealership. Or you can get a more generic flywheel holder for a bit less.
April is pretty unlikely, but I am getting a bit more time in the garage lately. I've been dieting, lost a few pounds and have a little more energy when I get home. I'm about 6'1" and 200lb right now, was 210lb a few weeks ago. Goal is to be under 175. It may not seem like a lot but it makes a big difference for me. I think it has a bit to do with the hypothyroidism I developed when I was doing radiation. I take a synthetic thyroid hormone now, but I've never fully recovered my energy.
April is pretty unlikely, but I am getting a bit more time in the garage lately. I've been dieting, lost a few pounds and have a little more energy when I get home. I'm about 6'1" and 200lb right now, was 210lb a few weeks ago. Goal is to be under 175. It may not seem like a lot but it makes a big difference for me. I think it has a bit to do with the hypothyroidism I developed when I was doing radiation. I take a synthetic thyroid hormone now, but I've never fully recovered my energy.
Last edited by -TheBandit-; Mar 5, 2012 at 11:40 AM.
How are you going to get the damper back on without some means of holding the flywheel? I figure this holder will be good for removing and installing/torquing the cam phaser bolt, flywheel to crank bolts, flywheel to torque converter bolts, and damper bolt. You can get the Kent Moore tool for around $80-90 if you search online or maybe borrow one from a local dealership. Or you can get a more generic flywheel holder for a bit less.
April is pretty unlikely, but I am getting a bit more time in the garage lately. I've been dieting, lost a few pounds and have a little more energy when I get home. I'm about 6'1" and 200lb right now, was 210lb a few weeks ago. Goal is to be under 175. It may not seem like a lot but it makes a big difference for me. I think it has a bit to do with the hypothyroidism I developed when I was doing radiation. I take a synthetic thyroid hormone now, but I've never fully recovered my energy.
April is pretty unlikely, but I am getting a bit more time in the garage lately. I've been dieting, lost a few pounds and have a little more energy when I get home. I'm about 6'1" and 200lb right now, was 210lb a few weeks ago. Goal is to be under 175. It may not seem like a lot but it makes a big difference for me. I think it has a bit to do with the hypothyroidism I developed when I was doing radiation. I take a synthetic thyroid hormone now, but I've never fully recovered my energy.
Thread Starter
Joined: Apr 2010
Posts: 2,816
Likes: 86
From: Instagram @chevyhotrodder
Puttin' right along tonight on the flywheel holder. Using bits and pieces of scrap, I cut a bridge between two pieces of tube and tacked it together while bolted to the engine. Then I welded it, bolted it back up and tacked another piece to hold my set of teeth. I wish the pictures turned out better - I'm proud of the monster I've created. Yeah it's UGLY, but the tooth engagement is pretty darn good and I think it will serve it's purpose well.


Scratch one more off the list. Anyone want to take a guess at how much time that contraption took me to make?
Scratch one more off the list. Anyone want to take a guess at how much time that contraption took me to make?
I had an idea that could save someone some time in the future. After looking at the teeth you cut, and they look great by the way, I went down stairs to my storage cabinet and wow right there in front of me was the old flywheel off of the LQ4. I would just need to section it out to have the teeth part done. The rest I would have to follow suit. You were right on installing the ATI harmonic balncer, I ended up an 1/8" away from bottoming out the balancer. I hated to do it but the handy dandy ARP bolt finished the job. I used plenty of moly lube and locked the balancer down. I should have honed the ID of the balancer out a little but it was gouging so its a tight press fit. I wil however play hell on removing it in the future. Removing it will definately require a tool such as yours and a locking gear puller. Hopefully we wont have to travel down that path no time soon!! Great job on the tool!!!

Awesome job on the flywheel tool!! And thanks to Tony for pointing this fab job out to me. I'm ashamed to say I haven't checked in on this thread for a while, but you're doing a great job with everything Clint!