


Fuel Pump/Dropping Tank Write Up
Ive seen a lot of people asking for a write up on doing a fuel pump swap and dropping the tank, including me, so I decided to try my hand at one. I tried to document the process fairly well and take pictures of everything I could (when I remembered).
First off I am going to say that this was a pain in the *** to do. A lot of little things went wrong that made the whole thing come to a halt. Things like the exhaust pipes begin <1/4" to close to slide the tank out between them made the job a lot harder. Overall it took around 6-7hrs from start to finish working at a VERY relaxed pace and breaks for food etc. If you worked hard at it and didnt run into any roadblocks, you could prob get it done in half the time. For the record I was installing a racetronix pump and the hotwire kit.
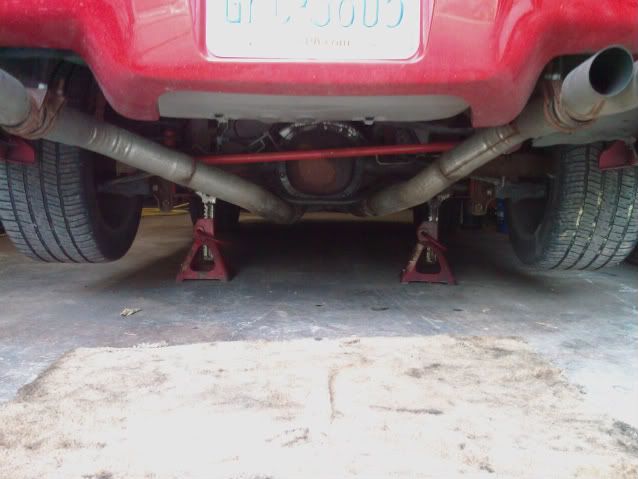
1- First off you want to get the car HIGH up and then let the rear hang down. I jacked it up by the diff and then put the jack stands under the frame so it would drop as far as possible.
2- After that youll want to remove the gas cap and holder on top of the filler neck. Just open up the gas tank and remove the 2 (or maybe 3) philips head screws and just pull it out, cap and all.
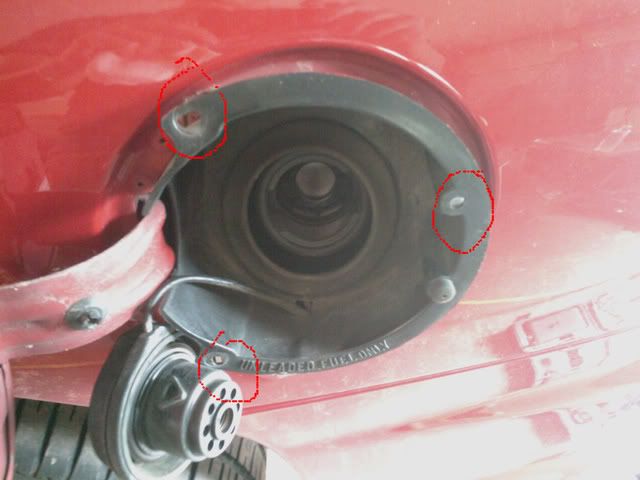
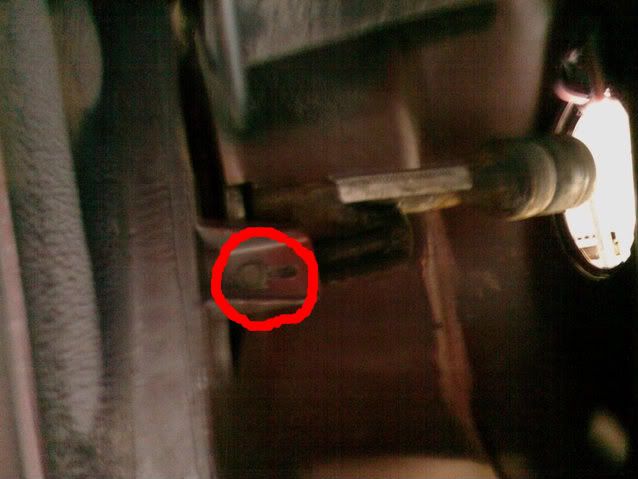
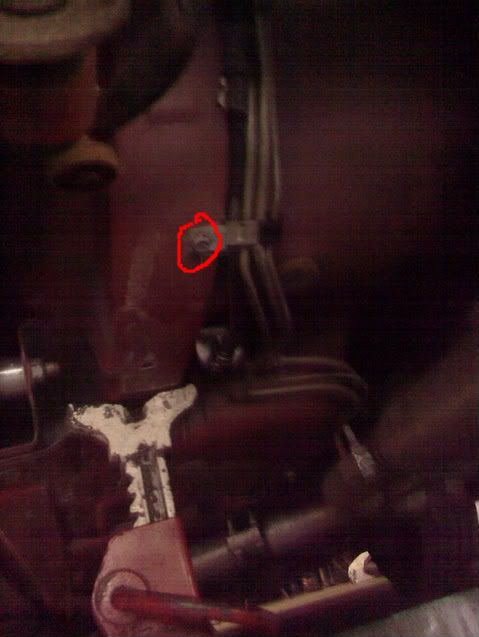
3- Look underneath the car right where the other side of the gas lid would be. There should be a black piece of plastic that is tucked into tabs. Pop it out of the tabs and look inside and youll see the filler neck. There is a 10mm bolt that you will have to unscrew to free the neck. Its a lot easier if someone holds the neck while you do this.
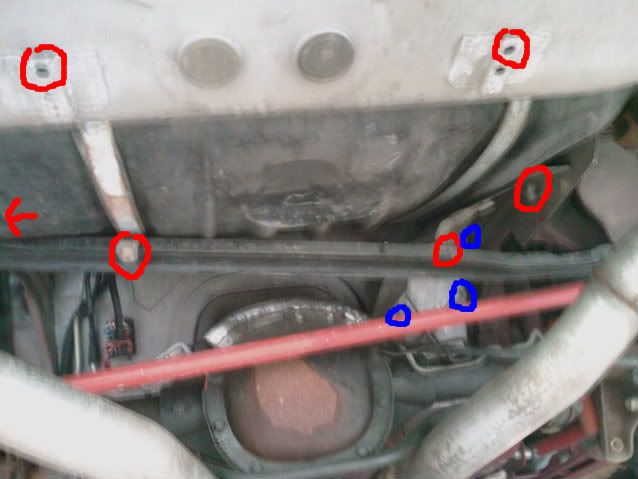
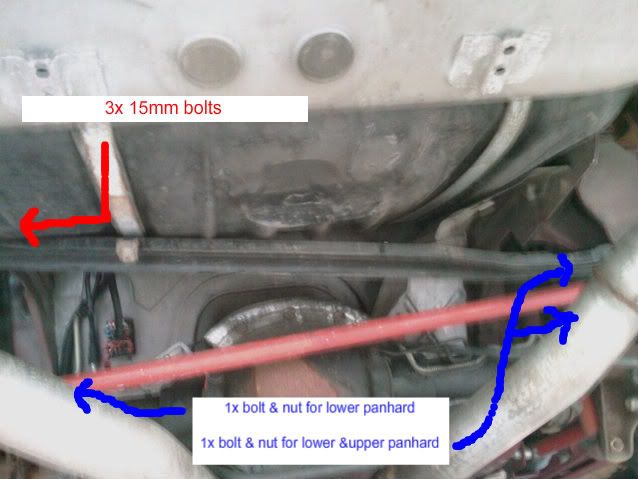
4- Now youre going to remove the heat shields for the gastank. There is one big one (that is already removed in the pic) that has six bolts on it. Two on the upper panhard bar, two on the gas tank, and one on each side on the frame (red circles). These bolts have very shallow heads, so they are a pain if you have a taperd socket. The second smaller heat shield has 3 bolts (blue circles) that are pretty obvious.
5- Next you have to unbolt at least the top of the upper panhard bar. There are 3x 15mm bolts holding it into the frame. I had to remove both the upper and lower panard bars. This makes a lot of room. To do this there are two bolts with a nut holding the lower panhard in and one holding the upper in. If you want a walkthrough to that go to www.ls1howto.com. Its really pretty simple though.
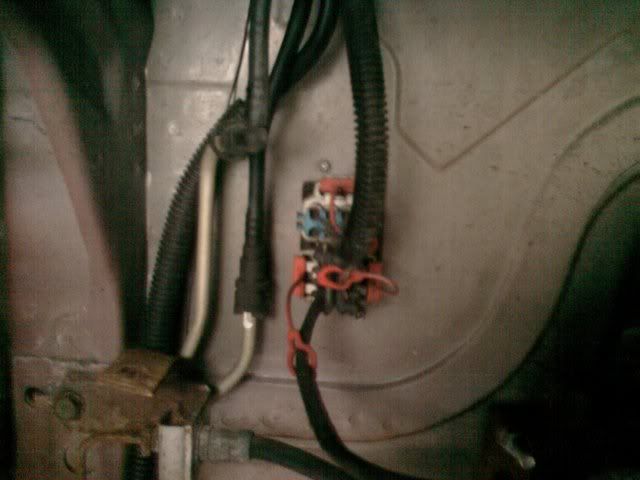
6- Now youre going to have to remove the fuel lines and electrical connectors. I started at the fuel filter, because you will have to remove it anyway. Just pinch the clip on one side to remove the small end and grab the filter/nut on the other end and loosen it. Gas is going to pour out of it so watch out. Again, if you need to see how to do this, www.ls1howto.com. I also removed the 10mm bolt holding the clip that holds the fuel lines together so I could take the line from the filter and free it up from the others.
The other two fuel lines are simply disconnected. One you just pinch with your fingers, the other you just pinch with needle nose pliers to remove it (like the fuel filter). For the electrical connectors just pop the locks and pull them out. They will only go in one way so you dont have to worry about mixing them up.
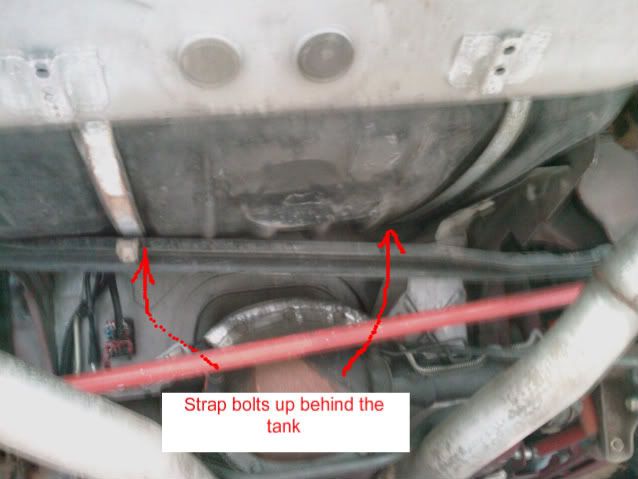
7- Finally Its time to drop the tank. This is assuming your exhaust is out of the way. I had true duals run under the axle, so I didnt have to worry about this. There are two straps with bolts on either side of the tank. It will take a good sized extension to reach them. If youre doing this on your own, I would recommend getting a jack to support the tank because that sob is heavy. It is a lot easier having someone else to help maneuver it out though. Just take the bolts out and bend the straps to get them to clear the tank. You can bend them back to shape so dont worry about forcing them a little. After this, the tank should slide out with a little work to make the filter neck clear. Try sliding the pass side out first.
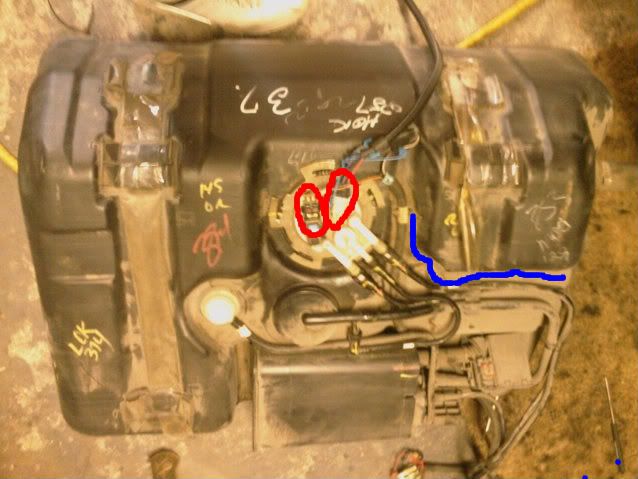
8- This picture shows what you should be looking at in front of you. Undo the electrical connectors (red) and set them aside. Use a small hammer to tap the lock around the pump assembly until it rotates enough to come off. The blue line in the picture is roughly where you want the wiring to go when you put the tank back together. You want it to hang down the back towards the drivers side. Inspect your tank at this point to see if there is any crap in it. Racetronix recommends you drain and clean the tank. I couldnt because there was a lot more gas than I thought in the tank and I had no where to dispose of it. The tank looked remarkably clean inside anyway so I don think it was that big of a deal.
9- From this point the instructions from racetronix covers everything you need to know up to putting the pump back in, so Im not going to go over that. One thing to note: Before reinstalling the pump bucket I filled it with gas to make sure the pump had gas to prime. This is optional, but just a saftey step.
10- After you have the pump back in, everything is going to go pretty much in reverse. Tap the lock the other way to secure the pump assembly in to the tank. Now the harness will only fit one way. I cant really describe how it fits, and I failed to take a pic of this, but its pretty easy to see which connectors go together. Like I said before, run the wires towards the back drivers side of the tank.
11- Lift the tank up by the drives side first, making sure the filler neck goes in the hole in the frame to the gas tank opening. Bend the straps back over the tank and put the bolts back in the holes to secure it.
12- Now put the electrical connectors back in the spot on the body. Reconnect the fuel lines and run the line for the filter back through the same holder that it was in, but dont replace the bolt to tighten it yet. Put the filter in and then but the bolt in the holder securing the lines so you have a little play to get the filter in.
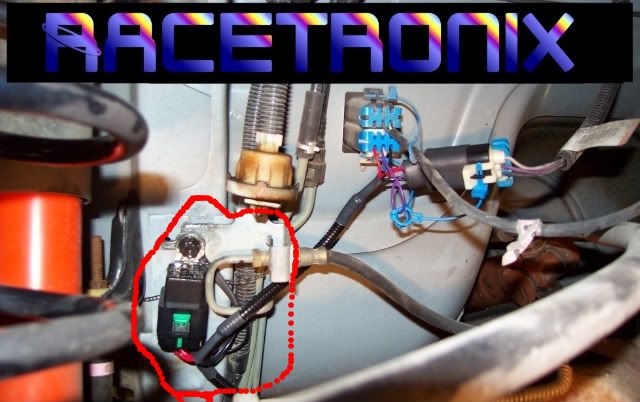
13- There is a bolt to the left of the electrical connectors on the body that is another bracket for the fuel lines. Unbolt that and then clean the area with a wire brush to get a good connection. Put the ground on (closest to body) then the relay on that bolt and then put it the bolt back in. This is what the relay should look like, pic taken from racetronix.
14- Now reattach the upper and lower panhard bars, the bolt for the filler neck, exhaust, and heat shields etc in the reverse order you removed them.
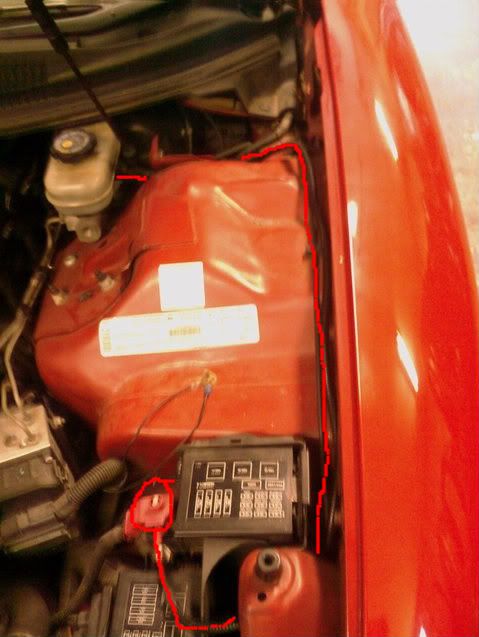
15a- I ran the wiring along the fuel lines. I kept it all on the drivers side as opposed to crossing it over like racetronix recommends. I just followed the fuel lines along the drivers side and went up under the heat shield by the drivers side header. I attached the positive lead to the battery terminal by the fuse boxes. The eyehole on the lead needs to be enlarged a little bit too to fit on that bolt. This is a diagram of how I ran the wire.
15b- If you follow racetronix path, you will run the wires over the transmission hump when you get to it and then run them up to the alternator/battery along the pass side header area. Just make sure its protected from the heat.
16- Take the negative cable and positive cables off the battery. Push the factory nuts out of the cables and insert the new brass ones to replace them. Attach the new ground wire to the new bolt on the negative terminal. If you put the power lead on the battery, youll attach it on the same way you did the ground cable.
This finishes the install. Make sure to follow the instructions that racetronix gives you like filling the bucket with gas before you put it back in the tank, putting at least 10 gallons in the tank before you prime it, and priming it 3 times before starting.
I only had a few problems with this install. First was getting the tank out/in. This was remedied by taking my tail pipes off. I am getting a custom exhaust done anyway and I dont mind dumps for now. The second was the clear pump tube in the pump would NOT go on to the assembly no matter what. I ended up putting the clamp on the tube about 1/8" (maybe less) from the top of the bucket. Other than that it worked out pretty well.
Hope this helps everyone out. It was my first attempt at a write up, so if anyone has any suggestions/corrections just post up and let me know. Good luck to whoevers taking on this task
Edit: Please dont quote the write up in posts
First off I am going to say that this was a pain in the *** to do. A lot of little things went wrong that made the whole thing come to a halt. Things like the exhaust pipes begin <1/4" to close to slide the tank out between them made the job a lot harder. Overall it took around 6-7hrs from start to finish working at a VERY relaxed pace and breaks for food etc. If you worked hard at it and didnt run into any roadblocks, you could prob get it done in half the time. For the record I was installing a racetronix pump and the hotwire kit.
1- First off you want to get the car HIGH up and then let the rear hang down. I jacked it up by the diff and then put the jack stands under the frame so it would drop as far as possible.
2- After that youll want to remove the gas cap and holder on top of the filler neck. Just open up the gas tank and remove the 2 (or maybe 3) philips head screws and just pull it out, cap and all.
3- Look underneath the car right where the other side of the gas lid would be. There should be a black piece of plastic that is tucked into tabs. Pop it out of the tabs and look inside and youll see the filler neck. There is a 10mm bolt that you will have to unscrew to free the neck. Its a lot easier if someone holds the neck while you do this.
4- Now youre going to remove the heat shields for the gastank. There is one big one (that is already removed in the pic) that has six bolts on it. Two on the upper panhard bar, two on the gas tank, and one on each side on the frame (red circles). These bolts have very shallow heads, so they are a pain if you have a taperd socket. The second smaller heat shield has 3 bolts (blue circles) that are pretty obvious.
5- Next you have to unbolt at least the top of the upper panhard bar. There are 3x 15mm bolts holding it into the frame. I had to remove both the upper and lower panard bars. This makes a lot of room. To do this there are two bolts with a nut holding the lower panhard in and one holding the upper in. If you want a walkthrough to that go to www.ls1howto.com. Its really pretty simple though.
6- Now youre going to have to remove the fuel lines and electrical connectors. I started at the fuel filter, because you will have to remove it anyway. Just pinch the clip on one side to remove the small end and grab the filter/nut on the other end and loosen it. Gas is going to pour out of it so watch out. Again, if you need to see how to do this, www.ls1howto.com. I also removed the 10mm bolt holding the clip that holds the fuel lines together so I could take the line from the filter and free it up from the others.
The other two fuel lines are simply disconnected. One you just pinch with your fingers, the other you just pinch with needle nose pliers to remove it (like the fuel filter). For the electrical connectors just pop the locks and pull them out. They will only go in one way so you dont have to worry about mixing them up.
7- Finally Its time to drop the tank. This is assuming your exhaust is out of the way. I had true duals run under the axle, so I didnt have to worry about this. There are two straps with bolts on either side of the tank. It will take a good sized extension to reach them. If youre doing this on your own, I would recommend getting a jack to support the tank because that sob is heavy. It is a lot easier having someone else to help maneuver it out though. Just take the bolts out and bend the straps to get them to clear the tank. You can bend them back to shape so dont worry about forcing them a little. After this, the tank should slide out with a little work to make the filter neck clear. Try sliding the pass side out first.
8- This picture shows what you should be looking at in front of you. Undo the electrical connectors (red) and set them aside. Use a small hammer to tap the lock around the pump assembly until it rotates enough to come off. The blue line in the picture is roughly where you want the wiring to go when you put the tank back together. You want it to hang down the back towards the drivers side. Inspect your tank at this point to see if there is any crap in it. Racetronix recommends you drain and clean the tank. I couldnt because there was a lot more gas than I thought in the tank and I had no where to dispose of it. The tank looked remarkably clean inside anyway so I don think it was that big of a deal.
9- From this point the instructions from racetronix covers everything you need to know up to putting the pump back in, so Im not going to go over that. One thing to note: Before reinstalling the pump bucket I filled it with gas to make sure the pump had gas to prime. This is optional, but just a saftey step.
10- After you have the pump back in, everything is going to go pretty much in reverse. Tap the lock the other way to secure the pump assembly in to the tank. Now the harness will only fit one way. I cant really describe how it fits, and I failed to take a pic of this, but its pretty easy to see which connectors go together. Like I said before, run the wires towards the back drivers side of the tank.
11- Lift the tank up by the drives side first, making sure the filler neck goes in the hole in the frame to the gas tank opening. Bend the straps back over the tank and put the bolts back in the holes to secure it.
12- Now put the electrical connectors back in the spot on the body. Reconnect the fuel lines and run the line for the filter back through the same holder that it was in, but dont replace the bolt to tighten it yet. Put the filter in and then but the bolt in the holder securing the lines so you have a little play to get the filter in.
13- There is a bolt to the left of the electrical connectors on the body that is another bracket for the fuel lines. Unbolt that and then clean the area with a wire brush to get a good connection. Put the ground on (closest to body) then the relay on that bolt and then put it the bolt back in. This is what the relay should look like, pic taken from racetronix.
14- Now reattach the upper and lower panhard bars, the bolt for the filler neck, exhaust, and heat shields etc in the reverse order you removed them.
15a- I ran the wiring along the fuel lines. I kept it all on the drivers side as opposed to crossing it over like racetronix recommends. I just followed the fuel lines along the drivers side and went up under the heat shield by the drivers side header. I attached the positive lead to the battery terminal by the fuse boxes. The eyehole on the lead needs to be enlarged a little bit too to fit on that bolt. This is a diagram of how I ran the wire.
15b- If you follow racetronix path, you will run the wires over the transmission hump when you get to it and then run them up to the alternator/battery along the pass side header area. Just make sure its protected from the heat.
16- Take the negative cable and positive cables off the battery. Push the factory nuts out of the cables and insert the new brass ones to replace them. Attach the new ground wire to the new bolt on the negative terminal. If you put the power lead on the battery, youll attach it on the same way you did the ground cable.
This finishes the install. Make sure to follow the instructions that racetronix gives you like filling the bucket with gas before you put it back in the tank, putting at least 10 gallons in the tank before you prime it, and priming it 3 times before starting.
I only had a few problems with this install. First was getting the tank out/in. This was remedied by taking my tail pipes off. I am getting a custom exhaust done anyway and I dont mind dumps for now. The second was the clear pump tube in the pump would NOT go on to the assembly no matter what. I ended up putting the clamp on the tube about 1/8" (maybe less) from the top of the bucket. Other than that it worked out pretty well.
Hope this helps everyone out. It was my first attempt at a write up, so if anyone has any suggestions/corrections just post up and let me know. Good luck to whoevers taking on this task
Edit: Please dont quote the write up in posts
Last edited by DropTopBird; Aug 7, 2008 at 12:52 PM.

On The Tree
Joined: Dec 2005
Posts: 147
Likes: 1
Ive seen a lot of people asking for a write up on doing a fuel pump swap and dropping the tank, including me, so I decided to try my hand at one. I tried to document the process fairly well and take pictures of everything I could (when I remembered).
First off I am going to say that this was a pain in the *** to do. A lot of little things went wrong that made the whole thing come to a halt. Things like the exhaust pipes begin <1/4" to close to slide the tank out between them made the job a lot harder. Overall it took around 6-7hrs from start to finish working at a VERY relaxed pace and breaks for food etc. If you worked hard at it and didnt run into any roadblocks, you could prob get it done in half the time. For the record I was installing a racetronix pump and the hotwire kit.
1- First off you want to get the car HIGH up and then let the rear hang down. I jacked it up by the diff and then put the jack stands under the frame so it would drop as far as possible.
2- After that youll want to remove the gas cap and holder on top of the filler neck. Just open up the gas tank and remove the 2 (or maybe 3) philips head screws and just pull it out, cap and all.
3- Look underneath the car right where the other side of the gas lid would be. There should be a black piece of plastic that is tucked into tabs. Pop it out of the tabs and look inside and youll see the filler neck. There is a 10mm bolt that you will have to unscrew to free the neck. Its a lot easier if someone holds the neck while you do this.
4- Now youre going to remove the heat shields for the gastank. There is one big one (that is already removed in the pic) that has six bolts on it. Two on the upper panhard bar, two on the gas tank, and one on each side on the frame (red circles). These bolts have very shallow heads, so they are a pain if you have a taperd socket. The second smaller heat shield has 3 bolts (blue circles) that are pretty obvious.
5- Next you have to unbolt at least the top of the upper panhard bar. There are 3x 15mm bolts holding it into the frame. I had to remove both the upper and lower panard bars. This makes a lot of room. To do this there are two bolts with a nut holding the lower panhard in and one holding the upper in. If you want a walkthrough to that go to www.ls1howto.com. Its really pretty simple though.
6- Now youre going to have to remove the fuel lines and electrical connectors. I started at the fuel filter, because you will have to remove it anyway. Just pinch the clip on one side to remove the small end and grab the filter/nut on the other end and loosen it. Gas is going to pour out of it so watch out. Again, if you need to see how to do this, www.ls1howto.com. I also removed the 10mm bolt holding the clip that holds the fuel lines together so I could take the line from the filter and free it up from the others.
The other two fuel lines are simply disconnected. One you just pinch with your fingers, the other you just pinch with needle nose pliers to remove it (like the fuel filter). For the electrical connectors just pop the locks and pull them out. They will only go in one way so you dont have to worry about mixing them up.
7- Finally Its time to drop the tank. This is assuming your exhaust is out of the way. I had true duals run under the axle, so I didnt have to worry about this. There are two straps with bolts on either side of the tank. It will take a good sized extension to reach them. If youre doing this on your own, I would recommend getting a jack to support the tank because that sob is heavy. It is a lot easier having someone else to help maneuver it out though. Just take the bolts out and bend the straps to get them to clear the tank. You can bend them back to shape so dont worry about forcing them a little. After this, the tank should slide out with a little work to make the filter neck clear. Try sliding the pass side out first.
8- This picture shows what you should be looking at in front of you. Undo the electrical connectors (red) and set them aside. Use a small hammer to tap the lock around the pump assembly until it rotates enough to come off. The blue line in the picture is roughly where you want the wiring to go when you put the tank back together. You want it to hang down the back towards the drivers side. Inspect your tank at this point to see if there is any crap in it. Racetronix recommends you drain and clean the tank. I couldnt because there was a lot more gas than I thought in the tank and I had no where to dispose of it. The tank looked remarkably clean inside anyway so I don think it was that big of a deal.
9- From this point the instructions from racetronix covers everything you need to know up to putting the pump back in, so Im not going to go over that.
10- After you have the pump back in, everything is going to go pretty much in reverse. Tap the lock the other way to secure the pump assembly in to the tank. Now the harness will only fit one way. I cant really describe how it fits, and I failed to take a pic of this, but its pretty easy to see which connectors go together. Like I said before, run the wires towards the back drivers side of the tank.
11- Lift the tank up by the drives side first, making sure the filler neck goes in the hole in the frame to the gas tank opening. Bend the straps back over the tank and put the bolts back in the holes to secure it.
12- Now put the electrical connectors back in the spot on the body. Reconnect the fuel lines and run the line for the filter back through the same holder that it was in, but dont replace the bolt to tighten it yet. Put the filter in and then but the bolt in the holder securing the lines so you have a little play to get the filter in.
13- There is a bolt to the left of the electrical connectors on the body that is another bracket for the fuel lines. Unbolt that and then clean the area with a wire brush to get a good connection. Put the ground on (closest to body) then the relay on that bolt and then put it the bolt back in. This is what the relay should look like, pic taken from racetronix.
14- Now reattach the upper and lower panhard bars, the bolt for the filler neck, exhaust, and heat shields etc in the reverse order you removed them.
15a- I ran the wiring along the fuel lines. I kept it all on the drivers side as opposed to crossing it over like racetronix recommends. I just followed the fuel lines along the drivers side and went up under the heat shield by the drivers side header. I attached the positive lead to the battery terminal by the fuse boxes. The eyehole on the lead needs to be enlarged a little bit too to fit on that bolt. This is a diagram of how I ran the wire.
15b- If you follow racetronix path, you will run the wires over the transmission hump when you get to it and then run them up to the alternator/battery along the pass side header area. Just make sure its protected from the heat.
16- Take the negative cable and positive cables off the battery. Push the factory nuts out of the cables and insert the new brass ones to replace them. Attach the new ground wire to the new bolt on the negative terminal. If you put the power lead on the battery, youll attach it on the same way you did the ground cable.
This finishes the install. Make sure to follow the instructions that racetronix gives you like filling the bucket with gas before you put it back in the tank, putting at least 10 gallons in the tank before you prime it, and priming it 3 times before starting.
I only had a few problems with this install. First was getting the tank out/in. This was remedied by taking my tail pipes off. I am getting a custom exhaust done anyway and I dont mind dumps for now. The second was the clear pump tube in the pump would NOT go on to the assembly no matter what. I ended up putting the clamp on the tube about 1/8" (maybe less) from the top of the bucket. Other than that it worked out pretty well.
Hope this helps everyone out. It was my first attempt at a write up, so if anyone has any suggestions/corrections just post up and let me know. Good luck to whoevers taking on this task
Originally Posted by Gottahavels1
I'm about to drop my tank and put the fuel pump in tomorrow morning. what do you mean by priming the tank? Do i really need to fill it with 10 gallons?
The 10 gallons is what racetronix recommends. I had mine run down to what SHOULD have been empty, but it still had like 3 gallons or so in the bottom. I guess this was a little reserve, because it always usually takes me about 280 miles to finish off 16 gallons and i was at about 279 when I did the swap. Anyway I added 5 gallons to it to make sure that there was plenty of gas for it to prime with. So I didnt have the 10 gallons, but thats what racetronix recommends for their pump and I dont want people following my write up and not listening to what the manufacture recommends and messing their pump.
Trending Topics
Thanks a lot. Haha ummmm...I honestly dont remember about the price. I bought the pump about a year ago and just now got around to installing it. I think it was whats calssified now as their "pump plus kit" so prob around $225.
LS1 Tech Stories
The Best V8 Stories One Small Block at Time

Topdon ONE vs. Artidiag 800 BT2: Which is the Diagnostic Tablet For You?
Pouria Savadkouei
Gas Monkey Built a 6-Wheel Ferrari Testarossa With a Corvette LT4 Engine
Verdad Gallardo
7 Most Reliable High-Performance Engines GM Has Ever Built
Verdad Gallardo
Amazing '71 Camaro Restomod Is Modern Muscle Car Under the Skin
Verdad Gallardo
6 Common C5 Corvette Failures and What's Involved In Repairing Them
Pouria Savadkouei
Retro Modern Bandit Pontiac Trans AM Comes With Burt Reynolds' Autograph
Verdad Gallardo
Top 10 Greatest Cadillac V Series Performance Models Ever, Ranked
Pouria Savadkouei
Top 10 Most Powerful Chevy Trucks Ever Made!

Hennessey's New Supercharged Silverado ZR2 Has 700 HP
Verdad Gallardo
Yeah I just finished mine today. It was the little things that held me up the most. Next time (hopefully never) I will definately make a trap door. But good write up anyways, it was very helpful.
Glad to hear you got through it. Haha its always the little things that take the most time. I must have spent over an hour on just trying to get that damn pump tube on. I dont think Ill ever do the trap door mod, unless I need to repeatedly access the fuel system quick. Something about cutting into the back of the car just doesnt sit right with me.
Thats a good question and Im not quite sure. I want to say you wont because its providing the right pressure of fuel so the injectors will no have to stay open as long. This is just a guess, but Im sure someone that knows will chime in. For the record, before the swap I was only getting 18 and the last tank I got a little over 20 doing the same drive.
Btw in reference to your sig....your damn lucky if youre gettin a tank of 93 for just $45. Haha it costs me almost $65 where I live.
Btw in reference to your sig....your damn lucky if youre gettin a tank of 93 for just $45. Haha it costs me almost $65 where I live.
yea i need to change my sig, its about 60-65 for me also. but when i bought my a4 i had to drive it about370 miles back home, and i got 27mpg doing about 68mph on cruise.i would hate for that to go down because i drive a ways to work.

Joined: Jun 2004
Posts: 1,501
Likes: 7
From: Ft. Irwin, California (But Virginia is home)
Excellent write-up  I ws a lazy-a$$ and made a trap door when I installed my Racetronix.....but for those that don't want to take a dremel to the body, this is the way to go.
BTW, I hooked my hotire kit DIRECTLY to the positive connector on the alternator. Worked fine for the past 2 years and no wires to see when you pop the hood.
I ws a lazy-a$$ and made a trap door when I installed my Racetronix.....but for those that don't want to take a dremel to the body, this is the way to go.BTW, I hooked my hotire kit DIRECTLY to the positive connector on the alternator. Worked fine for the past 2 years and no wires to see when you pop the hood.

METAL TANKS ARE A ****!!!