


it's gettin' close!
Thread Starter
Joined: Oct 2006
Posts: 2,608
Likes: 0
From: Webb City, MO...out in the garage
I took some pics and will post them for you guys later.
I forgot to take good pics after it was all back together before I took it to my buddies body shop this afternoon...speaking of which, the hood/bumper will be painted soon
I forgot to take good pics after it was all back together before I took it to my buddies body shop this afternoon...speaking of which, the hood/bumper will be painted soon
TECH Junkie
Joined: Oct 2009
Posts: 3,551
Likes: 2
From: Rutherford, North Carolina
i wanna see the rest of the gauge cluster cause dammit im tired of seeing the orange/red mile screen and them off white/yellow back lights and i wanna see it done like what your doin to see if itll convince me to tackle this project or not lol so hurry with the pics lol haha
Thread Starter
Joined: Oct 2006
Posts: 2,608
Likes: 0
From: Webb City, MO...out in the garage
not any good ones, not yet. i've been waiting on the needles to show up. don't get too excited  the overlay is pretty clean and simple. i didn't want anything too flashy, just subtle, clean, and factory looking with a couple small changes.
LS1 Tech Stories
The Best V8 Stories One Small Block at Time

6 Common C5 Corvette Failures and What's Involved In Repairing Them
Pouria Savadkouei
Retro Modern Bandit Pontiac Trans AM Comes With Burt Reynolds' Autograph
Verdad Gallardo
Top 10 Greatest Cadillac V Series Performance Models Ever, Ranked
Pouria Savadkouei
Top 10 Most Powerful Chevy Trucks Ever Made!

Hennessey's New Supercharged Silverado ZR2 Has 700 HP
Verdad Gallardo
Coachbuilt N2A Anteros Is an LS2-Powered C6 Corvette In Italian Clothes
Verdad Gallardo
Awesome K5 Blazer Restomod Comes With C7 Corvette Power
Verdad Gallardo
10 Camaros You Should Never Buy

10 LS Engine Myths That Refuse to Die
Verdad Gallardo
Still my favorite build on this site by far. This girl is getting in GMHTP for sure.
You're going to love the 3.5" exhaust, trust me. That extra .5" gives it such a unique sound, I'll never go back to a 3" exhaust again.
No sir, i have not used V-bands before. i'll be sure to try the tapping method when tightening them. I don't know that i HAVE to have 3.5" pipe, but the headers have 3.5" collectors and the motor IS 454 cubic inches, i'd rather not reduce it down less than the header collectors.
Thread Starter
Joined: Oct 2006
Posts: 2,608
Likes: 0
From: Webb City, MO...out in the garage
...and the exhaust does sound spectacular. I gave in to a little peer pressure when I unloaded it at the body shop and all my buddies demanded seeing the tires spin. i just rolled into it from a slow roll for a split second and it SANG...made everyone's hair stand up. A couple guys from nearby businesses came over drooling, they thought NASCAR was in town

Thread Starter
Joined: Oct 2006
Posts: 2,608
Likes: 0
From: Webb City, MO...out in the garage
Thread Starter
Joined: Oct 2006
Posts: 2,608
Likes: 0
From: Webb City, MO...out in the garage
Tools used:
15watt soldering iron - Radio Shack
.032" lead-free solder - Radio Shack
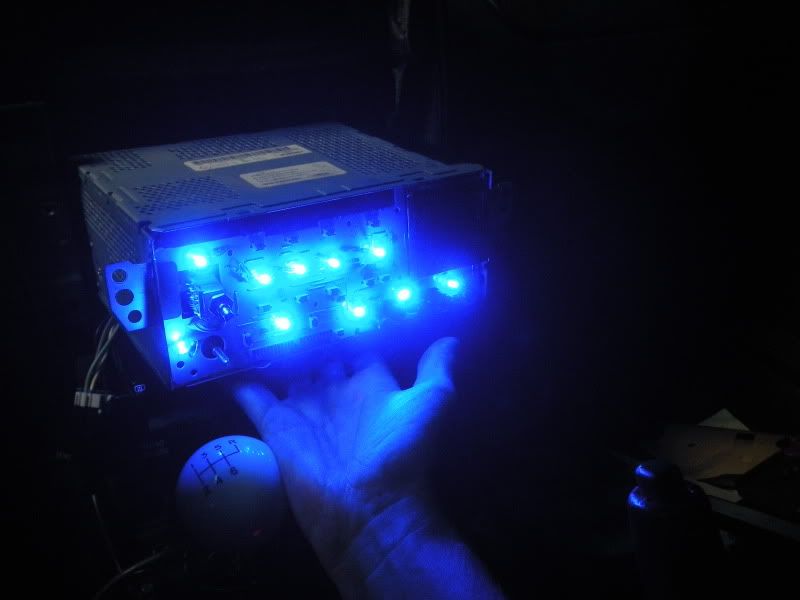
3mm LEDs, color of your choice (i used blue) - superbrightleds.com
680ohm 1/4 watt resistors - Ebay, under $3.00 shipped for 50
Misc hand tools, primarily small flat-head screwdrivers
clamp or vise to hold parts while working
This was a pretty straight-forward process but there were some parts that i wished i had known beforehand. Here's how i did it:
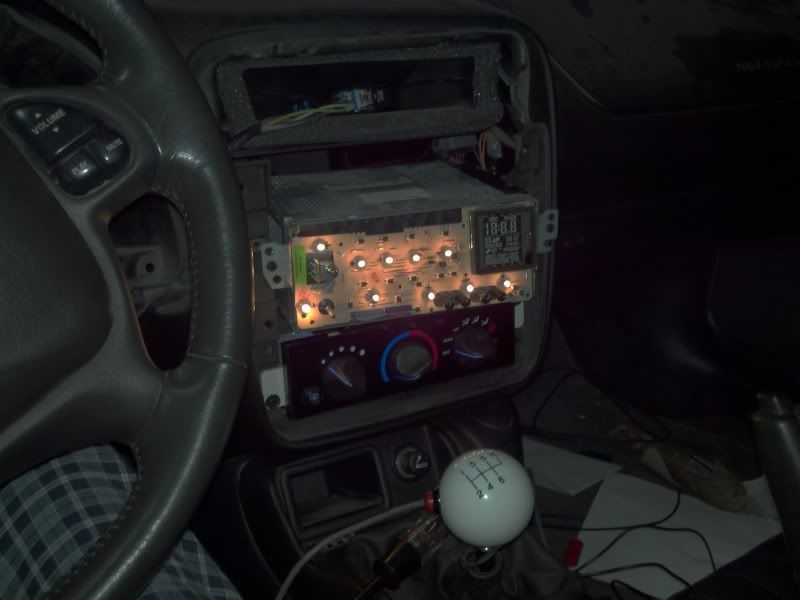
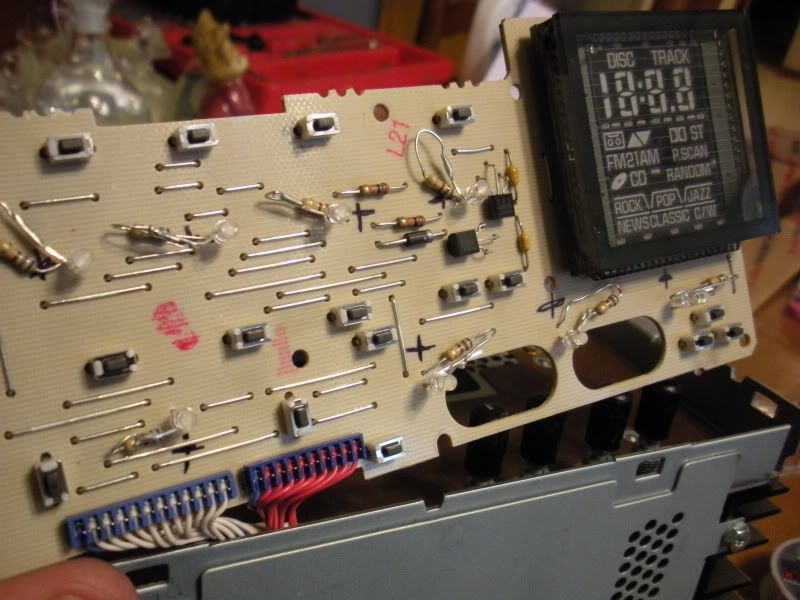
First i removed the switches, that was the easy part. The bezel around your radio/HVAC controls just pops right off, no tools necessary. The switches are just snapped into the back, pop them out and unplug them. i recommend doing one at a time so you don't get them mixed up.
Once the switch is out, you can pry the button off the little pegs holding it on the sides with a small flat-head screwdriver, maybe even with just your fingers if you're good. then you will have something that looks like this:
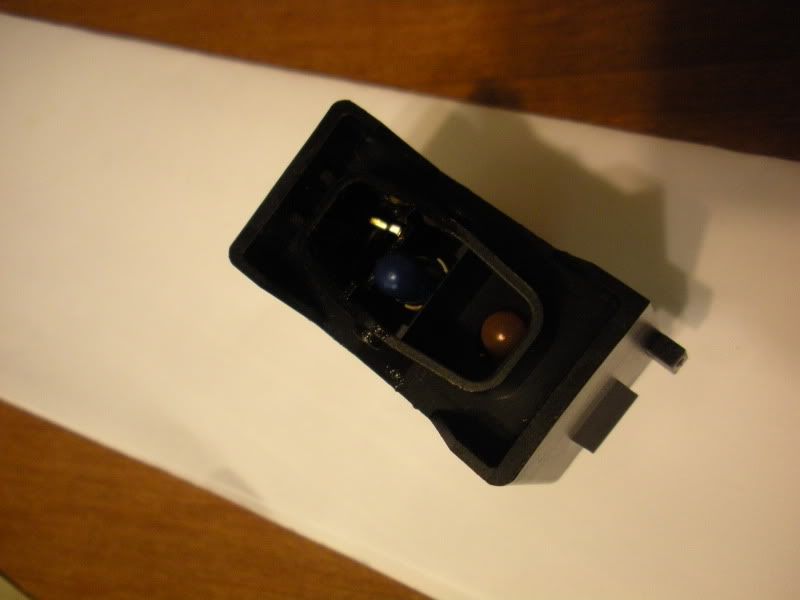
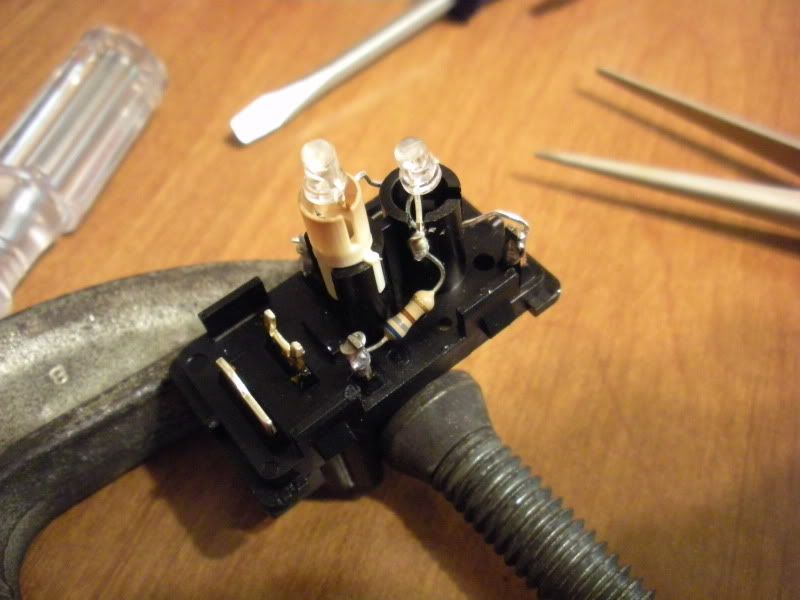
Two bulbs, a blue one for the illumination, and the orange one for indicating switch activation. These are actually incandescant bulbs with little....uh..."condoms" on them that can be peeled off. initially, on the ASR switch, i put the blue one on the indication bulb and put a LED in the illumination spot, but later went back and put all LEDs in (even though i don't have ASR any more). Be careful though because there is a little brass lever inside that is not attached to anything. it is what the button presses on to complete the circuit when you hit the switch. Note the position of this lever if you haven't already moved it by taking the switch out. If you did move it, it isn't difficult to see how it goes back on. it just rests on a little brass peg and you can see the wipe pattern on it from the switch, so you can figure out how to put it back on when re-assembling the switch. Now you can pry the switch apart. there are 4 tabs holding it together that are difficult to get to. i used 3 or 4 small flat-head screwdrivers here, but anything you can get in there to pry the two halves apart will work.
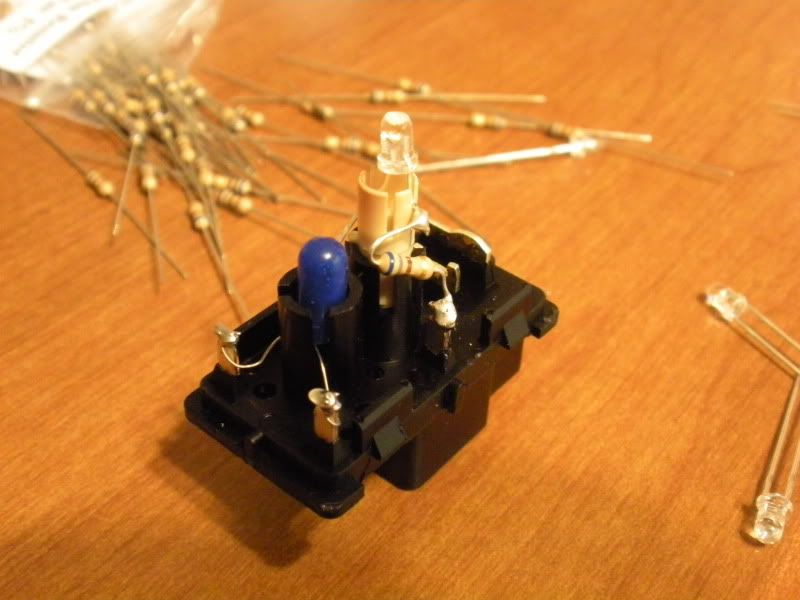
Here's what it looked like with the switch taken apart and the "condom" switched and a LED in place of the original bulb:
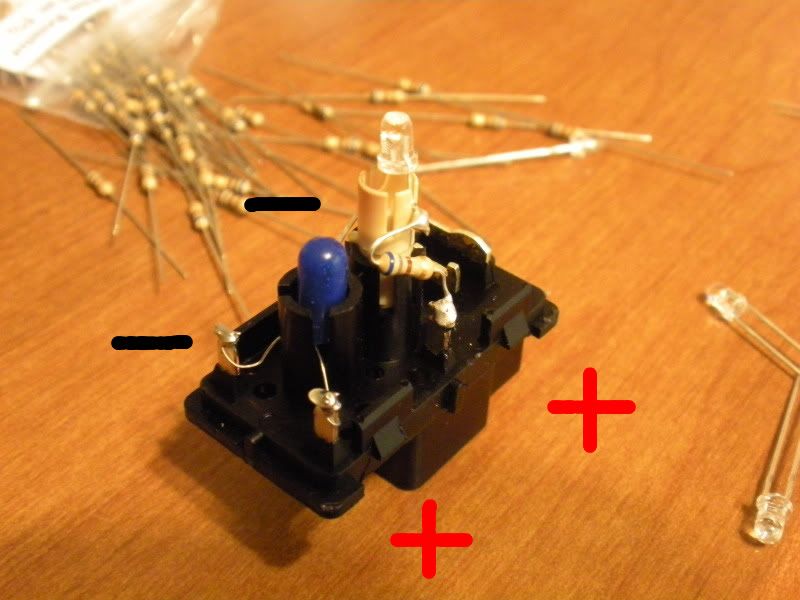
Now, the ASR and Fog switches having difference polarities. this is how the ASR switch is i belive if memory serves:
And the Fog switch is like this:
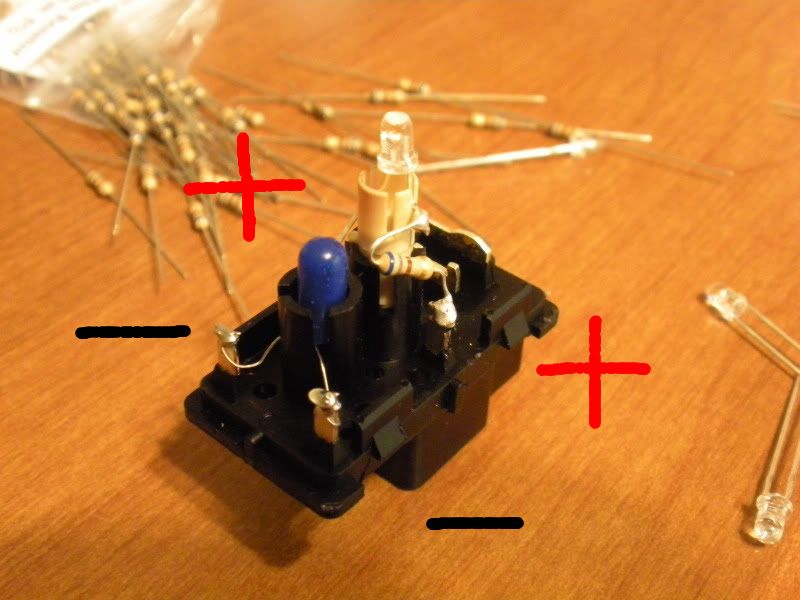
The pictures i uses above to show polarity are of the same switch, but once you get the two switches apart, you'll see the difference. Then, simply solder a resistor onto the positive (longer leg) side of the LED and solder the LED/resistor assembly onto the switch. Make sure the bulb is centered and the resistor is in a position that won't interfere when the switch body is re-assembled.
I recommend plugging the switches back in once the LEDs are installed and verifying your work before re-assembling the switches. it's a major PITA to pry the two halves apart, as you will find out, so you only want to do it once. the soldering is the easy part.
15watt soldering iron - Radio Shack
.032" lead-free solder - Radio Shack
3mm LEDs, color of your choice (i used blue) - superbrightleds.com
680ohm 1/4 watt resistors - Ebay, under $3.00 shipped for 50
Misc hand tools, primarily small flat-head screwdrivers
clamp or vise to hold parts while working
This was a pretty straight-forward process but there were some parts that i wished i had known beforehand. Here's how i did it:
First i removed the switches, that was the easy part. The bezel around your radio/HVAC controls just pops right off, no tools necessary. The switches are just snapped into the back, pop them out and unplug them. i recommend doing one at a time so you don't get them mixed up.
Once the switch is out, you can pry the button off the little pegs holding it on the sides with a small flat-head screwdriver, maybe even with just your fingers if you're good. then you will have something that looks like this:
Two bulbs, a blue one for the illumination, and the orange one for indicating switch activation. These are actually incandescant bulbs with little....uh..."condoms" on them that can be peeled off. initially, on the ASR switch, i put the blue one on the indication bulb and put a LED in the illumination spot, but later went back and put all LEDs in (even though i don't have ASR any more). Be careful though because there is a little brass lever inside that is not attached to anything. it is what the button presses on to complete the circuit when you hit the switch. Note the position of this lever if you haven't already moved it by taking the switch out. If you did move it, it isn't difficult to see how it goes back on. it just rests on a little brass peg and you can see the wipe pattern on it from the switch, so you can figure out how to put it back on when re-assembling the switch. Now you can pry the switch apart. there are 4 tabs holding it together that are difficult to get to. i used 3 or 4 small flat-head screwdrivers here, but anything you can get in there to pry the two halves apart will work.
Here's what it looked like with the switch taken apart and the "condom" switched and a LED in place of the original bulb:
Now, the ASR and Fog switches having difference polarities. this is how the ASR switch is i belive if memory serves:
And the Fog switch is like this:
The pictures i uses above to show polarity are of the same switch, but once you get the two switches apart, you'll see the difference. Then, simply solder a resistor onto the positive (longer leg) side of the LED and solder the LED/resistor assembly onto the switch. Make sure the bulb is centered and the resistor is in a position that won't interfere when the switch body is re-assembled.
I recommend plugging the switches back in once the LEDs are installed and verifying your work before re-assembling the switches. it's a major PITA to pry the two halves apart, as you will find out, so you only want to do it once. the soldering is the easy part.
Thread Starter
Joined: Oct 2006
Posts: 2,608
Likes: 0
From: Webb City, MO...out in the garage
I had to cut it in three spots and weld V-band clamps in so i could get it in and out. i have to remove my tranny crossmember to get it in and out still. NOTE: THIS IS BECAUSE OF MY BMR XTREME TORQUE ARM. Not all cars will have the clearance issues i did. I have a Dynomax bullet welded in now just behind that turn-down.
I would **** bricks if my car was in a magazine. That would definitely make my day.
...and the exhaust does sound spectacular. I gave in to a little peer pressure when I unloaded it at the body shop and all my buddies demanded seeing the tires spin. i just rolled into it from a slow roll for a split second and it SANG...made everyone's hair stand up. A couple guys from nearby businesses came over drooling, they thought NASCAR was in town
...and the exhaust does sound spectacular. I gave in to a little peer pressure when I unloaded it at the body shop and all my buddies demanded seeing the tires spin. i just rolled into it from a slow roll for a split second and it SANG...made everyone's hair stand up. A couple guys from nearby businesses came over drooling, they thought NASCAR was in town
That's awesome. I went from true duals to a custom 3.5" setup, I think I may have showed you the thread, I'll never go back. I get compliments all the time and the sound is so deep I love it. I'm also glad you didn't go with tips, keeps the car looking even cleaner.
i did my ODO with white LEDs and my cluster went kaplooie. 
gonna give it another go in another couple weeks, but did you do anything aside from connect the center light terminals and stick the two 3mms on? Mine would light up but wouldnt display mileage (/anything)
gonna give it another go in another couple weeks, but did you do anything aside from connect the center light terminals and stick the two 3mms on? Mine would light up but wouldnt display mileage (/anything)
Thread Starter
Joined: Oct 2006
Posts: 2,608
Likes: 0
From: Webb City, MO...out in the garage
Nope, that's all I did.