VHT stock corners
#1
i might be trading a guy my smoked corners for his stock corners so i can VHT them. I saw a thread awhile back where this guy had this stock ones VHT'd but i cant find it anymore. I searched and came up empty handed. ANyone have any suggestions on if this is a good idea? or maybe even pictures/ a link to that thread? thanks guys.
#2
Do it. I have mine done and they look great. They came out a little darker than I wanted but they look good with my whistler modded headlights. Best of all, you can still see the light through them.
#5
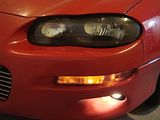
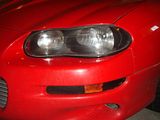
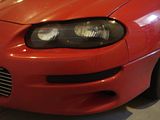
Yeah, I have my stock corners VHT'd and I'm very happy with the results. Here are the only pics I've got (sorry, none with the lights on but they look just as you'd expect). In the first one, the rear corner is sprayed, but is reflecting the flash from the camera so you get an idea of how effective it would be at night.


Trending Topics
#10
TECH Resident
iTrader: (3)
Joined: Sep 2007
Posts: 896
Likes: 1
From: Holmes County (thats right Amish Country), OHIO
Sand like a **** then sand some more. Get all the casting numbers and bumps off of there. I went from 180 grit to 2000. Probably an over kill. Then VHT to your liking. Lightly sand with 1000 or 2000 clear coat many many times. then one light 2000 grit sanding then one coat of clear. This takes some time but its worth it. Also if using the stock yellow and red markers don't forget to VHT the top bottom and side. or you'll have a tinted yellow shining in the middle with yellow light coming from the sides. I just did mine on the face first and hated it. Then sanded them down and did it again the right way.
#11
Definitely sand them smooth. Looks 100000x better.
Sanded smooth, removed all outer ridges, part numbers, etc:

Sprayed with Niteshades, clear coated, wet sanded, and polished:

I ended up switching to clear corners in the end though. The visibility of the lights was cut down by more than half. It was almost non existent during the day. If you do go this route. I would suggest not going too dark on them. As you can see, mine were pitch black, and it just wasn't practical or safe for a daily driver. I've since sanded them back down to remove all the paint, they're on the shelves as backup now.
My process was the same as araber89's. Except I started with 400 grit - 600 - 800 - 1000 - 1500 - then 2000 grit. I've always had beautiful results taking small steps up like that, it's honestly worth the extra 15-20 minutes (tops..) it takes to go through.
Sanded smooth, removed all outer ridges, part numbers, etc:
Sprayed with Niteshades, clear coated, wet sanded, and polished:

I ended up switching to clear corners in the end though. The visibility of the lights was cut down by more than half. It was almost non existent during the day. If you do go this route. I would suggest not going too dark on them. As you can see, mine were pitch black, and it just wasn't practical or safe for a daily driver. I've since sanded them back down to remove all the paint, they're on the shelves as backup now.
My process was the same as araber89's. Except I started with 400 grit - 600 - 800 - 1000 - 1500 - then 2000 grit. I've always had beautiful results taking small steps up like that, it's honestly worth the extra 15-20 minutes (tops..) it takes to go through.
#12
instead of vht i used transparent window tint spray from a local hobby store. its a little easier to come by and only 3 bucks for the mini spray cans. just make sure you use plenty of clear and if its out of a rattle can trying warming it up a little first it"ll come out a lot thinner.


