
HID TSX retrofit...just the beginning..


 04-02-2009, 09:56 PM
#22
On The Tree
Thread Starter
Join Date: Sep 2002
Location: San Antonio, Texas
Posts: 147
Likes: 0
Received 0 Likes
on
0 Posts
The Lexan will protect the glass lens. Right now it is just out in the open exposed to rocks and anything else that might get kicked up. A pair of lenses is 70 bucks so I figured I'd want some sort of barrier to protect them.
The vacuum table definitely makes a tight fit. It took some pushing and pulling to get the projectors out of the mold but no adherence to each other.
The vacuum table definitely makes a tight fit. It took some pushing and pulling to get the projectors out of the mold but no adherence to each other.
04-02-2009, 10:15 PM
#23
TECH Apprentice
iTrader: (3)
Join Date: Jul 2006
Location: Grayson,ga.
Posts: 334
Likes: 0
Received 0 Likes
on
0 Posts

Will the projector not get hot enough to melt the lexan cover in front of it?Does the lexan distort the beam any?And will the headlights close properly without hitting?They look pretty cool though.
04-02-2009, 10:19 PM
#24
On The Tree
Thread Starter
Join Date: Sep 2002
Location: San Antonio, Texas
Posts: 147
Likes: 0
Received 0 Likes
on
0 Posts
Thats exactly what I am wondering. The oven starts to soften it at around 300 degrees give or take. I am not sure how the Lexan will hold up, that is yet to be seen.
There is plenty of room for the lights to close, I did lots of manual raising and lowering of the lights to make sure all clearances were okay.
There is plenty of room for the lights to close, I did lots of manual raising and lowering of the lights to make sure all clearances were okay.
04-03-2009, 03:27 AM
#25
TECH Addict
iTrader: (7)

Join Date: Apr 2004
Location: NorcaL
Posts: 2,187
Likes: 0
Received 0 Likes
on
0 Posts
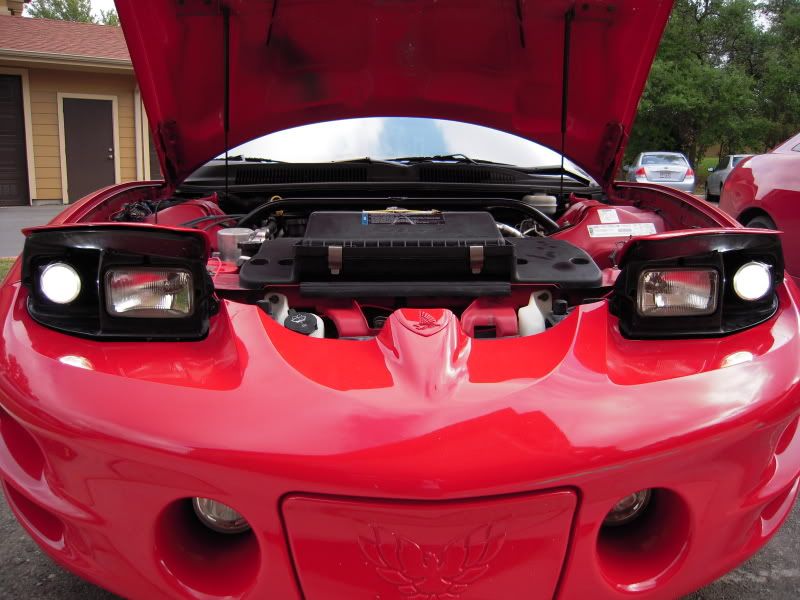
Damn good job. Your Light output is real good!
I wish I could do this to a Camaro without having the headlights look funny. I hate those Ebay projectors headlights
I wish I could do this to a Camaro without having the headlights look funny. I hate those Ebay projectors headlights
04-03-2009, 07:41 AM
#27
TECH Addict
iTrader: (11)
Join Date: Jan 2003
Location: Minnesota Corn Fields
Posts: 2,452
Likes: 0
Received 10 Likes
on
9 Posts

How do you make the rotation adjustments on these?
It looks like to were planning on using the dome form? Was it just not working, and causing too much deformation? I wanted to try the dome form method rather than acutally forming it to the lense and housing, but not sure now. Any reason you switched?
Could I borrow your dome shaped form?
What HID kit did you go with?
04-03-2009, 08:44 AM
#28
On The Tree
Thread Starter
Join Date: Sep 2002
Location: San Antonio, Texas
Posts: 147
Likes: 0
Received 0 Likes
on
0 Posts
When I made the square Lexan piece, instead of drilling a straight shot hole through it. I made an arcing path for it. That way I had rotation clockwise and counterclockwise if needed. I got extremely lucky as I didn't have to adjust that at all. I'm guessing as long as your square Lexan piece fits snugly in the square headlamp bracket and you measure accurately for your hole drilling, it will mount flush.
I still may use the dome, it all depends on what works. I don't think the dome that I made is deep enough right now. But I'm sure with some duct tape or cardboard I could fix that. My latest idea is to use our current stock wrap-around shroud and form a gentle curve over the low beam squared opening. I don't know if it will look good but it is an option if all else fails. The form fitting molds I made, have a slight distortion to them optically, but I reduced the heat and increased heating time and had the same pliability and form results with less optical distortion. I think I can tweak it a bit more and get it perfect.
I see alot of people still running their open projectors so I wonder just how prone it is to breaking/rock chips/scratches if left exposed. I'll probably drive mine this weekend one night without any protection so we'll see. If they get scratched it will be on me, and I'll just have to pick up a new lens.
I got my HID items from DDMTuning (D2S bulbs, bulb connectors, ballasts and wiring harness) and the projectors from Retrofit Source. Used 55w ballasts and 5000K bulb. I heard the higher watt ballast would drown out most of the blue or else I was going to go with 4300K. I am absolutely satisfied with the 5000K, very bright/white light with maybe a bit of blue to it.
Last edited by LastHawk; 04-03-2009 at 09:29 AM.
04-03-2009, 11:00 AM
#29
I got my HID items from DDMTuning (D2S bulbs, bulb connectors, ballasts and wiring harness) and the projectors from Retrofit Source. Used 55w ballasts and 5000K bulb. I heard the higher watt ballast would drown out most of the blue or else I was going to go with 4300K. I am absolutely satisfied with the 5000K, very bright/white light with maybe a bit of blue to it.
04-04-2009, 09:47 AM
#30
On The Tree
Thread Starter
Join Date: Sep 2002
Location: San Antonio, Texas
Posts: 147
Likes: 0
Received 0 Likes
on
0 Posts
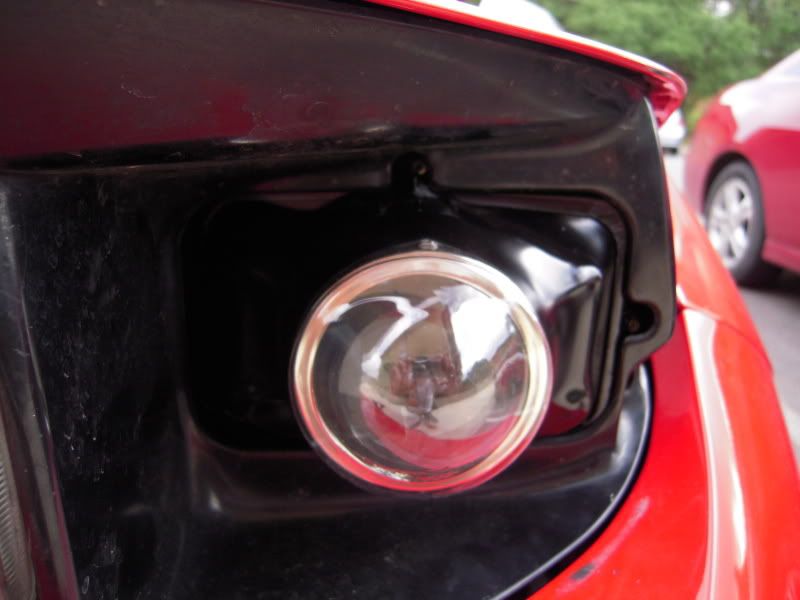
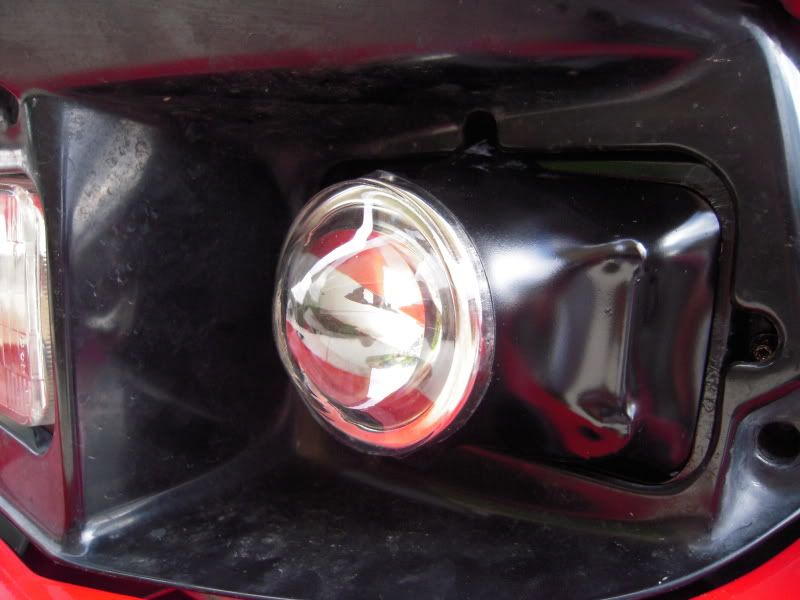
Made these shrouds for the projectors yesterday. I kinda mucked 'em up making them 'em fit so ignore the surface imperfections  .
.
These are just the mock-ups and I want to try and get them to fit just a tad bit better.
After install, I let the HIDs heat up and run for about 30 minutes. I was able to touch the surface over the lens without a problem, it was just a little bit warm.
It is daylight so I can't tell how much the beam pattern is affected, but I did place my hand in front of each 'naked' and installed shroud and didn't see any difference in the clarity. I should get a better idea tonight.
At this point the only thing not covered or protected is the last 1/4 of the projector. I was able to get some neoprene which teachers use for projects and I am going to give that a try. Hopefully it will make a nice pull-on/pull-off cover =)

. These are just the mock-ups and I want to try and get them to fit just a tad bit better.
After install, I let the HIDs heat up and run for about 30 minutes. I was able to touch the surface over the lens without a problem, it was just a little bit warm.
It is daylight so I can't tell how much the beam pattern is affected, but I did place my hand in front of each 'naked' and installed shroud and didn't see any difference in the clarity. I should get a better idea tonight.
At this point the only thing not covered or protected is the last 1/4 of the projector. I was able to get some neoprene which teachers use for projects and I am going to give that a try. Hopefully it will make a nice pull-on/pull-off cover =)
04-04-2009, 10:11 AM
#32
TECH Addict
iTrader: (11)
Join Date: Jan 2003
Location: Minnesota Corn Fields
Posts: 2,452
Likes: 0
Received 10 Likes
on
9 Posts
Made these shrouds for the projectors yesterday. I kinda mucked 'em up making them 'em fit so ignore the surface imperfections .
These are just the mock-ups and I want to try and get them to fit just a tad bit better.
After install, I let the HIDs heat up and run for about 30 minutes. I was able to touch the surface over the lens without a problem, it was just a little bit warm.
It is daylight so I can't tell how much the beam pattern is affected, but I did place my hand in front of each 'naked' and installed shroud and didn't see any difference in the clarity. I should get a better idea tonight.
At this point the only thing not covered or protected is the last 1/4 of the projector. I was able to get some neoprene which teachers use for projects and I am going to give that a try. Hopefully it will make a nice pull-on/pull-off cover =)
. These are just the mock-ups and I want to try and get them to fit just a tad bit better.
After install, I let the HIDs heat up and run for about 30 minutes. I was able to touch the surface over the lens without a problem, it was just a little bit warm.
It is daylight so I can't tell how much the beam pattern is affected, but I did place my hand in front of each 'naked' and installed shroud and didn't see any difference in the clarity. I should get a better idea tonight.
At this point the only thing not covered or protected is the last 1/4 of the projector. I was able to get some neoprene which teachers use for projects and I am going to give that a try. Hopefully it will make a nice pull-on/pull-off cover =)
Do you have any pics of the whole assembly out of the car so I can see the back side of it looks like?
04-04-2009, 11:10 AM
#33
On The Tree
Thread Starter
Join Date: Sep 2002
Location: San Antonio, Texas
Posts: 147
Likes: 0
Received 0 Likes
on
0 Posts
Here is the only pics I have of the whole assembly. Hope it helps.
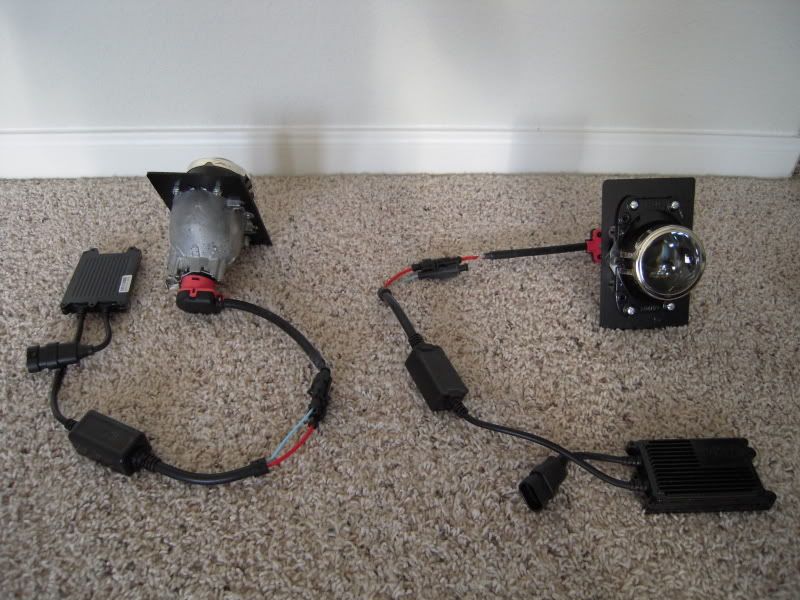
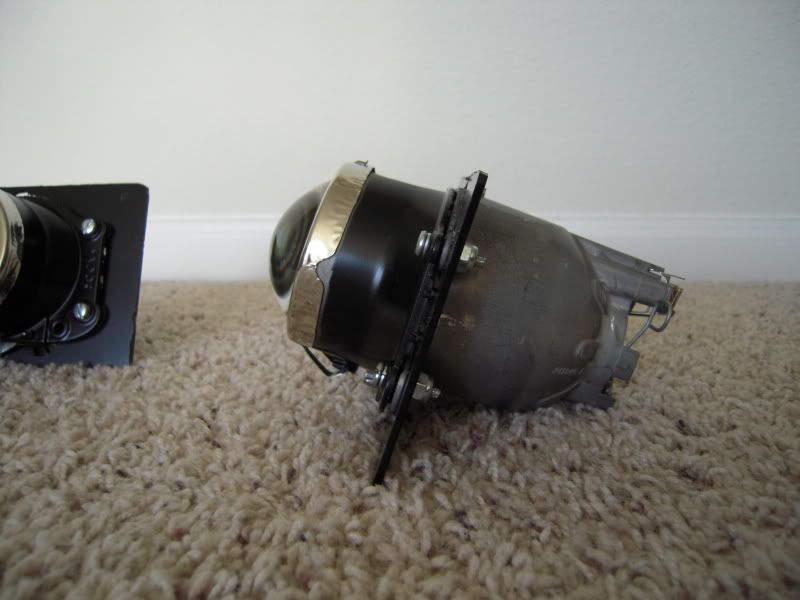
The projector itself, is two pieces. Even when mated together and bolted, there are gaps that need to be filled to keep them from taking in water without a complete enclosure like most car have with these lights. I really hope I can use the neoprene to form a nice sleeve over it and not have to silicone the two halves.
And yes these are the same shrouds I formed, just painted with the chrome and lens portion taped over.
Last edited by LastHawk; 04-04-2009 at 12:16 PM.
 04-04-2009, 12:51 PM
#36
On The Tree
Thread Starter
Join Date: Sep 2002
Location: San Antonio, Texas
Posts: 147
Likes: 0
Received 0 Likes
on
0 Posts
Thanks for the suggestion, I have used HIDplanet quite a bit. Especially the guys doing 240sx retrofits, they have a similar design as ours.
04-04-2009, 07:26 PM
#38
TECH Enthusiast

Join Date: Jun 2004
Posts: 597
Likes: 0
Received 0 Likes
on
0 Posts
There is NO comparison when retrofitting a REAL HID system into our cars. Firebird or Camaro.. both have the worse headlight system ever created.
Looks good fast. A friend of mine went the route you did then one step futher and ditched the halogen high, replacing his single xenon with a bixenon setup.
