Before and after headlight pics (wet sanding)
 06-10-2009, 09:20 PM
#1
Here ya go. About an hours work with some supplies I got from work (harbor freight tools). Our package of various wet sanding paper (220, 550, 1000, and 1200 grit), mcguires plastic-x, and an applicator.
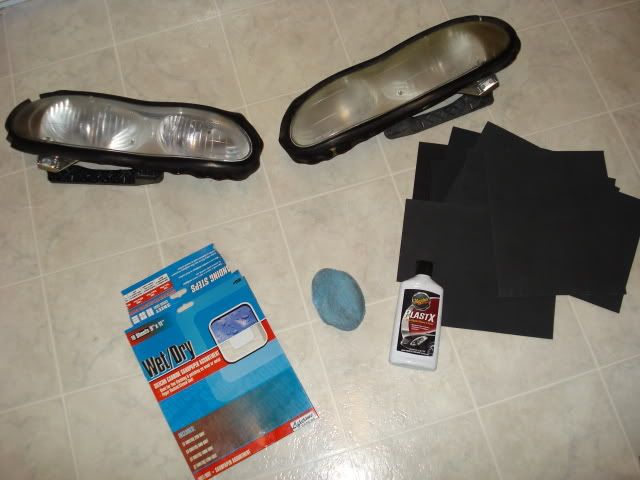
I used every different grit for about 2 to 3 minutes under a trickle of water in the kitchen sink, starting with the 220 and working my way up to 1200. After that, I sat on the couch and rubbed the crap out of them with the applicator using liberal amounts of plastic-x while watching NCIS on TV
After it was all said and done I found a bottle of Nu Finish Scratch Doctor. Maybe I'll hit them with a few minutes of that stuff later.
Not the best in the world, but much better. After I put em back on I put a coat of wax on them. That seemed to clean it up a bit too, plus it should protect it from road nasty as well. I'm not totally satisfied, but good ol' elbow grease always seems to work better than any of the kits or bags of headlight stuff sold at parts houses. When I worked for Advance Auto I sold lots of those little things. A customer who claimed to travel from parking lot to parking lot cleaning headlights for a living said that all he uses is 1000 grit and plastic-x. At HFT, some customers say they do the same for a living but apply a clear coat via an air brush.
Oh, BTW, sidewalk sale weekend at HFT coming up in 2 days, FYI. Mega cheap tools, and managers willing to make deals
 06-10-2009, 10:26 PM
#2
12 Second Club

Join Date: Nov 2005
Posts: 1,847
Likes: 0
Received 0 Likes
on
0 Posts
we normaly dont go that low with the grit on plastic lowest i have used is a 1000 grit then 15 then 2k.
go get some 1500 and 2k and that will make them look better after a buff.
i use my porter cable polisher with a 4in yellow and a 4in orange pad and they look almost new when im done.
go get some 1500 and 2k and that will make them look better after a buff.
i use my porter cable polisher with a 4in yellow and a 4in orange pad and they look almost new when im done.
06-10-2009, 10:56 PM
#3
TECH Fanatic
iTrader: (25)

Join Date: Dec 2005
Location: Denton, Texas
Posts: 1,206
Likes: 0
Received 0 Likes
on
0 Posts

looks great, that is a pretty low grit though... I wouldnt go below 600. I just had mine redone, did it myself the first time, at the body shop that my car was at. They had this badass kit that 3M makes especially for polishing headlights. It has a bunch of different grits of really small pads that go on an orbital I think, never got to see the thing.
06-11-2009, 04:35 AM
#4
Yeah, that was pretty coarse. I had seen where several people had used really high grit sand paper and I started wishing that I had some. When yall wet sand them, how much water is involved? I had a stream about 1/3 the size of an ink pen body sorta drooling onto whichever half of the headlight I was working on. The sandpaper always had water around it. It almost seemed like it worked a little better when it wasnt so wet.
The biggest pita about hand sanding are those damn tabs on the front of the lense! WTF are they? Is that where a machine ligned the headlights up originally? Can you grind them off?
The biggest pita about hand sanding are those damn tabs on the front of the lense! WTF are they? Is that where a machine ligned the headlights up originally? Can you grind them off?
06-11-2009, 01:21 PM
#5
12 Second Club
Join Date: Nov 2005
Posts: 1,847
Likes: 0
Received 0 Likes
on
0 Posts
some guys have cut off those tabs then just kept sanding untill they where flush and gone.
they have that 3m kit at the parts store for 20 bucks and i think u use a regular drill for it.
to make it easyer dont do it in the sink get you a bowl put a drop of soap then fill it half way and get the water sudsy the soap makes it a lot easyer and just keep diping the paper in when it starts to get dry.

 06-11-2009, 10:04 PM
#7
I didnt do the inside. I'll save that for a whistler mod weekend. Soap would be good. Definitely going with some 2000 grit next time. Anyone tried Nu Finish Scratch Doctor? I found a bottle of this stuff in my bucket of wash stuff. No clue how it got here, but maybe its a sign.... 
Trending Topics
06-11-2009, 11:02 PM
#8
If you have any polish laying around, give it a shot. I've used System One (the best for this kinda stuff) and even Menzerna for this kinda stuff. Comes out perfect every time.
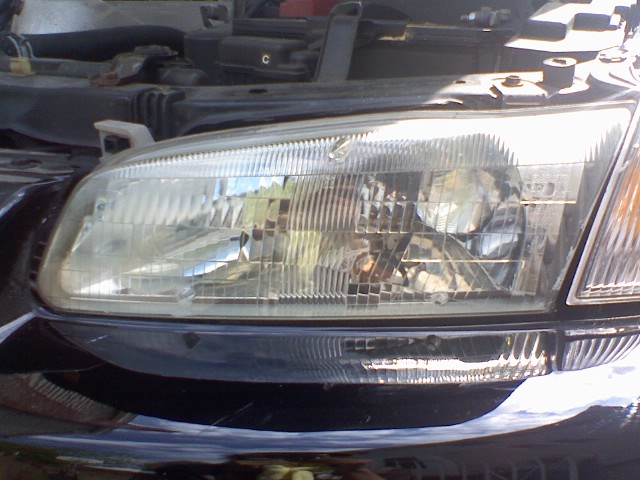
EDIT: Try going over them again, with a finer grit and then use some polish. These are pics from when I did my parent's Camry.
Before.

After.
EDIT: Try going over them again, with a finer grit and then use some polish. These are pics from when I did my parent's Camry.
Before.
After.
Last edited by 98 WS6; 06-11-2009 at 11:08 PM.