Want to clean up my coilpack wiring.


 01-15-2012, 11:40 PM
#44
So I laid out my brackets and looked at them for a while thinking how would be the best way to trim them up. Broke out the sharpie and started drawing.
This is what I came up with and I'm sorry for the bad quality.
I was pretty eager to get started as I won't be able to get back to them until next weekend, so I broke out the compressor and the grinder and got to work.
This is as far as I got tonight.
To give you an idea of where the material was removed from, here are the pieces laying on the other intact bracket.
This just crossed my mind however. If the bracket is cut, what is going to hide the wire?
Should have thought about that before I guess... I would finish the one your are working on, install both, then see which you like better.
I agree... Just give them a good "extra bit" at the end after they are tight and it should hold I would think.
What do you mean sweep the coils to one side?
01-16-2012, 01:36 AM
#46
Excellent work man..
This just crossed my mind however. If the bracket is cut, what is going to hide the wire?
Should have thought about that before I guess... I would finish the one your are working on, install both, then see which you like better.
I agree... Just give them a good "extra bit" at the end after they are tight and it should hold I would think.
What do you mean sweep the coils to one side?
I'm thinking I'm going to swap the wires, say drivers side to the passenger side so the clips will install with the wires extending up and along the tops of the coils connecting to the other connectors, I also thought about this as I didn't want the wires below the coils now .
I don't think this will effect anything as the signals being sent through the wires in controlled by the PCM right?
As far as sweeping them maybe I should have said pivot them where the would be slightly angled sitting on the valve cover but I had decided against this as it would make the spark plug wires bent. Now if I could perhaps mount the coils slightly towards the rear of engine bay with the coils rotated clockwise slight this would allow the plug wires to remain vertical in their natural position. Kind of hard to describe and would probably look silly anyways, just something that popped in my head while I was grinding.
01-16-2012, 01:49 AM
#47
I'm thinking I'm going to swap the wires, say drivers side to the passenger side so the clips will install with the wires extending up and along the tops of the coils connecting to the other connectors, I also thought about this as I didn't want the wires below the coils now .
I don't think this will effect anything as the signals being sent through the wires in controlled by the PCM right?
As far as sweeping them maybe I should have said pivot them where the would be slightly angled sitting on the valve cover but I had decided against this as it would make the spark plug wires bent. Now if I could perhaps mount the coils slightly towards the rear of engine bay with the coils rotated clockwise slight this would allow the plug wires to remain vertical in their natural position. Kind of hard to describe and would probably look silly anyways, just something that popped in my head while I was grinding.
However, I don't think you can swap the connections. I could be wrong but I think each one has to be wired up to a certain one. That is an assumption though and I could be wrong.
Get you on the sweeping/pivot part. I would just play with them until it looks "right". Hell when I do things like this it takes me 30 mins just deciding something like that.. And unbolting/re installing them 25 times! LOL Should have seen me relocating the EVAP on the girls car the other night. I placed that bitch with zip ties 20 times before I decided where to put it!

 , I'm definitely in to see the floating coil pics
  01-17-2012, 06:48 PM
#54
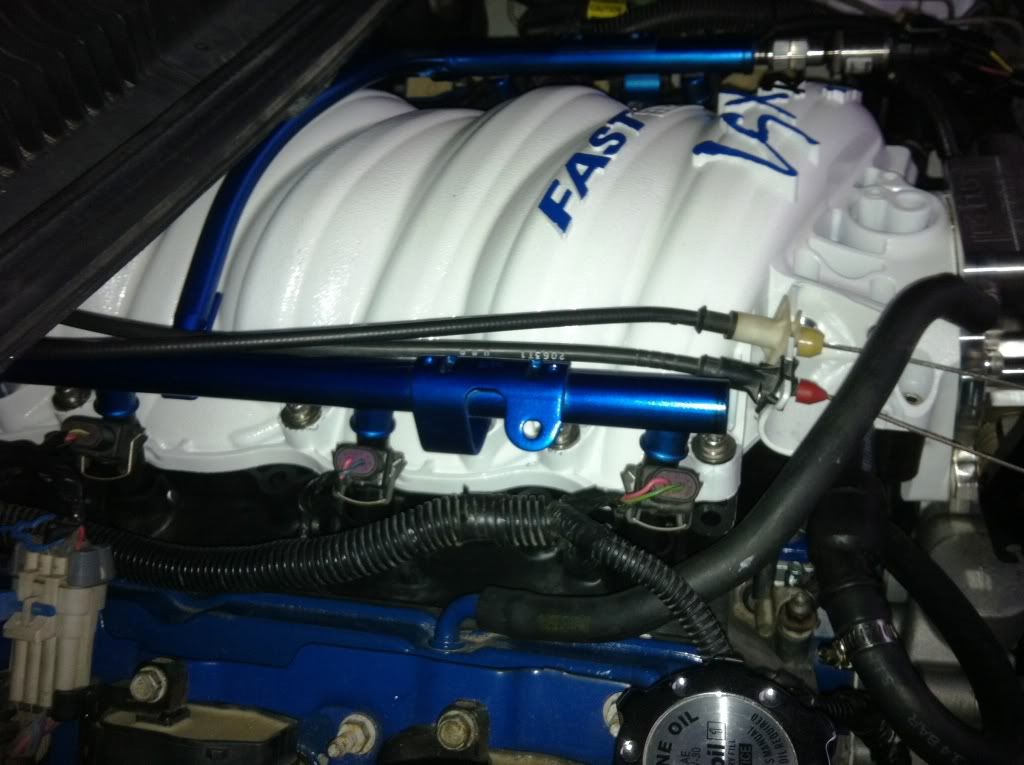
No this is great it will show everyone different options as I think we all like a less clutter more thought out looking engine bay and everyone knows smartly placed color can put the way the engine bay looks on a whole other level. I'm shocked how much I like the way the factory fuel rail turned out.
Is that the dark ford blue engine paint?
My mind is thinking up different color combos now. But I'm really digging the idea of painting my rail and catch can, anodized burgundy and the covers and brackets NBM. Leave the coils black for a toned down less in your face look (kind of my whole approach to anything appearance wise on my car, hence why I instantly hated the red and black). I think burgundy on my car looks great but I'll have to do a spray out to see how nice that rattle paint looks.
Last edited by My6speedZ; 01-17-2012 at 07:05 PM.
01-18-2012, 08:25 AM
#55
No this is great it will show everyone different options as I think we all like a less clutter more thought out looking engine bay and everyone knows smartly placed color can put the way the engine bay looks on a whole other level. I'm shocked how much I like the way the factory fuel rail turned out.
Is that the dark ford blue engine paint?
My mind is thinking up different color combos now. But I'm really digging the idea of painting my rail and catch can, anodized burgundy and the covers and brackets NBM. Leave the coils black for a toned down less in your face look (kind of my whole approach to anything appearance wise on my car, hence why I instantly hated the red and black). I think burgundy on my car looks great but I'll have to do a spray out to see how nice that rattle paint looks.
Is that the dark ford blue engine paint?
My mind is thinking up different color combos now. But I'm really digging the idea of painting my rail and catch can, anodized burgundy and the covers and brackets NBM. Leave the coils black for a toned down less in your face look (kind of my whole approach to anything appearance wise on my car, hence why I instantly hated the red and black). I think burgundy on my car looks great but I'll have to do a spray out to see how nice that rattle paint looks.
 ) and painted a few other things.
 The engine IS Ford engine blue... it was the closest thing I could find at an auto parts store to my first Camaro (in the avatar) to use on an engine.
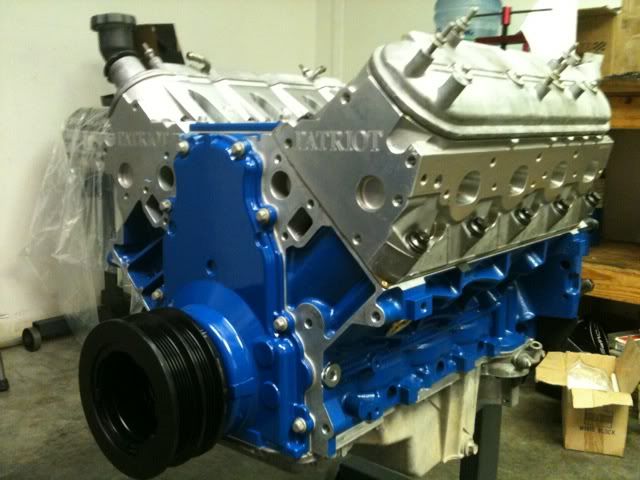
I'm not usually a fan of anodized parts in the engine bay, kind of reminded me of older hot rod show motors with red and blue anodized fittings everywhere. But when I had to install fuel rails, I picked up a set of Scorpions and they complimented the engine color so well! I had to lay enough coats of the paint to get close to the engine color, since the color tended to deepen with additional coats. Now, Im a huge fan!

 01-18-2012, 11:38 PM
#57
Also, what color did you decide to paint the valve covers? IIRC you said black, which means as long as the wires are wrapped good and tight in the black tape you had before, they shouldn't be too noticeable.
Just remember... We can't hide EVERY wire in our engine bay, cut down to bare minimum you have to show and it will look WAY better.
01-19-2012, 12:08 AM
#58
Nice man! How well are they going to stay in place?
Also, what color did you decide to paint the valve covers? IIRC you said black, which means as long as the wires are wrapped good and tight in the black tape you had before, they shouldn't be too noticeable.
Just remember... We can't hide EVERY wire in our engine bay, cut down to bare minimum you have to show and it will look WAY better.
I'm going to cut off the upper threaded part of the screws and smooth them.
I'm either going to go black or maybe navy blue, depends on how well I can match it.
I also ordered some woven nylon wire loom in black to give the harness a better more finished look as I don't think I'm going to be able to hide them that well.
 01-19-2012, 08:19 AM
#60
I torqued them pretty lightly and I don't think them shifting around will be a problem, once I get it back on the road (and tighten them properly) I'll drive it for a day or so and check them, I guess if I need to I can always dab them loctite.
I'm going to cut off the upper threaded part of the screws and smooth them.
I'm either going to go black or maybe navy blue, depends on how well I can match it.
I also ordered some woven nylon wire loom in black to give the harness a better more finished look as I don't think I'm going to be able to hide them that well.
 Will you paint the coil brackets to match the valve covers, paint them black or leave them red?