When you click on links to various merchants on this site and make a purchase, this can result in this site earning a commission. Affiliate programs and affiliations include, but are not limited to, the eBay Partner Network.
Decided to upgrade my Ferris wheel to something more sporty. A nice 350 mm Momo with a NRG adapter and. 1/2 in spacer. All in all the wheel is about one inch farther back now. I didn�t go for the quick release set up. Can always add it later if I want. There is a one inch spacer that would put the wheel very close to stock position. Will see how this set up feels. So far the new position seem perfect. Will have to drive it for a bit. I think it looks great. And does not obstruct the gauges at all. Horn works great, and I am still working on the air bag light. Ordered the correct resistors after getting the wrong ones and the thing not working. Will get back to you regarding the correct resistor trick.
I bought 2 wheels. A 350mm Momo, and a 330mm Sparco. Gonna try them both. The Sparco has a 2 inch dish. I�m using a short hub adapter and a 1/2 inch spacers. Both from NRG. You have to use the 1/2 inch spacer because with out it the horn button will hit the steering shaft and the bolt. It needs a bit more depth. The Sparco fits exactly like the stock wheel. The Momo has a one inch dish and sits one inch farther away. So far I like the smaller Sparco. Will switch back and forth a few times and see. But what a great improvement. Not only in the look, but how the car turns now.
A few more picks Stock wheel measurement. Momo compared to the barge wheel. Momo is about one Inch much shorter than 18 wheeler wheel. Momo measurement. Hub and spacer Momo Installed Sparco dish. Sparco measurement. Same position as the stock wagon wheel.
can you provide part number for the steering hub you went with? also links to were you purchased the resistors?
This is the 1/2 inch spacer. This is a one inch spacer. Will work better of your wheel has a one inch dish. ( flat steering wheel) These are the resisters. Make sure they have 2 gold stripes and 2 red ones. Amazon. $7. See the stripes This is the adapter. You have to use a spacer with it. If you don�t the horn button won�t snap in to place as it will hit the steering stem and the dig bolt.
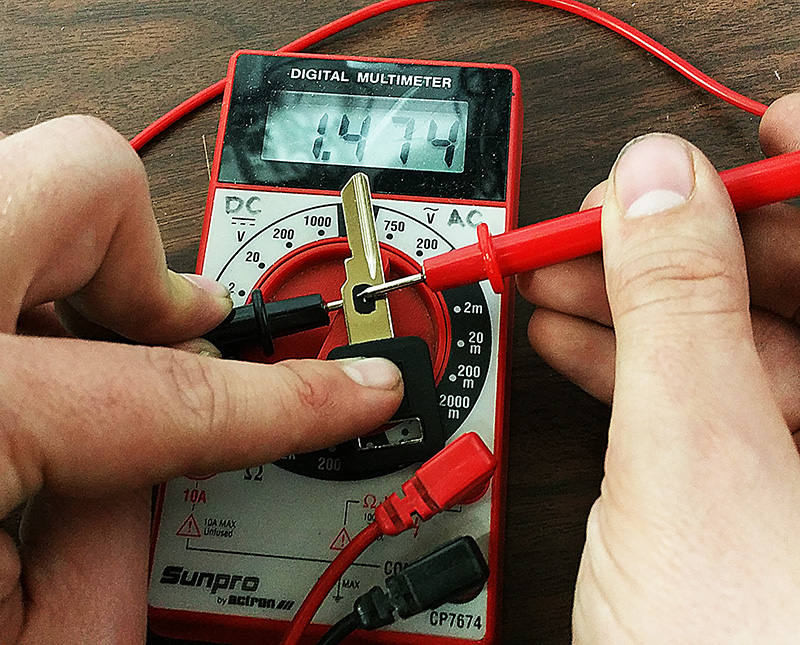
Your car might not use the same value. There are multiple possible values. You need to measure your current key pellet to get the correct value for your car. Also, it would be a good idea to solder and not just twist the wires.
Your car might not use the same value. There are multiple possible values. You need to measure your current key pellet to get the correct value for your car. Also, it would be a good idea to solder and not just twist the wires.
i did solder my resistor on. Now, how do you measurements your �key pellet�???! I assume you mean that little plastics doohickey attached to the ignition key shaft right? Or are just kidding around?
Use a multi-meter in the resistance measurement setting and put one probe one one side and the other probe on the other side of the metal tabs sticking up in that black pellet in the key shaft.
Use a multi-meter in the resistance measurement setting and put one probe one one side and the other probe on the other side of the metal tabs sticking up in that black pellet in the key shaft.
ok awesome info there. One question tho, when we buy resistors it�s always like a 2.2 ohm etc. The numbers on that chart are like 1436 to 1623 ohm with nominal at 1540 for example. How do you get 2.2 ohm resistor for example out of those numbers? Do you know what I mean. How do you convert the 4 digit number to what I�m used to seeing and that I can type in to Amazon to order?
You don't, a 1540 resistor is just that. A 2.2 ohm is 2.2
You can find a 1.9 - 2.2 to work. the resistor is dropping the current in that circuit.
The watts = the amount of heat it can handle.
The picture above show that you can use a 1.5 ohm resistor. anymore would reduce the voltage.
Last edited by Tramminc; Nov 26, 2020 at 01:31 PM.
You need to buy a resistor in the correct range or combine resistors in series to get the correct range. You can't "convert" the resistor you bought to be in the correct range.
I think the closest/easiest you can get for #6 would be a 1K resistor + a 470 resistor in series to make 1470. There are 1470 ohm resistors, but 1K & 470 are more plentiful.
I think you're showing him the vehicle anti-theft bypass and he's just trying to turn the airbag light off on the dash
When I removed the original wheel, I pulled out the clock spring and pulled out the air bag wire after cutting off the plug. Then I soldered the resistor to that plug under the dash. It�s a nice clean install. And if I ever want my original wheel back, those wires will snake back up very easily. All I will have to do is solder that plug back on to the end of the air bag wire.