


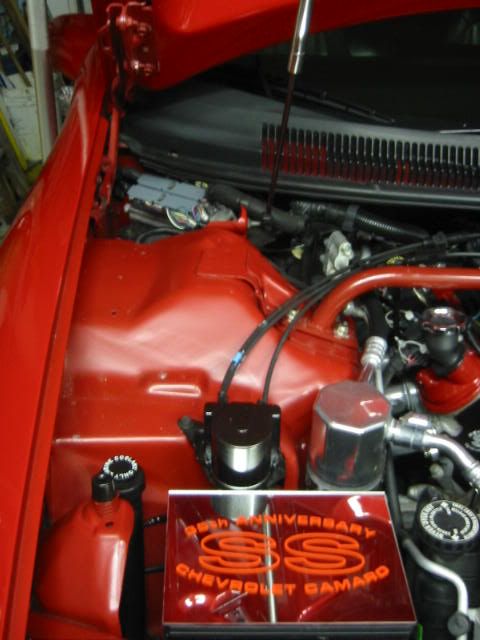
!WIRE and a lil BONDO...COMPLETED!!!
yet another successful !WIRE mod....LOVE HOW IT LOOKS!!!
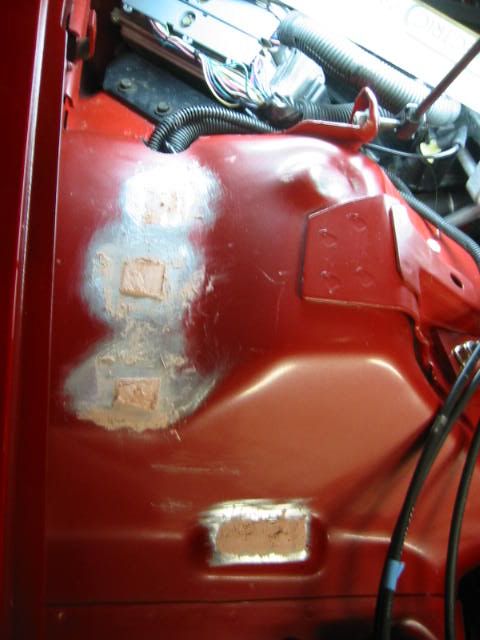
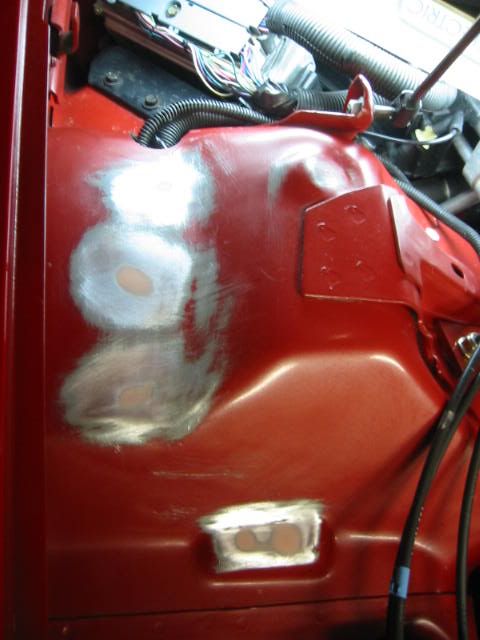
Check out the pics! Also, I picked up a lil can of Bondo at Advanced and went ahead and filled in the left over holes...that came out perfectly too...
now on to glossy red paint!
comments or questions welcome!
Check out the pics! Also, I picked up a lil can of Bondo at Advanced and went ahead and filled in the left over holes...that came out perfectly too...
now on to glossy red paint!
comments or questions welcome!
One thing not explicity covered in the tutorial has me wondering...what about the power dist. block? Where did it go? What about grounding the wires? It's all gone, where are your new points? Thanks 
Trending Topics
Originally Posted by contraststriker
One thing not explicity covered in the tutorial has me wondering...what about the power dist. block? Where did it go? What about grounding the wires? It's all gone, where are your new points? Thanks
LS1 Tech Stories
The Best V8 Stories One Small Block at Time

6 Common C5 Corvette Failures and What's Involved In Repairing Them
Pouria Savadkouei
Retro Modern Bandit Pontiac Trans AM Comes With Burt Reynolds' Autograph
Verdad Gallardo
Top 10 Greatest Cadillac V Series Performance Models Ever, Ranked
Pouria Savadkouei
Top 10 Most Powerful Chevy Trucks Ever Made!

Hennessey's New Supercharged Silverado ZR2 Has 700 HP
Verdad Gallardo
Coachbuilt N2A Anteros Is an LS2-Powered C6 Corvette In Italian Clothes
Verdad Gallardo
Awesome K5 Blazer Restomod Comes With C7 Corvette Power
Verdad Gallardo
10 Camaros You Should Never Buy

10 LS Engine Myths That Refuse to Die
Verdad Gallardo


Bondo is NOT what you use to fill holes. It's gonna shrink and crack and fall out in a few months. It's made to fill small imperfections on a surface. WELD the holes shut!
Looks nice now get it painted and post more pictures!
I have filled non structural, small holes in metal with bondo for years and never had one crack. Yes, welding is better but not all of us have access to a welder or the skill needed to weld properly not to mention the amount of work to grind the welds down flush. Put a welder in the hands of a novice and he will likely have BIGGER holes than when he first started.
I have filled non structural, small holes in metal with bondo for years and never had one crack. Yes, welding is better but not all of us have access to a welder or the skill needed to weld properly not to mention the amount of work to grind the welds down flush. Put a welder in the hands of a novice and he will likely have BIGGER holes than when he first started.

Originally Posted by Mike02Z
Put a welder in the hands of a novice and he will likely have BIGGER holes than when he first started.
That made me laugh for some reason. Prolly reminds me of a kid trying to arc weld 1/8 stainless in welding class with the welder all the way up lol. He cut threw the ****** table.
OK here are some answers to EVERYONES posts, and thanks for the comments,,,
As far as using Bondo to fill holes, I agree that it shrinks...cracks, etc...these holes however are MINUTE, and when mixing the Bondo I added extra hardener, its solid as hell...i feathered it out with some 400 sand paper..if my eyes were closed, I wouldnt be able to tell where the metal stops and where the Bondo starts...I thought about welding, as i have some experience wleding with my arc welder..but ehhh, well try this first....
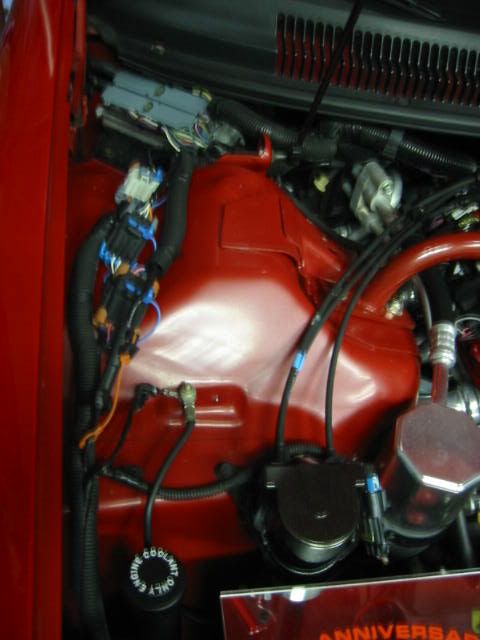
As far as cutting wires, I DID NOT CUT ONE SINGLE WIRE.....you simply diconnect the wire connectors, put one half through your new hole you drill and bring the other half (the front most half of the harness) and feed it through a stock space that is between the fender and frame(about 10 square inches or room)
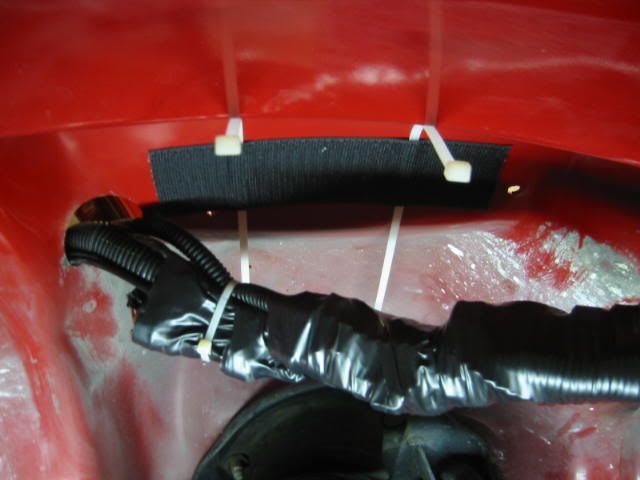
As far as where the wires sit, look at t he pics, I used some HEAVY DUTY velcro and zip ties to keep it firmly planted up against the wheel well...IT AINT GOING ANYWHERE..i double wrapped the harness with electric tape, zipped it up and velcro'd it...i then reinstalled the wheel well cover, cant even tell there is anything there...seriously!!
As far as my GROUNDs are concered, thats really up to you where you want to relocate them...there are a number if bolt heads and nuts in the proximity of these two wires to hook them up...i actually fastened them to an already exiting bolt and nut near the rear of the turn signal, just like the HOW TO said..again its up to you AND IS OPTIONAL!!
Guys, I will be honest, DO NOT BE AFRAID TO DO THIS MOD...some mods may seem intimidating...this is not..it is one of those things where you just take your time, and thats it...
Sorry about the EPIC...any questions are welcomed!
THANKS
As far as using Bondo to fill holes, I agree that it shrinks...cracks, etc...these holes however are MINUTE, and when mixing the Bondo I added extra hardener, its solid as hell...i feathered it out with some 400 sand paper..if my eyes were closed, I wouldnt be able to tell where the metal stops and where the Bondo starts...I thought about welding, as i have some experience wleding with my arc welder..but ehhh, well try this first....
As far as cutting wires, I DID NOT CUT ONE SINGLE WIRE.....you simply diconnect the wire connectors, put one half through your new hole you drill and bring the other half (the front most half of the harness) and feed it through a stock space that is between the fender and frame(about 10 square inches or room)
As far as where the wires sit, look at t he pics, I used some HEAVY DUTY velcro and zip ties to keep it firmly planted up against the wheel well...IT AINT GOING ANYWHERE..i double wrapped the harness with electric tape, zipped it up and velcro'd it...i then reinstalled the wheel well cover, cant even tell there is anything there...seriously!!
As far as my GROUNDs are concered, thats really up to you where you want to relocate them...there are a number if bolt heads and nuts in the proximity of these two wires to hook them up...i actually fastened them to an already exiting bolt and nut near the rear of the turn signal, just like the HOW TO said..again its up to you AND IS OPTIONAL!!
Guys, I will be honest, DO NOT BE AFRAID TO DO THIS MOD...some mods may seem intimidating...this is not..it is one of those things where you just take your time, and thats it...
Sorry about the EPIC...any questions are welcomed!
THANKS
Originally Posted by 1FST99Z
did you put a gromit on the hole where the wires go through. just a thought to protect the wires.
When I drilled the hole, I took a small file and filed the inside of the hole, its actually as smooth as a babys ***, PLUS the stock wiring sleeve protect the fragile wires...so im double TRIPLE safe with a grommet...
Godo idea anyHOW!
Originally Posted by Sgt. Spuds
That made me laugh for some reason. Prolly reminds me of a kid trying to arc weld 1/8 stainless in welding class with the welder all the way up lol. He cut threw the ****** table.
Ive never had a problem with welding since day one, although I did have a instructer telling me what to do. I can gas weld pretty good, and arc decent. Im by no means a great welder, but none of my welds have ever failed. I have a stock short stick cut down that I gave to a guy and he has been powershifting on it for some time now and no problems.. That being said, I'd of mixed up some jb quick 
11 Second Club
Joined: Mar 2003
Posts: 1,173
Likes: 1
From: NE Ohio
https://ls1tech.com/forums/appearance-detailing/309397-hood-latch-cable-relocation.html
It's in the "hall of fame" sticky at the top of the page.
It's in the "hall of fame" sticky at the top of the page.