


M6 to A4 and A4 to M6 Conversion info
Thread Starter
The Bull
Joined: Jun 2002
Posts: 3,578
Likes: 2
From: Grand Rapids, MI
We have been asked to provide a guide to doing a TH400/350 and a glide conversion for our cars. We also have been asked by a few members on how to do a M6 to A4 and A4 to M6 conversion. I have not personally done one, but I have a general idea on how to accomplish this. Can someone provide any specific details on this conversion, either way. For instance, PCM programming is required. A new wiring harness may be required for the different connectors, or at least rewiring it for the electrically inclined, etc.
Any information you guys could provide would be very useful!
This is not a thread to post in if you're looking for a trade. Put it in the classified.
Any information you guys could provide would be very useful!
This is not a thread to post in if you're looking for a trade. Put it in the classified.
Last edited by Ragtop 99; Jul 5, 2005 at 10:21 PM.
When i did my 6 speed to A4 swap this is what i needed to do the job there might be otherways to do the job but this is what i did and it worked and was very easy. If you have any questions at all feel free to pm me.
4l60e Out of a 98 and newer
Torque converter
Flexplate
A4 crossmember out of 98+
Trans dipstick tube
Trans lines for cooler
Trans cooler (6speed radaitors do not have trans coolers built in)
A4 pedeals
A4 shifter
A4 shifter cable
A4 center consule
A4 wireing harness
Get m6 computer reflashed to a A4 computer
Tranny
First disconect the battery Ok it is pretty easy to do the job first the tranny. Start off by suporting the car. Remove the drive shaft out of the car. Then suport the trany with a jack of some sort. take off the trans crossmember. Then take off the torque arm mount off the 6 speed. Get a flat head or pick and on the clutch hydrolic cable push in the white peice on the hose going in the bellhousing in the drivers side. Now with t56 supported start removing all the bolt bolting the tranny to the bellhousing. Then remove all the bellhousing bolts and the clutch and flywheel. Now you will need to install the A4 flexplate.
Go in to the inside of the car and get under the dash you will need to remove the clutch mastercylinder 2 nuts on the fire wall. And all the bolts bolting the pedeals to the fire wall. there will be 4 that go with the break booster and 2 over by the gas pedeal and 1 that is up by the steering colum. Now we need to remove the master to get it out of the firewall. When remvoing the pedeals they will come out with out remveing anything eles. Rotate them counter clockwise aroudn the steering shaft and it will come out re install them the same way.
( 2 options find clutch pedeal plug in and ether connect the 2 together or you can run the wires to the auto shifter to get the PRNDL switch hook up correctly this will only cause the car to start in any gear)
Ok you will have a hole in the fire wall where you removed the master cylinder you will need to covwer this with something. Get creative.
On the center consule you will need to remove the uper part wich has a bolt under the ash tray and 2 in the glove box. I just left the rubber 6 speed boot and useed RTV to cover the hole of the where the shifter comes up. There will be a airbag sensor under there and remove the 2 bolts closest to the front of the car and install the auto shifter and reinstall the bolts.And then get the shifter calbe pop a hold in the rubber boot and slide it through and in to the shifter.
Ok get the a4 harness and figure out where ever plug in goes before you even start. On the inside of the car take off the passanger side kick panel and un plug the connects come from the fire under the computer. Now get under the hood and remove the wireing harness. all teh plugins are the same besides for the wires going to the tranys. When are installing the new be sure to plug in the ones that went it so the firewall and run them just like factory had them.
Ok remove the starter and fill the converter full of fluid and install it in thecar and them put them both in the car. put all the bellhousting bolt in the trany and install it then put the torque converter bolts in the flywheel. Install the new trans crossmember in the car alond with the new driveshaft. Plug in all the plugs in in to the tranny. Now you will need to connect the shifter cable to bolts on the trans pan and it clips on the side of the tranny. Now you will need to run cooler lines i just used trans rubber hose from autozone to the cooler and back support it along the was to the body. Fill it up with fluid and you should be done.
Well i most likley forgot something on this and it is late. So if you have any questions pm me.
O and if some one is doing the swap and needs pictures becuse of my sorry explaining that i did i cant get you any pictures you need dont have them but i can go take them. I know how i felt when i did it when i was 17 not saying much becuse i am only 19 now. 
Originally Posted by bichin95redta
Hey all, I'm new to the forum. I'm a regular @ FBody.com, and some of the guys over there recommended this site for tech info.
This winter, I will be doing cam/heads on my '95 Trans Am. I am worried about the 4L60e holding up, as I have heard not too much but bad about this tranny. I'd like to swap the A4 for an M6, but I think it may be too big a job for me. Does anyone know of any shops that specialize in this conversion? Or, does anyone have a recommendation for a GOOD race-prepped 4L60e that'll hold up to more than stock HP/TQ?
This winter, I will be doing cam/heads on my '95 Trans Am. I am worried about the 4L60e holding up, as I have heard not too much but bad about this tranny. I'd like to swap the A4 for an M6, but I think it may be too big a job for me. Does anyone know of any shops that specialize in this conversion? Or, does anyone have a recommendation for a GOOD race-prepped 4L60e that'll hold up to more than stock HP/TQ?
if some1 can right up on the LS1's tranny swap A4-M6 thatd be greatly apperciated in the Manual Transmission forum....obviuously 4L60E-T56 swap
When Cartek swapped my M6 for an A4 they kept the M6 harness and used a TCI stand alone unit to control the trans. It was nice cause you could set your lines pressures and shift points with your laptop very easily. I have since gone to a 350 trans but if you decide to go with a TCI unit, I still have it for sale.
Trending Topics


As you can see the plugs are wired a little different they are labled as follows
factory M6 side..................factory A4 side
A:tan----------A:tan
B:grey---------B:empty I think grey was for the skip shift
C:pink---------C:pink
D:purple-------D:purple
E:blk/wht------E:blk/wht
F:org/blk-------F:empty needed to move H up here
G:brown-------G:empty is for the back up lights
H:green--------H:org/blk is for for reverse lights
J:ylw/blk-------J:ylw/blk
K:grn/wht------K:grn/wht
now to figure out where the wiring goes since theres no park lockout sw wiring the factory clutch start wirng needs to be jumped I THINK. I hope this helps some people as I"m trying to get it right will post more with time.
The M6 is the dash wiring which will stay and adapting a A4 harness to it which seems easy so for as its just requires moving one wire and rerouting some others.
Last edited by 11SECSS; Feb 4, 2006 at 12:51 PM.
LS1 Tech Stories
The Best V8 Stories One Small Block at Time

Topdon ONE vs. Artidiag 800 BT2: Which is the Diagnostic Tablet For You?
Pouria Savadkouei
Gas Monkey Built a 6-Wheel Ferrari Testarossa With a Corvette LT4 Engine
Verdad Gallardo
7 Most Reliable High-Performance Engines GM Has Ever Built
Verdad Gallardo
Amazing '71 Camaro Restomod Is Modern Muscle Car Under the Skin
Verdad Gallardo
6 Common C5 Corvette Failures and What's Involved In Repairing Them
Pouria Savadkouei
Retro Modern Bandit Pontiac Trans AM Comes With Burt Reynolds' Autograph
Verdad Gallardo
Top 10 Greatest Cadillac V Series Performance Models Ever, Ranked
Pouria Savadkouei
Top 10 Most Powerful Chevy Trucks Ever Made!

Hennessey's New Supercharged Silverado ZR2 Has 700 HP
Verdad Gallardo Here are some tips going from M6 -> A4.
First thing is to make sure you have everything. That being said, here are some tips:
1. Drop the steering colum to take the pedals out. It'll make things much much easier. Also remember where all of the plugs go. Take a pic if it'll help.
2. You're going to have a decent sized hole in the tunnel where the M6 shifter came up thru. You'll need to cover this. Here is what I did. Get a piece of decently think sheet metal atleast 18"x18" and some self tapping screws. Trace the hole onto a piece of paper. Then cut the metal 1" larger than the trace. You'll only be able to go 1/2" bigger on the top (front) due to space. From there line it up. Then drill some holes thru the sheet metal and the tunnel. Keep the holes you drill as close to the lip of the tunnel hole as possible (1/4-1/2"). Use a very thin drill bit. I made 2 on the top, 2 on the bottom and 3 on each side. That was more than enough. Then screw it down. After you've got it screwed down you'll need a rubber mallet. You'll notice you have all of the edges sticking out. Beat them into place with the mallet. After a bit they will all fold down nicely and it'll lood good. Then go under the car. Fill in the new "seam" of the cover and the tunnel lip with some black RTV sealant. Use plenty and go around the entire rim. Allow that to dry. Then mock up your shifter to see there your shifter cable will come thru. It should be on the drivers front part of the cover. Then go back under the car and drill thru with a 2" hole saw. Feed the shifter cable up and pop the rubber gromet into place.
3. A lift makes things very easy.
Here's all that you will need parts wise.....
4L60E with bell housing
A4 shifter
A4 wiring harness
A4 crossmember
A4 flexplate
A4 upper console
A4 pedals
Trans dip stick tube
Converter
Trans cooler
And you'll need an A4 tune thrown in it or have it reflashed to an A4.
If you have any other questions, feel free to ask.
-Brian

I just started the swap yesterday. i found i didnt have to drop the steering collum at all. it was tricky.. but all 3 pedals can come out as one. and for the tunnel hole. i used a 1/8'' peice of alluminum. i used the rubber boot from the 6 speed as a template on how to bend the edges. i found the carpet gets in the way for trying to bend the metal with the hammer trick.. seems your beating the carpet trying to bend metal just didnt work for my thick alluminum. but thats just me. theres a small lip on the front of the boot to. i used an adj wrench and a vice to bend my lips. i sprayed the peice with some red paint just for the hell of it. heres a camera phone pic i took yesterday. due to the blank off plate on my shifter. the bolt heads are still holding my plate up in the back from sitting correctly. if i get the tranny out today ill take a few more pics. help get some info on here. 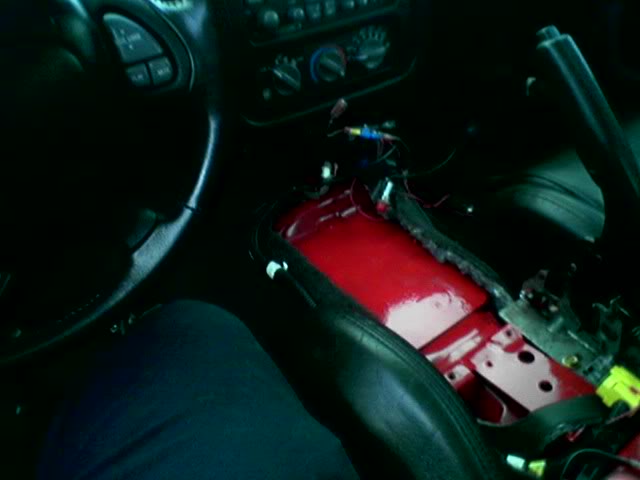
Last edited by smokin2002; Mar 24, 2006 at 06:50 AM.
Just in case no one knew it was there https://ls1tech.com/forums/manual-transmission/200480-m6-a4-a4-m6-conversion-info-requested.html . This has tons of info in it for A4-M6 swaps, to bad that one and this one isn't linked somehow...
Dan
Dan
TECH Veteran
Joined: Dec 2004
Posts: 4,012
Likes: 1
From: Beaumont, TX
Originally Posted by Joey7489
so basically the m6 is just the transmission versus the T56? im not really familiar with the different **** like m6 th350 a4 th400 and stuff.. but can anybody familiarize me.. please?

M6 = acronym for 6-speed manual transmissions
A4 = acronym for 4-speed automatic transmissions
T56 = designation for the particular M6 GM transmission that comes on LS1 cars
4L60E = designation for the particular A4 GM electronic-valvebody transmission that comes on LS1 cars, been around since 1997
700R4 (aka 4L60) = non-electronic predecessor to the 4L60E, been around since 1982
TH350 = GM 3-speed automatic transmission, been around since 1969
TH400 (aka 3L80) = GM 3-speed automatic transmission, been around since 1964
4L80E = GM 4-speed automatic transmission, successor of TH400 with overdrive added
Originally Posted by JayBirdWs6
I have shitty idle ever since my A4 to M6 Swap. It doesnt idle at all. Anyone have any idea's?
did you have your PCM reflashed for a M6 or is it still on the A4 program
I just finished doing the M6 to A4 conversion on my car and kept track of just about everything I did and took some pics of the trickier stuff. These instructions assume you have a basic automotive knowledge and are for information only, It worked great for me with a 2002 Pontiac Trans-Am so use the info accordingly. I will get the pics up on a website soon with a link and I also have to add the wiring info for the switches and the torque ratings for all the bolts/nuts before it is complete. i will also be happy to offer up any and all help I can to whoever needs it. So here is what I did, use the info as you will, I think I covered everything I did. The swap took me about 5 days but I also ran into some snags with parts and the like that you shouldn't have with this instruction. I'd also loke to thank my Father (george88gta) for all his help with fabrication, I'd still be banging out the floor panel if it wasn't for him.
T-56 to 4l60E swap in an 02 F-body
What you will need:
4l60E Automatic transmission
Torque converter w/bolts
Flexplate w/ bolts
Transmission cooler
4L60E shifter with cables, Park Neutral switch and shiftlock controls
4l60E shift handle
Automatic pedal set
Auto transmission dipstick
Transmission shift lever
Shifter cable bracket (mounts on transmission pan)
Automatic console top
4l60E transmission crossmember
4l60E Torque arm mount
PNP switch wiring pigtail
Shiftlock control wiring pigtail
Automatic trans wiring harness
Automatic PCM or have yours re-flashed
Trans temp gauge (optional)
Trane temp manifold ( optional)
9X9 piece of sheetmetal
4X4 piece of sheetmetal
Stage 1: prepping the car
Disconnect the negative battery cable
INTERIOR: Part 1
1. Remove the Shifter handle
2. Remove the upper console, disconnect the TCS switch (if present), ashtray light and cigarette lighter
3. Remove the lower console, disconnect the auxiliary outlet connector
4. remove the rubber shiftboot
5. Remove the front driver seat and rear driver seat
6. Remove the underdash panels on the driver and passenger side of the car
7. Remove steering column (Not required but it makes the pedals easier to get out, I just worked around it)
8. Disconnect the clutch master cylinder, the throttle cable and brake control lever from the pedals
9. remove the clutch master cylinder from the firewall, ijust left it in the engine bay for now
10. Disconnect the connectors for the brake lights, clutch override and cruise control (cruise is on BOTH the brake pedal and the clutch)
11. Once disconnected you can unscrew the switches for the brake lights and cruise control from their respective pedals
12. Remove the throttle pedal, it is held on by 1 clip
13. Remove the 2 13 MM bolts (one is way up above the pedals) and the 6 13MM Nuts that hold the pedals in place
14. Next rotate the pedals CAREFULLY over the steering column (if installed) or pull them out if you took the column out.
15. Put the brake light and cruise switches onto your A4 pedals and install the pedals in the reverse you took the M6 pedals out, it is a bit easier
16. Hook up the wires to the switches that are present. Leave the clutch override disconnected for now and the way I dealt with the cruise control switch was to press the button in and tie it tightly with electrical tape and a zip tie. Another way to do it is to find an automatic car and get the electrical pigtail off of the pedals that doesn�t have the extra connectors for the clutch pedal, I couldn�t find one and it is no longer available from GM.
Underneath/engine bay: Part 1
1. Disconnect the 4 Oxygen sensor connectors
2. remove the exhaust from the headers back
3. Remove the driveshaft
4. Remove the driveshaft loop (if installed)
5. disconnect the VSS, skipshift, reverse lockout and pull the harness ont top of the transmission as far as possible
6. Remove the starter motor and inspection cover, disconnect the wiring harness ground next to it
7. Disconnect the low oil sensor and crank position sensor and remove the connector from the AC compressor
8. Loosen or remove the fan belt
9. Remove the alternator, or at least loosen it enough to get the connector off the alternator, there is also a ground on this side up on the fender
10. Remove the ground wire on the driver side of the block
11. Now you should be able to pull the wiring harness up to the top of the engine CAREFULLY, I think I covered all the connectors but check if the harness gets stuck
12. Now remove the following connectors on the top of the engine (There may be a few I can�t remember off the top of my head so make sure you get them all)
a. Intake air temperature
b. Mass air flow
c. Throttle position sensor
d. Idle air control valve
e. Coolant temp sensor
f. All 8 fuel injectors
g. Fuel pressure sensor
h. Canister purge valve
i. MAP sensor
j. Cam sensor
k. Low oil pressure sensor
l. Knock sensors
m. Grounds on the back of the driver side head (it is a 15MM bolt)
n. A/C accumulator
o. The 4 connectors on the passenger side fender
p. The 2 vacuum lines that are bundled in the harness
q. Both connectors on the PCM
13. Next climb in the passenger side of the car and go under the dash by the kick panel and disconnect the two connectors that run through the firewall.
14. remove the PCM
15. Remove the firewall grommet and pull the connectors that run into the car out into the engine bay
16. If you didn�t miss any grounds or connectors you should be able to get the harness out now.
Transmission Removal:
1. Remove the shifter handle from the transmission
2. Raise and support the car, then support the rear axle separately
3. Remove the torque arm and transmission mount
4. Put the transmission on a transmission jack and remove the crossmember
5. Support the engine with a block of wood and stand under the oil pan
6. Remove the hydraulic clutch line from the master cylinder (if still hooked up)
7. Remove the 8 15MM bolts that hold the transmission to the bellhousing (don�t miss the one by the vent tube!)
8. Slide the jack backward from the bellhousing (you may need a pry bar) until the input shaft is clear of the bellhousing, then drop the jack down and put the old transmission in a safe place
9. Now remove the 13MM Bolts that hold the bellhousing to the engine, then remove the bellhousing
10. Remove the pressure plate, clutch disc and flywheel
Last edited by Batman WS-6; Jan 29, 2007 at 11:46 AM.
Part 2:
Installing the new transmission
1. Put the new wiring harness on top of the engine and get the transmission and O2 sensor harness down the back of the engine. Now may be a good time to get the grounds on the back of the head and the cam, oil pressure, knock and MAP sensors plugged in
2. Install your dipstick tube
3. Install the flexplate
4. Put the automatic transmission up on the jack and install the torque converter, make sure it goes in all the way, there should be roughly 1 � inches between the front of the bellhousing and the converter body, if there isn�t it isn�t all the way in.
5. Put on the torque arm mount, shift control lever and shift cable bracket
6. Try to get the torque converter and flexplate holes closed to lined up
7. Slide the transmission up into place making sure to line up the dipstick tube on the way up.
8. Once it is in place go ahead and put in the 13MM Bellhousing bolts and torque them down
9. Now line up the torque converter and flexplate and get the bolts in there and torque them down
10. Install the new transmission crossbrace and transmission mount
11. Plug in the 20 way connector and VSS and the transmission is in place
12. Reinstall the torque arm and the car can go back on the ground
Underneath and Engine bay, Part 2:
1. Reinstall the driveshaft and driveshaft loop (if installed)
2. Plug in the alternator and re install it
3. Install and hook up your front O2 sensors if possible
4. Connect the crank position and low oil sensors and hook up the ground on the passenger side of the block
5. reinstall the inspection cover and starter motor
6. Install the transmission ground somewhere to the body
7. Hook up the driver side engine block ground and the ground up on the driver side fender area
8. Lower the car back down to the ground
9. Position the wiring harness so it lays properly on the engine then connect all of the connectors, I started on the passenger side and went around the engine then up to the front
10. Once you have them all hooked up run the wires through the firewall under the PCM and hook up all the looms and the harness is in place
11. Install the PCM and hook the main connectors up to it. And that should be it for the harness
The floorpatch and shifter installation
-This was the biggest pain of the install for me, so be patient!
1. Get yourself a 9"X9" piece of sheetmetal to start with
2. Trace the basic outline of the hole in the floor FROM THE TOP onto a piece of paper
3. cut the paper to the outline you traced and put it on your 9X9 piece of metal
4. Take a marker and trace the outline onto your sheetmetal and cut it with tin snips
5. Take the marker and the metal to the car. Put the piece of sheetmetal in place, odds are you are going to have to tweek it. Worry about the front and back first and get them how you want them. Cut it accordingly and hit with a sheetmetal hammer until the front and back fit nicely on the floor.
6. Once you get the front and back the right size take your marker and draw a line on each side of the metal patch where you estimate the car starts to curve
7. Now I don't have any metal benders but it did find out a 3 inch piece of PVC in a vise gives you a real good curve. We put a decent curve in it on each side then went back to the car and hammered it down (gently) to the right shape. At this point it required some more trimming so we got that done and it fit almost perfectly.
8. Take the sheetmetal back out again and file down all the sharp edges you made before you put your eye out!
9. Now with that done get back in the car and bring your old underconsole shift boot with you. Lay the patch down and put the boot over it exactly as it would be if you were putting it back in the car. Take the marker and mark the top 2 holes and bottom 1 hole on the boot onto your patch. Take it all out AGAIN and head to your drill or drill press (highly recommend a press for this)
10. Drill the 3 holes out, I think we used a 3/8 bit, You want the holes to be BIGGER then the screws, trust me you won't get it dead on unless you spend hours doing this. Once the 3 holes are drilled it's back down to the car.
11. Check the alignment of the holes and file them out as necessary to get the screws in. FYI: the patch stripped 2 of my screw holes in the car, I fixed this by using a larger screw so be warned. Now reinstall the patch and the boot and screw them down. Mark the rest of the holes and repeat step #10.
12. Now with that done it is time to drill the holes for the shifter. Before you do this you MUST get the old bracket off the Airbag module. It is tack-welded on so tap it off with a hammer and chisel. Remove the shift boot and re-install just the plate. Then take your shifter, put the 2 back bolts in and find out you have a 1 inch gap between the floor and the shifter. Not a big deal, time to get creative. Mark where the holes need to go on the floor for the shifter with an awl (can't get a marker through the holes), take it all out and head back to the drill
13. Drill out the 2 holes then take the shifter and elongate the 2 mounting holes LENGTHWISE only, again you won't get it perfect, at lease we didn't, so this will give you some slop to work with.
-----From here on this is what "We Did" it may or may not be what you want but it works----
14. Grab 2 1/4 bolts, about 2.5 inches long. Grab 2 flat washers, the wider the washer the better as long as it is 1/4 inch. Take the patch, 2 bolts and 2 washers over to your welder (hope you have one). We welded the bolts through the bottom of the patch to make studs out of them. (I will post up pics eventually so be patient).
15. While it cools go ahead and get 4 3/8 inch nuts (about a 1/2 thick each).
16. Now that it is cool grab the patch and the 4 nuts and get back inthe car again. Re-mount the patch, put the nuts onto the studs and then put the shifter in place, hopefully it fits as well as ours did, it was off by a little bit (thus the elongation of the holes) but it will work.
17. Pull the shifter back out, get the drill with a 2 inch holesaw and drill out a hole as close to the top left corner of the patch as you can get WITHOUT cutting the edges or taking out a screw. This will be for your shifter cable/boot.
18. Now to brace the patch so it won't expand and contract while you are driving look around for an old piece of metal. We found one with holes in it that just happened to coincide with the studs we made so we cut it to length. It will go over the studs and then the 4 nuts will be on top of it. It should add some rigidity to it.
19. Clean it with lacquer thinner, scuff it with 100 grit sand paper, Prime, paint and let it dry, I used Rustoleum on it but it takes a few days for it to get good and hard, so if you are in a hurry use a different paint.
Installing the transmission cooler and temp gauge
This is a play it by ear part, I can�t give you guidance on this because it depends entirely on what kind of cooler you get, I suggest just following the manufacturers instructions on this one, it is not hard to do. Also I made a bracket for the tarns temp manifold, but install it wherever you can if you bought a temp gauge
Last edited by Batman WS-6; Aug 14, 2006 at 10:37 AM.
Wiring the shiftlock control and PNP switch
You are going to need to run a total of 8 wires for the 2 switches, 6 for the PNP and 2 for the shiftlock. The connector pigtails you bought from the dealer for an exceptionally high price should be labeled A-F on the PNP and A-B on the shiftlock the wires go to the following places
PNP switch:
A. Shift Lock control circuit - Black/white wire from shiftlock control solenoid (Connector C200, Pin E)
B. PCM - Orange/Black wire from the white connector (Connector C220, pin H)on the end of the engine harness (the one that is inside the car on the passenger side under the kick panel)
C. Back up Lights - Brown wire, Same connector as above (Connector C220, Pin G)
D. Ground - Light green wire in Connector C400, Pin F (not sure where this one is but I can look it up) or to a chassis ground.
E. Start circuit - Clutch override switch (on the pedal), Purple/white wire
F. Start Circuit - Clutch Override switch (on the pedal), Dark green wire
Shiftlock Control:
A. PNP switch, Pin A
B. Brake light switch
Once that is all done bundle up the wires and tuck them up under the dash and do the following:
1. Permanently mount the floorpatch with some kind of body sealer to keep water out
2. Install the shifter and run the cable through the floor, installing the grommet
3. Put the lower console in ( use your old ashtray light for the light in your shift indicator) and hook up the accessory outlet
4. Install the upper console and shift handle
5. Re-install the seats and under dash panels
6. Raise the car again and run the shift cable through the bracket, lock it in place and put the clip on it, then hook the cable up to the shift control lever on the transmission
7. put fluid in the transmission
8. Re-install your exhaust and hook up the negative battery cable and you are all set to try it out
Testing your new transmission
Testing the Brake lights: Step on the brake, they should illuminate, if they don�t the switch may be unplugged or out of adjustment. To adjust it just turn it in it�s threads until it works
Testing the PNP Switch and shiftlock control: With the car SHUT OFF Put the car in reverse and you should get your reverse lights. Next put it back in park, put on the E-brake and block the drive wheels, just in case. Then start the car (if you haven�t added fluid to the transmission yet now is the time). It should start up and not try to move. Now with the brakes off try and move the shifter (be careful because if the shiftlock doesn�t engage you are going to end up in reverse) if it doesn�t move then the shiftlock is working. Now step on the brake and the shiftlock should disengage allowing you to put it in gear. If it works put the car in park and shut it off. If it didn�t work check the 2 wires and repair accordingly. If it did work, with the car off put it in any gear and bump the ignition. The car SHOULD NOT START, if it tries to start troubleshoot the appropriate wires until it works right.
Now warm the car up to operating temp (hopefully you decided to put in a trans temp gauge to keep an eye on it), run it through the gears and top off the fluid, check for leaks and then go for a ride.

Originally Posted by Captain InsaneO
From a M6 to A4 who has gotten the cruise control to work, and how?
exactly. finding the console in good shape and pedals seems like the hardest part. oh, and the part that made me decide I was def. reusing the center console is the fact that you dont have to have the shifter EXACTLY in the right place to work in the auto shifter "slot". know what I mean? cause mounting the shifter solidly is important and kind of a pita. I suggest doin this part BEFORE installing the trans so you have access to the bottom of the trans tunnel. then use long bolts/nuts that go through your new plate, and through the tunnel. there's a pic of my shifter/console in another guys post asking for pics on the board I just posted yesterday.
chris
chris
Originally Posted by blkmgc1
i have just finished a m6---a4 swap and need a little help i have no reverse lights and no cruise i taped the switch shut and still no cruise and as for reverse lights im at a loss i read this and what is said is awsome no doubt. however i have no brown wire in my a4 harness to connect to the old m6  any thoughts thanks guys i know im dumb later
any thoughts thanks guys i know im dumb laterchris
Originally Posted by blkmgc1
i have just finished a m6---a4 swap and need a little help i have no reverse lights and no cruise i taped the switch shut and still no cruise and as for reverse lights im at a loss i read this and what is said is awsome no doubt. however i have no brown wire in my a4 harness to connect to the old m6 any thoughts thanks guys i know im dumb later
any thoughts thanks guys i know im dumb laterwhat do you mean no brown wire in your a4 harness? did you swap harness' too? if so then the wire is now inside the car in the center console in the big/wide connector that is supposed to go to the stock a4 shifter. sorry I forgot about this.
if you want to, call my cell phone tomorrow and give me a fax # I'll try to get you a schematic and highlight the wires you need, and tell you where they are in the car and fax it over to you by the end of the day.
chris
313-655-2983