
Goodridge Stainless Steel Brake Line Installation
 07-18-2011, 01:43 PM
#1
TECH Enthusiast
Thread Starter
iTrader: (4)
Join Date: Jun 2009
Location: Portland, OR
Posts: 574
Likes: 0
Received 0 Likes
on
0 Posts
Goodridge Stainless Steel Brake Line Installation – Cadillac CTS-V
Why do you need stainless steel brake lines?
Rubber brakes lines are the original equipment in nearly all production vehicles. Regardless if they are new or old, they will bulge under pressure, creating that “spongy” or “mushy” feeling in the brake pedal. The difference in expansion characteristics between rubber and braided stainless steel brake lines is a result of differences in hose construction. Where rubber hoses typically consist of a rubber inner hose wrapped fabric braid then covered in an additional rubber outer sheath, braided stainless steel hoses typically consist of a PTFE (polytetrafluoroethylene, also branded Teflon�) inner hose wrapped in a braid consisting of stainless steel wire. The stainless wire braid more effectively resists expansion due to pressure inside the hose core. This in effect improves brake system effectiveness by more directly transferring operator input to the brake friction surfaces.
Goodridge is the world's leading manufacturer of performance fluid transfer systems for over 40 years. It operates in the OEM, automotive, motorcycle, motorsport, defense and specialist industrial sectors, and is the leader in manufacturing stainless steel brake lines. Goodridge brakes lines are stainless outer braid is covered with a clear PVC (polyvinyl chloride) to protect the wire and inner hose from the elements and chemicals, to protect the vehicle from abrasion, and for an improved appearance. Coated braided stainless steel hoses have the same essential construction as rubber hoses in terms of an inner hose wrapped in a braid followed by an outer layer, but the different materials in the braided stainless steel hoses offer substantially different and arguably better characteristics. The added benefit of buying Goodridge’s stainless steel brake line kits is that it has all the new parts and fittings needed to upgrade your brakes, from flare fittings, banjo fittings, retaining clips, copper crush washers, and individually labeled brake lines.
The Goodridge G-Stop kit includes 5 new brake lines, flared banjo fittings and their associated copper washers. You’ll need an assortment of flare nut wrench and box end wrenches. If you try to use box end wrenches on the flare fittings you might round off the flare nuts (the wrenches are a good investment), various sockets to remove the brake caliper if you chose to (not required), small torque wrench, pliers to pull out the metal clips and buddy for the brake bleeding part. And lastly, you’ll need some brake fluid since you will lose some when you change out the brake lines.
The kit went together seamlessly. All the parts fit, and with the pre-labeled brake lines reduces any chance of using the wrong line in the wrong position. The finished product works extremely well - no burrs from the braiding, treated fittings, it all works together extremely well. The pedal feel, after the installation, became solid. The pedal feel went from good to great. It compliments the 4 piston front, 2 piston rear Brembo calipers perfectly.

1. Here are the parts that are included in the kit.

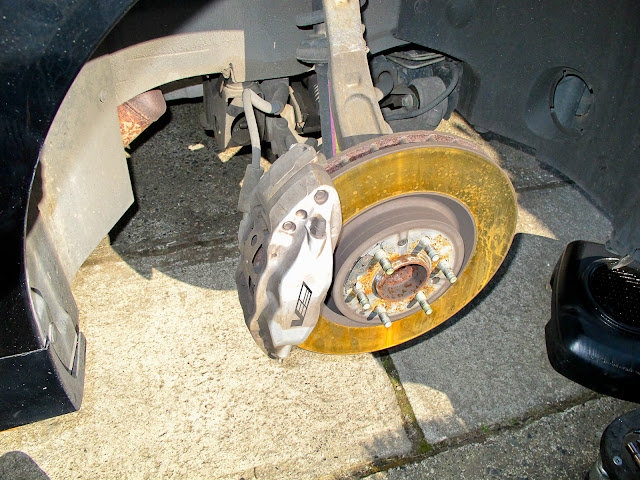
1. A good thing to do while upgrading the brake lines, is to change out the brake pads, new rotors, and flush out the old brake fluid. At this time, the fluid was upgraded from the factory DOT 3 brake fluid to ATE Super Blue Racing DOT 4 synthetic fluid. Pads were upgraded to Hawk HP+ front and HPS rear pads, and cross drilled and slotted rotors from Rotorpros.com.

2. Raise the car off the ground, and secure it with a jack stand for safety. Start at the wheel furthest (in hydraulic-circuit terms) from the master-cylinder and progress toward the closest. The correct order for the CTS-V is right rear, left rear, left front, right front.

3. Here are the factory rubber brake lines. Unique to the CTS-V, there are two lines in the wheel well – one that runs to the calipers, the other makes a U-turn down the subframe, which leads to the left rear caliper.

4. Carefully remove the banjo bolt that secures the factory brake line to the caliper. Be sure to have a catch pan and rags to catch the brake fluid as it drips from caliper and lines.

5. After removing the clips securing the factory lines, you can put a wrench on both the front and backside of the fitting to separate the two. At this point, you can remove them both.

6. Here are the two factory lines in the right rear compared to Goodridge’s stainless steel replacement lines.

7. Here are the fittings after the rubber lines have been removed.
8. Reverse the removal steps, and install the stainless steel lines. One of two are installed in this photo. Next, it’s time to move on to the line that connects the hard lines to the caliper.
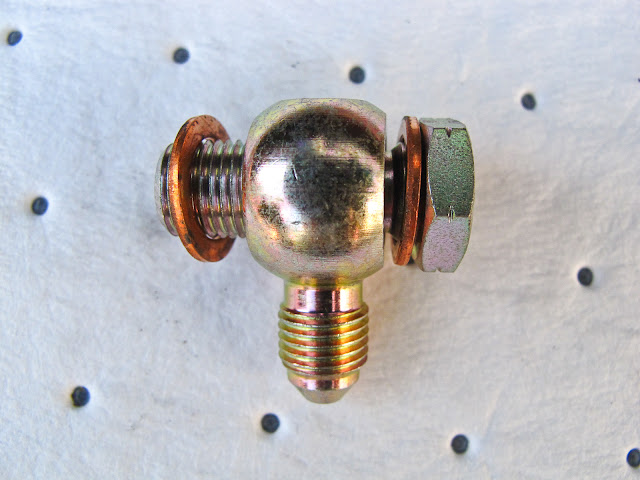
9. Using the supplied Goodridge fittings, assemble the fitting as shown, with a banjo bolt, copper washer, banjo-to flare fitting, and lastly the copper washer. The will thread into the brake caliper. Be sure to just have it finger tight, and you will need to adjust the angle of the fitting based on the bend and orientation of the stainless steel line.

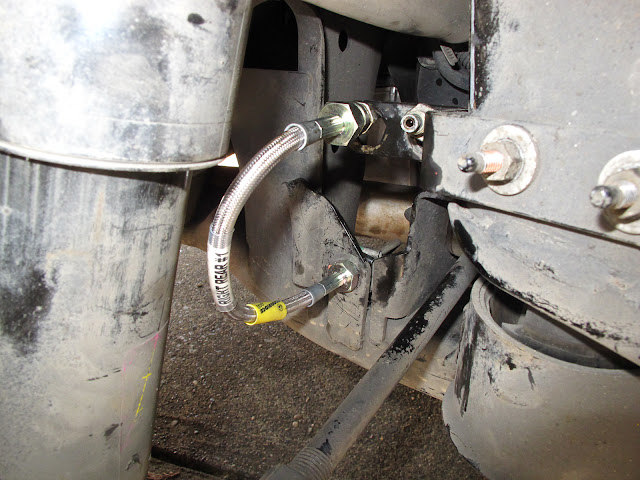
10. Here is the fitting attached to the brake caliper. After attaching everything by hand, and have everything adjusted to where the line is routed properly where it will not bind or kink.

11. Using the Goodridge supplied clips, secure the new lines to the factory support bracket.

12. With both lines connected, make sure to properly clean off all the brake fluid with brake cleaner.

13. Next, it’s time to bleed the brakes. These fixed calipers have two bleeder nipples (as opposed to the single bleeder on a sliding/floating caliper). In case you are doing this upgrade by yourself, you can get a solo bleeder kit like this.
MOST IMPORTANT - always start on the inboard side of the caliper (closest to the inlet of the brake line) to remove the bubbles.
Simply attach the rubber hose to the nipple, crack it loose, and pump the brakes until all the old fluid is out, and you no longer see any air bubbles. The ATE fluid is blue, so it is easy to tell when the old clear (now brownish) brake fluid is fully expelled, and the new fluid has made it down to the caliper. Make sure to bleed both sides of the brakes.

14. Here is the left rear factory setup, soon to be replaced. Again, remove the factory clips, grab your flare wrenches, and remove the factory lines.

15. Here is the stainless steel line that has replaced the factory line.
16. With the left rear done, it’s time to move on to the right front.

17. With the factory rotor and caliper removed, here is the installation of the stainless line.

18. With the caliper and rotor reinstalled, connect it to the caliper, and bleed this as well.

19. Time to move on to the remaining left front corner. As with the previously installed lines, the procedures should be relatively familiar now.

20. The last, but not least, use the supplied Goodridge decal to decorate your engine bay! Wash your hands, grab your beverage of choice, and relax, because now you’re done.
Last edited by DrSpeed; 07-19-2011 at 10:42 AM. Reason: Updated Photo Source
 07-18-2011, 03:18 PM
#2

I don't know about you, but getting those stupid clips off took more time than the rest of the project. This is a great write up for those that aren't familiar with the process.
I recommend replacing the caliper nipples with speed bleeders also. It makes flushing the fluid quick and easy in the future, and all you need is a tube to get the job done.
I recommend replacing the caliper nipples with speed bleeders also. It makes flushing the fluid quick and easy in the future, and all you need is a tube to get the job done.
07-18-2011, 03:21 PM
#3

not a fan about buying 8 solo bleeders...
also, most important missing from article... Bleeding order.
PROPER ORDER:
1. Passenger Rear – INNER * Inner first due to the caliper inlet being on the outside
2. Passenger Rear - OUTER
3. Driver Rear - INNER
4. Driver Rear - OUTER
5. Passenger Front - INNER
6. Passenger Front - OUTER
7. Driver Front - INNER
8. Driver Front - OUTER
The following users liked this post:
1CL3ANSUP3RSPORT (08-30-2020)
07-18-2011, 03:57 PM
#4
TECH Enthusiast
Thread Starter
iTrader: (4)
Join Date: Jun 2009
Location: Portland, OR
Posts: 574
Likes: 0
Received 0 Likes
on
0 Posts
not a fan about buying 8 solo bleeders...
also, most important missing from article... Bleeding order.
PROPER ORDER:
1. Passenger Rear � INNER * Inner first due to the caliper inlet being on the outside
2. Passenger Rear - OUTER
3. Driver Rear - INNER
4. Driver Rear - OUTER
5. Passenger Front - INNER
6. Passenger Front - OUTER
7. Driver Front - INNER
8. Driver Front - OUTER
And you don't need 8 bleeders - you can do one at a time and simply move the hose from one nipple to the next.
07-18-2011, 04:02 PM
#5
TECH Enthusiast
Thread Starter
iTrader: (4)
Join Date: Jun 2009
Location: Portland, OR
Posts: 574
Likes: 0
Received 0 Likes
on
0 Posts
I don't know about you, but getting those stupid clips off took more time than the rest of the project. This is a great write up for those that aren't familiar with the process.
I recommend replacing the caliper nipples with speed bleeders also. It makes flushing the fluid quick and easy in the future, and all you need is a tube to get the job done.
I recommend replacing the caliper nipples with speed bleeders also. It makes flushing the fluid quick and easy in the future, and all you need is a tube to get the job done.
And I agree with you on removing the factory clips. I was ready to torch them off after pulling the 3rd one off.
 07-18-2011, 04:05 PM
#6
Wow, solid writeup with plenty of pictures. Looks like an infomercial for Goodridge though. Do you work for them?
__________________
2013 Corvette Grand Sport A6 LME forged 416, Greg Good ported TFS 255 LS3 heads, 222/242 .629"/.604" 121LSA Pat G blower cam, ARH 1 7/8" headers, ESC Novi 1500 Supercharger w/8 rib direct drive conversion, 747rwhp/709rwtq on 93 octane, 801rwhp/735rwtq on race fuel, 10.1 @ 147.25mph 1/4 mile, 174.7mph Half Mile.
2016 Corvette Z51 M7 Magnuson Heartbeat 2300 supercharger, TSP LT headers, Pat G tuned, 667rwhp, 662rwtq, 191mph TX Mile.
2009.5 Pontiac G8 GT 6.0L, A6, AFR 230v2 heads. 506rwhp/442rwtq. 11.413 @ 121.29mph 1/4 mile, 168.7mph TX Mile
2000 Pewter Ram Air Trans Am M6 heads/cam 508 rwhp/445 rwtq SAE, 183.092 TX Mile
2022 Cadillac Escalade 6.2L A10 S&B CAI, Corsa catback.
2023 Corvette 3LT Z51 soon to be modified.
Custom LSX tuning in person or via email press here.


Trending Topics
07-18-2011, 05:37 PM
#8
TECH Enthusiast
Thread Starter
iTrader: (4)
Join Date: Jun 2009
Location: Portland, OR
Posts: 574
Likes: 0
Received 0 Likes
on
0 Posts
I am a freelance writer as well:
http://www.8-lug.com/features/1104_8...ack/index.html
http://www.8-lug.com/tech/1101_8l_au...ges/index.html
http://www.8-lug.com/features/1104_8...ack/index.html
http://www.8-lug.com/tech/1101_8l_au...ges/index.html
07-18-2011, 06:43 PM
#9
I have the goodridge lines. This job isn't for everyone..
I recommend plugging the stock hard lines when you are switching the rubber lines out, and do NOT let the reservoir go dry. I'm not sure how mine got funked up but I've been driving with a very spongy pedal for quite some time now. I guess I got air in the abs system because I've bled the crap out of it, including bench bleeding the master and engaging the abs after, then re-bleeding...
Also, do not overtighten the bleeder screws or you will be sorry..
07-18-2011, 08:48 PM
#11

Nice writeup and it's good to have this information for those of us that will do it someday and avoid some pitfalls and such. Thanks...the only 'modification' I'll do though is use my mityvac pump-kit but should add this on the list soon, as I bet the results are night and day?
07-18-2011, 09:02 PM
#12
TECH Fanatic
Great writeup, but too late for this V owner. Had SS brake lines done last month.
Don't think I'm as sensitive to my car as many others are, and yet I can tell the difference. Love 'em.
Don't think I'm as sensitive to my car as many others are, and yet I can tell the difference. Love 'em.
07-19-2011, 12:25 AM
#13
TECH Enthusiast
Thread Starter
iTrader: (4)
Join Date: Jun 2009
Location: Portland, OR
Posts: 574
Likes: 0
Received 0 Likes
on
0 Posts
Nice writeup and it's good to have this information for those of us that will do it someday and avoid some pitfalls and such. Thanks...the only 'modification' I'll do though is use my mityvac pump-kit but should add this on the list soon, as I bet the results are night and day?
A night and day difference for sure.
I would equate the responsiveness of your brakes with the SS lines to the ramp up rate of LED going full bright versus that of a normal incandescent bulb.
Thanks!
07-19-2011, 02:49 PM
#15
TECH Apprentice

Join Date: Apr 2005
Location: Chicagoland
Posts: 392
Likes: 0
Received 0 Likes
on
0 Posts
Great write-up. Lots of brake lines on this thing 
One addition, if you haven't used one, get a Motive Power Bleeder. Makes bleeding almost fun.....not really. Pressurizes the reservoir with an extra tank of brake fluid. Once it is pumped up, one trip around loosening bleeders until they run clean then on to the next wheel. I try to bleed mine once a year and this makes it a 10 minute job....assuming the wheels are off
One addition, if you haven't used one, get a Motive Power Bleeder. Makes bleeding almost fun.....not really. Pressurizes the reservoir with an extra tank of brake fluid. Once it is pumped up, one trip around loosening bleeders until they run clean then on to the next wheel. I try to bleed mine once a year and this makes it a 10 minute job....assuming the wheels are off
08-22-2011, 08:39 PM
#16
Teching In

Join Date: Jan 2008
Location: Fort Mill, SC
Posts: 35
Likes: 0
Received 0 Likes
on
0 Posts
Asking for a favor from you CTSV guys:
If someone would like to part with their stock rubber lines when they're done with the braided line swap I'll take them. All pieces if you can, LMK. Thanks!
Ed
If someone would like to part with their stock rubber lines when they're done with the braided line swap I'll take them. All pieces if you can, LMK. Thanks!
Ed
04-17-2012, 09:34 PM
#17
Teching In

Join Date: Jun 2010
Location: Allen
Posts: 1
Likes: 0
Received 0 Likes
on
0 Posts
I bought this same kit but when installing the Passenger rear line going to the caleper the fitting from the car wouldn't fit. It appears to be a different size. The fitting used to tighten all the other ones is an 11/16 but the passenger rear is a 19mm. Did anyone else notice this or did my kit come with the wrong line? 
Scott
Scott
04-18-2012, 01:00 AM
#19
TECH Enthusiast
Thread Starter
iTrader: (4)
Join Date: Jun 2009
Location: Portland, OR
Posts: 574
Likes: 0
Received 0 Likes
on
0 Posts
I bought this same kit but when installing the Passenger rear line going to the caleper the fitting from the car wouldn't fit. It appears to be a different size. The fitting used to tighten all the other ones is an 11/16 but the passenger rear is a 19mm. Did anyone else notice this or did my kit come with the wrong line?
Scott
Scott
Hell yes. Gives it a "I'm going to stop RIGHT NOW" brake pedal feel.
04-20-2012, 03:21 AM
#20

I bought this same kit but when installing the Passenger rear line going to the caleper the fitting from the car wouldn't fit. It appears to be a different size. The fitting used to tighten all the other ones is an 11/16 but the passenger rear is a 19mm. Did anyone else notice this or did my kit come with the wrong line?
Scott
Scott
To the OP, wtf is with your car dude. Does it have a salvage title? From the looks of your old rotors and undercarage it belongs in a wrecking yard.