That Just Happened Too (Maggie Version)....
 08-06-2012, 01:45 PM
#61
Launching!
Thread Starter
iTrader: (3)
Join Date: May 2012
Location: Michigan
Posts: 270
Likes: 0
Received 0 Likes
on
0 Posts
I did try 1 and 3 gear and it still turned. I will try 4th. Just seems like I may damage something internal pulling on it like that. In regards to pushing the brakes...how does that help since the car is on the ground and not moving anyway?
 08-06-2012, 02:00 PM
#62
TECH Fanatic
You are going to have to have someone stand on the brakes to loosen the crank bolt. FYI - get an ARP crank bolt to replace the OE one, they require much less torque than the TTY crank bolt from GM.
Do you have the tensioner extension plate from the Maggie kit? If you do, you can order the style tensioner that is used by Maggie through Gates for $50. If not, get the Maggie setup, it will be much easier than piecing everything together.
Do you have the tensioner extension plate from the Maggie kit? If you do, you can order the style tensioner that is used by Maggie through Gates for $50. If not, get the Maggie setup, it will be much easier than piecing everything together.
08-06-2012, 02:04 PM
#63
Launching!
Thread Starter
iTrader: (3)
Join Date: May 2012
Location: Michigan
Posts: 270
Likes: 0
Received 0 Likes
on
0 Posts
You are going to have to have someone stand on the brakes to loosen the crank bolt. FYI - get an ARP crank bolt to replace the OE one, they require much less torque than the TTY crank bolt from GM.
Do you have the tensioner extension plate from the Maggie kit? If you do, you can order the style tensioner that is used by Maggie through Gates for $50. If not, get the Maggie setup, it will be much easier than piecing everything together.
Do you have the tensioner extension plate from the Maggie kit? If you do, you can order the style tensioner that is used by Maggie through Gates for $50. If not, get the Maggie setup, it will be much easier than piecing everything together.

 08-06-2012, 04:05 PM
#65

 08-06-2012, 08:01 PM
#66
08-06-2012, 08:04 PM
#67
Launching!
Thread Starter
iTrader: (3)
Join Date: May 2012
Location: Michigan
Posts: 270
Likes: 0
Received 0 Likes
on
0 Posts
I borrowed my neighbors cheater pipe and the bolt came off surprisingly easy. It turned so smooth that I thought the pulley was still turning. Only took one arm too to pull on it too.


 08-07-2012, 09:03 AM
#71
TECH Fanatic
You can make your own fuel line extension using the Dormon fuel line repair ends, reinforced rubber high pressure fuel line, and double clamps.
Edit: Actually, I may have my old Maggie extension harness as my Maggie went on an LS2. Let me look around down in the shop and see if I still have it. If I have it, its yours as long as the guy that got my Maggie doesn't want to hold onto it. I'll let you know.
Last edited by DMM; 08-07-2012 at 09:10 AM.
08-07-2012, 09:30 AM
#72
Launching!
Thread Starter
iTrader: (3)
Join Date: May 2012
Location: Michigan
Posts: 270
Likes: 0
Received 0 Likes
on
0 Posts
I would just extend the existing harness. Cut and solder, will probably take about 90 minutes.
You can make your own fuel line extension using the Dormon fuel line repair ends, reinforced rubber high pressure fuel line, and double clamps.
Edit: Actually, I may have my old Maggie extension harness as my Maggie went on an LS2. Let me look around down in the shop and see if I still have it. If I have it, its yours as long as the guy that got my Maggie doesn't want to hold onto it. I'll let you know.
08-07-2012, 10:53 AM
#73
TECH Fanatic
If memory serves me correctly, it is 16-18 gauge wire. I think I used 14 ga. (that is what I had at the time) when I extended the LS2 harness and the wire was almost double the size. Wire is not going to be the issue here, the connections will be. Make sure your joints are good and heat shrink them.
08-07-2012, 12:14 PM
#74
Launching!
Thread Starter
iTrader: (3)
Join Date: May 2012
Location: Michigan
Posts: 270
Likes: 0
Received 0 Likes
on
0 Posts
Sorry man, looked around and could not find it, I may have given it to the guy that got my old Maggie. I did find the LS6 snout and his old fuel rail that I have to send to him though.
If memory serves me correctly, it is 16-18 gauge wire. I think I used 14 ga. (that is what I had at the time) when I extended the LS2 harness and the wire was almost double the size. Wire is not going to be the issue here, the connections will be. Make sure your joints are good and heat shrink them.
If memory serves me correctly, it is 16-18 gauge wire. I think I used 14 ga. (that is what I had at the time) when I extended the LS2 harness and the wire was almost double the size. Wire is not going to be the issue here, the connections will be. Make sure your joints are good and heat shrink them.
08-07-2012, 01:18 PM
#75
TECH Fanatic
Correct. It really is not too much. I would get one roll of however they sell it (20 ft. Etc) and some black flex tubing from Harbor Frieght so it looks factory. Zip tie the flex to the engine harness that runs under the front of the Maggie so it does not get chewed up by the pulley. If you don't already have it, it takes a standard GM IAT sensor connector and 99 Camaro LS1 sensor.
08-07-2012, 01:40 PM
#76
Launching!
Thread Starter
iTrader: (3)
Join Date: May 2012
Location: Michigan
Posts: 270
Likes: 0
Received 0 Likes
on
0 Posts
Correct. It really is not too much. I would get one roll of however they sell it (20 ft. Etc) and some black flex tubing from Harbor Frieght so it looks factory. Zip tie the flex to the engine harness that runs under the front of the Maggie so it does not get chewed up by the pulley. If you don't already have it, it takes a standard GM IAT sensor connector and 99 Camaro LS1 sensor.
08-07-2012, 03:35 PM
#78
TECH Fanatic
Yep, I plan on getting the flex tube and wire. I have a harness that connect off of the maf connector and splits off for the IAT, so I won't have to cut it. As for the purge solenoid connector, don't I have to just extent the existing one? What is the LS1 sensor for that you are referring to. Also, what is the fitting that is sticking out the side of the maggie on the passenger side next to the purge solenoid. It screws into the side of the maggie. I don't see it in the instructions.
You are correct about the purge connector, cut the connector off, extend the wiring (I run the purge solenoid wires in the black tubing with the IAT wires since they are so close together) and reconnect color for color.
Not sure what you are referring to about the fitting...there are two fittings on the snout for the purge and PVC lines if I recall correctly. Can you post a picture of what you are referring to with a call-out?
 08-07-2012, 08:46 PM
#80
TECH Fanatic
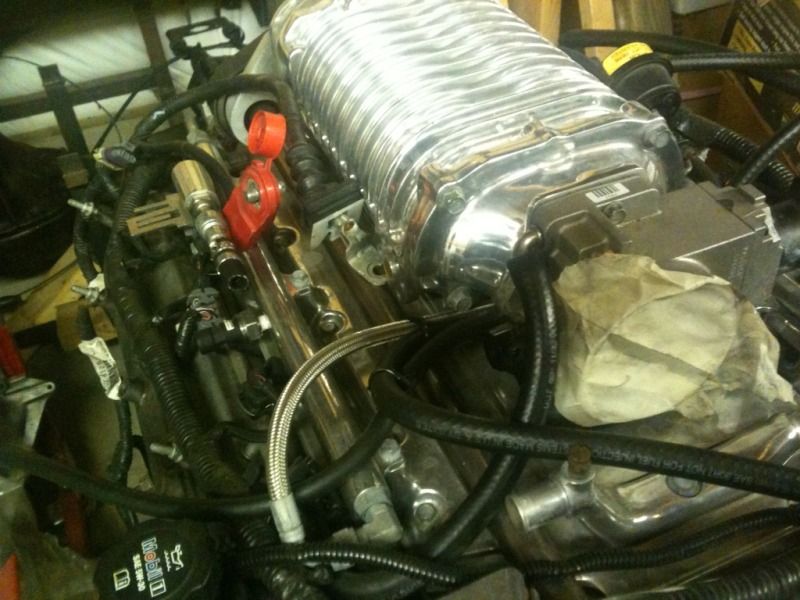
Umm...that is what is left of the Maggie kit fuel line extension. The rubber hose was cut just prior to the double clamp and quick disconnect fitting. Use the OE fuel line disconnect tool to disconnect the fitting and you will see what I mean. This is the same fitting that attaches to the OE fuel rail.
When sourcing the parts to make an extension line, use the existing female line fitting that you now have, and purchase a male fitting that will go into the OE female quick disconnect fitting.
Also, you want that braided fuel line that goes from one fuel rail to the other to go over top of the supercharger...the jack-shaft will rub it through if you don't.
Last edited by DMM; 08-07-2012 at 09:02 PM.