
REVSHIFT Rear Cradle Busings
 01-06-2013, 11:22 AM
#221

Well I attempted this today and its going to be much more of a bitch than I had thought originally. For people replacing the trailing arm bushings how are you getting the bolt out without removing the brake caliper?
Also I tried an air chisel/hammer as it was suggested by another forum member and there is no way that is going to work on getting the cradle bushings out. I am hoping to do the cradle bushings with the cradle still in the car anyone else have any suggestions as burning them while on the car seems like an awful idea!
Also I tried an air chisel/hammer as it was suggested by another forum member and there is no way that is going to work on getting the cradle bushings out. I am hoping to do the cradle bushings with the cradle still in the car anyone else have any suggestions as burning them while on the car seems like an awful idea!
 01-06-2013, 11:27 AM
#222

For the trailing arm bushings, there might be an easier way, but I went ahead and removed the brake caliper, rotor and disconnected the end links and bolt that holds the spring perch to the hub. I disconnected the end links & spring perch bolt because it allowed me to move the spring perch out of the way of the trailing arm bolt when trying to push it all the way out.
01-06-2013, 11:40 AM
#223
Alright JC I guess I will be removing the calipers/rotors as well. The trailing arm bushings seem to be the easier of the two. After I do these I will be doing motor mounts. But taking it one thing at a time get the rear done then move to the front.
Anyone figure out any other way to remove the cradle bushings with less hassle?
Anyone figure out any other way to remove the cradle bushings with less hassle?
01-06-2013, 12:03 PM
#224

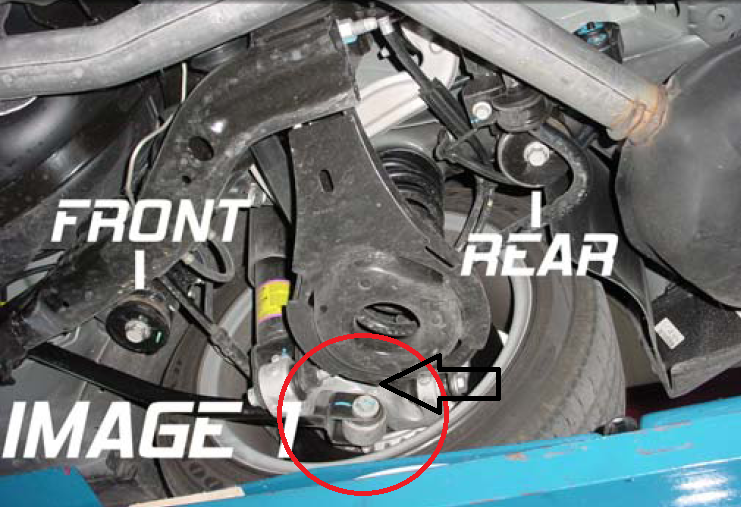
Which way is your ta bolt facing? Mine pulled out towards the inside of the car. What is the clearance issue you are experiencing?
As for the cradle bushings just put a jack under the diff and pull out the two cradle bolts on one side. Then lower the durga little and that side will drop. Then take the biggest drill bit you can and drill out the rubber around the center metal cylinder until you can pull it out. You may break a few bits so have extras. Then take a sawzall and saw the metal sleeve. Then take a flathead screwdriver or somethig wedge shaped and split the metal sleeve so one side pulls in and then pull the other side in and it should come right out. Then you can slide the new bushings in.
As for the cradle bushings just put a jack under the diff and pull out the two cradle bolts on one side. Then lower the durga little and that side will drop. Then take the biggest drill bit you can and drill out the rubber around the center metal cylinder until you can pull it out. You may break a few bits so have extras. Then take a sawzall and saw the metal sleeve. Then take a flathead screwdriver or somethig wedge shaped and split the metal sleeve so one side pulls in and then pull the other side in and it should come right out. Then you can slide the new bushings in.
01-06-2013, 12:15 PM
#225
Onefast awesome info thanks. Im gonna pick up the sawzall from my dad tomorrow most likely. Then work on it again in the next couple days. Could it be possible to sawzall the bushing out around the sleeve by going in that small opening on both sides of the bushing? The trailing arm bolts have to pulled to the outside of the car hence the issue with the caliper being in the way.
I wonder why some people have them in different ways or if it came that way from the factory for some reason. I cant pull the bolt out completely because it hits the rotor the nut is on the inside towards the spring perch.
I wonder why some people have them in different ways or if it came that way from the factory for some reason. I cant pull the bolt out completely because it hits the rotor the nut is on the inside towards the spring perch.
01-06-2013, 12:25 PM
#226
Onefast awesome info thanks. Im gonna pick up the sawzall from my dad tomorrow most likely. Then work on it again in the next couple days. Could it be possible to sawzall the bushing out around the sleeve by going in that small opening on both sides of the bushing? The trailing arm bolts have to pulled to the outside of the car hence the issue with the caliper being in the way.
I wonder why some people have them in different ways or if it came that way from the factory for some reason. I cant pull the bolt out completely because it hits the rotor the nut is on the inside towards the spring perch.
I wonder why some people have them in different ways or if it came that way from the factory for some reason. I cant pull the bolt out completely because it hits the rotor the nut is on the inside towards the spring perch.
You would almost definitely snap many blade trying to get it in between the metal sleeve and the cradle. I found just using a sawzall going straight at the metal sleeve to be easiest. BE CAREFUL not to saw too far in and start cutting into the cradle. Also be prepared so ALOT of rubber bits everywhere!
For drill bits regular all purpose should be fine but i found these to work much faster:
http://www.harborfreight.com/3-piece...set-42804.html
http://www.osh.com/eng/product/rotoz..._x_bit/6569743
01-06-2013, 12:35 PM
#227
Ok sounds good OneFast I have a harbor freight 20 minutes from me so I will go snag those if I don't find a drill bit to work out of the 80+ bits I have laying around lol. I appreciate the info. So you did one side then the other like passenger then driver? Completely undo both bolts on that one side go to town replace the bushings then bolt them back up and do the other side? Or did you do front to back?
01-06-2013, 12:40 PM
#228
TECH Enthusiast
iTrader: (13)

Join Date: Sep 2007
Location: SC
Posts: 666
Likes: 0
Received 0 Likes
on
0 Posts

Onefast awesome info thanks. Im gonna pick up the sawzall from my dad tomorrow most likely. Then work on it again in the next couple days. Could it be possible to sawzall the bushing out around the sleeve by going in that small opening on both sides of the bushing? The trailing arm bolts have to pulled to the outside of the car hence the issue with the caliper being in the way.
I wonder why some people have them in different ways or if it came that way from the factory for some reason. I cant pull the bolt out completely because it hits the rotor the nut is on the inside towards the spring perch.
I wonder why some people have them in different ways or if it came that way from the factory for some reason. I cant pull the bolt out completely because it hits the rotor the nut is on the inside towards the spring perch.
My TA bolts came out towards the control arm pocket. It's easier to just remove the caliper and rotor. Don't support the car by the control arm, let it droop and the bolt should just squeak by. Big *** C-Clamp and its out in less than 30 sec. Trust, it takes more time to remove the wheel, rotor, and caliper than it does to do the actual bushings.
01-06-2013, 12:50 PM
#229
Ok sounds good OneFast I have a harbor freight 20 minutes from me so I will go snag those if I don't find a drill bit to work out of the 80+ bits I have laying around lol. I appreciate the info. So you did one side then the other like passenger then driver? Completely undo both bolts on that one side go to town replace the bushings then bolt them back up and do the other side? Or did you do front to back?
 01-06-2013, 05:40 PM
#231
for me he only part that hit the spring perch was the washer so I just took a hammer and knocked it out.
 01-06-2013, 06:36 PM
#232
TECH Enthusiast
iTrader: (13)
Join Date: Sep 2007
Location: SC
Posts: 666
Likes: 0
Received 0 Likes
on
0 Posts
Yea, same with me OnefastV. A little wiggling and it came right out. Because of the higher durometer of the new bushing, I had to use a hammer to tap it back in past the spring pocket. Im guessing the fact that i did mine on a 2 post lift may have helped.
01-06-2013, 10:44 PM
#233
Oh hmmm yea mind pulls out the opposite way. The actual nut is towards the perch and bolt head/washer towards the rotors.
I will give all of this a shot this weekend take some pics and post them up for you guys.
I will give all of this a shot this weekend take some pics and post them up for you guys.
01-11-2013, 05:44 AM
#234
About half done now. The trailing arm bushing was simple once I drilled all around the bushing. The other bushing took much more time I was doing the drilling trick then realized the sawzal up between the bushing worked very very well. It was going great got one bushing out then my battery for my drill/sawzall **** the bed on me. So, that put the work to a halt I will need to pick one up tomorrow. The real issue im having is getting the sleeve out. That thing is in there damn good!
01-11-2013, 06:40 PM
#235
TECH Enthusiast
Thread Starter
Join Date: Jun 2011
Location: New Haven, CT
Posts: 654
Likes: 0
Received 0 Likes
on
0 Posts
Anybody got an opinion on the diff bushing from Revshift? I'm finally placing my order for the cradle bushings and since I'm dropping the cradle I'm considering swapping in one of their diff bushings at the same time.
Here's the sticking point, I have a brand new creative steel diff bushing installed at the moment with 0 miles on it, don't even know how it feels yet as I haven't driven my V in 4 months due to brake line bleeding issues and a few dozen adjustments trying to get my coilovers right as well as working on my tune with HP tuners to get the car to idle.
SO is it worth just dumping my creative steel bushing right now while I'm at it? I did mash it a bit installing it without their special tool.
01-11-2013, 08:25 PM
#236
While this might just be a case of me getting used to the Creative Steel bushing, I *think* that the clunk that I've been getting from the drivetrain has slowly increased over the 6-8 months since I installed it. Therefore, I'm going to tear it out and replace it with the 95A Revshift bushing that I bought. It's a shame that you're asking now--in a couple of weeks, I should be able to provide a lot more information on this subject.
01-12-2013, 01:55 PM
#237
TECH Enthusiast
Thread Starter
Join Date: Jun 2011
Location: New Haven, CT
Posts: 654
Likes: 0
Received 0 Likes
on
0 Posts
While this might just be a case of me getting used to the Creative Steel bushing, I *think* that the clunk that I've been getting from the drivetrain has slowly increased over the 6-8 months since I installed it. Therefore, I'm going to tear it out and replace it with the 95A Revshift bushing that I bought. It's a shame that you're asking now--in a couple of weeks, I should be able to provide a lot more information on this subject.
02-05-2013, 12:56 PM
#238
TECH Enthusiast
Thread Starter
Join Date: Jun 2011
Location: New Haven, CT
Posts: 654
Likes: 0
Received 0 Likes
on
0 Posts
Just want to throw a shout out to the quality customer service of RevShift. They took my impatient *** complaints in stride and even took a $40 hit on shipping for my cradle bushings via express mail to get them to me after I screwed up on my order. Doing good work RevShift, look forward to my next purchase once you release the next set of bushings!! Highly recommend them!
02-25-2013, 06:11 PM
#239
Is anyone else getting LOTS more dif whine with these? I got them in this weekend cruised around a bit to make sure everything was fine. Did one burnout to verify no wheel hop (yeah!) then parked it. On the way to work and back this today I noticed a ton more differential noise. So much so that I got back under it tonight to make sure everything was correctly torqued, nothing binding/unusual, checked the diff for leaks and fluid level. All appears as it should be but the thing is singing up a storm.