
8.8 rear end vibration


 08-28-2015, 10:40 AM
#102
08-30-2015, 09:47 AM
#103
TECH Enthusiast
08-30-2015, 06:57 PM
#104

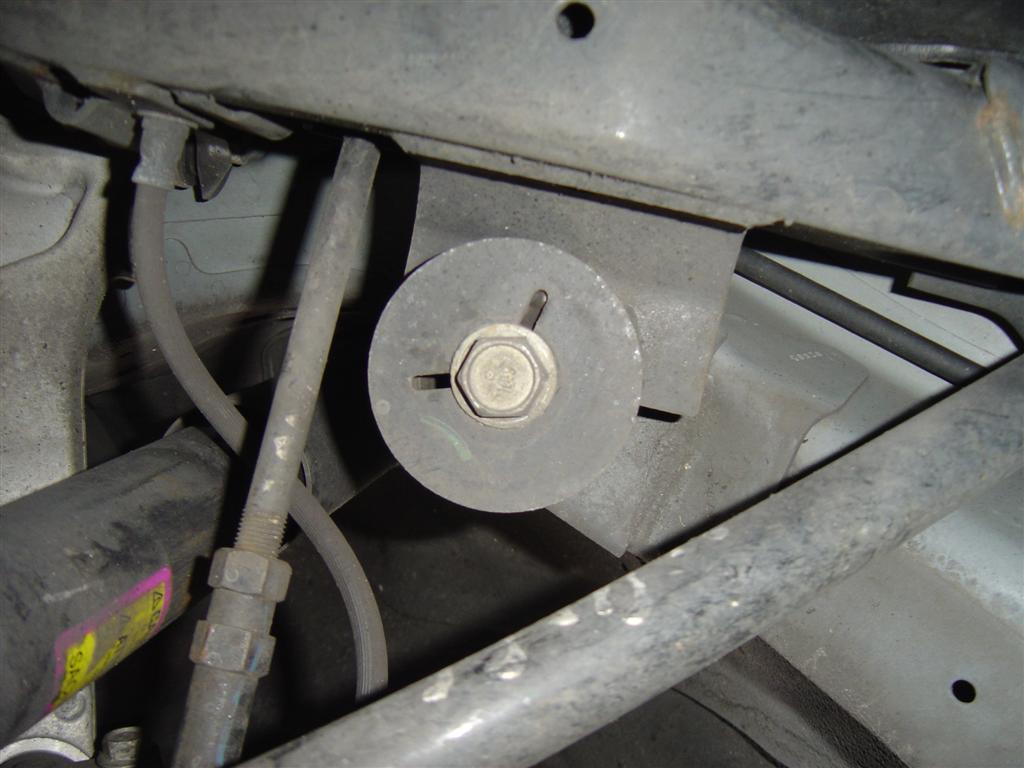
1 factory cradle bolt washer under each front cradle bushing gave me a 1/2 a degree at the pinion which is where I need to be I guess. Wheels off being powder coated so it'll be a little while before I can drive it.
The front cradle washers have a larger bolt hole size than the rears...
The front cradle washers have a larger bolt hole size than the rears...
09-10-2015, 06:49 AM
#105
Shimming the cradle made ALL the difference. It still there just a little but the improvement is dramatic and I'm confident that the rest of it can be shimmed out at the transmission. I put the factory mount back in which has long studs which will give me the flexibility I need to fine tune it!!!
09-12-2015, 03:12 PM
#106

Shimming the cradle made ALL the difference. It still there just a little but the improvement is dramatic and I'm confident that the rest of it can be shimmed out at the transmission. I put the factory mount back in which has long studs which will give me the flexibility I need to fine tune it!!!
09-12-2015, 11:47 PM
#107
TECH Addict
iTrader: (19)
Join Date: Aug 2007
Location: Where the Navy tells me to go
Posts: 2,407
Received 107 Likes
on
89 Posts

The other day while looking at parts online I noticed that GM sells shims in various sizes for carrier bearing (part #6 in various sizes here). So, I pulled out my FSM to see what it says about those shims. Not much, really, but there's a little information that might come in handy for those fighting vibrations.
The driveshaft replacement procedure doesn't mention the shims at all. But in the front portion of the driveshaft section of the FSM there's troubleshooting guidance for assorted noises. Under "Shudder on Acceleration at Low Speed (CTSV)" [which I realize isn't really what most people are experiencing, but I don't see anything anywhere in the procedure about high speed vibrations] it says "Determine if the driveline angle is incorrect and correct as necessary. Refer to Diagnostic Starting Point - Vibration Diagnosis and Correction on page 0-41 in Vibration Diagnosis and Correction."
The Vibration Diagnosis and Correction section is very extensive - over 60 pages, including diagnostic procedures, vibration theory, etc. Pretty impressive. In the Vibration Analysis - Driveline section, all the way down at step 23 it tells you to measure the propeller shaft angle, "Refer to Driveline Working Angles Measurement on page 0-84."
Although it doesn't specifically say so, that section appears to be written for the V-6 driveshaft, as it tells you to measure the angle of the front and rear portions of the driveshaft, then subtract them to determine the working angle of the U-joint. The V-6 driveshaft has the U-joint in the middle, whereas the V shaft has the U-joint at the rear. (At least, I think that's the case. Right?) The principle would be the same, though, you just would take the measurement at the rear end instead of in the middle of the driveshaft. Anyway, after you determine the working angle it says:
But then it doesn't tell you how to adjust the working angle.  If you flip another 10 pages, though, you find a section called Driveline Working Angles Adjustment.
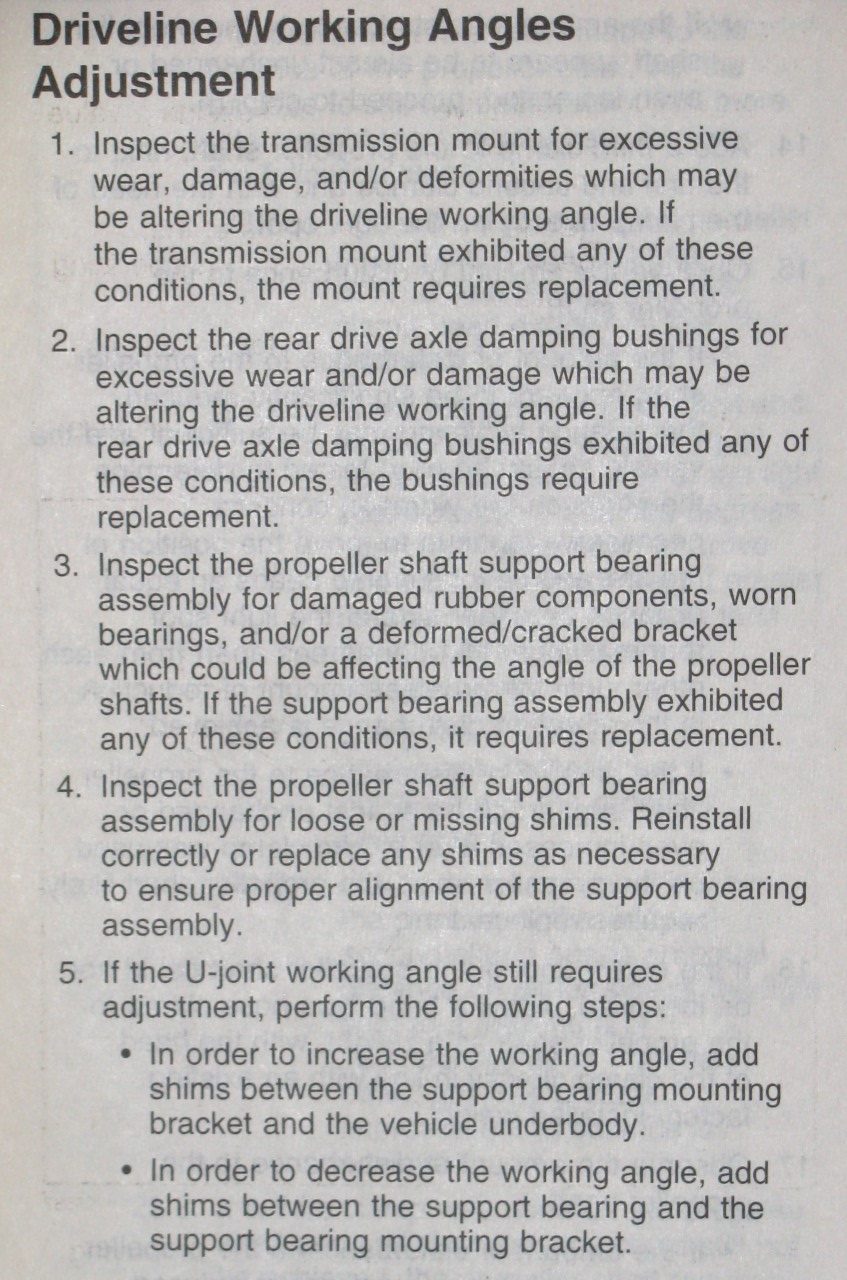
So, it seems to me that if you're using a stock driveshaft with the pinion flange adapter, then you could add/remove shims at the carrier bearing and/or adjust the bushings at the pinion in order to adjust the working angle of the driveshaft U-joint. If you're using a different driveshaft, then of course the adjustments would be different.
The driveshaft replacement procedure doesn't mention the shims at all. But in the front portion of the driveshaft section of the FSM there's troubleshooting guidance for assorted noises. Under "Shudder on Acceleration at Low Speed (CTSV)" [which I realize isn't really what most people are experiencing, but I don't see anything anywhere in the procedure about high speed vibrations] it says "Determine if the driveline angle is incorrect and correct as necessary. Refer to Diagnostic Starting Point - Vibration Diagnosis and Correction on page 0-41 in Vibration Diagnosis and Correction."
The Vibration Diagnosis and Correction section is very extensive - over 60 pages, including diagnostic procedures, vibration theory, etc. Pretty impressive. In the Vibration Analysis - Driveline section, all the way down at step 23 it tells you to measure the propeller shaft angle, "Refer to Driveline Working Angles Measurement on page 0-84."
Although it doesn't specifically say so, that section appears to be written for the V-6 driveshaft, as it tells you to measure the angle of the front and rear portions of the driveshaft, then subtract them to determine the working angle of the U-joint. The V-6 driveshaft has the U-joint in the middle, whereas the V shaft has the U-joint at the rear. (At least, I think that's the case. Right?) The principle would be the same, though, you just would take the measurement at the rear end instead of in the middle of the driveshaft. Anyway, after you determine the working angle it says:
Specification
Maximum U-joint working angle: 0.75 degrees
If the calculated working angle exceeds the specification, then the angle requires adjustment.
If the calculated working angle is 1/2 degree or less, then the angle requires adjustment.
Maximum U-joint working angle: 0.75 degrees
If the calculated working angle exceeds the specification, then the angle requires adjustment.
If the calculated working angle is 1/2 degree or less, then the angle requires adjustment.
So, it seems to me that if you're using a stock driveshaft with the pinion flange adapter, then you could add/remove shims at the carrier bearing and/or adjust the bushings at the pinion in order to adjust the working angle of the driveshaft U-joint. If you're using a different driveshaft, then of course the adjustments would be different.
09-13-2015, 06:04 PM
#108
1 cradle mount washer/plate (Max at CS calls them plates and he has tons in stock if you want any) took care of almost all of the vibes and the plan was to raise the trans up a little to cure the rest. However, I stumbled across another set of cradle mount plates in my spares and as the tools were still out (and these were a lot easier to install than trans shims), I added another set of plates between the frame and the 2 front cradle mounts just to see what it would do and I'm happy to report that this thing is smooth as glass.
So to sum it up, 2 factory cradle mount washers/plates under each one of the front cradle mounts has completely eliminated all of my driveline vibrations.
If you think about it long enough, you may be able to convince yourself that this may in some way affect the rear alignment specs (caster) but I can't tell that the car drives any differently other than the fact that I can drive it 120mph all day long if I so choose.
Last edited by ls1247; 09-13-2015 at 06:10 PM.
09-13-2015, 08:45 PM
#109
09-14-2015, 08:40 AM
#110
I essentially used the same thing but the problem I had was trying to measure accurately down to a 1/4 or 1/2 of a degree because of the rough texture on the carbon fiber driveshaft. Angle readings varied by a degree or more at any given point on the shaft but not in a way that would lead you to believe that the shaft was warped, bent or otherwise out of round...the angle variations were totally random because of the rough texture. Wound up taking an average of say 5 or 6 readings and going with that but at the end of the day, it still, in my mind, wasn't accurate enough to put me into a margin of error less than a half a degree so you're basically making an educated guesstimation. I could have used a straight edge to take measurements against but that would have required taking the exhaust off the car and I didn't want to deal with that.
Its going to be a lot faster to just try shims under the front cradle bushing if your 8.8 vibes...seriously, if you have access to a good air compressor, it takes like 10 minutes.
Last edited by ls1247; 09-14-2015 at 08:49 AM.
09-29-2015, 08:29 AM
#113
TECH Addict
iTrader: (19)
Join Date: Aug 2007
Location: Where the Navy tells me to go
Posts: 2,407
Received 107 Likes
on
89 Posts
Or something else?
09-29-2015, 08:35 AM
#114
bingo...a couple of those between the frame and the front cradle bushing nosed the diff down enough to make it happy. You could do the same thing by shimming the transmission up but it's a little tight and you'll probably be removing the exhaust to do it. This didn't take very long at all.
Last edited by ls1247; 09-29-2015 at 08:46 AM.
09-29-2015, 10:18 AM
#115
bingo...a couple of those between the frame and the front cradle bushing nosed the diff down enough to make it happy. You could do the same thing by shimming the transmission up but it's a little tight and you'll probably be removing the exhaust to do it. This didn't take very long at all.
I once put the front diff bushings in backwards (thick ones on the top) which caused the pinion to nose down like you're doing...... It caused the driver side inner cv bolts to hit the cradle ever so slightly. It was how i learned that the bushings have a top and a bottom

I'm not sure how far that moved them as to how far you're moving them, but I do know that eventually it will cause this problem.
Just an FYI
09-29-2015, 10:54 AM
#116
See, another reason I'm glad mine is working with none of these issues.
I once put the front diff bushings in backwards (thick ones on the top) which caused the pinion to nose down like you're doing...... It caused the driver side inner cv bolts to hit the cradle ever so slightly. It was how i learned that the bushings have a top and a bottom
I'm not sure how far that moved them as to how far you're moving them, but I do know that eventually it will cause this problem.
Just an FYI
09-29-2015, 12:42 PM
#118
So, I'm guessing we could change the thickness of the front bushings to nose the pinion down instead of shimming the entire cradle but it causes issues with CV clearance?
I would have thought that the rear mount was too stiff to let the diff move too much but I guess you can force is down a degree or two with the front bushings.
Is there any way to give us more clearance at the cv's?
I would have thought that the rear mount was too stiff to let the diff move too much but I guess you can force is down a degree or two with the front bushings.
Is there any way to give us more clearance at the cv's?
09-29-2015, 01:45 PM
#119
TECH Enthusiast
So, I'm guessing we could change the thickness of the front bushings to nose the pinion down instead of shimming the entire cradle but it causes issues with CV clearance?
I would have thought that the rear mount was too stiff to let the diff move too much but I guess you can force is down a degree or two with the front bushings.
Is there any way to give us more clearance at the cv's?
I would have thought that the rear mount was too stiff to let the diff move too much but I guess you can force is down a degree or two with the front bushings.
Is there any way to give us more clearance at the cv's?
"fixing" the cradle would require making a new cradle with looser tolerances possibly.
09-29-2015, 02:07 PM
#120
I had to use a hammer to bend the "halfshaft tunnel" on the cradle out of the way to get my DSS 1000hp axles to even go through into the diff. It only needed a couple mm's but it was enough to prevent me from installing the driver side axle.
"fixing" the cradle would require making a new cradle with looser tolerances possibly.
"fixing" the cradle would require making a new cradle with looser tolerances possibly.