When you click on links to various merchants on this site and make a purchase, this can result in this site earning a commission. Affiliate programs and affiliations include, but are not limited to, the eBay Partner Network.
I'm using Percy's Vibe-lock 12pt locking header bolts. No complaints here. Just make sure you take out the pins first before taking out the bolt otherwise you'll strip out the threaded head bore. I'm also running GM stock gaskets without issue. I didn't like the kooks gaskets that came with. They looked very shoddily put together.
LOTS of LS guys run catless and there are benefits but I prefer cats for mellower sound and smell. If you like the power and don't worry about emissions compliance, and also like dirty exhaust smell, go catless. If you bought the Caddy in part because it's a Caddy, you'll want cats.
I'd also run Delco wires. MSDs from my experience do conduct better but they can cause difficult to track tune issues over time. They spark great but only run the NGKs if you plan on changing plugs every year or two. If you want 5-10 year tune ups, stick to the Delco Platinum or Iridium.
Also just ordered the felpro manifold gaskets and ordered the kooks bungs and stainess works plugs.
Now all i need to find is something to insualte the starter wire
Can someone point me in direction to what i need for that so i can order it?
Would this work? http://m.ebay.com/itm/Hi-Temp-Wire-I...%257Ciid%253A1
Or would this work? Just to wrapp the starter wire http://m.ebay.com/itm/Titanium-Exhau...%257Ciid%253A7
I think i can make that wrap work for that wire, and also i can use the stock motor mount heat sheilds and wrap that up around the starter as well, or use this heat wrap for the starter as well?
Wonder if i should get the 1 inch or the 2 inch
LOTS of LS guys run catless and there are benefits but I prefer cats for mellower sound and smell. If you like the power and don't worry about emissions compliance, and also like dirty exhaust smell, go catless. If you bought the Caddy in part because it's a Caddy, you'll want cats.
I'd also run Delco wires. MSDs from my experience do conduct better but they can cause difficult to track tune issues over time. They spark great but only run the NGKs if you plan on changing plugs every year or two. If you want 5-10 year tune ups, stick to the Delco Platinum or Iridium.
I figured i can add cats later down the road, atleast for now i can run these and i also dont have emissions here in fl.
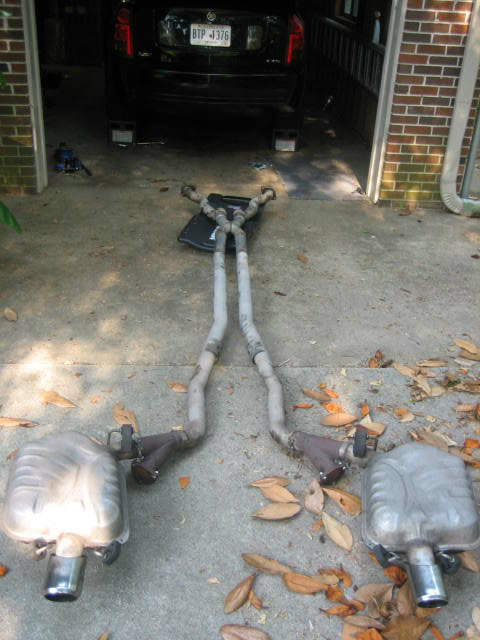
Now i just gotta figure out my catback system, its stock right now with a muffler delete. Should i remove the resonator and add a x pipe and weld some mufflers in the back or weld the stock mufflers back on?
Eventually down the road i plan on adding maybe a magnaflow or corsa system, but i need something diff for the time being
I do know i have a broken header bolt on the driver side front, think it happened when i had the bad drivers side mount. Hopefully theres enough thread there to get some vise grips on it, if not then its gonna have to stay broke, dont think theres room to get in there to tap it out. Any tips for when i remove the header bolts? Spray them with pb blaster? Loosen them with a socket wrech? Or an air ratchet? Loosen them while the motors hott or cold?
I do know i have a broken header bolt on the driver side front, think it happened when i had the bad drivers side mount. Hopefully theres enough thread there to get some vise grips on it, if not then its gonna have to stay broke, dont think theres room to get in there to tap it out. Any tips for when i remove the header bolts? Spray them with pb blaster? Loosen them with a socket wrech? Or an air ratchet? Loosen them while the motors hott or cold?
Kano Aerokroil Penetrating Oil, 10 oz. aerosol (AEROKROIL) https://www.amazon.com/dp/B000F09CEA/ref=cm_sw_r_cp_apip_72e61ndCtGurO
this works twice as well as PB Blaster. Not sure anything helps on those header bolts.
And while all this is off the car, it would make sense to replace the starter if it still has the "V1 only" solenoid connector. If it still has the factory V1 connector, it will more than likely fall apart in your hands.
Doing a swap to a "ring terminal" style starter is the only way to go. You can go with a 6.0 truck starter (which is roughly 1/2" longer than the V1 starter) for some extra starting power but in my experience, you have to loosen the motor mount and jack the engine up to get it in the car...the last time around I went with a 5.3 truck starter which is the same size as the V1 starter, uses a common ring terminal style connector and went into the car easily.
Should i get 4 o2 bung plugs then, since the rear o2 will be deleted. Or can i just leave the sensors in there?
Still trying to decide if i should cancel my order on the header bolts i ordered arp 434-1202 and go with the arp 434-1301, or just keep the ones i ordered
And while all this is off the car, it would make sense to replace the starter if it still has the "V1 only" solenoid connector. If it still has the factory V1 connector, it will more than likely fall apart in your hands.
Doing a swap to a "ring terminal" style starter is the only way to go. You can go with a 6.0 truck starter (which is roughly 1/2" longer than the V1 starter) for some extra starting power but in my experience, you have to loosen the motor mount and jack the engine up to get it in the car...the last time around I went with a 5.3 truck starter which is the same size as the V1 starter, uses a common ring terminal style connector and went into the car easily.
When i did my motor mounts last summer i had the starter out and all the connections seemed fine, but i cant remember if i unplugged them and removed it or just slid it out of the way.
But if i did wait and not do the starter now but do it down the road, would i have to remove that whole header? Or just the connection pipe??
Can u send me the starter part number for the 5.3 one and the ring terminal number so i can look into it and maybe order them up? I see several diff starters, but dont know a good brand, besides the 160 buck ac delco one
I was in a pinch and just bought an autozone starter. It think it was for an 06 sierra 1500 with a 5.3.
I used a ring terminal off an old GSXR wiring harness I had...much heavier than the thin crimp on style you get at Lowe's...I'd go to the junkyard and find a nice one.
Lowe's does sell a small connector that resembles the one below and I liked it because its easy to install and pretty beefy. It came with a sleeve and worked very well...
Why is there so much concern for locking header bolts? The ls platform is not exactly known for them working loose. Get a regular old set of apr bolts just because and go for some c lock nuts for the connection to the rest of the exhaust and some bigger bolts. 5 bucks from the hard ware store and done. If your c locks come loose you get a cookie.
1. Have two M18x1.5 bungs welded in. I recommend Kooks 9002S. You'll need one to support the wideband sensor your tuner needs to plug in. A second enables you to plug in a second device (e.g. Aeroforce or Ballenger AFR500) permanently.
2. Don't forget to get plugs for those bungs. I recommend Stainless Works O2P over the Kooks 9002SA plugs. The SW plugs seal better and it's easier to get a wrench on the smaller head.
3. Get your headers coated by Swain Tech. Don't wrap them or leave them bare. Bare headers will fry your motor mounts and make your IATs high, whereas header wrap will accelerate rusting and costs more than coating because you have to replace it every year.
4. The included gaskets are good. You can also try Fel-Pro MS92467 gaskets. Don't bother with GM gaskets. They're okay, but you can do better.
7. Be prepared to go to the tuner. Your car is going to throw codes with or without cats installed. I prefer cats because of the smell and the sound without them. If you're on a budget, try the Kooks 23103200. It's trivial to weld them or clamp them to a 2.5" catback.
Ok fuzzy, i ordered everything u said, now just waiting on my plug wires and the wire heat socks and the gaskets to get here, and just gotta find someone to weld the bungs in for me then i can send them off to be coated
I love those ARP bolts. The finish is super tough--I've bashed the sharp edges of my headers against them many times with no apparent damage.
By the way, I hope you have a 10 or 12mm gear wrench and 12-point socket. I forget which size they are. It's good to have both options for removing header bolts--some positions are easier to hit with a gear wrench (e.g. driver side front, next to the coolant sensor) and others are easier to hit with a short socket and 3/8" drive socket wrench.
I have 12 point sockets but no gearwrenches, ill have to pick some up.
But how did u bash the headers againt them? These are the ones with the head and the stem all in one peice instead of the other two peice arp ones
I'll show you when I get home. The bolts go through the holes in the header flanges, and then you crank one nut down on each bolt real tight to secure the bolts to the flanges. Then, when you go to join the exhaust to the headers, you thread the second set of nuts down after the cat/connection pipe flange to mate the halves of the exhaust together.
Since the first set of nuts are holding the bolts securely to the headers, you only need one wrench (one hand) to tighten the cat-side nuts. Otherwise you'd have to use two wrenches to prevent the bolt from rotating or pushing out as you try to tighten everything up. It may not sound like a big deal, but it's huge--having a hand free means you can guide the catback with one hand and wrench away with the other.
If you're working outside, these bolts allow you to slide the exhaust under the car (balanced on a cheap Harbor Freight motorcycle platform jack, if you follow me) and rest the cat end above the ground instead letting that end hit the deck. Then, before you attach the exhaust hangers, you can just run around to the front end of the car and loosely thread on the nuts. Keeping the cat ends off the ground avoids dinging them and prevents fouling when you're in an uncontrolled outdoor environment.
I removed the upper rails and rubber pads and installed a thick steel plate in their place... also makes transmission pulls really easy for one guy. While the car is up, you can use this platform to load a wheel to inspect the suspension geometry throughout the full range of motion.
Last edited by FuzzyLog1c; 07-06-2017 at 04:30 PM.
I see what Fuzzy's saying about the bolts. Basically to secure one end tightly into a flange to let the catback hang on that without tightening the rear bolts. However, I never really ran into that as an issue. It seemed that the ball flanges on my car were able to hold the exhaust in place well enough to allow me to stick the flange bolts through loosely before moving to the back to hang the rear mufflers. I just use a plastic creeper to support the exhaust as I roll it under the car since I have the creeper out anyway.
If you haven't hung the headers already, the easiest way I've found to hang the driver's side is to slide it up through the bottom and reach up with a bolt to start the rearmost thread from underneath. There's good room there and you can see what you're doing. Then go up to the top, slip the gasket between the flange and the forward most bolt and get that one started. Back the rear bolt out enough to slip the gasket over the backside and rethread, then thread the rest and tighten to spec once everything is aligned.
If you haven't hung the headers already, the easiest way I've found to hang the driver's side is to slide it up through the bottom and reach up with a bolt to start the rearmost thread from underneath. There's good room there and you can see what you're doing. Then go up to the top, slip the gasket between the flange and the forward most bolt and get that one started. Back the rear bolt out enough to slip the gasket over the backside and rethread, then thread the rest and tighten to spec once everything is aligned.[/QUOTE]
Im assuming they both went on through the bottom? And what about the sterring shaft, im sure i have to figure out where to make a dent in the header at, hopefully that dont damge the coating whenever i get them coated, unless I can figure out where to dent it first at but I won't know until I go to put them in and I won't put them in until they're coated.
 07-02-2017, 10:35 AM