
'70 Nova LY6/TH400 6.0VVT
 11-23-2010, 11:59 PM
#61

Jimbo - I don't plan on redoing the paint if I don't have to. My plan is to just touch it up here and there.
Life with an infant is a chaotic (and rewarding) experience. This project is not my priority, but here are a few odds and ends to give you a flavor of where I'm heading.
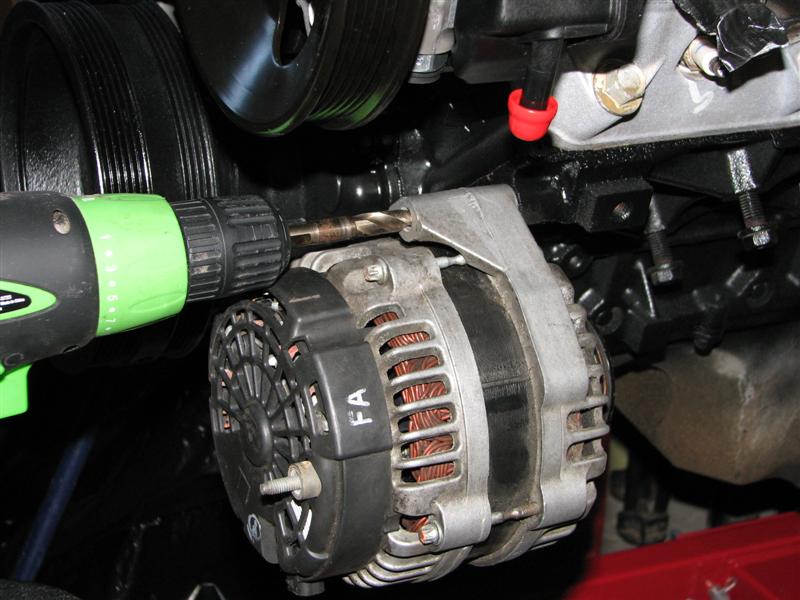
First I've decided to mount my truck "DR44" alternator in the lower "F-body" location. The DR44 is a large alternator and will present fitment difficulty, but I want to use it because it produces 160amps and plugs right into my ECM. I bought a 5th gen Camaro bracket only to find the hole spacing for the new alternators is different and will not work with older LSX alternators, so I will either have to make my own bracket or use a 4th gen Camaro bracket with spacers. The first step for putting one of these on an iron block is to tap the untapped hole for the upper mounting bolt. I determined position by attaching the alternator backwards using the lower mounting hole, then I used a large drillbit piloting in the upper alternator hole to start a dimple in the block. Then I removed the alternator and swapped to a smaller bit appropriate for an M10x1.5 tap. Here is a picture of the pilot drill operation for establishing the hole location. I don't have pictures showing the tapping process.
On the other side of the block, I've decided to mount a Trailblazer 5.3/6.0 AC compressor model TRSA12B (the "B" is important). This is a scroll compressor and it's smaller than the popular SD7H15 (508 equivalent) used in a lot of the high mount and aftermarket kits. The flow rate is almost exactly the same when you factor in the displacement and pulley sizes. The TRSA12B has PAD mount supply/discharge lines facing slightly upward and to the passenger side, which should be perfect for my Nova once the compressor is nestled into a notched subframe. I will likely have to use a PAD adapter to get to more standard hose fittings. The big advantage I see for this compressor is that it is just barely short enough that I can run it off the rear dedicated 4 rib belt and use a flipped SBC motor mount in the Autokraft position without interfering with the frame mount. I have never liked that the aftermarket and high mount kits put the AC as the last driven accessory on the 6 rib belt despite it requiring the most load to turn. That is bad for belts and bad for bearings on the other accessories. Another benefit of this compressor is that is has a built in pressure switch to disengage the clutch.

I got my unit from an eBay member for $70 plus $20 shipping. Then I bought a bracket from the stealership for $16, even though I think I will make a custom bracket to get the compressor a little higher. If you decide to do what I'm doing, just be careful not to get a TRSA12 instead of a TRSA12B - the non-B version is a passenger side mount for a 4.3 engine.

Here is a front view with things mounted, including the 5th gen Camaro waterpump and powersteering pump. Because of the large DR44 alternator and AC compressor, I will most certainly need to notch the subframe on both sides. I've taken careful measurements and I'm confident I can get this to work.


Here is how the engine lives most of the time - inside of a Summit Racing engine bag. I think I paid $10 for this when I ordered some other parts recently. It's very thick/durable and big enough to fit the big truck oil pan along with all the accessories shown above. A big garbage bag would work too.

I probably wont have any updates for a while since I'll be busy with the holidays and I am working at a snail's pace, but I do want to say thanks to everyone who's responded to my thread or helped me with questions in other threads.
Life with an infant is a chaotic (and rewarding) experience. This project is not my priority, but here are a few odds and ends to give you a flavor of where I'm heading.
First I've decided to mount my truck "DR44" alternator in the lower "F-body" location. The DR44 is a large alternator and will present fitment difficulty, but I want to use it because it produces 160amps and plugs right into my ECM. I bought a 5th gen Camaro bracket only to find the hole spacing for the new alternators is different and will not work with older LSX alternators, so I will either have to make my own bracket or use a 4th gen Camaro bracket with spacers. The first step for putting one of these on an iron block is to tap the untapped hole for the upper mounting bolt. I determined position by attaching the alternator backwards using the lower mounting hole, then I used a large drillbit piloting in the upper alternator hole to start a dimple in the block. Then I removed the alternator and swapped to a smaller bit appropriate for an M10x1.5 tap. Here is a picture of the pilot drill operation for establishing the hole location. I don't have pictures showing the tapping process.
On the other side of the block, I've decided to mount a Trailblazer 5.3/6.0 AC compressor model TRSA12B (the "B" is important). This is a scroll compressor and it's smaller than the popular SD7H15 (508 equivalent) used in a lot of the high mount and aftermarket kits. The flow rate is almost exactly the same when you factor in the displacement and pulley sizes. The TRSA12B has PAD mount supply/discharge lines facing slightly upward and to the passenger side, which should be perfect for my Nova once the compressor is nestled into a notched subframe. I will likely have to use a PAD adapter to get to more standard hose fittings. The big advantage I see for this compressor is that it is just barely short enough that I can run it off the rear dedicated 4 rib belt and use a flipped SBC motor mount in the Autokraft position without interfering with the frame mount. I have never liked that the aftermarket and high mount kits put the AC as the last driven accessory on the 6 rib belt despite it requiring the most load to turn. That is bad for belts and bad for bearings on the other accessories. Another benefit of this compressor is that is has a built in pressure switch to disengage the clutch.
I got my unit from an eBay member for $70 plus $20 shipping. Then I bought a bracket from the stealership for $16, even though I think I will make a custom bracket to get the compressor a little higher. If you decide to do what I'm doing, just be careful not to get a TRSA12 instead of a TRSA12B - the non-B version is a passenger side mount for a 4.3 engine.
Here is a front view with things mounted, including the 5th gen Camaro waterpump and powersteering pump. Because of the large DR44 alternator and AC compressor, I will most certainly need to notch the subframe on both sides. I've taken careful measurements and I'm confident I can get this to work.
Here is how the engine lives most of the time - inside of a Summit Racing engine bag. I think I paid $10 for this when I ordered some other parts recently. It's very thick/durable and big enough to fit the big truck oil pan along with all the accessories shown above. A big garbage bag would work too.
I probably wont have any updates for a while since I'll be busy with the holidays and I am working at a snail's pace, but I do want to say thanks to everyone who's responded to my thread or helped me with questions in other threads.
 11-24-2010, 08:19 AM
#62

Clint,
I am glad you touched on the AC compressor issue. I was curious on what you were doing. So you will be able to use this Trailblazer comp. . on your factory Nova AC system without any issues?
I always wondered about those Summit engine bags. Whether they were worth it or not. I haven't found a garbage bag big enough yet
11-24-2010, 09:12 AM
#63
My plan is to use the original evaporator, expansion valve and POA valve with a new condensor, drier, TB compressor, and custom lines. The POA valve will need to be recalibrated for 134a. Sanden SD7H15s have been used with original/classic AC systems successfully by others and this compressor should perform equivalently.
For reference, here is a good thread showing LSX fitment with the factory AC evaporator "suitcase".
https://ls1tech.com/forums/conversio...8-74-nova.html
Another good point of reference is this thread about frame notching for AC
https://ls1tech.com/forums/conversio...8-74-nova.html
For reference, here is a good thread showing LSX fitment with the factory AC evaporator "suitcase".
https://ls1tech.com/forums/conversio...8-74-nova.html
Another good point of reference is this thread about frame notching for AC
https://ls1tech.com/forums/conversio...8-74-nova.html
Last edited by -TheBandit-; 11-24-2010 at 09:44 AM.
11-24-2010, 11:16 AM
#64
Clint -
Let me see if I'm hearing you correctly with your current accessory plans:
*LY6 with LS3 intake/injectors/TB
*TB 5.3/6.0 AC Compressor, TRSA12B, run off OEM A/C groove on crank
*DR44 160 amp alternator, mounted in f-body location with custom bracket (need to space 3/4" from block)
*Drill and tap for alt. upper mount bolt
*L99 water pump
*L99 PS pump/bracket/pulley
*L99 idler pulley
*L99 tensioner?
I'm about 95% positive I'm doing an LY6 for the Goat, so I'm going to piggyback off all your hard work rather than trying to reinvent the wheel. You're the man - just do me a favor and run a T56 so I don't have to figure that out, either.
11-24-2010, 11:42 AM
#65
Some notes and corrections:
*LY6 with LS3 intake/injectors LY6 TB and LY6 MAP
*TB 5.3/6.0 AC Compressor, TRSA12B, run off OEM A/C groove on crank TRSA12B = Sanden 4911. I will likely make a custom bracket to raise & increase frame clearance. I plan to use the tensioner from the LY6 AC compressor
*DR44 160 amp alternator, mounted in f-body location with custom bracket (need to space 3/4" from block) This is the alternator that came with my 2007 LY6. I am not sure if 3/4" is the right value for a spacer, but using the z-feed on my mill and dial indicator on the LY6 accessory bracket, I measured 48mm from the engine block to rear alternator mounting tab, so I currently have 48mm spacers between the block and alternator to achieve correct pulley alignment. I will need to incorporate an idler somehow either with an OEM or custom bracket.
*Drill and tap for alt. upper mount bolt
For all the L99 stuff below, you can generically call them 5th gen Camaro accessories because they are also used on the Camaro variety of the LS3
*L99 water pump
*L99 PS pump/bracket/pulley
*L99 idler pulley Not sure about the idler pulley yet. If I make a custom alternator bracket, I can use either the LY6 or L99 idler. If I go with a 4th gen Camaro or GTO bracket, I will use it's idler.
*L99 tensioner? This is on national backorder, but assuming it eventualy shows up, it is what I plan to use.
Also of course I should note these are just my plans as of right now and they may change especially if I find something doesn't fit or work the way I epect it to! I am counting on being able to clearance the frame enough for this to work.
Hopefully what I am planning works out and I can return the favor of you providing so much info on your build!
11-24-2010, 10:34 PM
#66
12-08-2010, 04:05 PM
#67
Today I picked up some 4" x 1/2" 6061 aluminum to make engine mount adapters out of. My current (ever changing) plan is to mimick the Autokraft adapters, but add a 1/4" engine forward offset. The offset will help with AC compressor clearance at the engine mounts and the frame stands. I will slot the single hole in the SBC mounts to make this work. My hope is this does not generate problems for steering linkage or header clearance. Thoughts?
Here is a drawing of my adapter design. *EDIT* Drawing deleted due to incorrect spacing on SBC mount holes (3" should be 3.125"). The thickness of 7/16 is what Autokraft told me their mounts were, but I will likely make them in 1/2" first and see if I need/want to trim them later.
Here is a drawing of my adapter design. *EDIT* Drawing deleted due to incorrect spacing on SBC mount holes (3" should be 3.125"). The thickness of 7/16 is what Autokraft told me their mounts were, but I will likely make them in 1/2" first and see if I need/want to trim them later.
Last edited by -TheBandit-; 12-09-2010 at 09:28 AM.
12-08-2010, 06:31 PM
#68
So how did you get the stock LY6 MAP to work on the LS3 intake? Any chance of getting a picture? Mine were different.LY6 engine/L76 intake. But the typical LS3 MAP.
The mnt plates look good. Really easy and quick with that MILL you have at home.
thanks,
Jim
12-08-2010, 06:53 PM
#69
12-10-2010, 11:38 PM
#70
Got started on my 1/4" forward LSx to SBC adapters. Here are the dimensions. This is my own design based on dimensions I took from my old short & wide Energy Suspension SBC mount and the holes on my LY6 block.

Here is the first one just about finished, currently at an unmachined 1/2" thickness:

Trial fit - the hole pattern lines up right. I took the two forward bolts out to check the SBC mount fitment.

I still need to countersink the one hole and tap the two 3/8-16s, but that was all I had time for today.
Here is the first one just about finished, currently at an unmachined 1/2" thickness:
Trial fit - the hole pattern lines up right. I took the two forward bolts out to check the SBC mount fitment.
I still need to countersink the one hole and tap the two 3/8-16s, but that was all I had time for today.
Last edited by -TheBandit-; 12-13-2010 at 05:16 PM.
12-11-2010, 11:39 AM
#72
Yes, there will definitely be frame interference using this "truck" alternator in a low-mount position. I plan on notching the frame on both sides for the ac compressor and alternator. Some have used ls1 "car" alternators in the low mount position without modifying the frame, but I want the higher output of this one.
12-12-2010, 10:05 PM
#73
Today I made a hair more progress. I tapped the two 3/8-16 holes for mounting the SBC mounts and countersunk the one M10 that resides underneath. I didn't have a 90deg countersinking bit and couldn't find one (most are 82 at the hardware store and none of the machine tool suppliers are open on the weekend), so instead I used a 45 degree chamfering bit for a router (included angle is 90). That was cheap and worked great on the aluminum. I also put a notch in the OEM AC compressor bracket to fit around the bottom of the mount. Here are things mocked up with my 10-year-old SBC mounts. I will slot the single hole on the replacements to work with my 1/4" offset.


I really don't like having the SBC mounts upside-down, but it gives me some more room for the compressor and has been done this way by many LSx swappers in the past without reports of failing mounts.
Next I wanted to get a flavor for what my compressor notch is going to look like, so I took measurements and marked two sides. This laser level tool works great for marking straight lines, especially when combined with a calibrated stack of Christmas light boxes.


The lines are 4" from the left of the motor frame stand hole (the compressor sticks out 3" from the mount hole, so 1" for clearance) and 3-3/4" back from the front face of the crossmember (designed for 1/4" of clearance with the compressor, partly why I am moving the engine 1/4" forward). I still need to figure out how low I need to cut before I mark the front face of the crossmember and the bottom.
I think the frame needs another round of washing because looking at these pictures it's obvious I missed a bunch of spots.
I really don't like having the SBC mounts upside-down, but it gives me some more room for the compressor and has been done this way by many LSx swappers in the past without reports of failing mounts.
Next I wanted to get a flavor for what my compressor notch is going to look like, so I took measurements and marked two sides. This laser level tool works great for marking straight lines, especially when combined with a calibrated stack of Christmas light boxes.
The lines are 4" from the left of the motor frame stand hole (the compressor sticks out 3" from the mount hole, so 1" for clearance) and 3-3/4" back from the front face of the crossmember (designed for 1/4" of clearance with the compressor, partly why I am moving the engine 1/4" forward). I still need to figure out how low I need to cut before I mark the front face of the crossmember and the bottom.
I think the frame needs another round of washing because looking at these pictures it's obvious I missed a bunch of spots.
Last edited by -TheBandit-; 12-12-2010 at 10:16 PM.
12-13-2010, 07:48 AM
#74

It looks clean to me except I think there's something wrong with my computer screen. It seems to have a purple color to it.
Seriously, You're going about this project in an original way with a good engineering perspective and I look forward to seeing the results.

 12-14-2010, 10:04 AM
#79
So last night I did some more measuring and marking on the frame trying to determine how much needs to be cut out to make room for the AC compressor. I'm not very happy with the results. I determined that the bottom of the compressor was about 3-3/4" below the centerline of the motor frame stand bolt, so I marked my lowest line at 4-1/4" for 1/2" clearance. I also decided to extend the left (passenger) side line from 4" to 4-1/2" from frame stand bolt to give a little more wiggle room for my hand and a wrench (1-1/2" clearance to the side of the compressor. I'm considering adding more.). Here is what that looks like marked out on the frame.


So you can see this is not a small notch. It would take out a significant portion of the frame. You can also see the swaybar is above the lowest surface of where the compressor would be, so either I would need a bar with a bend further out or I would need to space the bar down from the frame hoping things would clear.
Here are a few ideas that have crossed my mind for dealing with this
- Make my own compressor bracket to move the compressor up. I think I can get 1/2" this way. I may be able to get more if the compressor also move out a little. I'll play around and see what I can come up with.
- Run less vertical clearance. I'm thinking 1/4" is the absolute minimum.
- Rely on engine tilt to give some more clearance. I'm not sure what it will be yet, but if the rear tilts down some that would help. I haven't checked driveline angles at this point.
- Find an aftermarket swaybar that curves differently.
- Raise the engine (not desirable due to ac box and brake booster clearance)
- Give up (unlikely)
I am open to suggestions!
Last edited by -TheBandit-; 12-14-2010 at 12:00 PM.
12-14-2010, 12:43 PM
#80
I am glad you didn't take the easy way (Kwik) out. I personally do not like the look of a top pass. mounted AC comp. I think the extra work of a low mount system will look ALOT better.