When you click on links to various merchants on this site and make a purchase, this can result in this site earning a commission. Affiliate programs and affiliations include, but are not limited to, the eBay Partner Network.
My 1965 Buick Skylark LQ9 engine retrofit thread. The car started with a 300 cubic inch Buick V-8 and a Super Turbine 300 2 speed automatic transmission. She was a plain Jane model with a bench seat and column shifter. The only notable options being power steering and a pretty rare tilt column.
The car received a 2004 Cadillac Escalade LQ9 with performance upgrades including a Comp Cams XR275HR, Edelbrock Performer RPM intake and Holley carburetor. The transmission is now a TH200-4R built by Lonnie @ Extreme Automatics. The rear end is a GM 8.5" corporate rear with a 3.90 and a new Eaton limited slip.
The car has already been converted to power front disc brakes and upgraded to 1 1/4" front sway bar with a 1" rear. All suspension, steering and brakes are all completely refurbished. The rear control arms were boxed and upgraded to the black poly bushings. The steering box was upgraded to a 12:1 fast ratio box. The interior has gone from a factory bench/column shift to bucket seats and factory console outfitted with a B&M shifter.
My performance goal for this car was to exceed 110 MPH in the quarter mile so I could run with the new Camaros and Mustangs. The first trip to the track in the Florida heat, the car ran 11.76 at 113.5. I can safely say: Mission accomplished.
I have created a detailed parts list as a resource for anyone else who might find it useful in post #4:65 Skylark/LQ9 swap parts list
************************************* NOTE ************************************
This thread has been damaged. Many posts, pictures are out of order. Some post are missing and some are combined without regards to sequence. There is still a ton of information in this thread, but it is not what it once was. I hope you still enjoy the pictures and posts.
Last edited by speedtigger; 06-07-2017 at 12:30 PM.
I have to agree with your daughter. From the pics that car looks great on the inside. It'd be a shame to cut that up. I'm not that attached to the engine.
Swap/Retrofit Parts (parts needed to complete the swap):
2004 LQ9 (55k miles)
Texas Speed Stage 1 CNC ported LS6 cylinder heads
Mast LS swap oil pan.
LS3 Dipstick assembly from 2010 Camaro - tube #12625031 dipstick #12634547 (recommended by Mast for use with their pan)
Edelbrock Victor Jr.
Holley HP 750 Carburetor
Professional Products billet inline fuel filter #10211 (pre-carb)
Doug's #D3338 coated headers
Painless Wiring fan controller system PRF-30141
MSD 6010
Map Sensor GM #16249939
GM 12621399 Flywheel & spacer assy (used to adapt LSX motors to old school automatic transmission)
Bowtie Overdrives TV cable kit
Aeromotive S/S Fuel Pump
Mallory Comp Series 140 billet pre-pump filter
Holley 12-803BP bypass fuel pressure regulator
Painless wiring fuel pump relay kit #50102
2 - 15' coils of 3/8" steel fuel line (only 1 coil needed if not running a return fuel line) (available from NAPA)
8 - 3/8" double flare nuts (to assemble new fuel lines)
4- 3/8" double flare unions (to assemble new fuel lines)
Edelbrock 6701 Motor mount kit - Modified to use custom frame stands
Energy Suspension Urethane tall and narrow motor mounts
Custom fabricated motor mount frame stands
2001 Corvette engine accessory system
Dayco Serpentine Belt
Lower radiator hose - Dayco 71321 (Jeep Laredo 87-92)
Upper radiator hose - Dayco 71981 (Corvette 98-04) spliced with a section of Dayco 71421 (Chevy Pickup 1500 w/v-6 88-93) ~ when using my JTR steam vent adapter
JTR (Jags that Run) Steam vent adapter "T" 1 5/16" x 1 9/16" x 1/4"
93 Taurus cooling fan - reconditioned from GTRecycler on E-Bay
Performance Upgrade Parts (parts I chose to upgrade for performance):
Comp Cam Custom Grind (226/234 - .598"/.612" on 110)
LS7 Lifters
PAC 1518 valve springs
Comp Cams 13702 Trunion upgrade kit.
Com Cams Hi-Tech hardened pushrods 7.375"
Cloyes Hex-A-Just timing chain (single roller HD)
Melling 10295 Oil Pump
Timing cover seal #12585673
ARP Harmonic Balancer Bolt #234-2503
Generic chrome 14" Air Cleaner
Pypes 3" Stainless Steel X pipe #XVA13
Walker DynoMax Super Turbo 3" Mufflers #17792
T/A Performance 3" Mandrel Bent Tailpips #TA_2007BT
PACE Performance PAC-4118 LS coil covers
LS6 valley cover 12568002 (for better PCV)
Fabricated PCV flow restrictor made using Holley #64 jet. - No PCV valve.
2 - 3/8" rubber hose caps (used to block off unused valve cover breather tubes)
160 degree thermostat (auto zone part # 37960)
Vehicle Upgrade Parts (Parts I chose to upgrade the vehicle to compliment the swap):
200-4R Transmission from Extreme Automatics
2800 stall converter from Circle D (2B)
B&M Quicksilver Shifter
High Performance 3.5" driveshaft from PST
8.5" corporate 10 bolt with 3.90 Precision Gears and Eaton Limited Slip
Rear Control Arm frame braces from Edelbrock
Summit 1" rear Sway Bar
GM Z28 1 1/4" front Sway Bar with Energy Suspension Bushings kit
1968 Chevelle SS396 Rebuilt Fast Ratio 12.7:1 Steering Box from Auto Zone
Disc Brake Conversion Kit from E-Bay (uses GM disc brakes components from 70-72 A-bodies)
Moog Front suspension rebuild kit
Energy Suspension Rear Control Arm Bushings
Energy Suspension Body Mount Kit #3.4155G
LRE Fab Shop Heater Delete Panel #150522710081
B&M 70266 Super Cooler - transmission cooler
Procar Pro 90 Series 1300 Bucket Seats
Autometer Gauges - Series II Black (oil pressure, water temperature, tachometer)
Grant Stainless Steel 3 spoke Steering Wheel
Optional Items:(Things I would like but I may wait to control cost)
Classic Auto Air a/c system (this will wait until all other work is done and the car is sorted out)
Last edited by speedtigger; 07-14-2012 at 01:14 PM.
Right on man. I've seen you on V8buick as well as here. My 65 is gettin a LT1 and 4l60E. Saving up money for the frame blasting and powdercoating before I go further. I'll be looking forward to this progress. Keep it up man.
I used a tim's tool and would not do so again. It was fine for stock springs and retainers but didn't work so well with my patriot duals, had to grind it down a bit. Not worth $30 anyway. The gauges look good, I like the tach.
I used a tim's tool and would not do so again. It was fine for stock springs and retainers but didn't work so well with my patriot duals, had to grind it down a bit. Not worth $30 anyway. The gauges look good, I like the tach.
You know, I did not like the looks of the design, but there were so many great testimonials I ordered it. In my case I am running the PAC 1518 single springs, so I should not have the same clearance issue.
Last edited by speedtigger; 02-08-2011 at 06:54 PM.
Im glad you went with the LS swap. It seems like some of the guys on the buick site are afraid of technology. Im going to be doing a swap into my 67 GS as soon as I get all the parts I need. I will be watching this build on both sites.
Im glad you went with the LS swap. It seems like some of the guys on the buick site are afraid of technology. Im going to be doing a swap into my 67 GS as soon as I get all the parts I need. I will be watching this build on both sites.
I am not so sure that they are afraid of technology as much as they are purist loyal to the brand. I have always been that way too. But, 64-66 Skylarks never came with any motors that are capable of performance levels that would meet my goals on this build. I could have went with a 455 but that motor never came in the 64-66s anyway. So, from a purists standpoint, a 455 does not belong in my car any more than the LQ9. If RWD Skylarks were built today, they would be LSX based. So, why not.
Besides, I know what it would cost to build a 10:1 455 with Aluminum heads and a roller cam. 10 grand is too rich for my blood. This LQ9 was $1100. With the cam, springs, intake and what-nots, I will have $2000 in the motor. 450 HP for 2 grand? Yes please!
I just pulled everything apart to install my new cam and when I removed it from the package, every bearing surface and every lobe had rust on them. The rust is deep enough to feel with your finger nail, so it is going back. That sure put a damper on my Sunday fun!
I guess I will do the valve springs and call it a day.
Another set back today. The new adjustable LS2 timing set that I ordered from Yank here on the board is looser than the factory original 55k mile timing chain.
The factory chain had 3/8" of play while the new timing set has over 1/2" of play! After further investigation, it appears the problem is in the new LS2 cam sprocket. I installed the new chain on the factory cam sprocket and it had the same 3/8" play as the factory 55k mile chain. Sooooo, I guess I will call Yank tomorrow to address this problem.
Here are some pics. It shows a comparison next to a ruler of the difference:
I am not so sure that they are afraid of technology as much as they are purist loyal to the brand. I have always been that way too. But, 64-66 Skylarks never came with any motors that are capable of performance levels that would meet my goals on this build. I could have went with a 455 but that motor never came in the 64-66s anyway. So, from a purists standpoint, a 455 does not belong in my car any more than the LQ9. If RWD Skylarks were built today, they would be LSX based. So, why not.
Besides, I know what it would cost to build a 10:1 455 with Aluminum heads and a roller cam. 10 grand is too rich for my blood. This LQ9 was $1100. With the cam, springs, intake and what-nots, I will have $2000 in the motor. 450 HP for 2 grand? Yes please!
That $10,000 455 would only blow up before the $2000 LQ9. The dash gauges look very nice, keep up the good work.
Very Nice, my '64 special has been in this process for years nut-bolt resto all the way up until the under-hood area.. Can't wait to see your finished product! Ought to scream having that in a 3000 lb car.
Another set back yesterday. When inspecting the Corvette accessory drive system that I bought off of a board member, I found the harmonic balance had a substantial groove worn where the front seal rides. Judging by the general condition of the Corvette accessories that I purchased, I would say the seller may have been a little "optimistic" when quoting the mileage.
So, where is the best place to buy a 2001 Vette harmonic balancer?
I decided to build my fuel pump set up while I am waiting for my engine parts. I build this set up so it could be double insulated. I will be making every effort to keep this pump system quiet. The Edelbrock was purchased because it is supposed to be one of the quietest external pumps. I hate noisy fuel systems.
The Vette harmonic balancer should be about $85 at your local dealer. If not there are always some on eBay but used ones usually go for $50 so I would spend the extra and buy new.
The Vette harmonic balancer should be about $85 at your local dealer. If not there are always some on eBay but used ones usually go for $50 so I would spend the extra and buy new.
I picked a new GM balancer up through my buddies wholesale account for nice price yesterday. I also ordered a LS2 timing chain dampener for possible retrofit to the LQ9 block.
I picked up my Tuarus cooling fan from GTRecycler on E-Bay. The fan was cleaner than new and came complete with the pigtail. He claims that he disassembles, tests and cleans each fan. After seeing the product, I believed it.
Here is a pic:
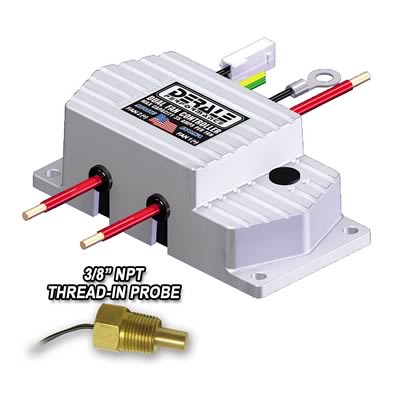
Now that I have an electric fan, I have to control it. After a lot of reading and consideration, I chose the Derale 16789. It has the ability to control the power hungry 2 speed fan and has a provision for a manual switch or air conditioning signal.
I installed the camshaft and measured for new pushrods this morning. I was surprised to see the factory camshaft and lifters were running .130" of preload. Most of what I have read says they are typically about .100". Anyhoo, I ordered some 7.375" Comp Cams High Tech pushrods from byunspeed. This will put me just under .100" preload.
For those that have been following this build, you will recall that the first cam came in very badly rusted. Below are some shots of what a rust free camshaft should look like! The cam did need to be cleaned though. The hollow center bore was filled with crap, so I busted out the shotgun cleaning kit. This cam turned out to be a 20 guage
One of the other things I was considering was installing the LS2 chain dampener. However, I decided against this.
It turns out that the bolts that hold the dampener in place are quite long. And, as you can see in the picture, the area of the block to be drilled is fairly thin comparatively speaking. So, in order to drill and tap this area to accept the dampeners retaining bolts, this section of the block would have to be drilled all the way through.
There would be no way to keep all of the cast iron shavings from drilling and tapping out of the inside of the shortblock. Since I do not intend to disassemble the shortblock, I will pass on this mod.
It's a pity about the damper, i broke a dual rollmaster road racing due to no damper. Will only use my car on occasional track fun days now, can't afford the repair bills lol.
Mike at Yank sent me another LS2 timing gear set today. This one has 3/8" slack like the original 55k miles timing set did. So, I guess I will roll with it. I sure wish this thing had a dampener.
I installed some UMI Performance rear control arm braces over the weekend. A-bodies and G-bodies are known for needing these once you start leaving hard on sticky tires.


 11-06-2010, 04:15 PM