
Iron block low mount alternator DIY
 05-26-2011, 07:17 AM
#1
Teching In
Thread Starter
iTrader: (2)

Join Date: Apr 2010
Posts: 13
Likes: 0
Received 0 Likes
on
0 Posts
Hi,
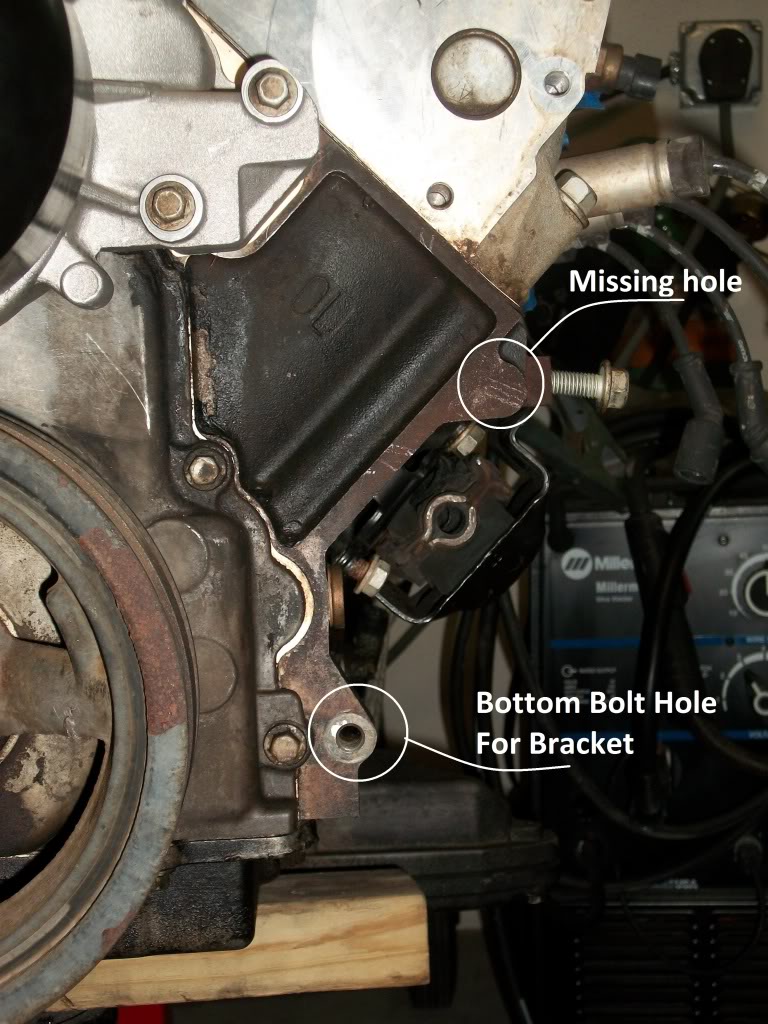
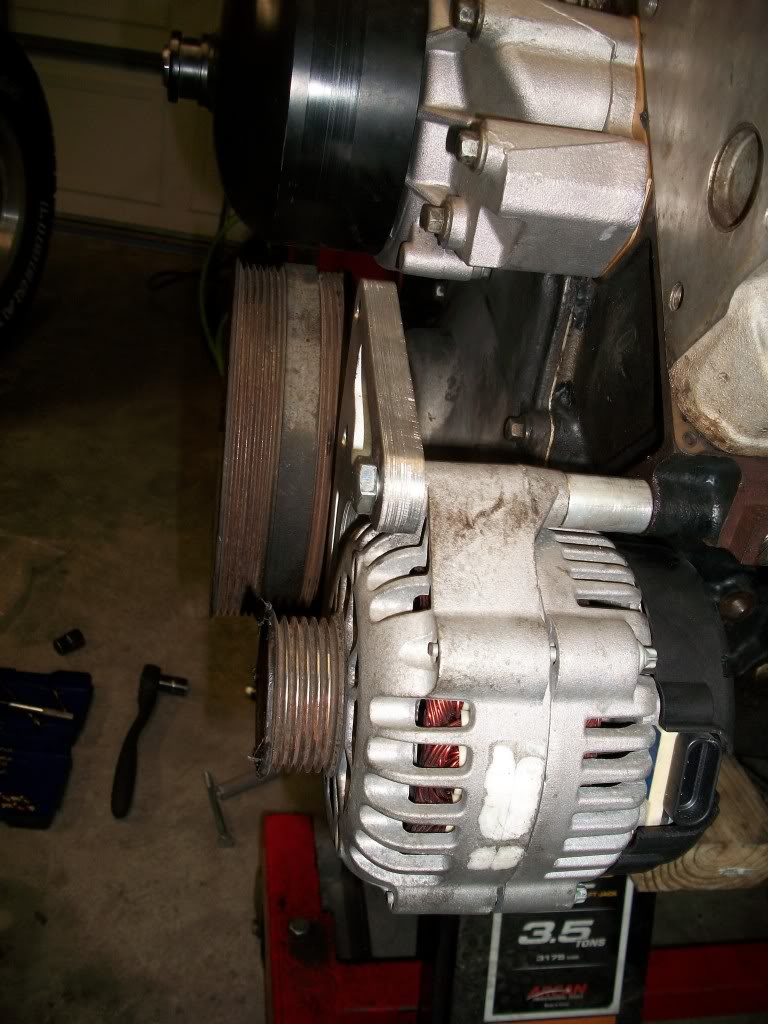
I decided to make a guide to drilling and tapping the extra hole needed to low mount an alternator on either the lq4 or lq9. This should also work for the 4.8 or 5.3 vortex engines, but always make sure to double check before beginning any modification of your engine block. There seemed to be a lot of questions about this, but mostly vague descriptions of how to do this.
Unlike their aluminum block brothers the Vortex engine series was missing this one hole for an alternator down low.
Tools Needed:
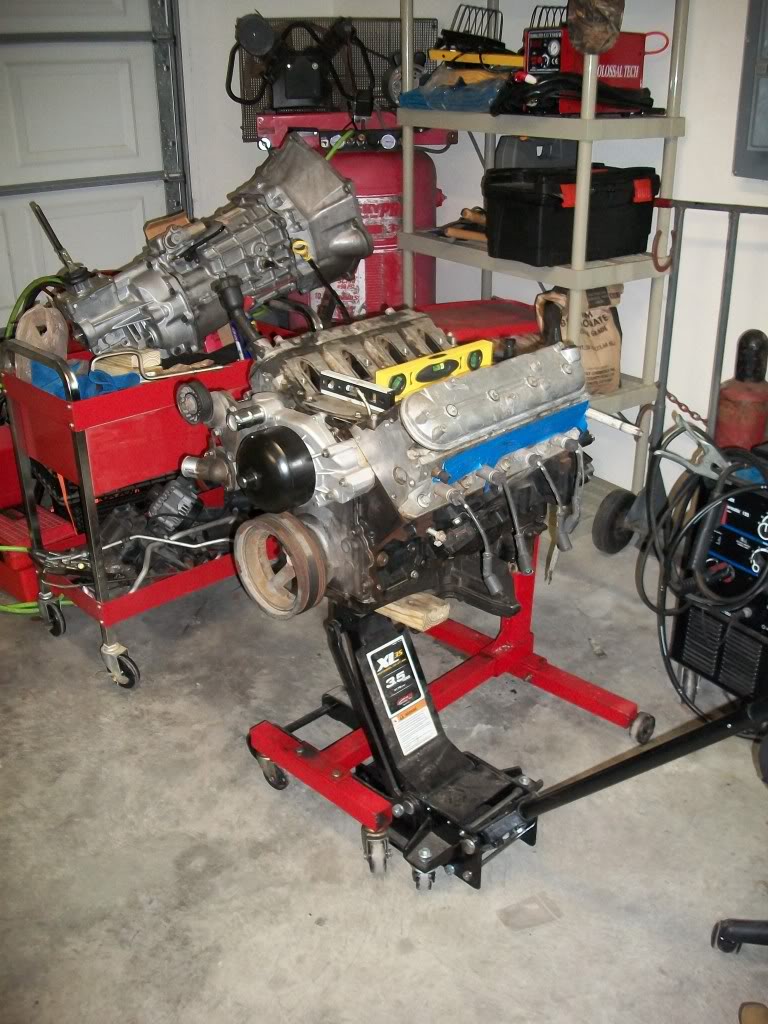
Engine stand (preferred).
Floor Jack and about a foot of 2x4
Good quality metal drilling bits (Sizes 1/8, and 5/16)
M10x1.50 Tap
Cutting oil, honing oil, or jack oil. Has to be light enough weight to be easily squirted into the hole. I generally suggest against drilling and tapping with WD40, but it can work in a pinch.
Variable speed Drill with bubble level on top. A High torque drill is suggested, but not necessary.
Two small or bullet levels.
Paint or dimple punch.
Digital or manual Caliper.
Adjustable wrench.
Replacement bracket, or after market bracket and hardware.
I suggest doing this with the engine out of the car if possible. When I did this mine was on an engine stand.
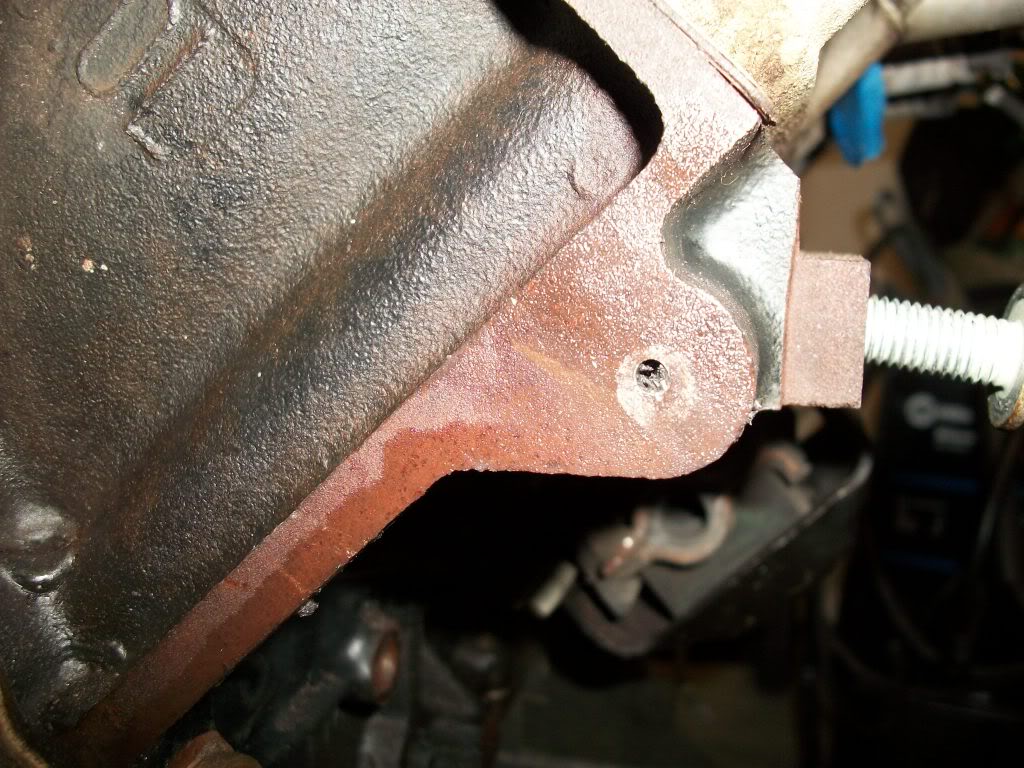
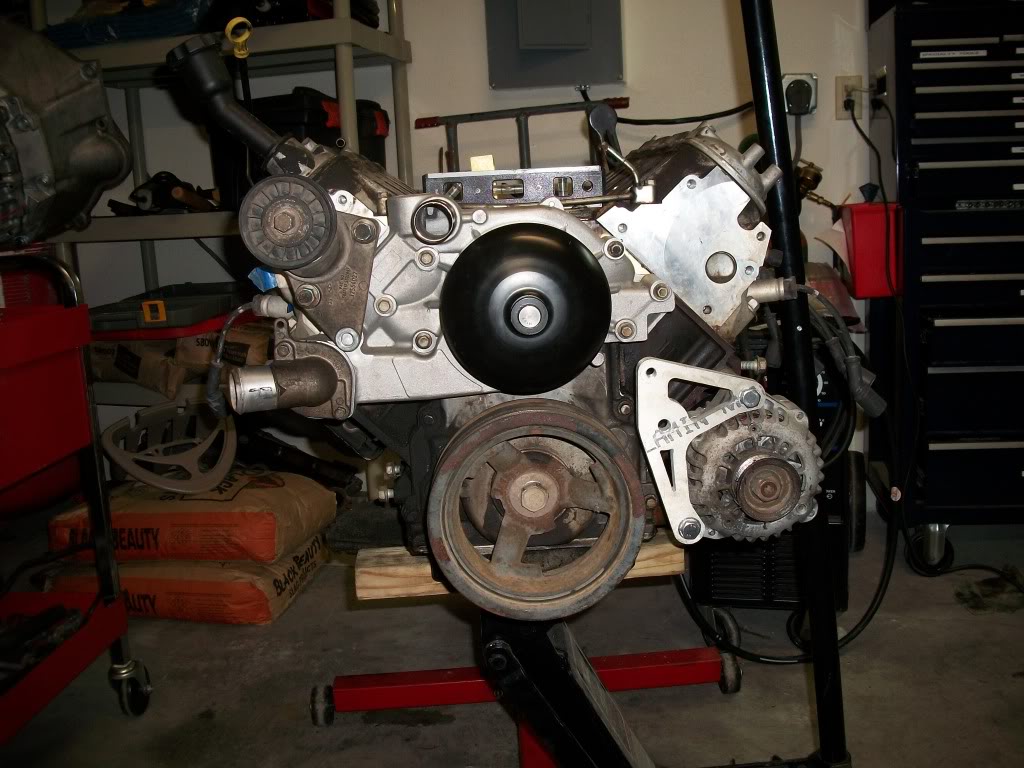
1) Start by removing the intake manifold, and the previous alternator bracket and power steering pump.
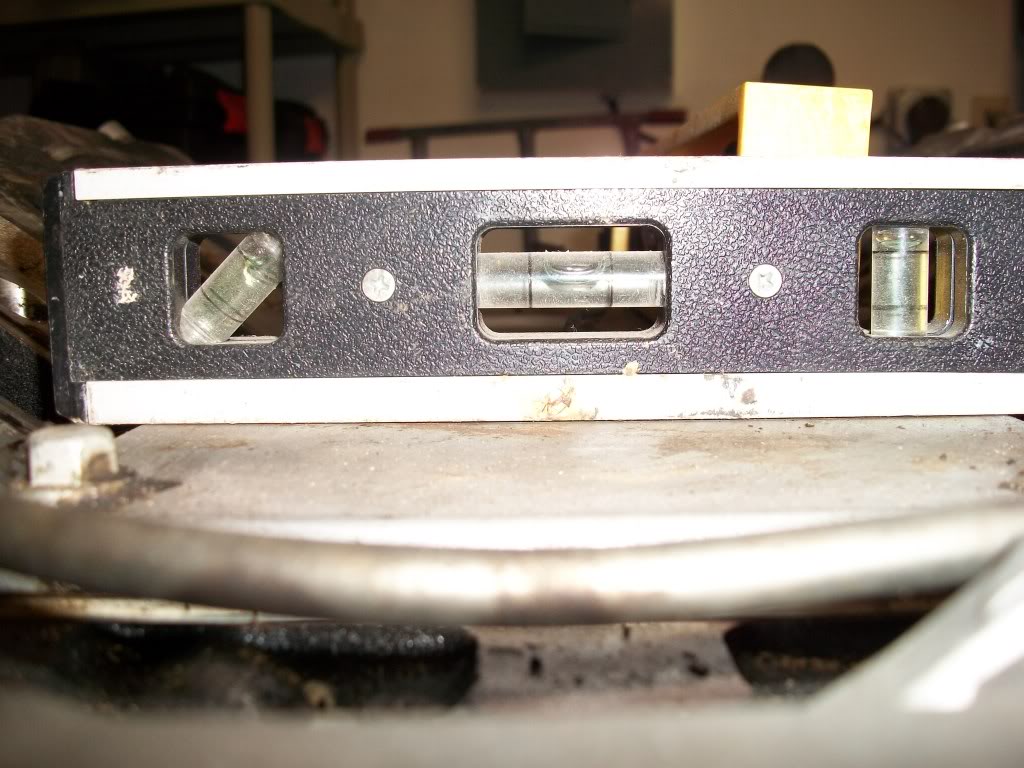
2) Place the two levels on the valley pan. One going front to back, and the other going from side to side.
3) Using the jack and the 2x4 jack the front of the engine up till both levels even out.
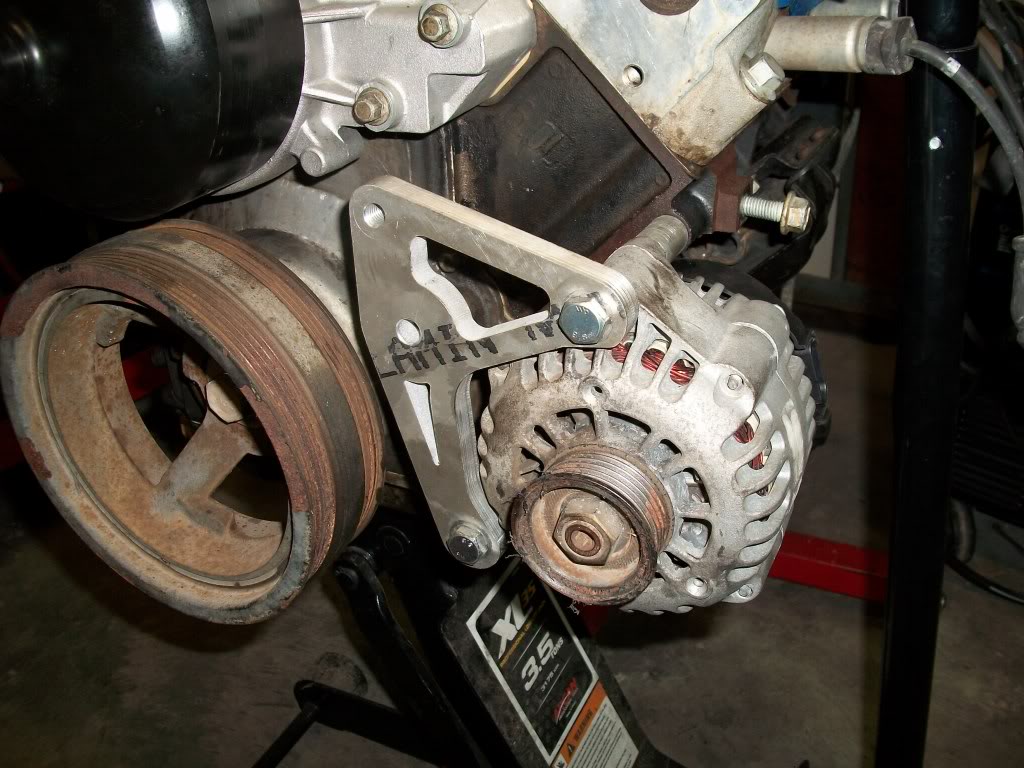
4) Take the alternator, and bracket and mount it into the bottom hole tightly. This should allow the alternator and bracket to move, but not completely fall down.
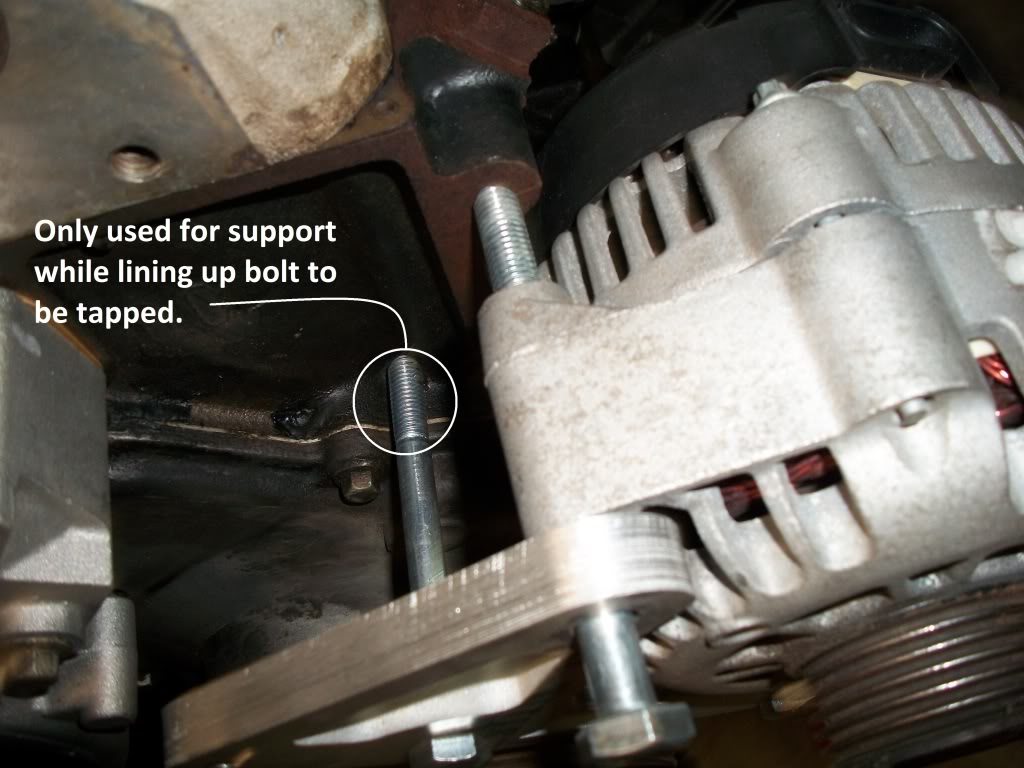
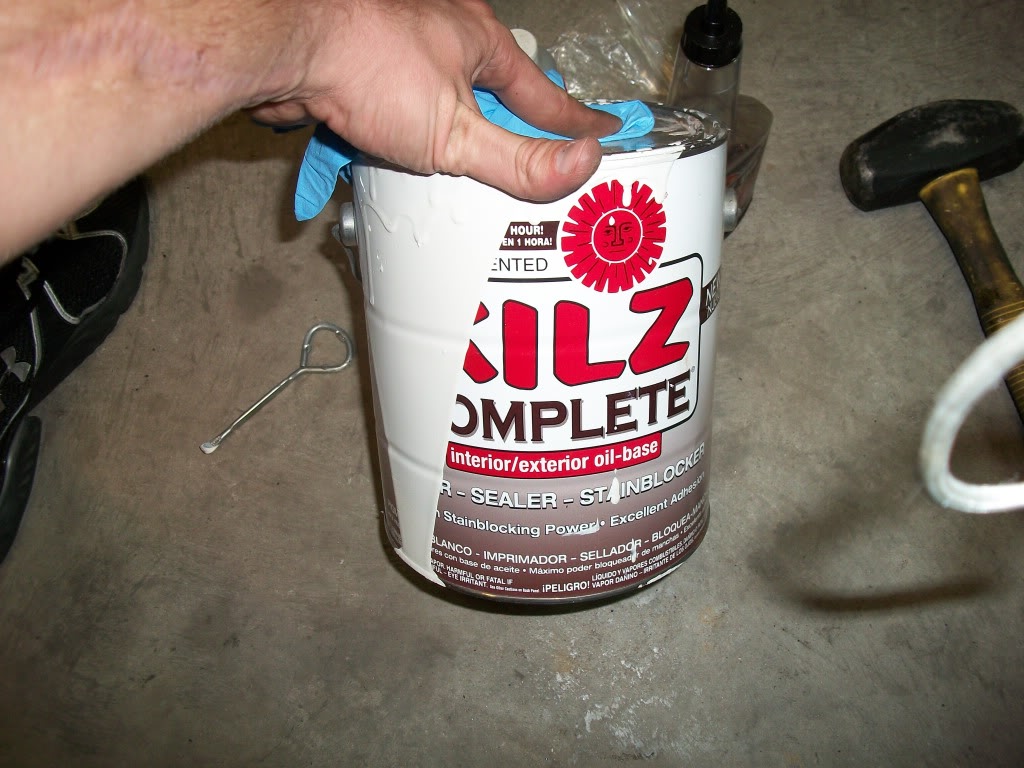
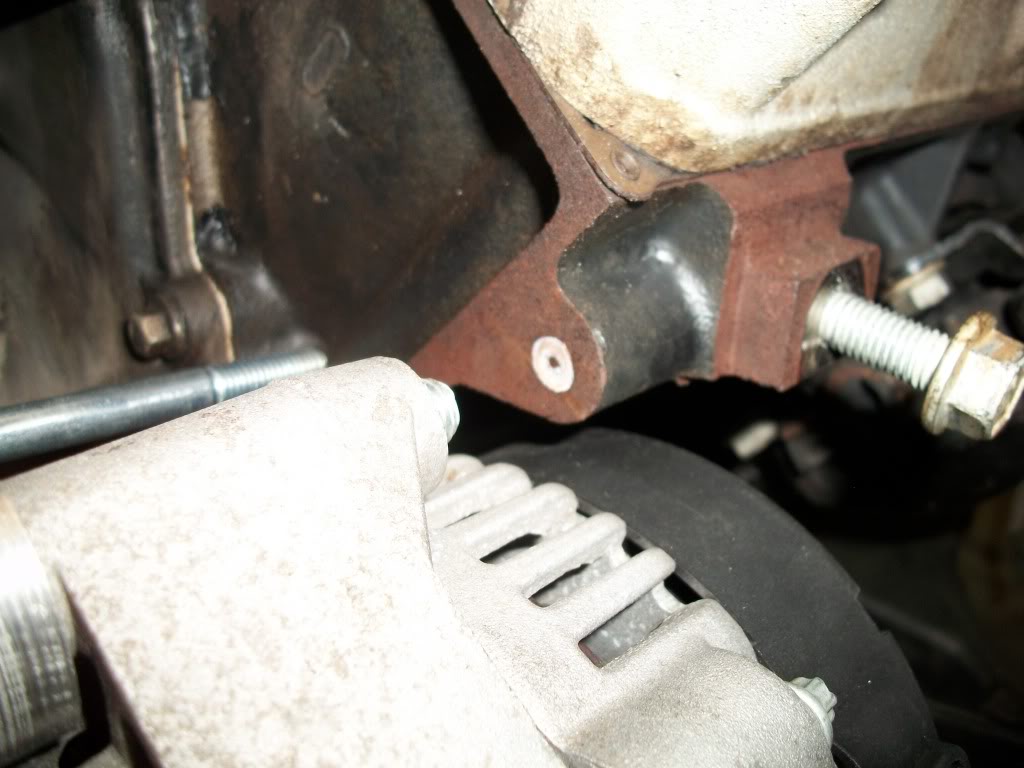
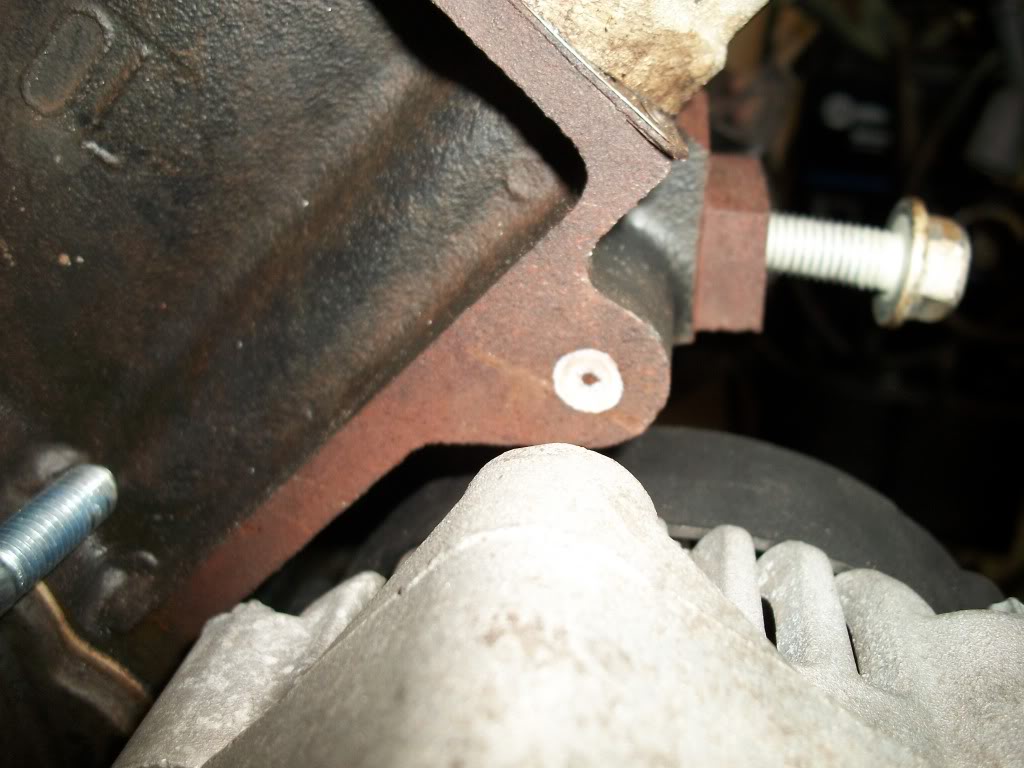
5) Using either the punch, or some old latex house paint mark where the hole needs to be. I place a small dab of Kilz primer I had left over in the garage on the bottom of the alternator bracket bolt and put it through.
6) Remove the alternator and bracket from the engine.
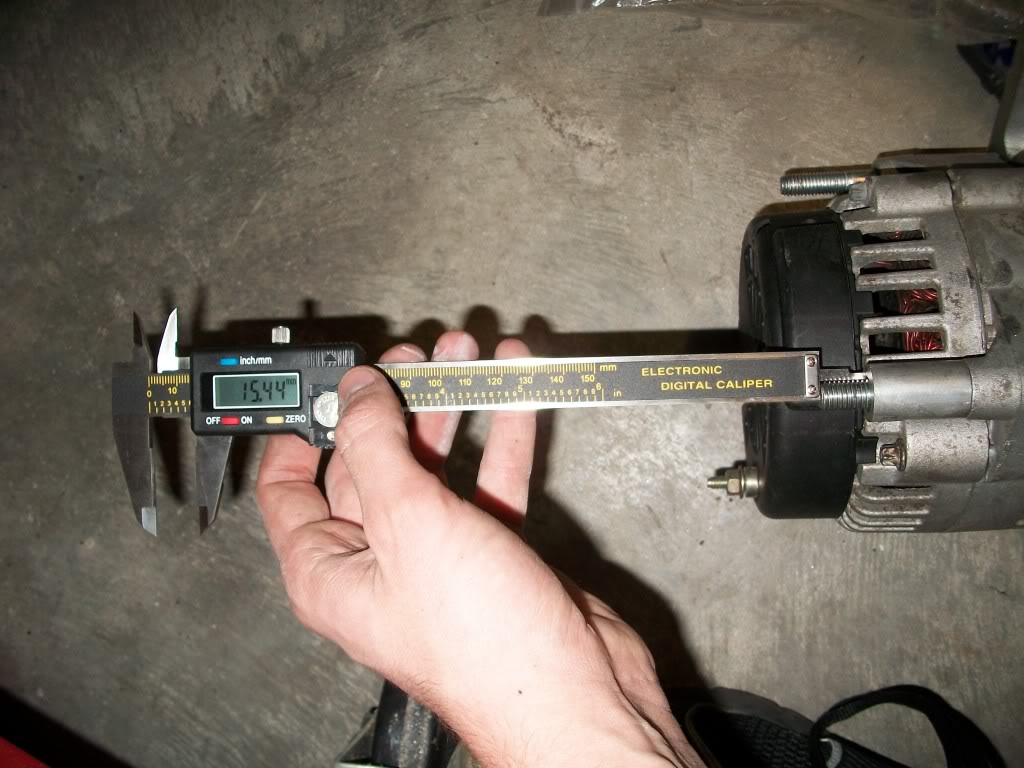
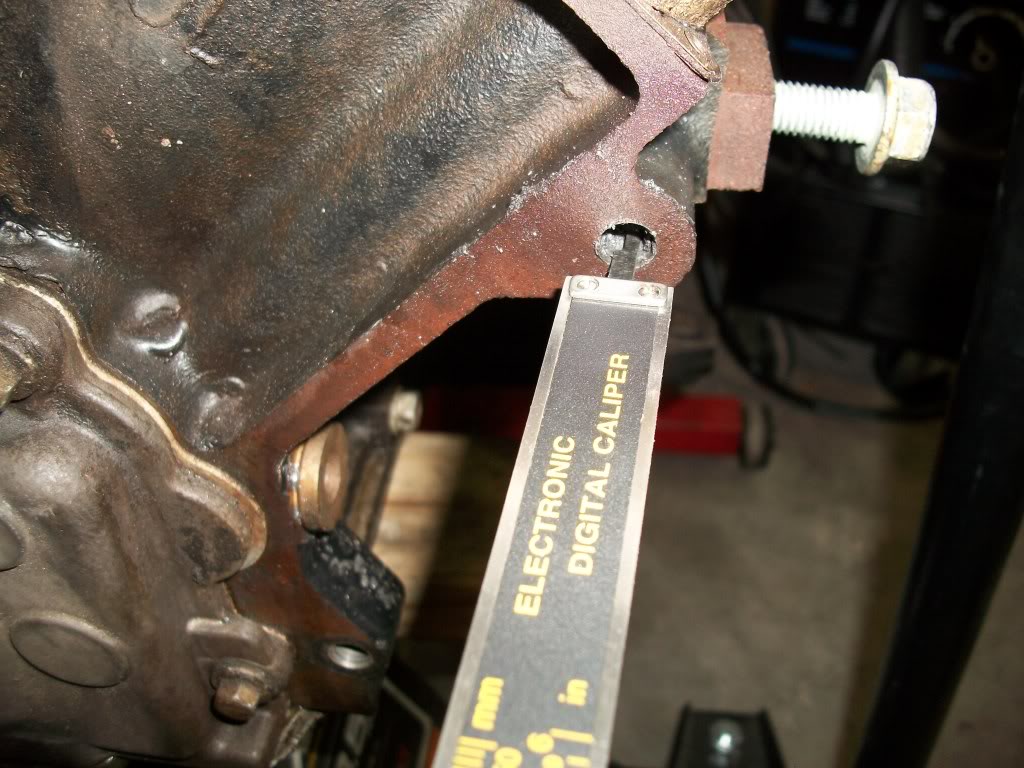
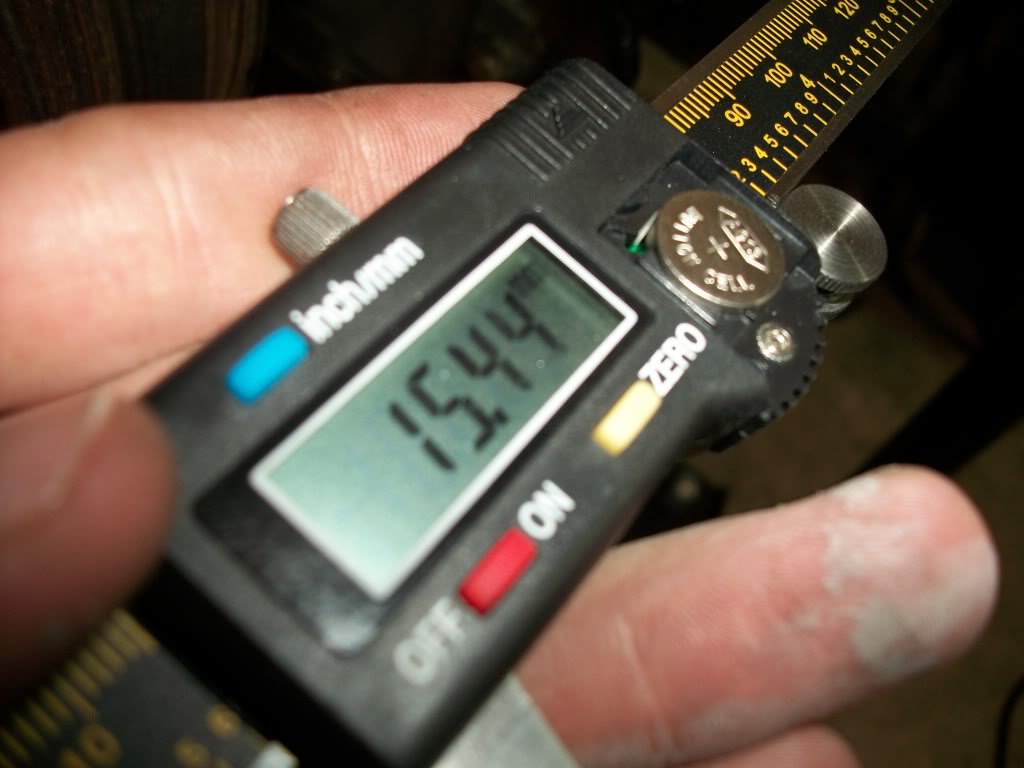
7) Measure the depth of thread needed to be drilled using the bottom of the caliper.
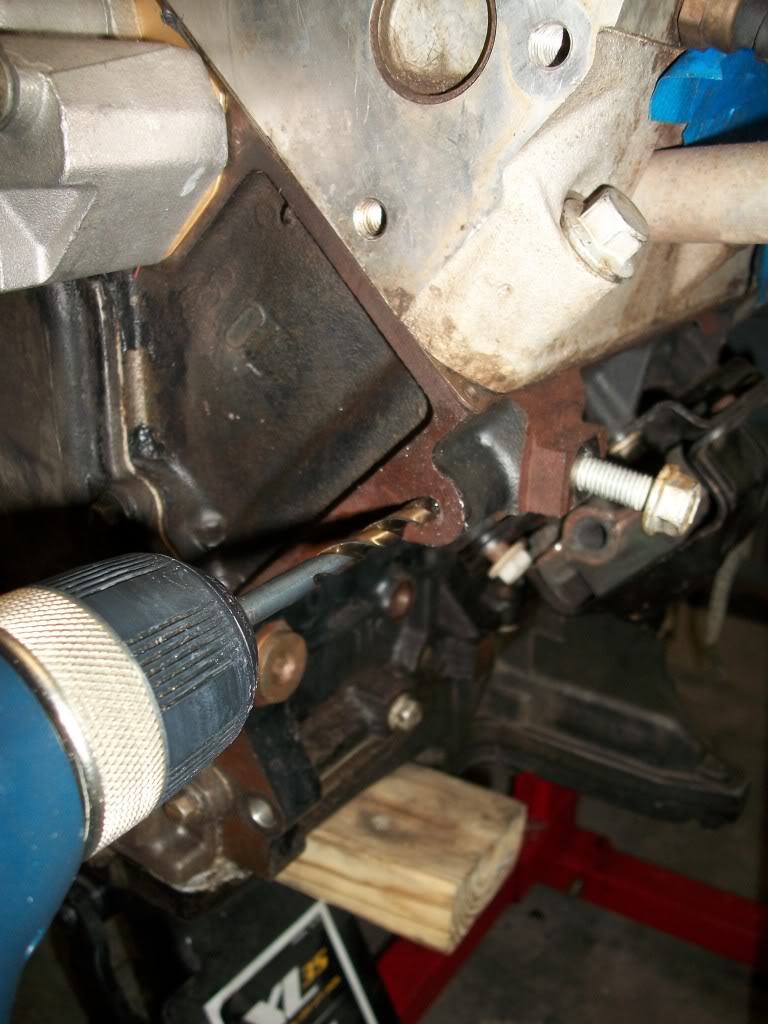
8) Start a pilot hole with the 1/8 drill bit. Make sure to apply oil to the bit before, and periodically during drilling. Also, go slow as to not burn up the drill bit, and make sure that the drill is level.
9) Once the pilot hole is started move up to the 5/16 drill bit and repeat the process. I kept the drill level by pushing my thighs up against the back of the drill, and operated it with one hand. The other hand went to the back of the block to supply more force. This worked for me.
10) Using the calipers again measure the depth of the hole. It took me a few times to get it right, but I ended up get a perciss measurement.
Exact measurements from before.
11) Oil the tap, and the hole in the engine block. Start slow using either the handle that came with the tap, or an adjustable wrench. I just bought the bit and the wrench worked wonders.
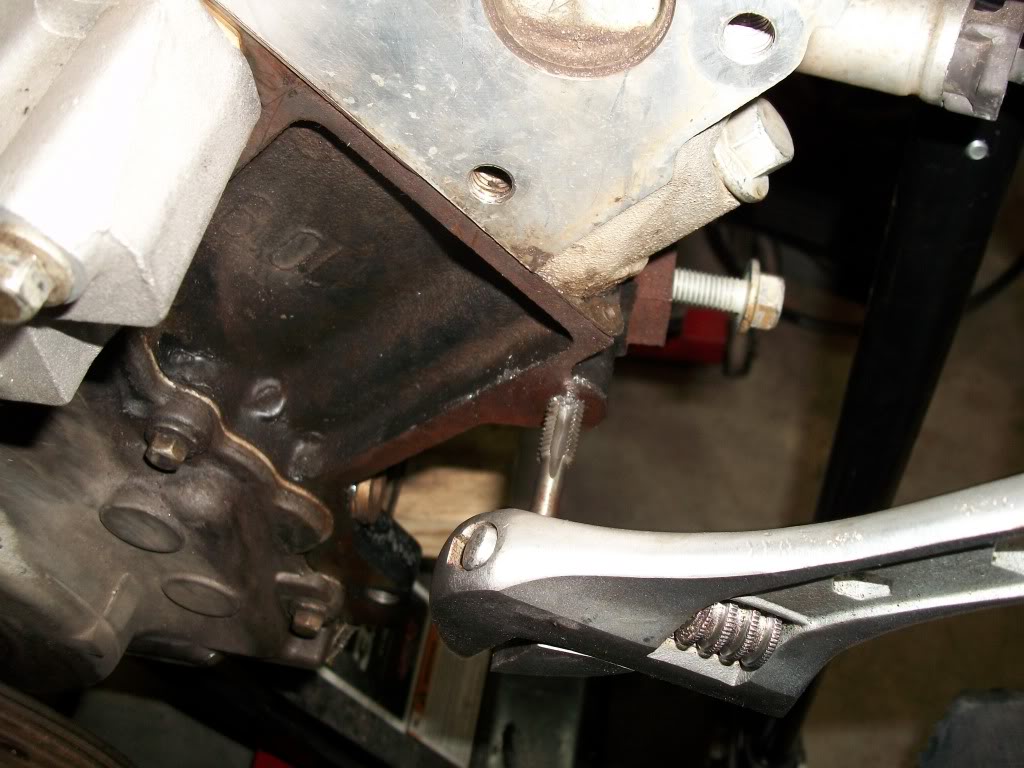
DO NOT USE A DRILL.
Tapping the block shouldn't be done to quickly. Take your time.
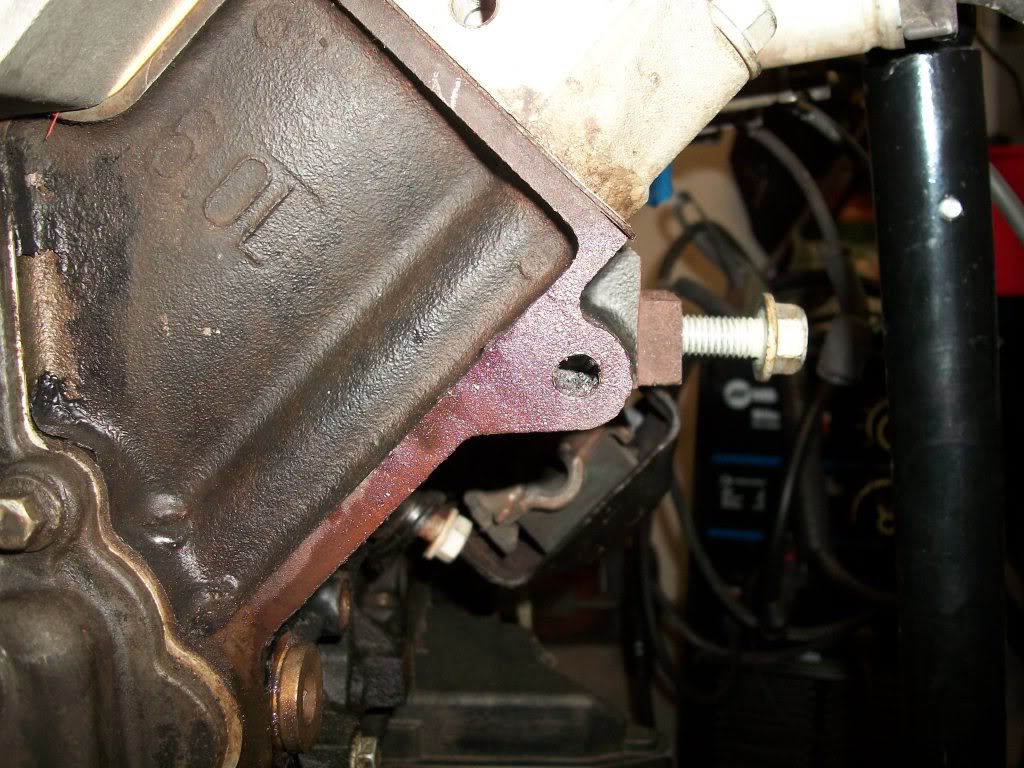
12) Once the hole has been tapped do a trial treading with a bolt from the bracket kit. If it fits properly than bolt the alternator and bracket up.
13) Profit.

Just a note the truck harmonic balancer wouldn't line up with the alternator setup I used. Using an f-body or Gto balancer solves this problem. New from Autozone for $60.
Hopefully this helps. Let me know if there is anything I can do to improve this write up.
DP
I decided to make a guide to drilling and tapping the extra hole needed to low mount an alternator on either the lq4 or lq9. This should also work for the 4.8 or 5.3 vortex engines, but always make sure to double check before beginning any modification of your engine block. There seemed to be a lot of questions about this, but mostly vague descriptions of how to do this.
Unlike their aluminum block brothers the Vortex engine series was missing this one hole for an alternator down low.
Tools Needed:
Engine stand (preferred).
Floor Jack and about a foot of 2x4
Good quality metal drilling bits (Sizes 1/8, and 5/16)
M10x1.50 Tap
Cutting oil, honing oil, or jack oil. Has to be light enough weight to be easily squirted into the hole. I generally suggest against drilling and tapping with WD40, but it can work in a pinch.
Variable speed Drill with bubble level on top. A High torque drill is suggested, but not necessary.
Two small or bullet levels.
Paint or dimple punch.
Digital or manual Caliper.
Adjustable wrench.
Replacement bracket, or after market bracket and hardware.
I suggest doing this with the engine out of the car if possible. When I did this mine was on an engine stand.
1) Start by removing the intake manifold, and the previous alternator bracket and power steering pump.
2) Place the two levels on the valley pan. One going front to back, and the other going from side to side.
3) Using the jack and the 2x4 jack the front of the engine up till both levels even out.
4) Take the alternator, and bracket and mount it into the bottom hole tightly. This should allow the alternator and bracket to move, but not completely fall down.
5) Using either the punch, or some old latex house paint mark where the hole needs to be. I place a small dab of Kilz primer I had left over in the garage on the bottom of the alternator bracket bolt and put it through.
6) Remove the alternator and bracket from the engine.
7) Measure the depth of thread needed to be drilled using the bottom of the caliper.
8) Start a pilot hole with the 1/8 drill bit. Make sure to apply oil to the bit before, and periodically during drilling. Also, go slow as to not burn up the drill bit, and make sure that the drill is level.
9) Once the pilot hole is started move up to the 5/16 drill bit and repeat the process. I kept the drill level by pushing my thighs up against the back of the drill, and operated it with one hand. The other hand went to the back of the block to supply more force. This worked for me.
10) Using the calipers again measure the depth of the hole. It took me a few times to get it right, but I ended up get a perciss measurement.
Exact measurements from before.
11) Oil the tap, and the hole in the engine block. Start slow using either the handle that came with the tap, or an adjustable wrench. I just bought the bit and the wrench worked wonders.
DO NOT USE A DRILL.
Tapping the block shouldn't be done to quickly. Take your time.
12) Once the hole has been tapped do a trial treading with a bolt from the bracket kit. If it fits properly than bolt the alternator and bracket up.
13) Profit.
Just a note the truck harmonic balancer wouldn't line up with the alternator setup I used. Using an f-body or Gto balancer solves this problem. New from Autozone for $60.
Hopefully this helps. Let me know if there is anything I can do to improve this write up.
DP
Last edited by dp.drift; 05-26-2011 at 07:25 AM.

 05-27-2011, 10:32 AM
#3
Teching In
Thread Starter
iTrader: (2)
Join Date: Apr 2010
Posts: 13
Likes: 0
Received 0 Likes
on
0 Posts
Not sure what route I'm going with the belt path. I wanted to mount the alternator down low since I can't use the truck's placement in the swap. This going into an 88 rx7. I may run ac, but I'm definitely not running power steering. I might need to make a custom pulley step for the top. Once again, not sure. I mainly wanted to do this write up since there wasn't one out there.
 05-27-2011, 08:52 PM
#5

Excellent write up, no doubt this will be a great reference for many.
That being said, I would never suggest using a wrench to turn a tap, especially when cutting new threads. I've seen too many broken taps result from this process. Do yourself a favor and spend the 10 bucks on a tap handle. It'll probably be one of those tools that spends 99.9% of its life in the toolbox but they're worth every penny. They're much cheaper than tap extractor sets, easy outs, drill bits,..... all those things you'll tear up after the tap breaks.
That being said, I would never suggest using a wrench to turn a tap, especially when cutting new threads. I've seen too many broken taps result from this process. Do yourself a favor and spend the 10 bucks on a tap handle. It'll probably be one of those tools that spends 99.9% of its life in the toolbox but they're worth every penny. They're much cheaper than tap extractor sets, easy outs, drill bits,..... all those things you'll tear up after the tap breaks.
05-28-2011, 06:19 AM
#6
Excellent write up, no doubt this will be a great reference for many.
That being said, I would never suggest using a wrench to turn a tap, especially when cutting new threads. I've seen too many broken taps result from this process. Do yourself a favor and spend the 10 bucks on a tap handle. It'll probably be one of those tools that spends 99.9% of its life in the toolbox but they're worth every penny. They're much cheaper than tap extractor sets, easy outs, drill bits,..... all those things you'll tear up after the tap breaks.
That being said, I would never suggest using a wrench to turn a tap, especially when cutting new threads. I've seen too many broken taps result from this process. Do yourself a favor and spend the 10 bucks on a tap handle. It'll probably be one of those tools that spends 99.9% of its life in the toolbox but they're worth every penny. They're much cheaper than tap extractor sets, easy outs, drill bits,..... all those things you'll tear up after the tap breaks.
08-28-2011, 11:07 AM
#7
Teching In

Join Date: Feb 2011
Posts: 9
Likes: 0
Received 0 Likes
on
0 Posts
I put a 3/8 bolt in mine. a 3/8 center drill goes a long way towards making shure the placement is perfect. also on the engine block I prefer a "gun tap" (two flutes) they are alot less prone to breakage
Trending Topics
 08-28-2011, 01:24 PM
#9

Great write up. I knew a hole had to be drilled and tapped, just didn't know which one. What aluminum bracket is that? Quick Performance?
08-28-2011, 02:59 PM
#11

Just a FYI to those following this article, you want to drill/tap deeper than the bolt thread, otherwise the bolt will bottom out before you have the alt tightened down. Theres nothing stopping you from drilling completely through the cast boss, no oil lines or water jackets to hit
01-07-2013, 12:33 AM
#13
Teching In
Join Date: Dec 2011
Posts: 37
Likes: 0
Received 0 Likes
on
0 Posts
great write up......your bracket looks the same as the ones i used on my setup from alpermotorsports.com they worked great and are cheap.....heres the link.
http://www.alpermotorsports.com/inde...duct_list&c=46
http://www.alpermotorsports.com/inde...duct_list&c=46


