

turbo 5.3 s10 build
 09-30-2011, 09:05 PM
#41
TECH Apprentice
iTrader: (7)

Join Date: Apr 2005
Location: New Berlin Wi
Posts: 309
Likes: 0
Received 0 Likes
on
0 Posts

Did you ever get your manifold situation figured out? How about building a manifold out of weld els for one side. it would be thick enough to handle the heat daily and should be cheap to build.
Are you planning on driving this thing daily year around? I'm also in wisconsin, I'm building a 95 scabs box with a 6 liter and a t56. I'm planning on making it my year around daily.
Kory
Are you planning on driving this thing daily year around? I'm also in wisconsin, I'm building a 95 scabs box with a 6 liter and a t56. I'm planning on making it my year around daily.
Kory
 09-30-2011, 09:50 PM
#42
TECH Regular
Join Date: Jun 2011
Location: Milwaukee, Wi.
Posts: 420
Likes: 0
Received 0 Likes
on
0 Posts
I tried driving my s10 in Milwaukee winters, with 400lbs in the back, I was still sliding. Driving down I-94 in a snow storm was an interesting experience. Dimes are not good year round trucks unless they're 4x4
10-01-2011, 10:04 AM
#43
TECH Apprentice
iTrader: (7)
Join Date: Apr 2005
Location: New Berlin Wi
Posts: 309
Likes: 0
Received 0 Likes
on
0 Posts
My current dd is a 99 4.3/auto long box 2wd. I've been driving it year around for the last couple of winters. it gets the job done, while it's not the best winter driver. My project truck will step into the role of year around dd when its done. scab/sbox 2wd 6 liter /6speed. shooing for 450whp. snow will probably be a bit more of a problem.
10-01-2011, 10:47 AM
#44
Got all the parts in this past week besides the cam and got some work done getting ready for the cam swap.
the 160 degree powerstat, MSD 2 bar map sensor, spark plug air holder, and all the gaskets for the timing cover and water pump and such
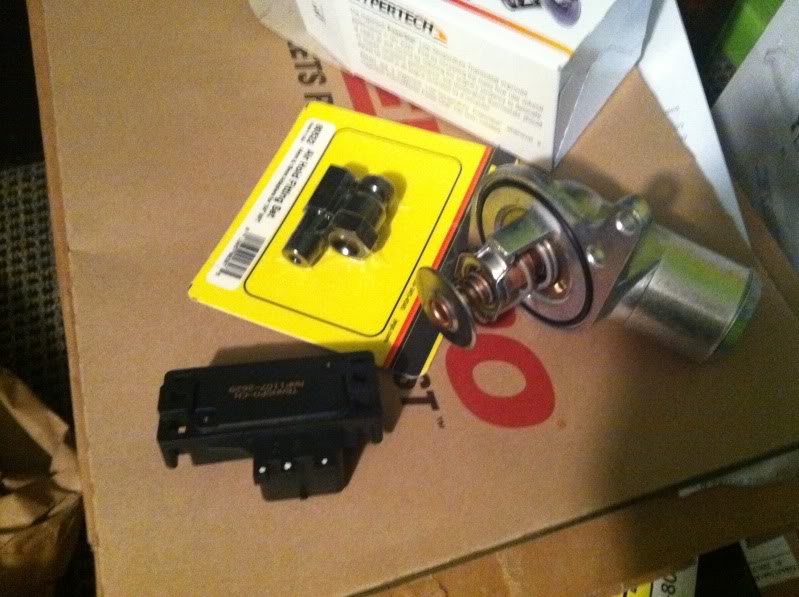
the muscle car oil pan kit

the taps and NPT threads for the oil pans feed/return lines to the turbo

the awesome $80 valve spring compressor tool. hate spending that much just for a tool

the ls6 valve springs. they switched from yellow to blue.

and the tr6's

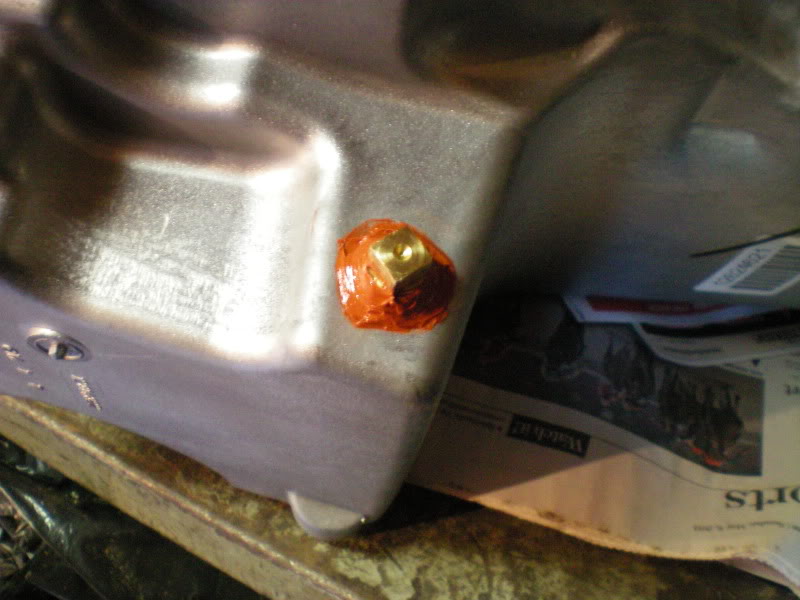
this is where i drilled out the pressurized oil pan fitting that i switched from the truck pan to the H3 pan. drilled it out, and tapped it with a npt fitting for the oil feed to the turbo

heres the oil drain line that i also tapped with an npt fitting. there wasnt enough wall to tap to so i kinda skrewed it into no threads. lets just say it aint coming out lol.

another shot of the 160 degree t-stat on the water pump

got the water pump off, nothing too amazing

probably the funnest part of the day. ripping this bitch *** harmonic balancer off. had to use a 5' breaker bar to get the bolt out and rented Oreilly's 3 jaw puller to pull it off. no fun
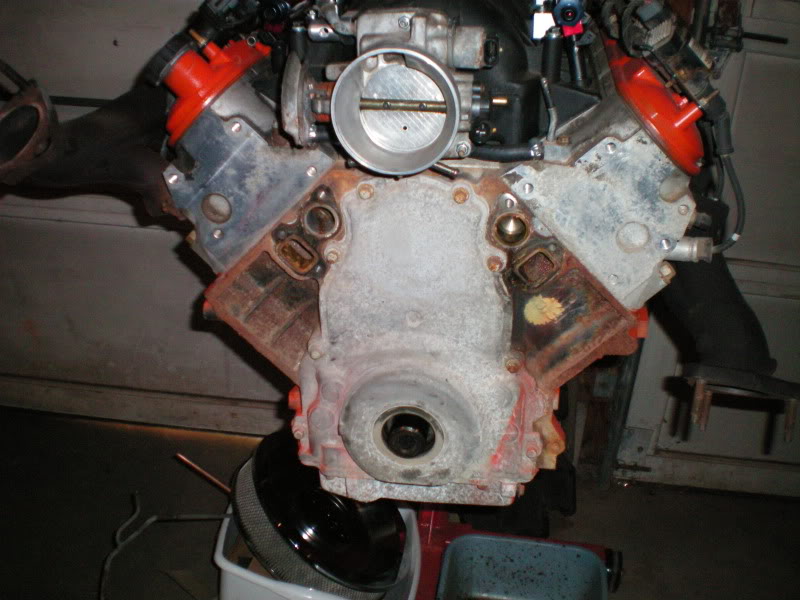
now the timing covers off. now just need to wait for the cam to come then everything else will be installed.

the painted timing cover

hopefully i can install the springs, cam, and oil pan next week and get this puppy back together
the 160 degree powerstat, MSD 2 bar map sensor, spark plug air holder, and all the gaskets for the timing cover and water pump and such
the muscle car oil pan kit
the taps and NPT threads for the oil pans feed/return lines to the turbo
the awesome $80 valve spring compressor tool. hate spending that much just for a tool
the ls6 valve springs. they switched from yellow to blue.
and the tr6's
this is where i drilled out the pressurized oil pan fitting that i switched from the truck pan to the H3 pan. drilled it out, and tapped it with a npt fitting for the oil feed to the turbo
heres the oil drain line that i also tapped with an npt fitting. there wasnt enough wall to tap to so i kinda skrewed it into no threads. lets just say it aint coming out lol.
another shot of the 160 degree t-stat on the water pump
got the water pump off, nothing too amazing
probably the funnest part of the day. ripping this bitch *** harmonic balancer off. had to use a 5' breaker bar to get the bolt out and rented Oreilly's 3 jaw puller to pull it off. no fun
now the timing covers off. now just need to wait for the cam to come then everything else will be installed.
the painted timing cover
hopefully i can install the springs, cam, and oil pan next week and get this puppy back together
10-01-2011, 10:54 AM
#45
Launching!

Join Date: Sep 2008
Posts: 273
Likes: 0
Received 0 Likes
on
0 Posts
your oil drain is wrong.... its way too low... being below the oil level, oil will back up the drain tube to the turbo, mines jsut under the rail (the top of the pan)..
http://www.youtube.com/watch?v=4965zkG0Z8w
heres mine.
ive driven it over 700 miles since finishing it a few weeks ago, its literally my only vehicle right now after selling my silverado.
ive had it up to 15 psi with race gas / pump mix.
zero traction on 15 and street tires...
small chance i might get to the track next saturday with it on drag radials...
10-01-2011, 11:31 AM
#46
Teching In

Join Date: May 2011
Posts: 19
Likes: 0
Received 0 Likes
on
0 Posts
& I'd strongly suggest NOT using barbed fittings for oil feed because if a hose pops off you could lose all of your oil
10-01-2011, 12:01 PM
#47
You know, I didn't even think of that until after I tapped it but I talked to a local and he said that it wouldn't matter. But it's better to be safe than sorry so I'll re tap one and just cap this one off or have someone weld it shut. Does it matter which part of the upper pan I tap into?
Why not those fittings? A hose clamp around it shouldn't leak
Why not those fittings? A hose clamp around it shouldn't leak
10-01-2011, 12:36 PM
#48
Launching!
Join Date: Sep 2008
Posts: 273
Likes: 0
Received 0 Likes
on
0 Posts
i would definately tap the drain higher, shouldnt matter where as long as it doesnt run right into anything on the inside of the pan..
for a the little added expense, i like the AN fittings and braided line.. stuff gets hot, like really hot on turbo cars... the clamp might keep it from leaking, but if the rubber line ever got too close or just from extended high temperatures decided to rupture... youve got a disaster on your hands...
for a the little added expense, i like the AN fittings and braided line.. stuff gets hot, like really hot on turbo cars... the clamp might keep it from leaking, but if the rubber line ever got too close or just from extended high temperatures decided to rupture... youve got a disaster on your hands...
10-01-2011, 06:16 PM
#51
If I could weld aluminum I would bit I dont wanna pay to get it welded. I think I'm gonna swap out the oil feed to an npt to an adaptor and run braided hose to it. Then put a block off npt fitting in that bottom one because I'm retarded then drill/tap a new one hole at the top for another npt to an adaptor. I can fix this.
10-01-2011, 06:56 PM
#53
Haha I appreciate it man if I weren't like 7 hours away I would. I'm up here in superior. Do you really think it would be a big deal to use the npt fittings like I have? I don't think it would leak though. But If I should get someone to weld it I can
10-01-2011, 07:21 PM
#54
TECH Apprentice
iTrader: (7)
Join Date: Apr 2005
Location: New Berlin Wi
Posts: 309
Likes: 0
Received 0 Likes
on
0 Posts
As long as it's secured so it can't come apart spilling oil all over the headers it will be ok. Also as previously mentioned the return must be above the oil level.
There is always more than one way to do something. just make sure you do it safely. Take a look at the way vortech plums return lines for their origional s trim supercharger kits (i've got one on my camaro) they punched a hole in the pan and epoxied a fitting into it. I bought my kit used and the bung had worked fine for the previous owner. I'm not sure the type of epoxy used. you could probably use something like that in addition to a few threads in the pan. should be fine.
Kory
10-01-2011, 08:20 PM
#55
Yeah those suckers are in there pretty damn good and they won't hit the headers. I shoulda thought about the return better before I tapped it but oh well now I know. I plan on switching locations of the return tomorrow morning and I was thinking on using a sealer also. How about the red rtv stuff used for gaskets?
10-01-2011, 08:23 PM
#56
TECH Regular
Join Date: Jun 2011
Location: Milwaukee, Wi.
Posts: 420
Likes: 0
Received 0 Likes
on
0 Posts
Very nice 91blowthru, nice to see the thing in action. Curious to see the numbers.
Damn Kory, feel bad for you living in New Berlin. I used to work in New Berlin, the cops there are dicks.
Damn Kory, feel bad for you living in New Berlin. I used to work in New Berlin, the cops there are dicks.
10-02-2011, 10:42 AM
#59
alright so i picked up another 3/8" - 18 npt fitting plug yesterday to plug up my mistake and i rtv'd the hell out of the outside of the fitting so i dont think it will leak lol
ok, so before i mess up again, i want all your input. which placement should i drill/tap the oil return for? #1, #2, or #3?
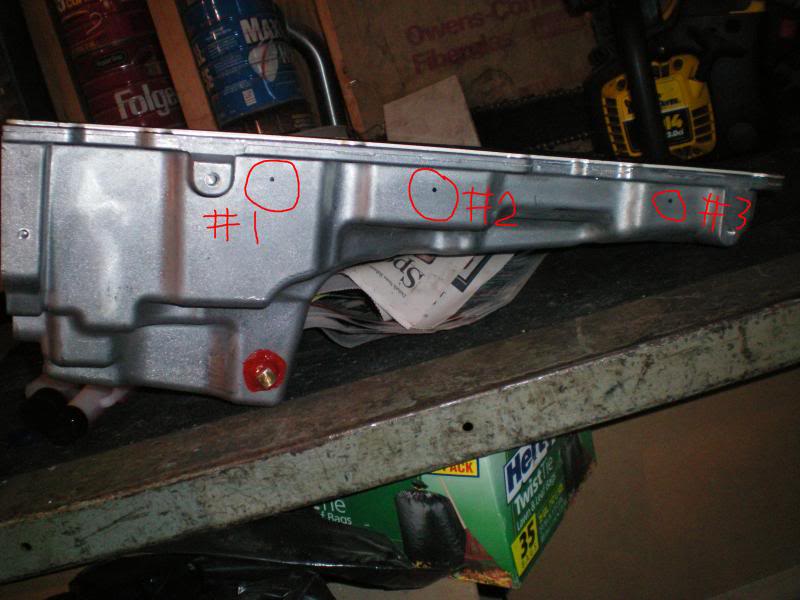

thanks for all your help i wouldnt be able to do this without you guys
I think I'm doing the #2 spot except a little more to the left. Don't want issues with being in the starters way in #1 Spot and don't want to have the same problem in my first tap as I might have in #3 spot.
ok, so before i mess up again, i want all your input. which placement should i drill/tap the oil return for? #1, #2, or #3?
thanks for all your help i wouldnt be able to do this without you guys
I think I'm doing the #2 spot except a little more to the left. Don't want issues with being in the starters way in #1 Spot and don't want to have the same problem in my first tap as I might have in #3 spot.
10-02-2011, 04:51 PM
#60
Launching!
iTrader: (6)
Join Date: Jan 2010
Location: MURICA
Posts: 251
Likes: 0
Received 0 Likes
on
0 Posts
i would def go with number three. cause it will be in the way of nothing and the oil will drain right back to the normal level. then you dont gotta worry bout it being the way of the starter. you could even put it in the front cover. those two spots i have used both and had no problems