Conversions & Swaps LSX Engines in Non-LSX Vehicles
Sponsored by:
Sponsored by:

6.0 in a 54 Chevy Bel Air

Thread Tools
 
Search this Thread
 
Old 09-25-2013, 02:35 PM
  #1  
On The Tree
Thread Starter
iTrader: (1)
 
Do Work 93YJ's Avatar
 
Join Date: Sep 2013
Location: Covington Ga
Posts: 130
Likes: 0
Received 0 Likes on 0 Posts
Default 6.0 in a 54 Chevy Bel Air

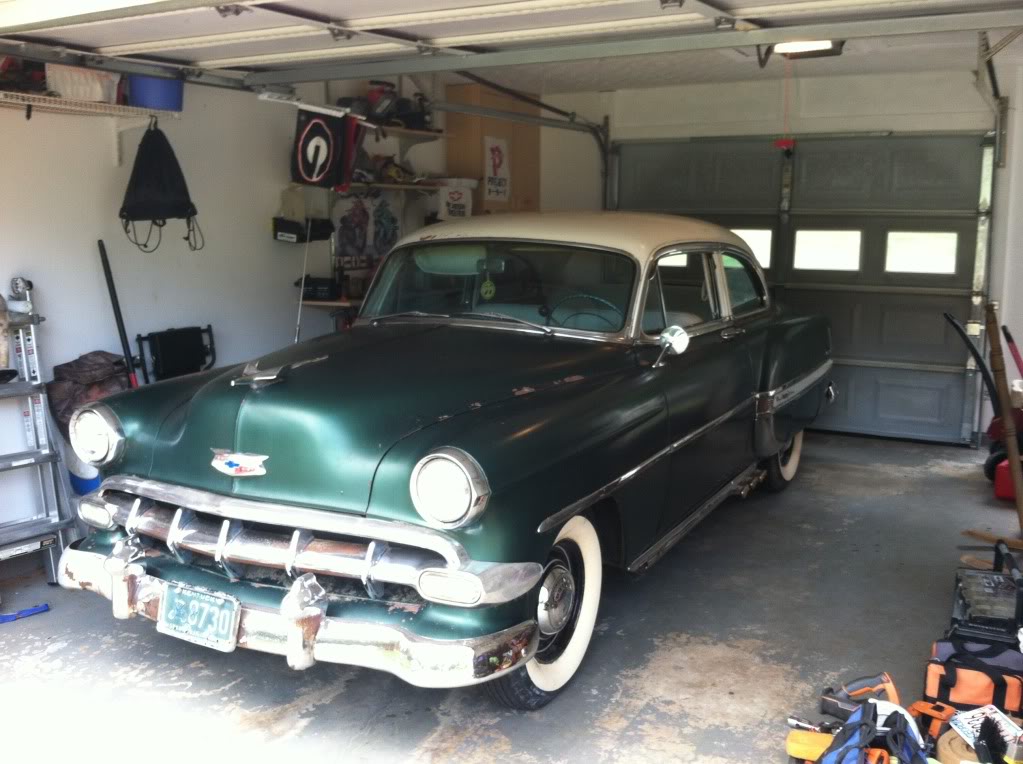
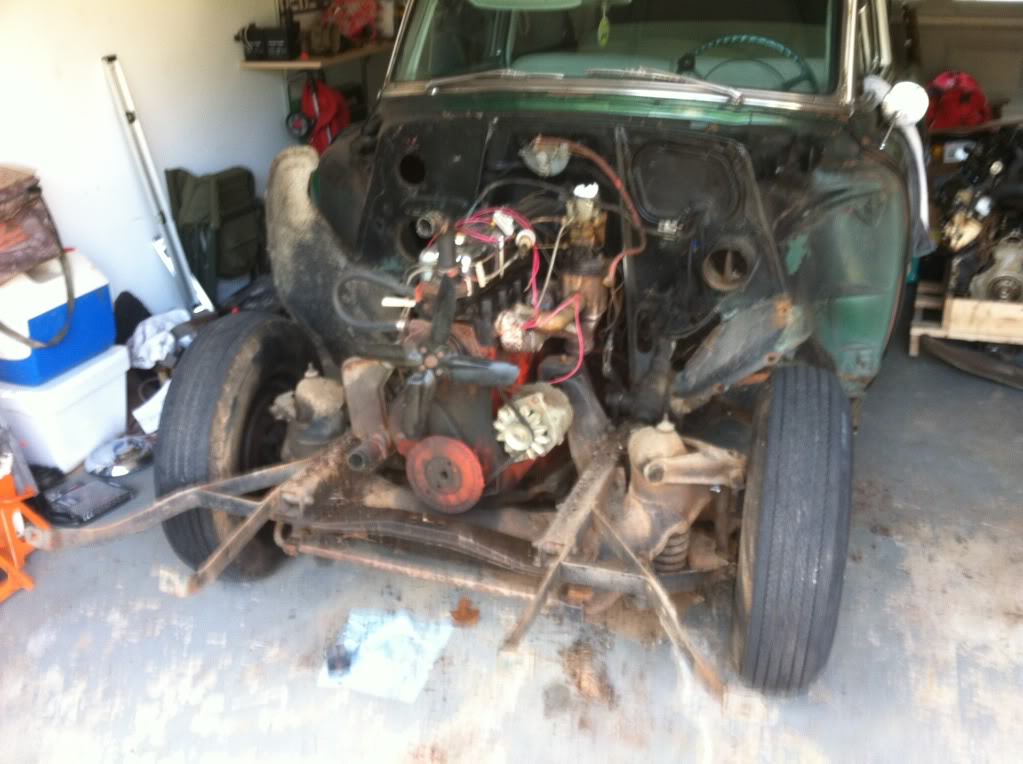
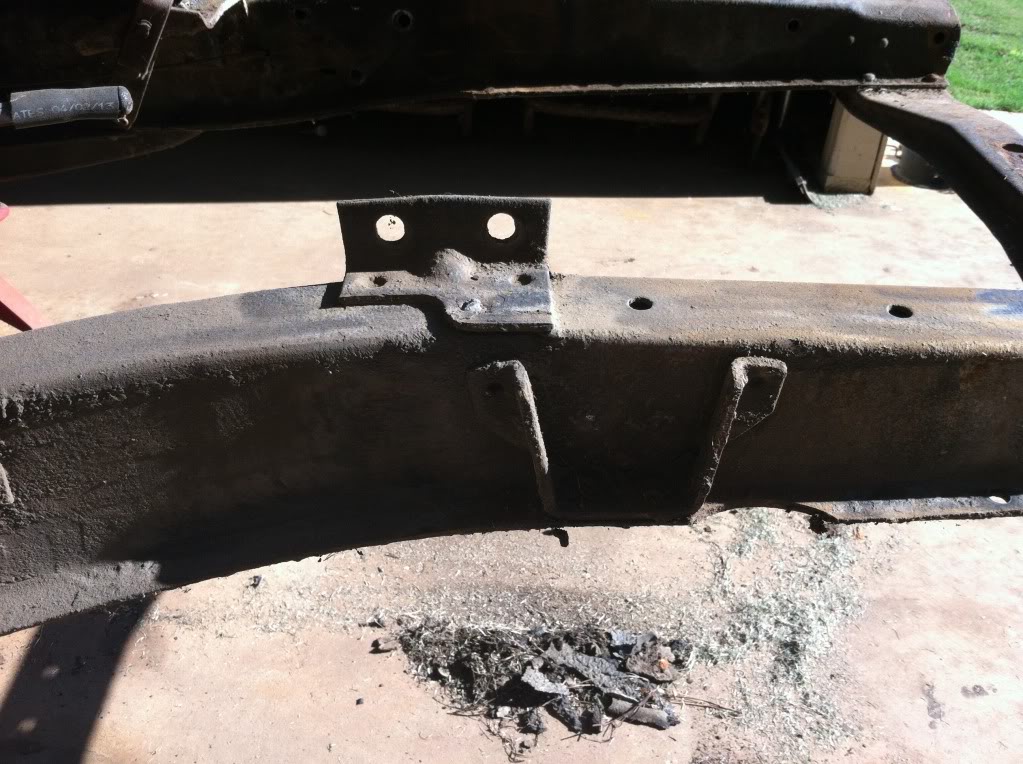
For the longest time I've wanted to install a 6.0 in an older car so the time finally came when I came across a really nice 54 Bel Air. It was a solid car with the old inline 6 that was needing some help bad so I got the car home and started tearing into it. First thing was to get the front end off and the old running gear out.
Name:  362D53C4-1F6D-437B-8021-8D3EF759926A-6077-00000564CF4E9E75_zps53b144cb.jpg
Views: 5256
Size:  112.6 KB
Name:  69A96975-C814-4992-AC40-86237A9ECA41-8961-0000084C28A2887E_zps668e8a03.jpg
Views: 4616
Size:  97.1 KB
Name:  45B26DAF-16E7-4387-AFCE-8BD642CF32E1-8961-0000084BF3489C47_zpsdce9c1f7.jpg
Views: 2907
Size:  122.1 KB
Name:  4C63E79B-1E3F-42D1-88C6-CC48E74ADB6A-14045-00000D1C2C8EF8A6_zps8574aaf4.jpg
Views: 4429
Size:  101.1 KB
Old 09-25-2013, 02:41 PM
  #2  
On The Tree
Thread Starter
iTrader: (1)
 
Do Work 93YJ's Avatar
 
Join Date: Sep 2013
Location: Covington Ga
Posts: 130
Likes: 0
Received 0 Likes on 0 Posts
Default

Started gathering parts.
6.0
Name:  3973092A-0BEF-43AC-BFCB-5BFC239BEFCD-6077-00000564DFEC1C67_zps5e5d67ed.jpg
Views: 2470
Size:  152.9 KB
MII front clip, air bags, and all the goodies to go along.
Name:  D96E0F29-5789-481E-A326-CEBC8F4C0E02-6782-0000059F6FAB9147_zpsf5786ab4.jpg
Views: 2475
Size:  96.0 KB
2000 S-10 4x4 blazer rear axle and springs
Name:  750255F5-5C33-4F14-9A36-0136471F6C09-11150-00000B34DDC6C8BD_zps101b9241.jpg
Views: 3504
Size:  137.6 KB
Old 09-25-2013, 02:50 PM
  #3  
On The Tree
Thread Starter
iTrader: (1)
 
Do Work 93YJ's Avatar
 
Join Date: Sep 2013
Location: Covington Ga
Posts: 130
Likes: 0
Received 0 Likes on 0 Posts
Default

Removed all the old suspension.
Name:  A054AFE6-16B8-4644-BBAF-1F4360D28209-17063-00000FFE96D560A4_zpsf1f30197.jpg
Views: 2479
Size:  119.6 KB
Name:  0AEC6259-A454-43B7-832B-7BB7A7DDEC4B-17063-00000FFE8D36E87C_zpsec754451.jpg
Views: 2496
Size:  125.1 KB
Name:  49DC50D9-8369-4729-813E-314AA4085F3C-6782-0000059F53429ED4_zps6269ba35.jpg
Views: 2412
Size:  219.0 KB
Name:  240B911C-25DF-48C6-AB01-F1D43ABC5B96-6782-0000059F5CD2DCF7_zps7715f98c.jpg
Views: 2449
Size:  71.5 KB
Old 09-25-2013, 02:53 PM
  #4  
TECH Regular
iTrader: (2)
 
loweredd's Avatar
 
Join Date: Oct 2004
Location: Struble, IA
Posts: 443
Likes: 0
Received 0 Likes on 0 Posts

Default

Whoa! Subscribed.
Old 09-25-2013, 02:57 PM
  #5  
TECH Addict
iTrader: (17)
 
AnotherWs6's Avatar
 
Join Date: Sep 2012
Location: Westchester, NY
Posts: 2,672
Likes: 0
Received 36 Likes on 30 Posts

Default

Def some cringing at tearing and hacking such a nice original car, but yeah subscribed.
Old 09-25-2013, 09:11 PM
  #6  
On The Tree
Thread Starter
iTrader: (1)
 
Do Work 93YJ's Avatar
 
Join Date: Sep 2013
Location: Covington Ga
Posts: 130
Likes: 0
Received 0 Likes on 0 Posts
Default

Thanks and I've never been a big fan of leaving cars original I always think there's room for improvements and creativity.
Old 09-25-2013, 09:18 PM
  #7  
On The Tree
Thread Starter
iTrader: (1)
 
Do Work 93YJ's Avatar
 
Join Date: Sep 2013
Location: Covington Ga
Posts: 130
Likes: 0
Received 0 Likes on 0 Posts
Default

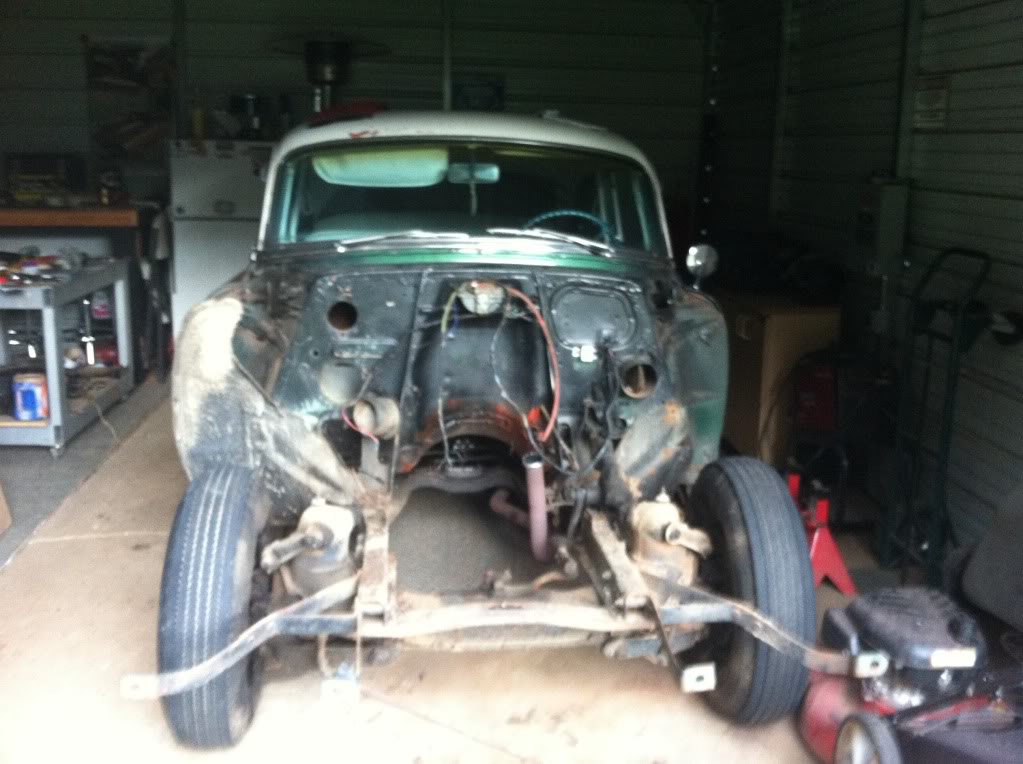
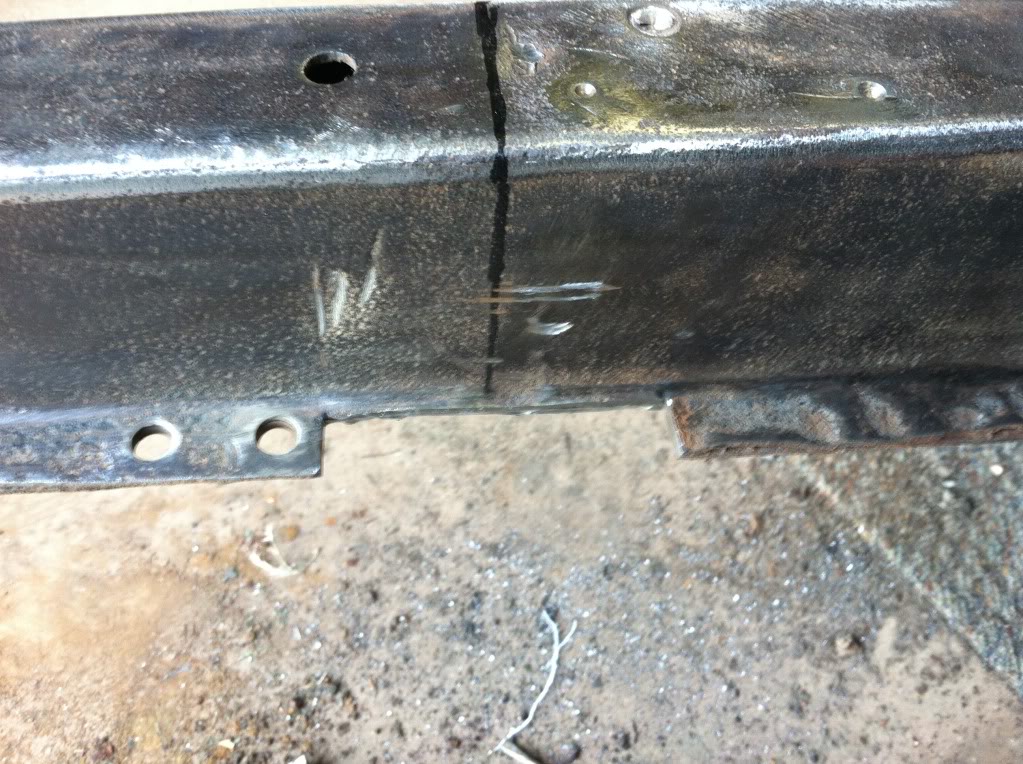
Now it was time to start installing the MII front clip. Started by cutting out the old motor and suspension mounts and then making lines for the center of the new crossmember.
Name:  80B554DC-AFF0-48E1-A8F4-EF6422D38BE2-17826-00001085A8569D8B_zpsc609003d.jpg
Views: 2583
Size:  149.8 KB
Name:  5B77BEAB-AA76-44B6-B0EA-2912F5A7C8A5-17826-00001085B1127460_zps942ce745.jpg
Views: 2497
Size:  116.1 KB

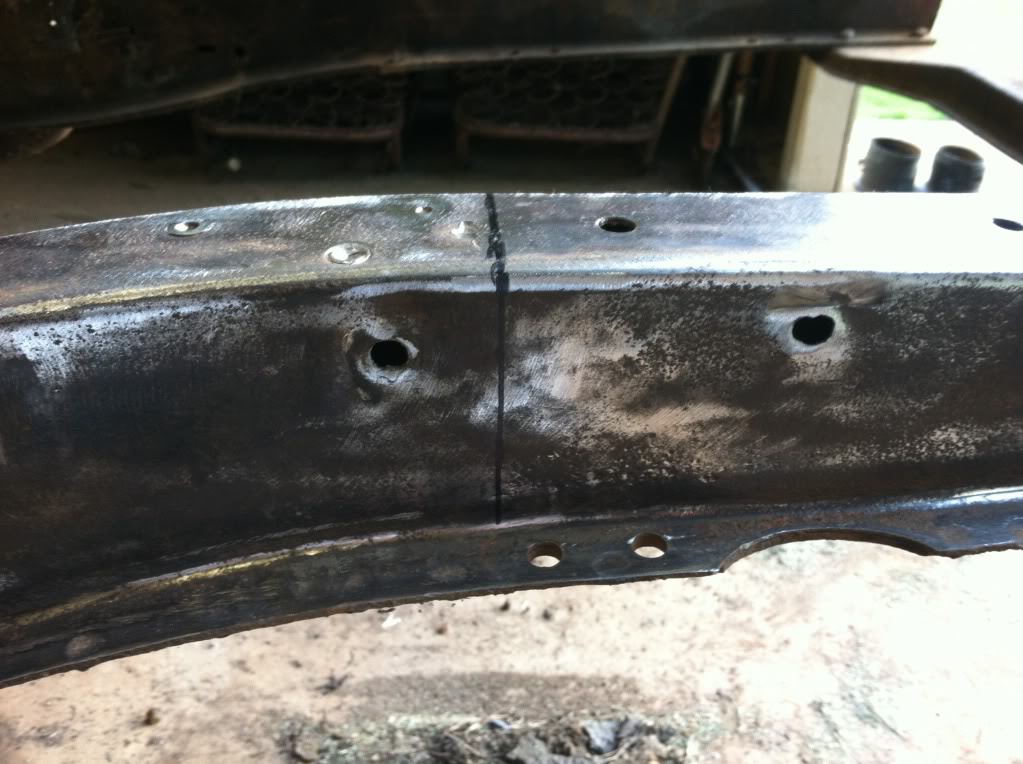
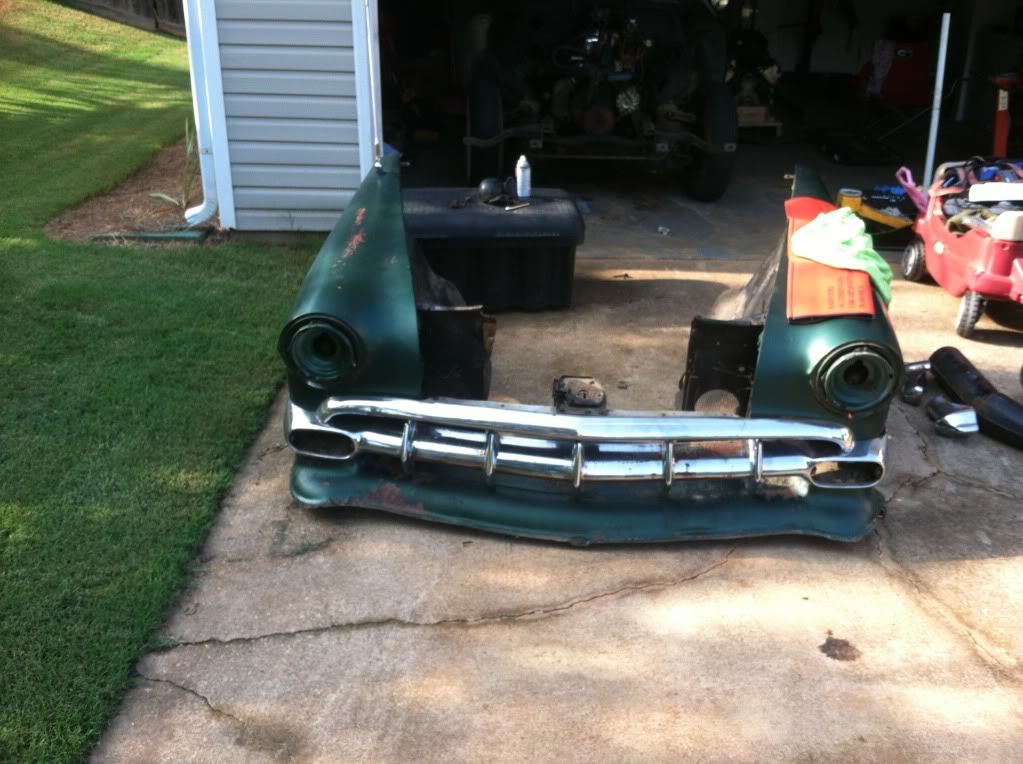
Had to cut the outside flange off for the crossmember to clear.
Name:  85302F2F-DC88-44DE-BE8D-B0FB2EB5C8FC-17826-00001085C7EB956A_zps7400c202.jpg
Views: 2423
Size:  181.8 KB
Old 09-25-2013, 09:25 PM
  #8  
On The Tree
Thread Starter
iTrader: (1)
 
Do Work 93YJ's Avatar
 
Join Date: Sep 2013
Location: Covington Ga
Posts: 130
Likes: 0
Received 0 Likes on 0 Posts
Default

After that I worked the crossmember till it was centered and square and burned it in.
Name:  BE7BECE1-0E00-478E-9677-A5ED438E673E-17826-00001085D5F63E58_zps0cdff905.jpg
Views: 2468
Size:  67.7 KB
Name:  E8996968-58CE-4427-8807-F824A530DB33-17826-00001085E2EF2529_zps75cf0e90.jpg
Views: 2423
Size:  84.2 KB

Then laid out the upper tower and tacked it in
Name:  851837DB-431A-473B-8558-15A56B5F9951-17826-00001085EA64CC66_zpsc9c2a997.jpg
Views: 2447
Size:  90.2 KB
Name:  7A1B60E9-9409-4655-BAB3-BFF0F652D959-17826-00001085F44EBCFB_zpsc4377fec.jpg
Views: 2406
Size:  71.0 KB
Old 09-25-2013, 09:31 PM
  #9  
On The Tree
Thread Starter
iTrader: (1)
 
Do Work 93YJ's Avatar
 
Join Date: Sep 2013
Location: Covington Ga
Posts: 130
Likes: 0
Received 0 Likes on 0 Posts
Default

After that came mock up of upper and lower a arms, bags, drop spindles, and rotors so I could mount wheels.
Name:  5DFE77DF-78B3-45F3-9FF5-E3EF3745B942-17826-000010860DF4BD9E_zps7834053e.jpg
Views: 2573
Size:  138.0 KB
Name:  5238DFA9-77F7-4E2C-A24F-B05237DF3E39-17826-000010861AB6A32E_zpsdaeba844.jpg
Views: 2582
Size:  147.4 KB
Name:  DD96B488-FA2F-4610-945A-FFF29B75D7B8-17826-000010862DDF47B2_zpse28dd09c.jpg
Views: 2504
Size:  119.3 KB
Old 09-25-2013, 09:34 PM
  #10  
On The Tree
Thread Starter
iTrader: (1)
 
Do Work 93YJ's Avatar
 
Join Date: Sep 2013
Location: Covington Ga
Posts: 130
Likes: 0
Received 0 Likes on 0 Posts
Default

Slapped the wheels and front end back on and laid her out.
Name:  12D67A1D-4879-4AE9-91F6-7B420B51CDFE-17826-0000108635E41B34_zps14713ab3.jpg
Views: 2485
Size:  88.4 KB
Name:  737D7059-D636-418D-BE56-344B8C888417-17826-000010864030EE49_zps999f52a7.jpg
Views: 2490
Size:  90.7 KB
Old 09-25-2013, 09:36 PM
  #11  
TECH Veteran
iTrader: (4)
 
ls1nova71's Avatar
 
Join Date: Jan 2008
Location: Liberty, MO
Posts: 4,373
Likes: 0
Received 194 Likes on 140 Posts

Default

This is going to be a cool car. Are you going to do anything to the body, or are you going to leave it alone? Does it have lake pipes on it?
Old 09-25-2013, 09:37 PM
  #12  
On The Tree
Thread Starter
iTrader: (1)
 
Do Work 93YJ's Avatar
 
Join Date: Sep 2013
Location: Covington Ga
Posts: 130
Likes: 0
Received 0 Likes on 0 Posts
Default

Disassembled everything and fully welded then cleaned up and painted.
Name:  268245C3-4385-442E-B7EB-CE53B52C69CD-18938-000011A19F855289_zpsf6e03a6e.jpg
Views: 2418
Size:  113.9 KB
Name:  5FE77DCC-15A2-49FE-A0F7-7156061EE42E-1259-000000F961AD65BC_zps995bf267.jpg
Views: 2430
Size:  104.3 KB
Old 09-25-2013, 09:46 PM
  #13  
On The Tree
Thread Starter
iTrader: (1)
 
Do Work 93YJ's Avatar
 
Join Date: Sep 2013
Location: Covington Ga
Posts: 130
Likes: 0
Received 0 Likes on 0 Posts
Default

After paint came finally assembly of the front end and running air lines.
Name:  F795658E-4C51-46B0-BE87-373BF3C51D73-11150-00000B34F8E90C44_zps3e8ca966.jpg
Views: 2621
Size:  151.1 KB

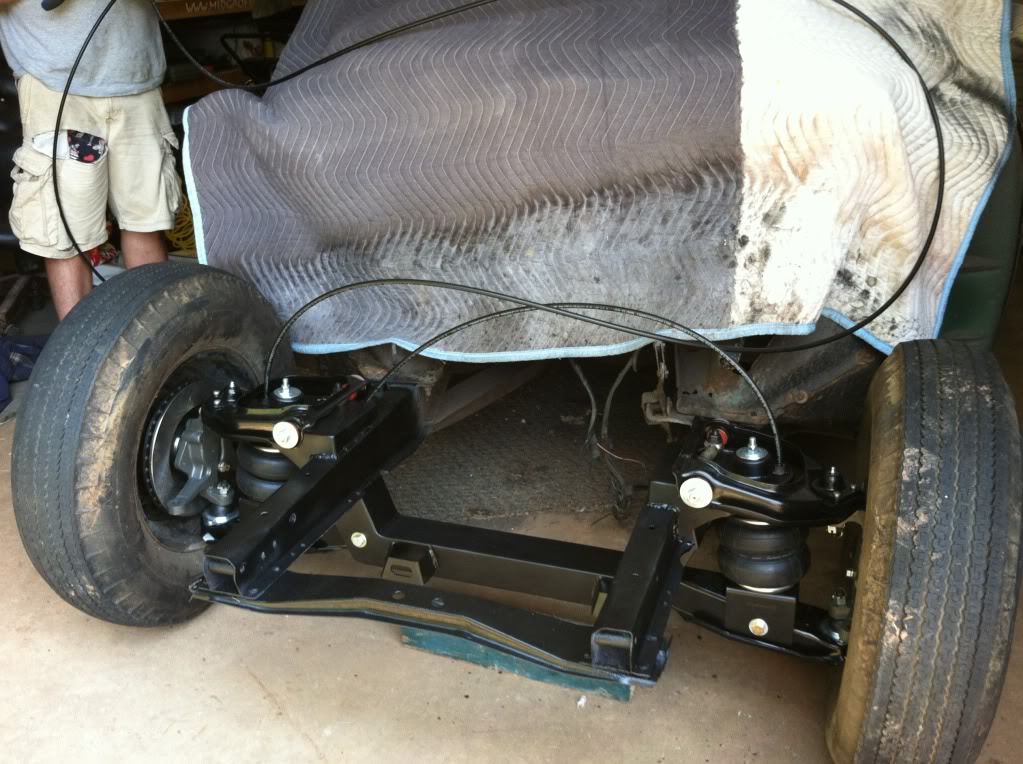
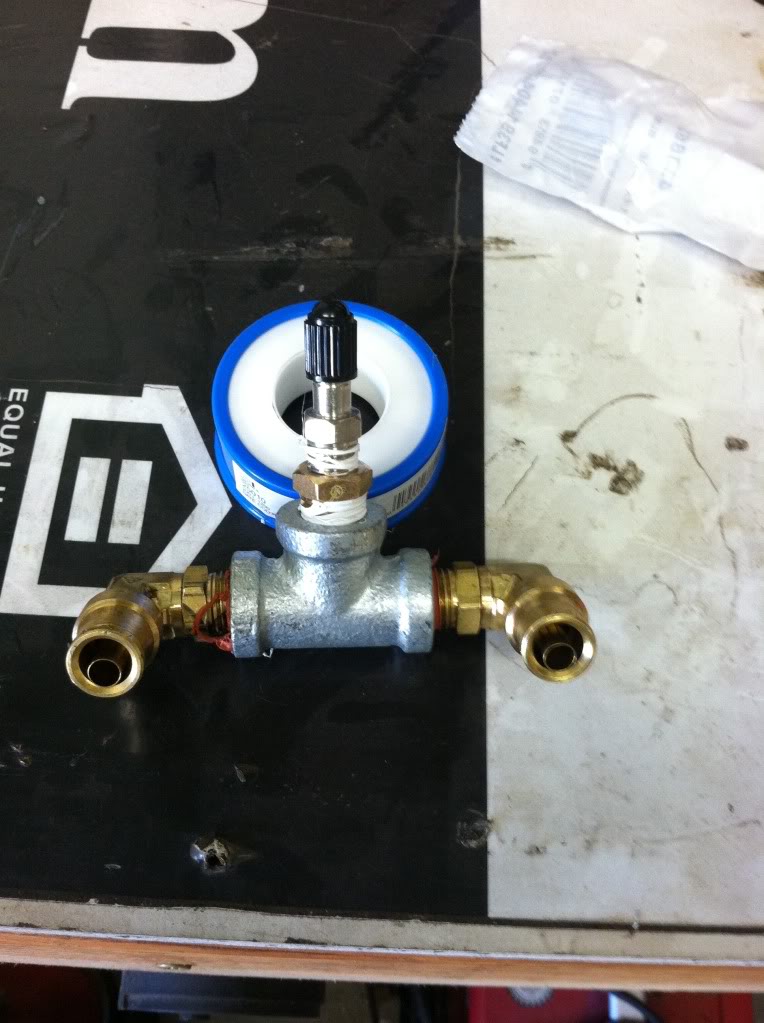
Also knew I was gonna need a way to lift the front to move the car around during the build so I made a trip to ACE hardware to get the fittings to build a temporary manifold.
Name:  C310430F-D728-40B2-B6F2-E2BCEE3D1917-11150-00000B34EB46E2CC_zps1ec28eee.jpg
Views: 2422
Size:  100.3 KB
Old 09-25-2013, 09:48 PM
  #14  
On The Tree
Thread Starter
iTrader: (1)
 
Do Work 93YJ's Avatar
 
Join Date: Sep 2013
Location: Covington Ga
Posts: 130
Likes: 0
Received 0 Likes on 0 Posts
Default

Made a short video of the front moving for the first time.
Old 09-25-2013, 09:52 PM
  #15  
On The Tree
Thread Starter
iTrader: (1)
 
Do Work 93YJ's Avatar
 
Join Date: Sep 2013
Location: Covington Ga
Posts: 130
Likes: 0
Received 0 Likes on 0 Posts
Default

Sorry for the short post just wanted to get you guys caught up to where I'm at today. I'll get more in dept as the build continues from here.
Old 09-25-2013, 09:53 PM
  #16  
TECH Enthusiast
iTrader: (1)
 
M6 Swap's Avatar
 
Join Date: Dec 2007
Location: Texas
Posts: 620
Received 4 Likes on 2 Posts

Default

Going to be sick! Subscribed
Old 09-25-2013, 10:33 PM
  #17  
On The Tree
Thread Starter
iTrader: (1)
 
Do Work 93YJ's Avatar
 
Join Date: Sep 2013
Location: Covington Ga
Posts: 130
Likes: 0
Received 0 Likes on 0 Posts
Default

Originally Posted by ls1nova71
This is going to be a cool car. Are you going to do anything to the body, or are you going to leave it alone? Does it have lake pipes on it?
Gonna leave it alone for a little while then after I get it running and driving like I want I'll slowly start doing the metal work on it. It did have lake pipes but they were shot I'm planning to put some back on it though.
Old 09-25-2013, 10:34 PM
  #18  
On The Tree
Thread Starter
iTrader: (1)
 
Do Work 93YJ's Avatar
 
Join Date: Sep 2013
Location: Covington Ga
Posts: 130
Likes: 0
Received 0 Likes on 0 Posts
Default

Originally Posted by M6 Swap
Going to be sick! Subscribed
Thanks
Old 09-26-2013, 08:43 AM
  #19  
TECH Regular
iTrader: (1)
 
brewster240's Avatar
 
Join Date: May 2006
Location: clearwater fl
Posts: 405
Likes: 0
Received 0 Likes on 0 Posts

Default

nice! ive always wanted to do a 54. i got close once with a 53, but after getting it home, there was more rust underneath than i wanted to handle

Old 09-26-2013, 05:17 PM
  #20  
On The Tree
iTrader: (3)
 
Leadfoot85's Avatar
 
Join Date: Jun 2013
Posts: 125
Likes: 0
Received 4 Likes on 4 Posts
Default

Looks good so far! I have a 52 Chevy Coupe that I'm doing pretty much the same thing to. So far I have installed a TCI MII front suspension (springs, not bags), 5.3 truck motor with LS1 intake manifold and accessories and I have a 10 bolt Posi rear end ready to go in.

I hope to have mine running and driving by the end of the year, but we all know how deadlines go...

Keep it up!


Quick Reply: 6.0 in a 54 Chevy Bel Air


All times are GMT -5. The time now is 02:26 AM.