
New Hooker/Holley 1st-gen parts compatibility with Ridetech TruTurn
 03-05-2014, 10:49 AM
#41
On The Tree
iTrader: (2)

Join Date: May 2013
Location: Austin Texas
Posts: 141
Likes: 0
Received 0 Likes
on
0 Posts
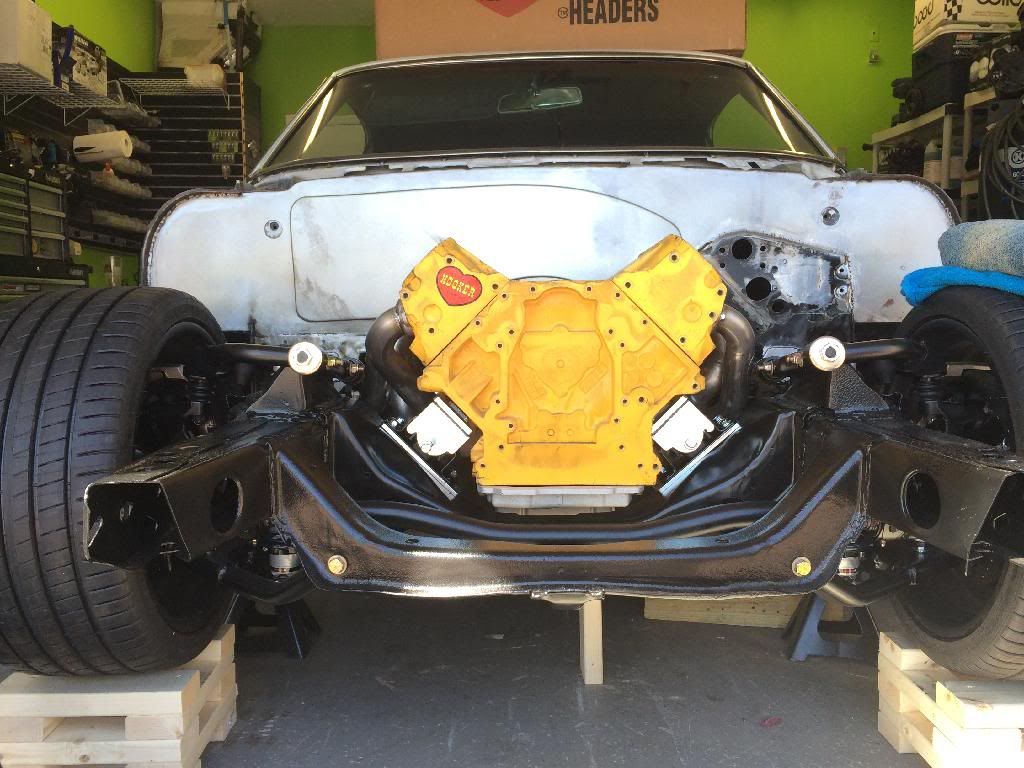
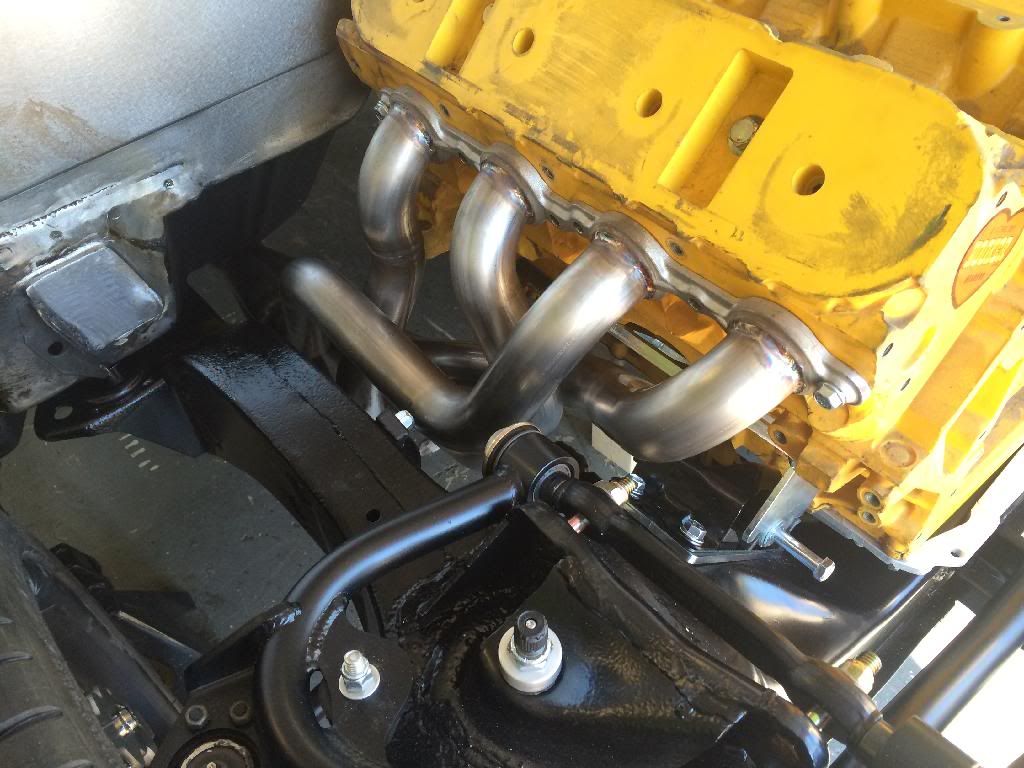
Yeah its really close to the same on both sides. I installed the drivers header and it clears everything. I need to get the transmission in and see where places the engine. It may move the oil pan closer to the steering and I may have a clearance issue. There is clearance at the front of the pan good its just at the sides where the ridetech bracket bends that may cause the clearance issues.
 03-05-2014, 11:03 AM
#42
TECH Junkie
Thread Starter


Yeah its really close to the same on both sides. I installed the drivers header and it clears everything. I need to get the transmission in and see where places the engine. It may move the oil pan closer to the steering and I may have a clearance issue. There is clearance at the front of the pan good its just at the sides where the ridetech bracket bends that may cause the clearance issues.
03-05-2014, 11:11 AM
#43
On The Tree
iTrader: (2)
Join Date: May 2013
Location: Austin Texas
Posts: 141
Likes: 0
Received 0 Likes
on
0 Posts
Yeah the engine mounts are installed but I just have a 2x4 between the rear of the engine and firewall currently to support it so my angles may be off by a little. If there is a clearance issue it looks like it will just be the corners of the pan like you said. I hopefully can wrestle the transmission and crossmember in tonight and find out for sure.
03-05-2014, 11:22 AM
#44
TECH Junkie
Thread Starter
Yeah the engine mounts are installed but I just have a 2x4 between the rear of the engine and firewall currently to support it so my angles may be off by a little. If there is a clearance issue it looks like it will just be the corners of the pan like you said. I hopefully can wrestle the transmission and crossmember in tonight and find out for sure.
03-05-2014, 07:52 PM
#45
On The Tree
iTrader: (2)
Join Date: May 2013
Location: Austin Texas
Posts: 141
Likes: 0
Received 0 Likes
on
0 Posts
Ok so I have an update. I didnt get the transmission in as I didnt have anyone to help me bench press it in but I do think the pan is going to clear. It may take a little grinding on the steering adapter or/and oil pan but not much. The passenger side header does have an issue though with the tie rod. Nothing a hammer will not fix but I didnt have the ***** to do it yet.
Last edited by cwylie; 03-05-2014 at 07:57 PM.
03-05-2014, 08:16 PM
#46
TECH Fanatic
iTrader: (5)
Join Date: Nov 2002
Location: South Florida
Posts: 1,227
Likes: 0
Received 0 Likes
on
0 Posts

Ok so I have an update. I didnt get the transmission in as I didnt have anyone to help me bench press it in but I do think the pan is going to clear. It may take a little grinding on the steering adapter or/and oil pan but not much. The passenger side header does have an issue though with the tie rod. Nothing a hammer will not fix but I didnt have the ***** to do it yet.
Here are my findings I will post pics tomorrow.
1. I don't have my trans here yet to bolt in place so I'm guessing at where I think the engine will be sitting. There is a lot of flex in the motor mounts so it sags way to the back if you don't support under the oil pan.
2. With the engine sitting level, to where i think it will with the trans connected and supported by the rear crossmember, the MAST pan clears perfectly. No rubbing, plenty of room.
3. The passenger tie rod hits the tube of the header. It barely hits, but it does hit. Im not sure that during suspension travel if this will get better or worse. I too was working alone tonight so I couldn't really flex the suspension and watch to see what was happening. From what I could tell the tie rod only hit at full steering lock.
One thing that I recommend to Hooker/Holly, and maybe I'm just blind or overlooked it, the motor mount adapters need to be in the directions. I must have put the things on the block 3 different times and ways before i found the right placement and orientation. It would be very helpful if they were etched driver passenger or stickered or something.
Ill get some pics tomorrow.
03-06-2014, 05:52 AM
#47
One thing that I recommend to Hooker/Holly, and maybe I'm just blind or overlooked it, the motor mount adapters need to be in the directions. I must have put the things on the block 3 different times and ways before i found the right placement and orientation. It would be very helpful if they were etched driver passenger or stickered or something.
Ill get some pics tomorrow.
Ill get some pics tomorrow.
 This and an arrow saying which way to point.
03-06-2014, 06:23 AM
This and an arrow saying which way to point.
03-06-2014, 06:23 AM
#48
TECH Junkie
Thread Starter
03-06-2014, 08:29 AM
#49
TECH Fanatic
iTrader: (5)
Join Date: Nov 2002
Location: South Florida
Posts: 1,227
Likes: 0
Received 0 Likes
on
0 Posts
Like stated above, looks like the tie rod on the passenger side is hitting the header tube. 1/8" dent in the tube and it will probably clear.
03-06-2014, 04:31 PM
#50
TECH Junkie
Thread Starter
Ok so I have an update. I didnt get the transmission in as I didnt have anyone to help me bench press it in but I do think the pan is going to clear. It may take a little grinding on the steering adapter or/and oil pan but not much. The passenger side header does have an issue though with the tie rod. Nothing a hammer will not fix but I didnt have the ***** to do it yet.
03-06-2014, 06:42 PM
#51
TECH Fanatic
iTrader: (5)
Join Date: Nov 2002
Location: South Florida
Posts: 1,227
Likes: 0
Received 0 Likes
on
0 Posts
Hey cwylie, your reported fitment, and that of dubsilverado, has got me thinking that you probably have another option to gain suitable clearance between the right side header inner tie-rod (other than a hammer beating). That option would be to make your own custom spacer plates that bolt to the subframe under the clamshells that shift the engine and trans back just enough for the tie-rod end to clear the header tube (I'm thinking 1/4" would do it). Since you are using the Holley 302-2 pan, it would also provide you with the extra space you need to clear the Tru Turn center link completely. Check the center mounting slots in your crossmember and the clearance between your steering box and the header tubes to see if the engine and transmission can be moved back by that much and just make new adapter plates from 1/4" mild steel using the existing plates supplied by Hooker as a template to locate the 4 counter sunk screw locations and the new location for the clamshell attachement holes, which will be located 1/4" further back towards the rear of the car. Once you attach the adapter plates to the subframe you merely have to drill out the two relocated clamshell attachment holes that pass through the subframe. This might be worth your effort to investigate.
03-06-2014, 08:18 PM
#52
On The Tree
iTrader: (2)
Join Date: May 2013
Location: Austin Texas
Posts: 141
Likes: 0
Received 0 Likes
on
0 Posts
OK so I have an update. The holley 302-2 oil pan clears at least on my car. Its not by much maybe a thick piece of paper but it does clear on the passenger side and I have about an 1/8 on the drivers side.I was doing some reading on the pitman and idler arms and I guess there are some longer ones available that were use on the Z28. I need to measure which ones I have but if I do have the short ones it may give me the clearance I need.
03-07-2014, 06:14 AM
#53
TECH Junkie
Thread Starter
OK so I have an update. The holley 302-2 oil pan clears at least on my car. Its not by much maybe a thick piece of paper but it does clear on the passenger side and I have about an 1/8 on the drivers side.I was doing some reading on the pitman and idler arms and I guess there are some longer ones available that were use on the Z28. I need to measure which ones I have but if I do have the short ones it may give me the clearance I need.
03-07-2014, 07:30 PM
#54
OK so I have an update. The holley 302-2 oil pan clears at least on my car. Its not by much maybe a thick piece of paper but it does clear on the passenger side and I have about an 1/8 on the drivers side.I was doing some reading on the pitman and idler arms and I guess there are some longer ones available that were use on the Z28. I need to measure which ones I have but if I do have the short ones it may give me the clearance I need.
03-08-2014, 10:15 AM
#55
On The Tree
iTrader: (2)
Join Date: May 2013
Location: Austin Texas
Posts: 141
Likes: 0
Received 0 Likes
on
0 Posts
So I took the plunge and dimpled the header to clear the tie rod ends. I think the 1 3/4 headers may be a better bet if you are planning to run the tru turn. It was not hard to do but it was not easy to take a hammer to a brand new set of headers. I have although seen way worse done to headers to fit steering boxes and other things on LS1 swaps. I think Todds solution could have fixed the problem as well but I liked where everything was sitting and decided to just dimple the header.
03-08-2014, 12:29 PM
#56
TECH Junkie
Thread Starter
So I took the plunge and dimpled the header to clear the tie rod ends. I think the 1 3/4 headers may be a better bet if you are planning to run the tru turn. It was not hard to do but it was not easy to take a hammer to a brand new set of headers. I have although seen way worse done to headers to fit steering boxes and other things on LS1 swaps. I think Todds solution could have fixed the problem as well but I liked where everything was sitting and decided to just dimple the header.
03-09-2014, 02:39 PM
#57
TECH Fanatic
iTrader: (5)
Join Date: Nov 2002
Location: South Florida
Posts: 1,227
Likes: 0
Received 0 Likes
on
0 Posts
Kills me to see that header dimpled too. Did it really need that much? I don't feel like mine hits that bad that it would need such a dimple.
On a side note, my trans will be here this coming week so I installed the T56 Holley Crossmember. I am very impressed. It looks awesome with the laser cutting, instructions were good, fitment was great, and it was super simple to install. Took about 15 minutes max. The floor clearance is excellent, it does not hang down at all beyond the subframe and it leaves a lot of room for exhaust routing. Very nice job on this piece Todd.
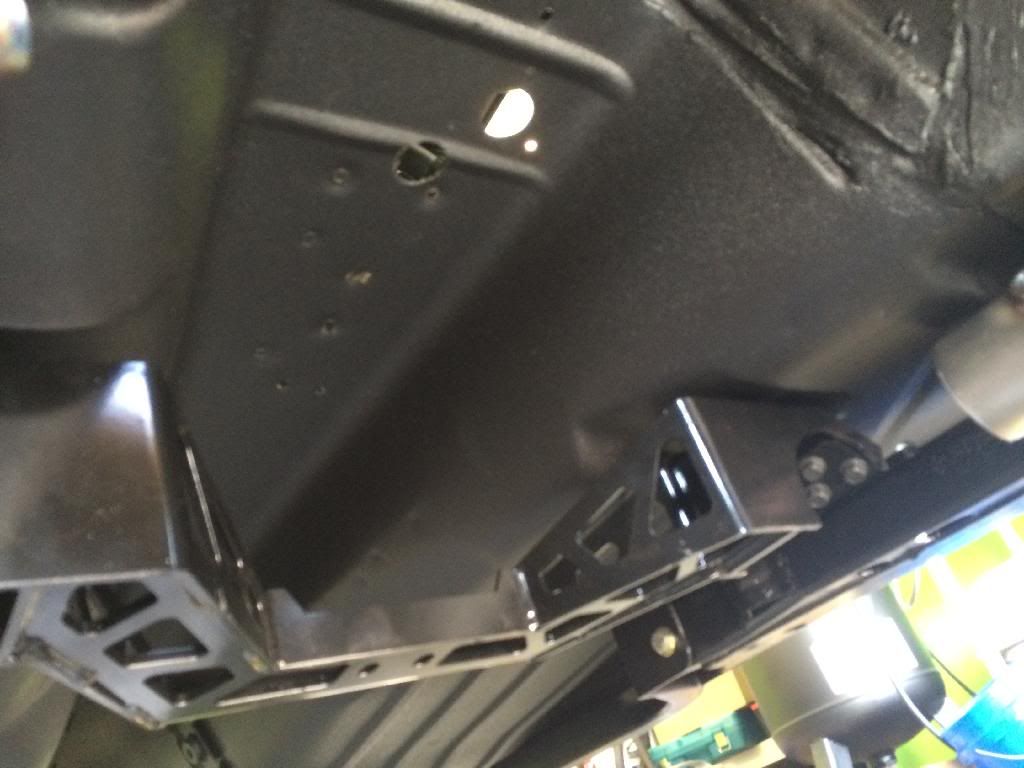
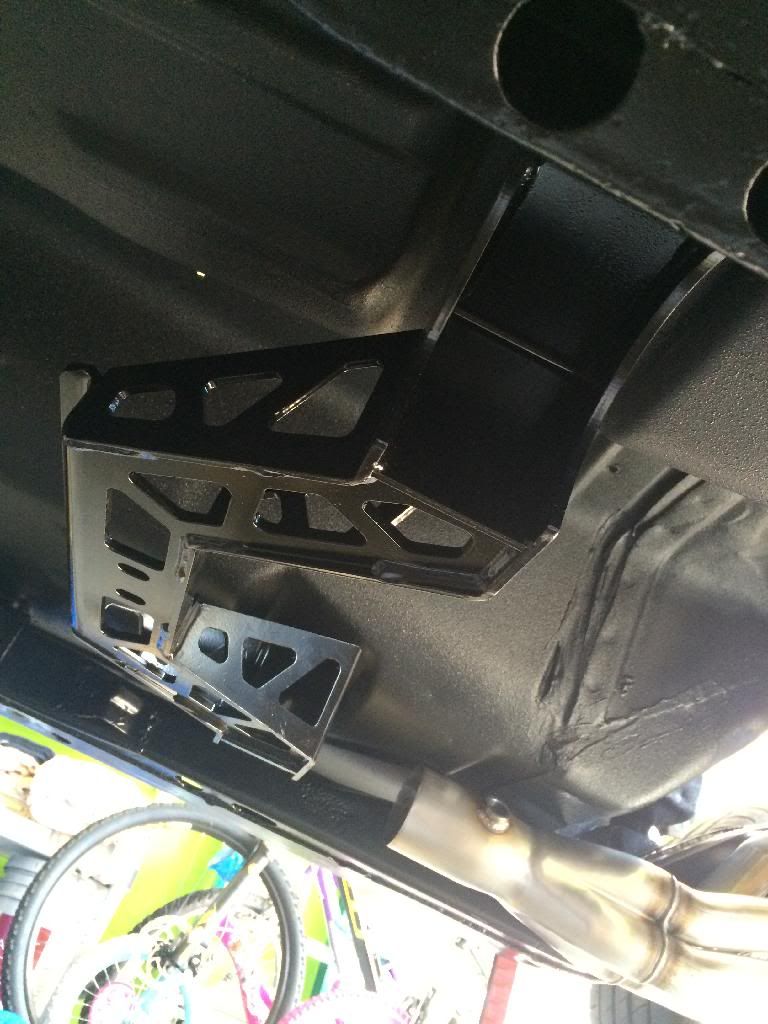
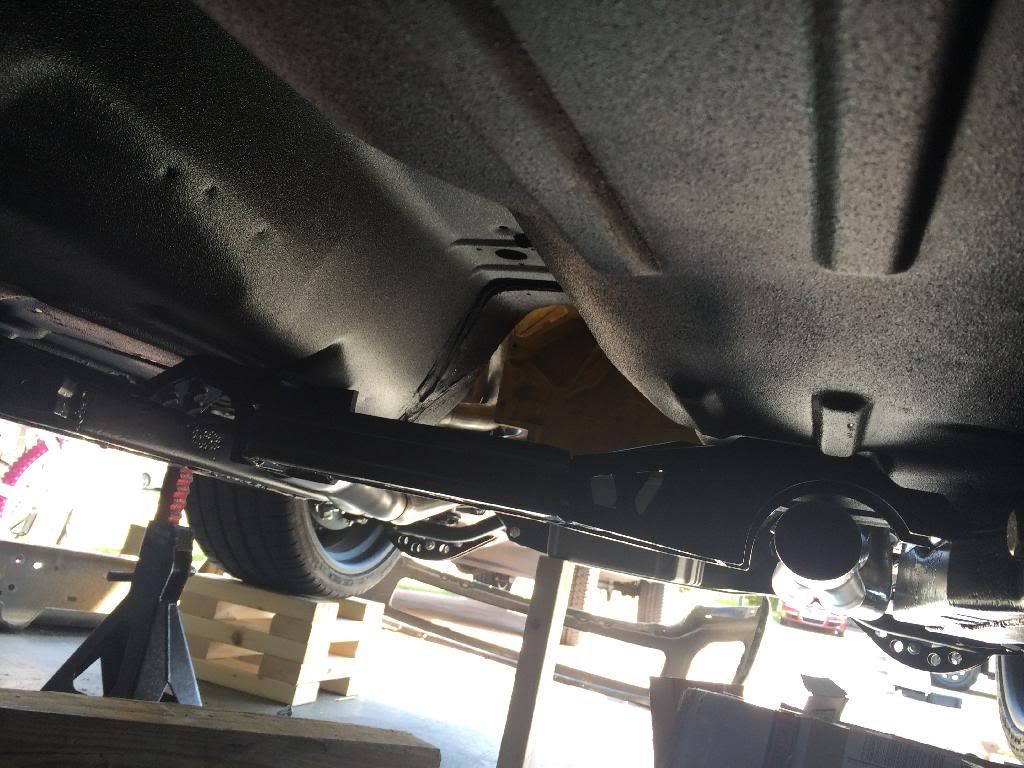
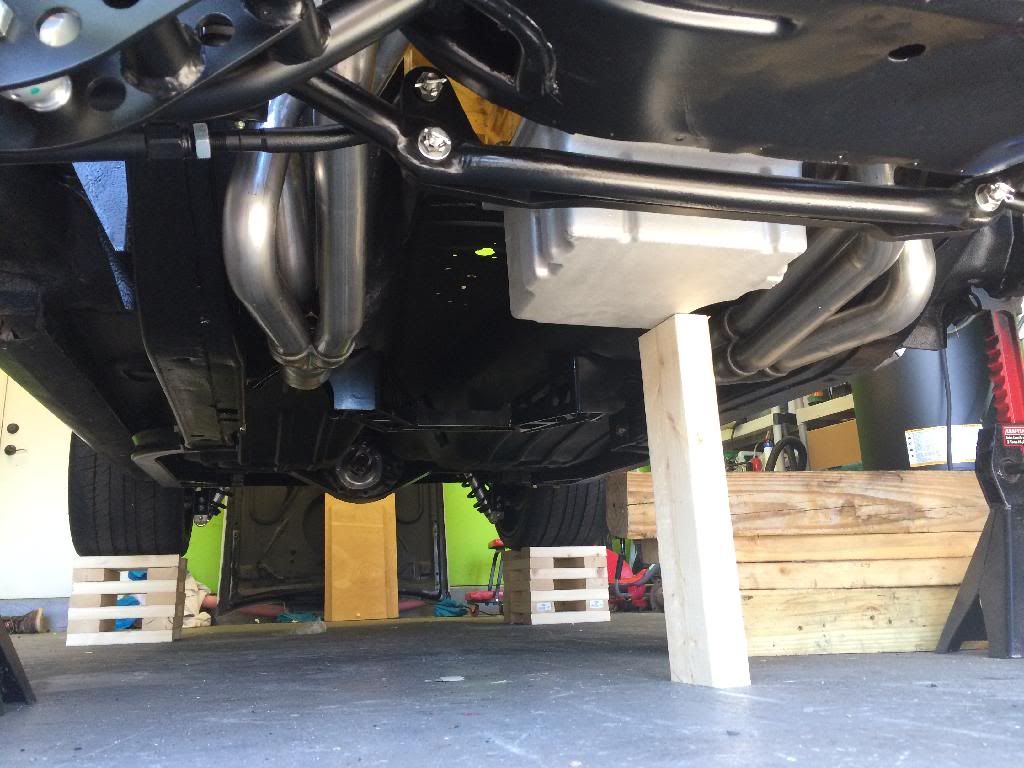
On a side note, my trans will be here this coming week so I installed the T56 Holley Crossmember. I am very impressed. It looks awesome with the laser cutting, instructions were good, fitment was great, and it was super simple to install. Took about 15 minutes max. The floor clearance is excellent, it does not hang down at all beyond the subframe and it leaves a lot of room for exhaust routing. Very nice job on this piece Todd.
03-10-2014, 06:54 AM
#60
TECH Junkie
Thread Starter
Kills me to see that header dimpled too. Did it really need that much? I don't feel like mine hits that bad that it would need such a dimple.
On a side note, my trans will be here this coming week so I installed the T56 Holley Crossmember. I am very impressed. It looks awesome with the laser cutting, instructions were good, fitment was great, and it was super simple to install. Took about 15 minutes max. The floor clearance is excellent, it does not hang down at all beyond the subframe and it leaves a lot of room for exhaust routing. Very nice job on this piece Todd.
On a side note, my trans will be here this coming week so I installed the T56 Holley Crossmember. I am very impressed. It looks awesome with the laser cutting, instructions were good, fitment was great, and it was super simple to install. Took about 15 minutes max. The floor clearance is excellent, it does not hang down at all beyond the subframe and it leaves a lot of room for exhaust routing. Very nice job on this piece Todd.