When you click on links to various merchants on this site and make a purchase, this can result in this site earning a commission. Affiliate programs and affiliations include, but are not limited to, the eBay Partner Network.
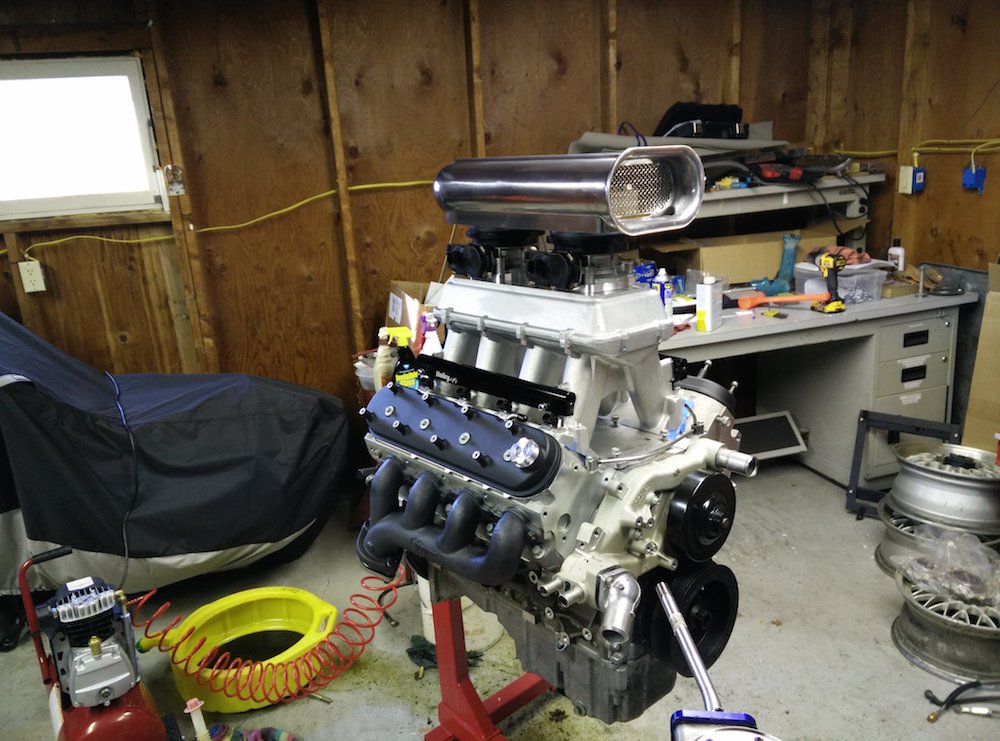
That's the very image of a hot rod mill. Perfecto.
Thanks Tony!
I got a few more goodies today from Speedway. The radiator came packaged very well, and for being $129 I can't complain. It is all aluminum with welded tanks. I went this route so that I can weld mounting tabs to the radiator to hold the fan assembly. The bottom hose is angled a little and is 1.75" while the upper hose is straight and 1.5", which is typical Chevy size.
This gives you an idea of how massive the fan is. Height wise the radiator is perfect, but obviously the mounting tabs for the fan are going to need some fiddling.
Here is the fan rotated 180 degrees, just to see what it might look like.
I think the first orientation will work out better. I will trim the fan shroud around the lower hose and weld some tabs on the radiator for mounts. On the other side, the mounting tabs extend past the tank, but I think I can weld tabs to the side of the tank to secure the shroud. Should work out pretty well.
Also picked up a T56 remote bleeder hose. Anyone that has ever installed a T56 knows what a pain it is to reach the bleeder once the trans is in place. This will allow me to route the bleeder out of the trans where it is more easily accessible.
I also picked up the nifty little brackets that I will attach under the car which will hold the bleeder assembly in place and out of the way.
The temperature today was pretty nice (38 degrees, a real heat wave!) so I decided to do a little work on the fan and radiator. The height of the fan shroud is just about perfect with the height of the radiator core. However, the bottom hose of the radiator interferes with the fan mount, so I cut it off and trimmed the shroud to fit nicely around the pipe:
I also trimmed the upper mount to clear the inlet, so now the fan sits flush against the core.
It's not done yet, but overall it's looking pretty good.
As I showed earlier, there is interference between the alternator and the #1 coil when using the Holley valve covers.
Holley does include a little offset bracket to address this, but unfortunately it does not work with the round Gen IV truck coils, which is what I have. I needed to finalize the placement of that coil because I finally got all the parts to finish the odd side coil harness. So I took the Holley bracket and cut out the center section, did a little grinding on the tabs, and presto:
The brackets now work with the round coil.
Before moving on, I wanted to double check the clearance with the alternator, and it all looks good:
Having the #1 coil in place allowed me to start on the odd side coil harness. I only made it this far:
I couldn't resist adding a little bling to this build. The valley covers will be fairly open given the layout of the Holley Hi-ram intake, so I got some ARP stainless hardware to make thing "pop"
Also got the water pump and thermostat housing bolt kit:
Once I get all of the parts fitted and working how I want, the plan is to have some of the more visible cast parts get sent for media blasting and anodizing. The finish on the valley cover is very smooth, but ultimately I want it to have a rougher "cast" finish, like the intake. I think having the texture of various parts matching will add a nice detailed touch without looking too "matchy matchy." The edges of the valley cover also have this ugly parting line where the mold came apart:
A little time with the grinder and a sanding disk makes it much more presentable. Once the whole part is media blasted, it will look very nice.
I also picked up some more parts (I love Amazon Prime). I ran across a thread on ls1tech discussing the virtues of using a 2012 LS3 Camaro starter on swaps. It is a newer design that uses two long bolt (instead of a short and long) and it has a plug-in connector from the ignition switch, and it was only $107 on Amazon. Here is the thread:
I'm really liking your project Andrew as it's bringing back a lot of good old memories of my teenage years. My first car was a 67' RX7 Cougar I inherited from my grandmother. I received a comprehensive lesson on how to rebuild Ford front suspensions on that car due to the fact she was an alcoholic and bent/destroyed every part of that cars' steering/suspension from hitting curbs and other obstacles on the way to the liquor store. I really liked that car. I may have to get another after seeing yours.
I'm really liking your project Andrew as it's bringing back a lot of good old memories of my teenage years. My first car was a 67' XR7 Cougar I inherited from my grandmother. I received a comprehensive lesson on how to rebuild Ford front suspensions on that car due to the fact she was an alcoholic and bent/destroyed every part of that cars' steering/suspension from hitting curbs and other obstacles on the way to the liquor store. I really liked that car. I may have to get another after seeing yours.
Todd,
I read what you wrote to my GF and we were both laughing our asses off. Hopefully you can see this one in person at this years LS Fest!
The temperature today got up to a balmy 36 degrees, so I bundled up and headed to the garage to get a little work done on the engine. The Big Brown Truck delivered some more bling today in the form of ARP studs for the exhaust. These are a little pricy, but damn ARP makes nice engine jewelry. Whenever I use stainless hardware with aluminum, I always make sure to use plenty of anti-seize. (Also got a new carbon fiber ring...LOL)
The ends of the studs have a small allen head key which makes installation super easy. I just snugged them up into the head.
Added a new OEM MLS gasket...
Then installed the thick washers and 12 point nuts.
I got an Earl's hose cutter which made making the fuel cross over line pretty simple.
I wrapped the ends with masking tape, but I still managed to bugger up the fittings a little bit.
I really love using the hard anodized fittings, because they look fantastic, and if you scratch them a little, you can just use a Sharpie to touch them up. Presto!
I also installed and wired up the fuel pressure sender. I used a -6 male to -6 female adapter that has a 1/8 NPT port. I used some liquid thread sealer to make sure there are no leaks.
As I mentioned before, the Holley Dominator has a ton of programmable input and outputs that can be used for just about anything. Since I have a T56, I need a way to energize the reverse lock-out solenoid. The OEM computer energizes it in combination with the clutch pedal and under 5 MPH. I really don't want to wire the clutch pedal into it, so I will simply have it energized below 5 MPH. This is easily programmable in the Dominator.
One thing I needed to make sure of is that the draw on that circuit doesn't exceed 2 Amps, otherwise a relay is needed. I wired it up to my truck battery and ran a test. Looks like I am good to go without a relay, since the draw is less than 1 amp.
After warming up and a little lunch, I finally decided to tackle the odd side coils.
I ran the wires, trimmed to length, heat shrink, cavity seals, terminals...
Does Holley offer test apps / procedures where you can fire specific injectors and coils? Some of the aftermarket electronics I bought has done so. For example, the Dakota Digital STA 1000 (which takes ODBII inputs and turns to analog outputs to drive non-digital gauges) In test mode, it outputs 60mph and some baseline rpm just to check your gauges and their calibration.
It'd be cool if you could use a noid light and a grounded plug to go through and check each injector signal and each coil pack.
I am not aware of such a capability on the Holley Dominator ECU, but it would certainly be a cool feature. I am pretty sure I got the wiring done right, but having an easy way to test would be welcome.
That dipstick just wasn't going to happen. It didn't take long for me to take a hacksaw to it, but not before measuring how far it extended out the bottom of the tube. For future reference, it was 2.125"
So I was anxious to get the dipstick situation figured out. I went to my local Napa and got some o-rings and then to the local hobby store for a piece of brass tubing. Then I went to the garage and got to work. I liked the length of the tube, so from there I figured out how much to cut the dipstick so that I would still have 2.125" sticking past the bottom of the tube. Once that was done, I slathered the outside of the .223 casing with flux and applied some solder in a few spots. Once that was done, it was time to stick the dipstick inside the case and fill it up with solder.
Made a bit of a mess but all that is easily cleaned up.
Once the dipstick was secured by the solder, I used a Dremel tool with a small mill bit to shape the groove for the o-ring.
The groove had to be deep enough not to stretch the o-ring too much, otherwise it wasn't going inside the tube.
Nice snug fit...
The OEM dipstick is retained to the plastic handle with a small roll pin. I measured the roll pin and found a drill bit that was a hair smaller and drilled a hole through the case, the solder, and the dipstick.
Then I tapped in the roll pin all the way.
The brass tube that I got at the hobby store made a nice fit over the dipstick tube, but was just a hair loose over the .223 casing. This is where the solder on the outside of the case came in. I filed it down a little at a time until the brass tube fit tightly.
There...
Looks very inconspicuous on the engine.
But I am sure that some people will notice it and have a chuckle.
The outside of the brass tube is a little slick, and it would be nice to add some sort of texture, but it's good for now.
Andrew
Last edited by Project GatTagO; 01-27-2015 at 03:57 PM.
Great job on the dipstick! I have that same ugly yellow thing in my L92 swap. Your work inspired me (along with a very annoying coolant leak on my old brass radiator) to swap over the Speedway universal AL radiator that's been sitting in my garage for a few months. They are nice quality radiators.
I built a fan shroud out of 1/8" aluminum sheet and welded it to the back of the radiator and added some 3 1/2" mounting "wings" on the sides. You can see the threadserts for the fan mounting. I still need to wire that up as I moved the bus bar which feeds the fan power to the opposite side.
BTW - if I'm taking away from your build thread... let me know. I can delete the post. In my own, I appreciate idea sharing.
I just TIG'd it enough to keep it in place. It is a tight seal all around, so leaking when the fan is on won't be an issue.
there's about 1/2" between the fins and the inner plane of the shroud.
No worries man. I like sharing ideas as well. That's what this place is for. When I installed the L92 in my GTO I got a Corvette dipstick and tube that were much shorter. So if you want a stock look, you can do the same.
On the dipstick... good info on the vette one. makes sense as the dipstick must stick out of the engine cover. I need to decide if I'll eventually swap the to an LS6 intake manifold from the stock L92 or just leave it as is. I love what you are doing, but Holley's computer doesn't (yet) control the 6L80 and I've already invested in the stock computer / harness.
I don't like the chevy truck cover. haven't seen an escalade one. I have plenty of room in my engine bay for the truck manifold... it is just ugly. I don't think I'd invest the time in shaving it.
BTW - does Holley require the fuel pressure gauge or is that just for your own monitoring?
The LS6 intake won't work on your L92 because the ports are different. If you want a car style intake you have to go with the LS3, which is what I have. I am not sure that Holley will ever have the ability to connect with the 6L80/90E transmissions because they actually have an internal TCU that communicates with the ECU.
The L92 Escalades used a very similar engine cover as the trucks:
The Holley ECU does not require a fuel pressure sensor, but the harness is already wired for one, so I just installed it. I don't plan on having any other gauges besides the new Holley display, so the more sensors that are directly connected to the ECU, the better, because I will be able to display them if I want.


 01-14-2015, 03:23 PM