

Dedicated Matt's Documented Lexus Is300 LS1 Swap with Wiring guide and engine mods
 11-30-2014 | 02:17 PM
#1

I'd like to take a moment to answer the first question "Why the Ls1 based engine swap"
1. Parts are plentiful and cheap
2. Incredibly easy to work on
3. Easy to make great power
4. The stock ECU is flashable by many shops
5. Lightens the front end to yield a 50/50 weight distribution
The ls1 swapped is300 has to be one of the most agile and confidence inspiring vehicles I've ever driven. I forget it has 4 doors all the time. If you play your cards right this swap can be completed for $9000-$12,000.
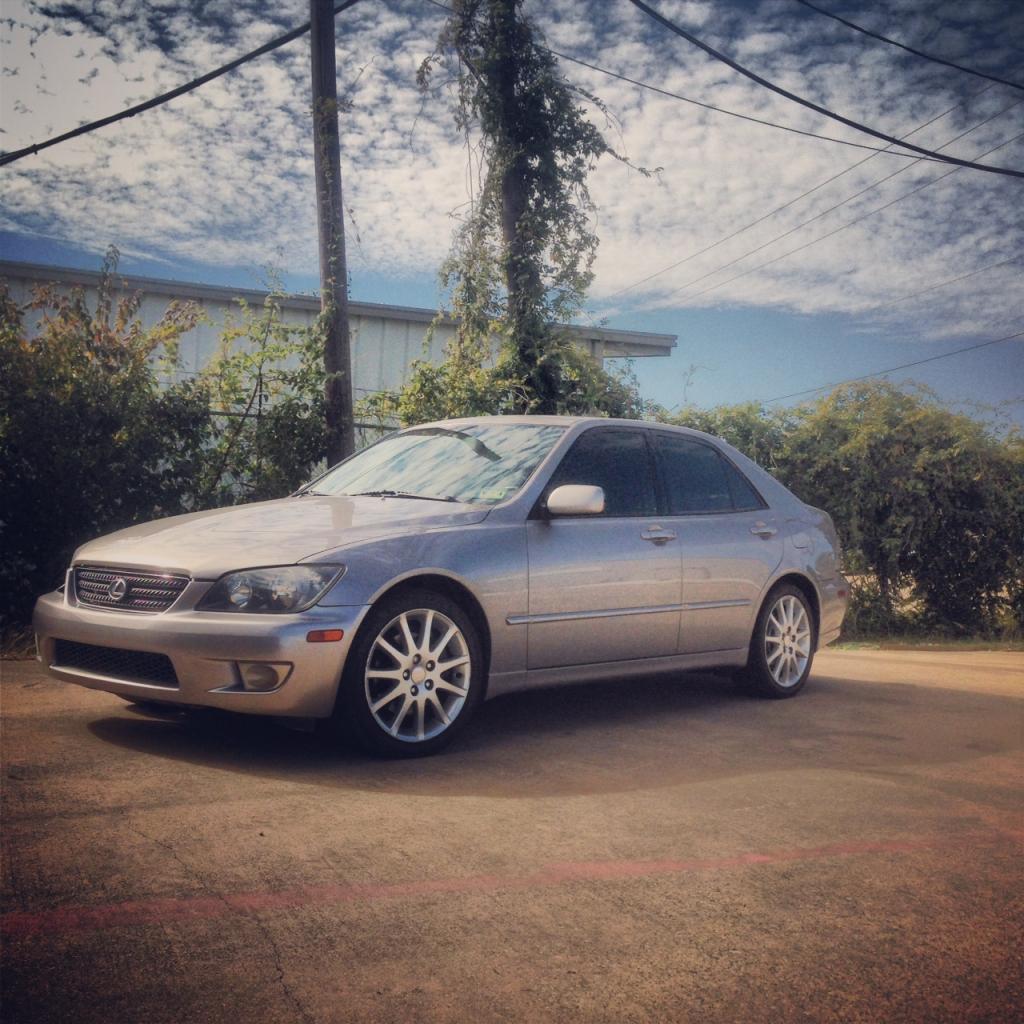
Now moving onto the swap. Its hard to think its been nearly 5 years since I swapped the first ever Is300 with an Ls1. After searching for sometime I found a great deal on this 2003 Sport Design Is300 with a 5spd trans and LSD sporting the Thundercloud Metallic paint color. Love it!
In this thread I will do my best to cover the swapping process from choosing the right Ls engine to basic wiring and purchasing the right swap components.
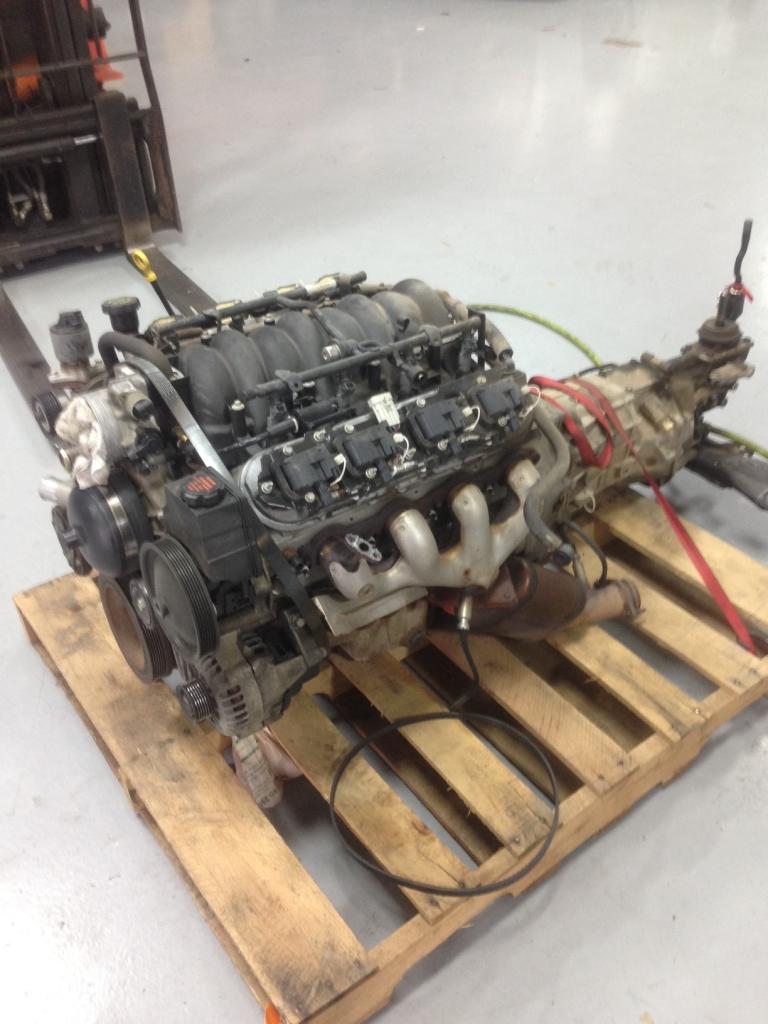
My go to engine swap is the LS1/T56 combo found in the 1998-2002 Camaro and Trans Am. This combo is a common find on craigslist for $2800-$3500. The F-body wiring harness and front drive accessories provide the easiest solution for the is300 swap. I found this setup with 99,000 miles still in the car and bone stock. Watch out for scammers!
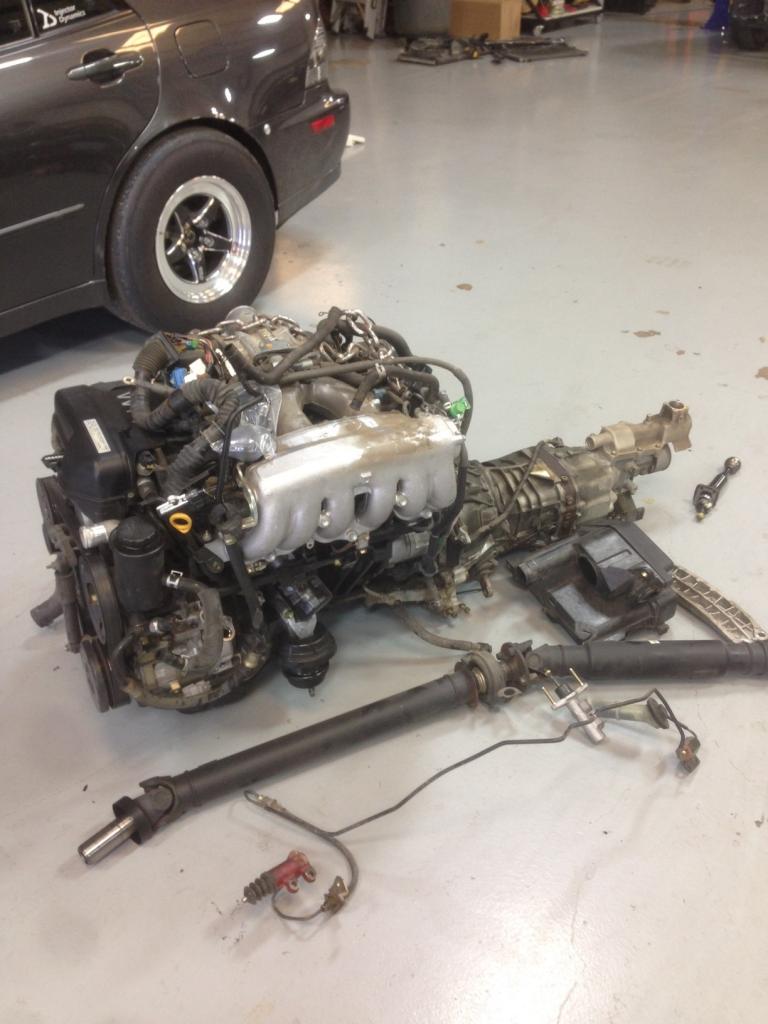
I don't plan to cover engine removal because this is pretty basic but I would like to note some parts worth keeping during this process.
Stock parts to keep:
Transmission mount bolts (4) M10x1.25
A/C lines (2)
Power wire running from alternator to fuse box (1)
Now that you've kept those few items this is what you're left with to sell. Depending on mileage I get between $1000 and $1500 for these parts
1. Parts are plentiful and cheap
2. Incredibly easy to work on
3. Easy to make great power
4. The stock ECU is flashable by many shops
5. Lightens the front end to yield a 50/50 weight distribution
The ls1 swapped is300 has to be one of the most agile and confidence inspiring vehicles I've ever driven. I forget it has 4 doors all the time. If you play your cards right this swap can be completed for $9000-$12,000.
Now moving onto the swap. Its hard to think its been nearly 5 years since I swapped the first ever Is300 with an Ls1. After searching for sometime I found a great deal on this 2003 Sport Design Is300 with a 5spd trans and LSD sporting the Thundercloud Metallic paint color. Love it!
In this thread I will do my best to cover the swapping process from choosing the right Ls engine to basic wiring and purchasing the right swap components.
My go to engine swap is the LS1/T56 combo found in the 1998-2002 Camaro and Trans Am. This combo is a common find on craigslist for $2800-$3500. The F-body wiring harness and front drive accessories provide the easiest solution for the is300 swap. I found this setup with 99,000 miles still in the car and bone stock. Watch out for scammers!
I don't plan to cover engine removal because this is pretty basic but I would like to note some parts worth keeping during this process.
Stock parts to keep:
Transmission mount bolts (4) M10x1.25
A/C lines (2)
Power wire running from alternator to fuse box (1)
Now that you've kept those few items this is what you're left with to sell. Depending on mileage I get between $1000 and $1500 for these parts
Last edited by ATSMATT; 12-07-2014 at 02:41 PM.
11-30-2014 | 02:17 PM
#2
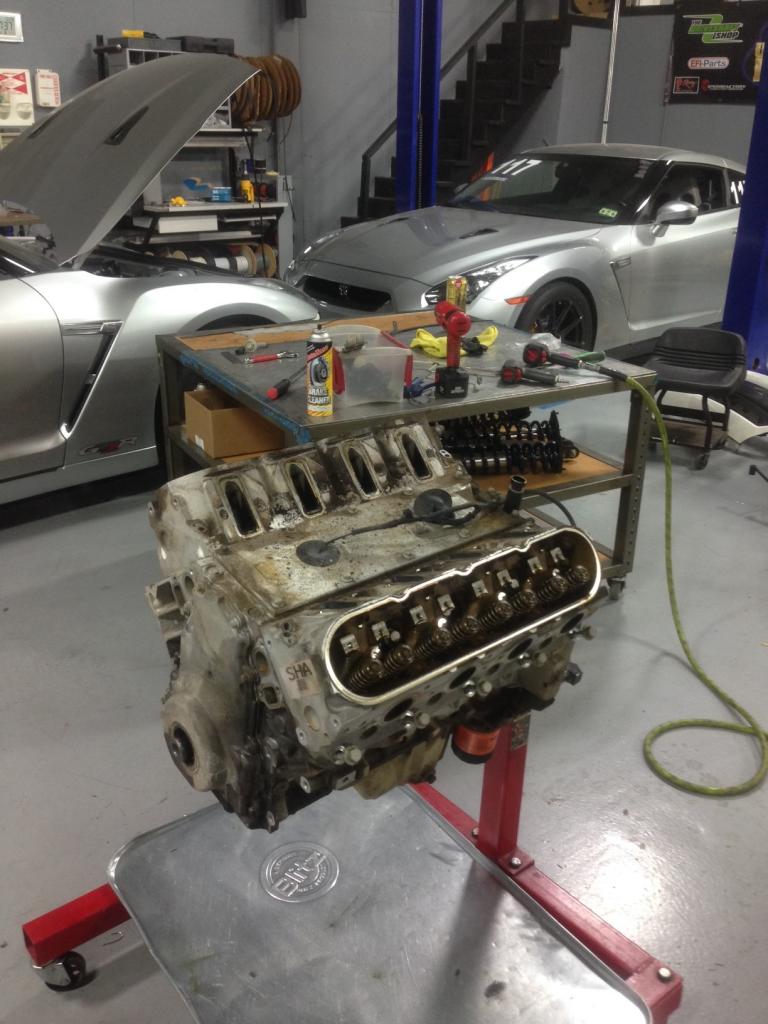
In this section I'll touch a little on engine mods and some basic parts that can be installed before the engine is married to the chassis. If you can spare the money at the beginning of the swap you can save yourself some money and a little headache. I prefer to go through all my engines from top to bottom before install.
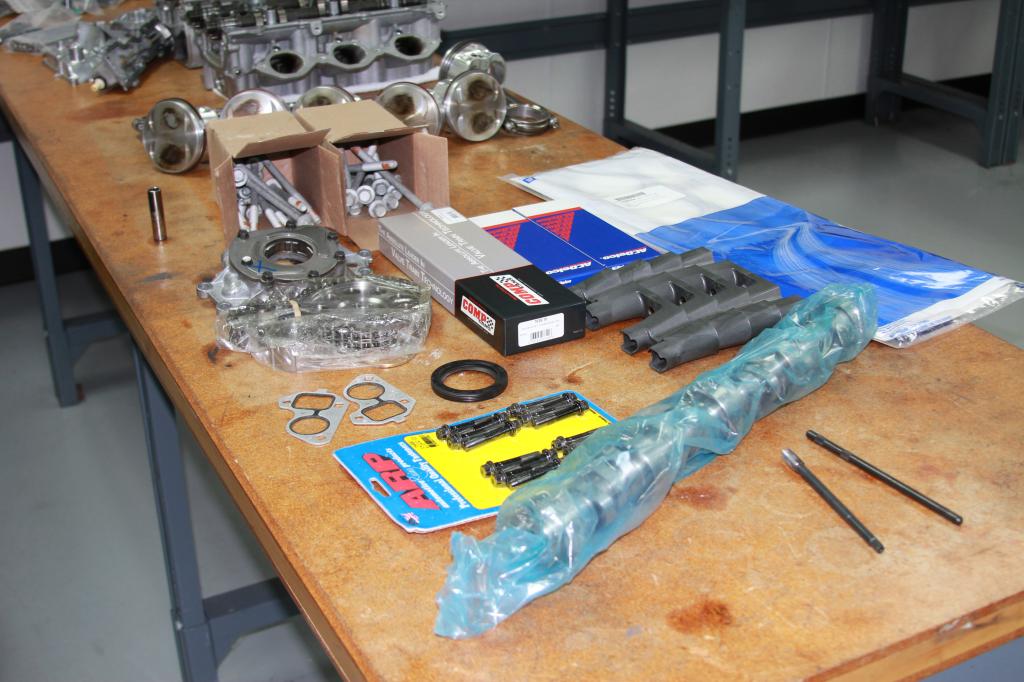
Here's a nice little pile of the parts I'll be installing.
The list:
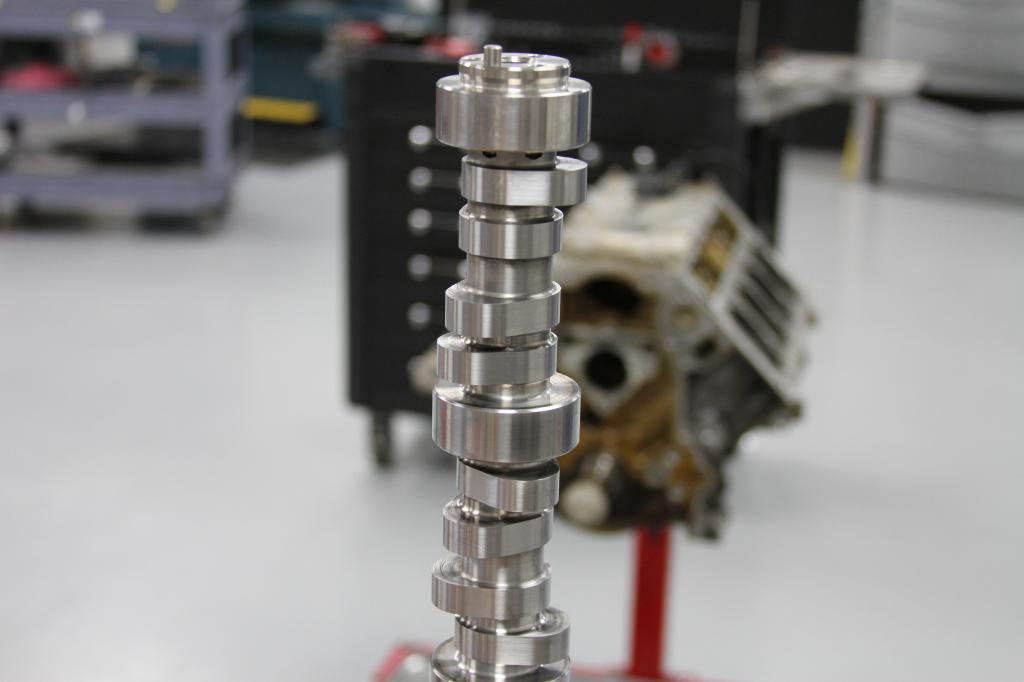
Tick performance 225-228 Camshaft
Comp pushrods
Brian Tooly double valve springs and supporting valvetrain
LS7 roller lifter 12499225
Trick Flow double roller chain/gear set TFS-30678533
LS2 Lifter trays 12595365
MLS head gaskets 12498544
OEM head bolt kits 12498545
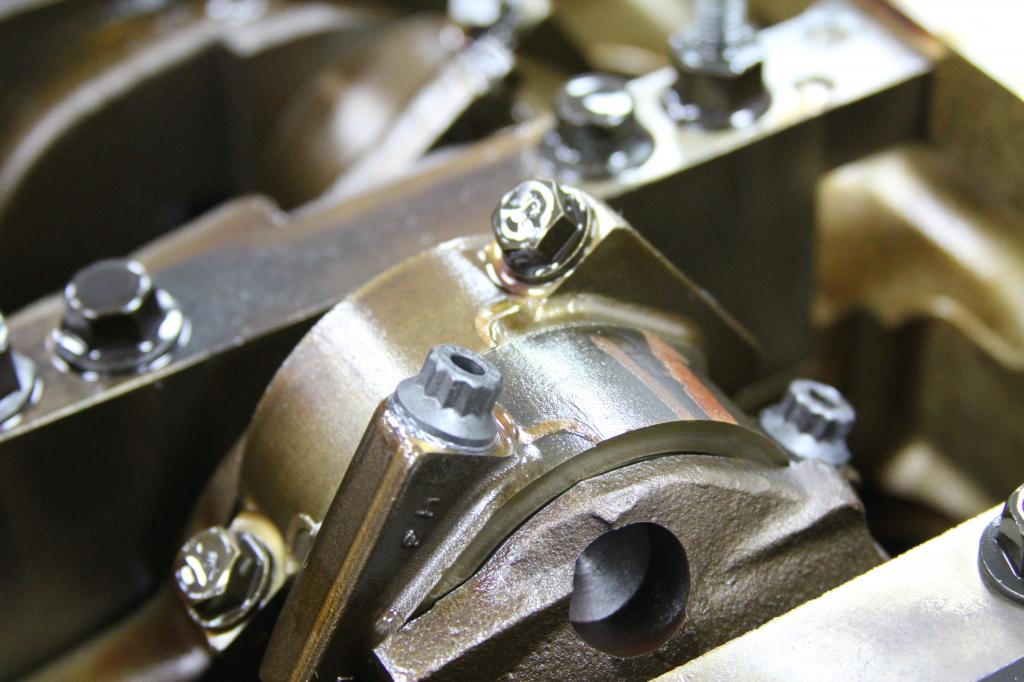
ARP Rod bolts ARP-134-6006
Timing cover gasket 12633904
Water pump gaskets 12630223
Crank seal 12585673
Valve cover gaskets
New oil pump
The dirty task of the tear down and cleaning process. Luckily for me I have a hot wash cleaner and ultrasonic cleaner here at T1.
The early model ls1's are known to have weak rod bolts. Swapping these out now can save you big time in the long run.
There's a ton of info on camshafts I suggest you do you're homework here and be true with yourself when pondering power goals vs reliability. Pro tip - Clean the camshaft inside and out, the factory does a poor job of this most of the time.
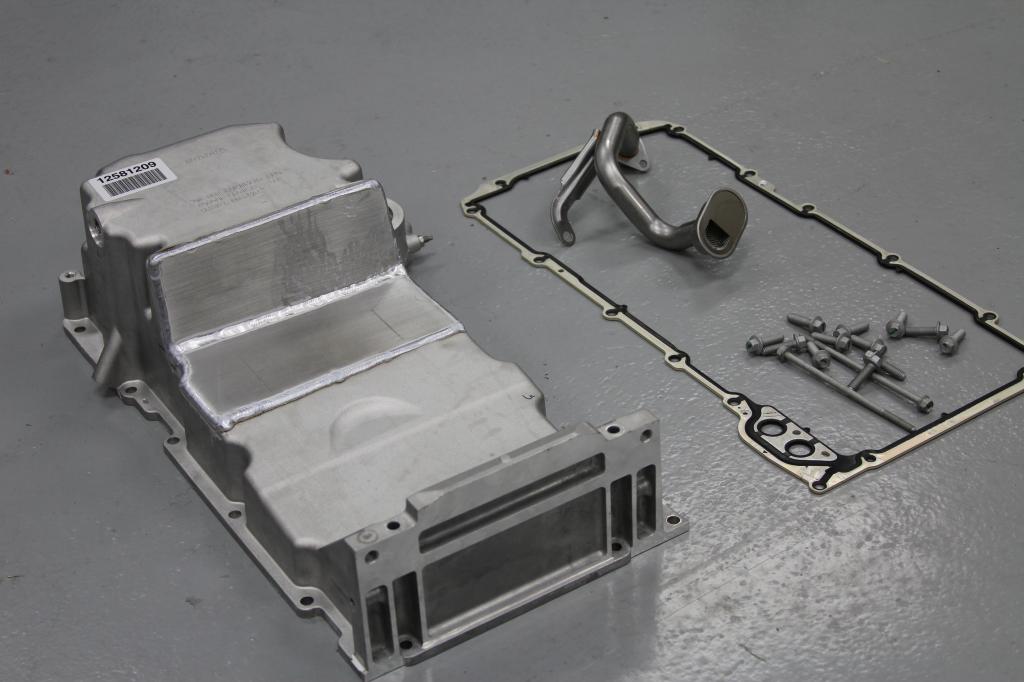
Another key part of this swap is the Pontiac GTO oil pan modified to clear the cross member. Yes you loose some volume but I have guys road racing these cars without issue. I suggest overfilling a bit.
Here's a nice little pile of the parts I'll be installing.
The list:
Tick performance 225-228 Camshaft
Comp pushrods
Brian Tooly double valve springs and supporting valvetrain
LS7 roller lifter 12499225
Trick Flow double roller chain/gear set TFS-30678533
LS2 Lifter trays 12595365
MLS head gaskets 12498544
OEM head bolt kits 12498545
ARP Rod bolts ARP-134-6006
Timing cover gasket 12633904
Water pump gaskets 12630223
Crank seal 12585673
Valve cover gaskets
New oil pump
The dirty task of the tear down and cleaning process. Luckily for me I have a hot wash cleaner and ultrasonic cleaner here at T1.
The early model ls1's are known to have weak rod bolts. Swapping these out now can save you big time in the long run.
There's a ton of info on camshafts I suggest you do you're homework here and be true with yourself when pondering power goals vs reliability. Pro tip - Clean the camshaft inside and out, the factory does a poor job of this most of the time.
Another key part of this swap is the Pontiac GTO oil pan modified to clear the cross member. Yes you loose some volume but I have guys road racing these cars without issue. I suggest overfilling a bit.
11-30-2014 | 02:19 PM
#3
I may not have all the answers for the automatic transmission swap but I will shed some light on the manual T-56 and TR6060 variants. The key issue here is purchasing the right transmission so that the shifter lands in the OEM Lexus shifter hole properly. I've always used the F-body t-56 1998-2002 Camaro/trans am transmission and have found it requires a small amount of notching towards the front of the opening. (I'll post a picture of this here later)
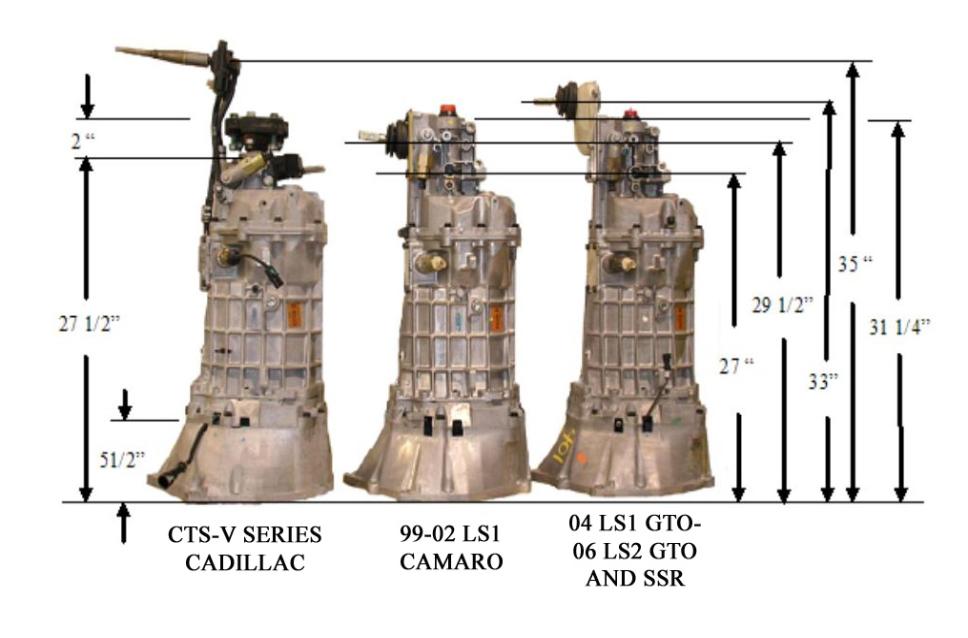
This picture illustrates the the tail housing and shifter location differences between 3 of the most common T56 transmissions. Its easy to see why the F-body trans works so well for the IS300. For those of you that don't know the Corvette places the transmission the rear of the vehicle using a "torque tube" to connect the engine and trans. This would require even more unnecessary spending.
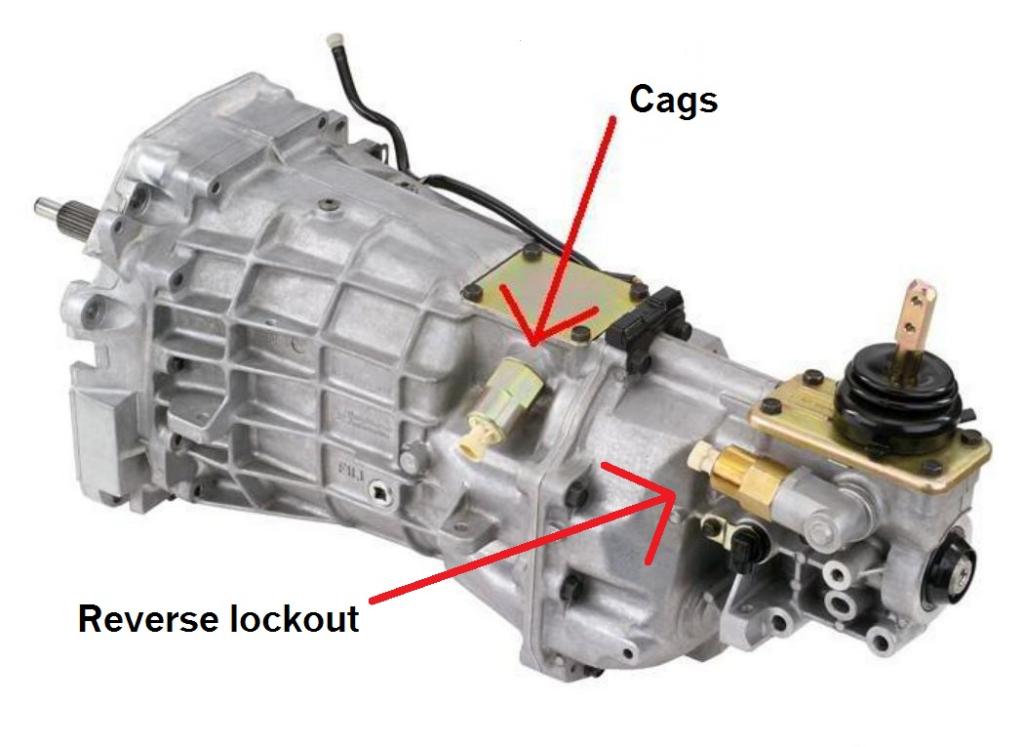
Without going into a lengthy explanation I'll share some part numbers to delete the Skip shift and reverse lock out feature on the T-56 trans. Not only are these features annoying but they don't fit in the Is300 trans tunnel very well. The list of parts is short and cheap.
Reverse Lockout Delete:
Dorman 555-086
CAGS Delete:
Dorman 090-040
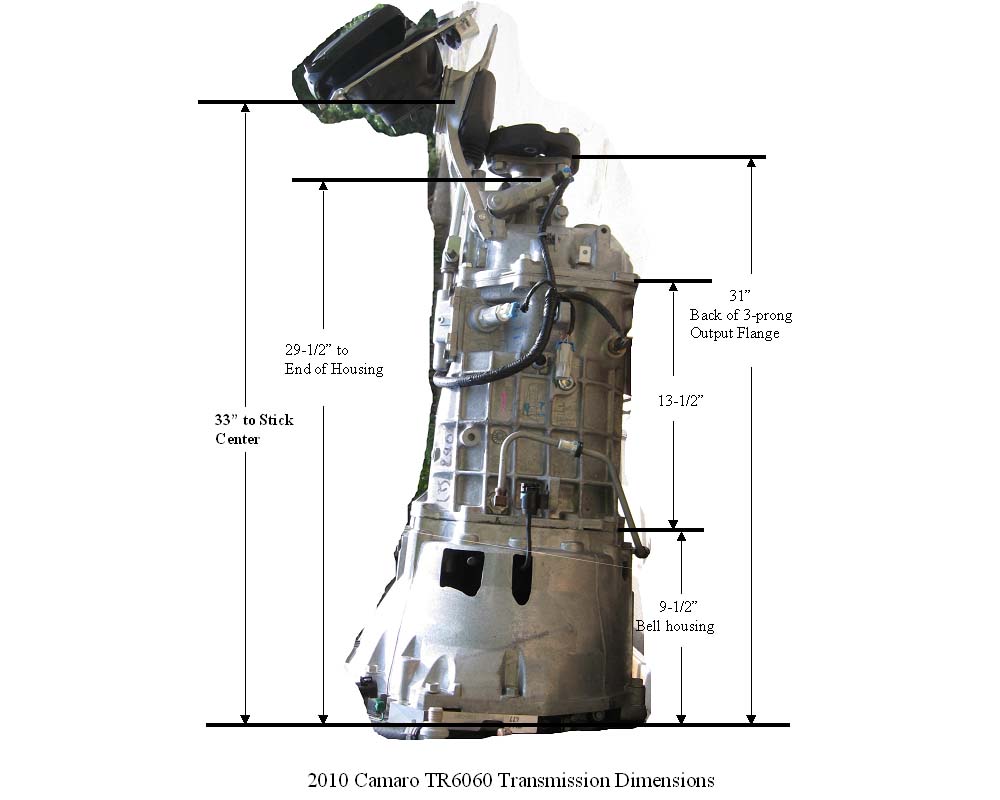
Planning to make some serious power or drag racing on slicks? The T-56 has some weak spots in stock form. If you're planning to make over 500ft lbs of torque I suggest you look into the viper mainshaft upgrade or the next Topic. The TR6060 found in the newer Camaros and Cadillac CTS-V models. The CTS-V trans being the stronger of the two. These will require some work to make them fit but I know it can be done. RPM did the trans for my drag lexus project.
Info on the Tr-6060 can be found in this link, you'll also the the "Tremec Magnum TR-60606" which may offer some nice shifter location options for a good price.
http://www.hotrod.com/how-to/transmi...-transmission/
CTS-v and Camaro lengths.
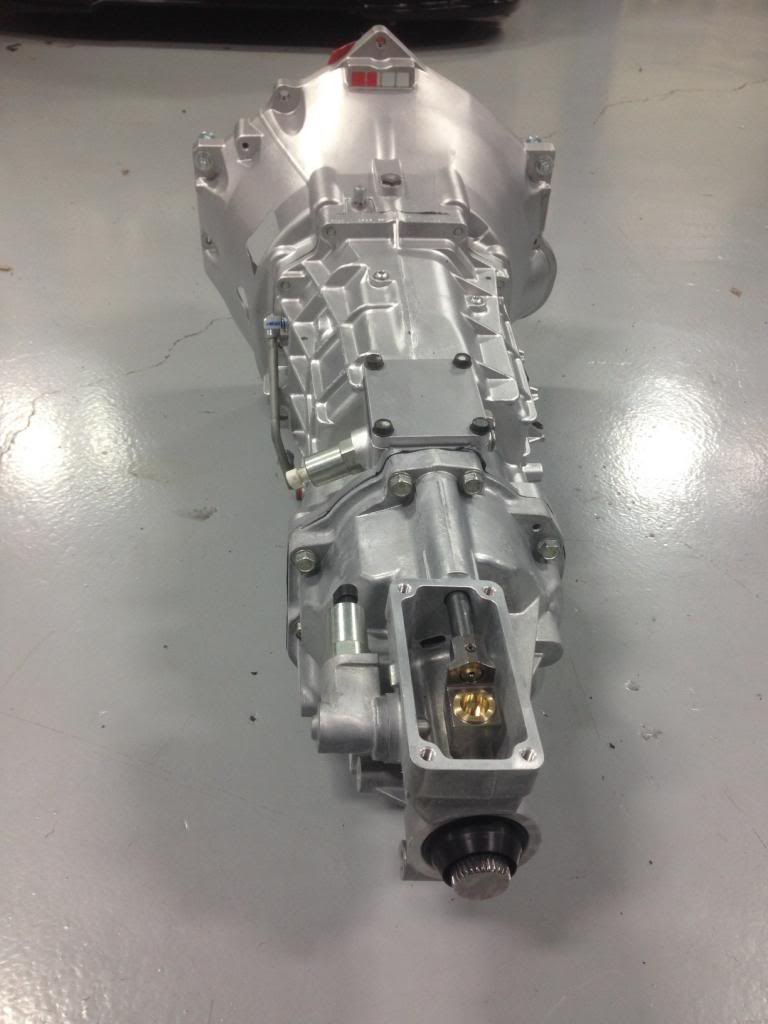
This is my modified CTS-v tr-6060 with f-body tail housing.
This would be a good time to change the clutch since the stockers don't hold much power. I've chose the stock LS7 clutch and flywheel combo since this clutch is known to hold good power while retaining stock driveablity, not too hard on the wallet either.
Clutch and pressure plate: 24255748
Flywheel: 12571611
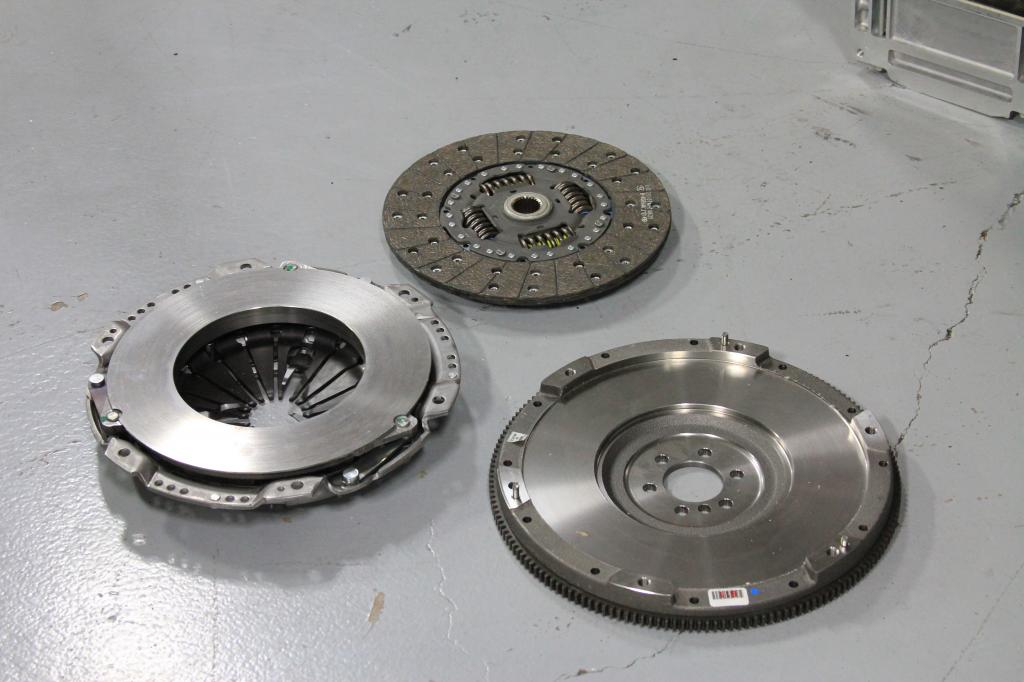
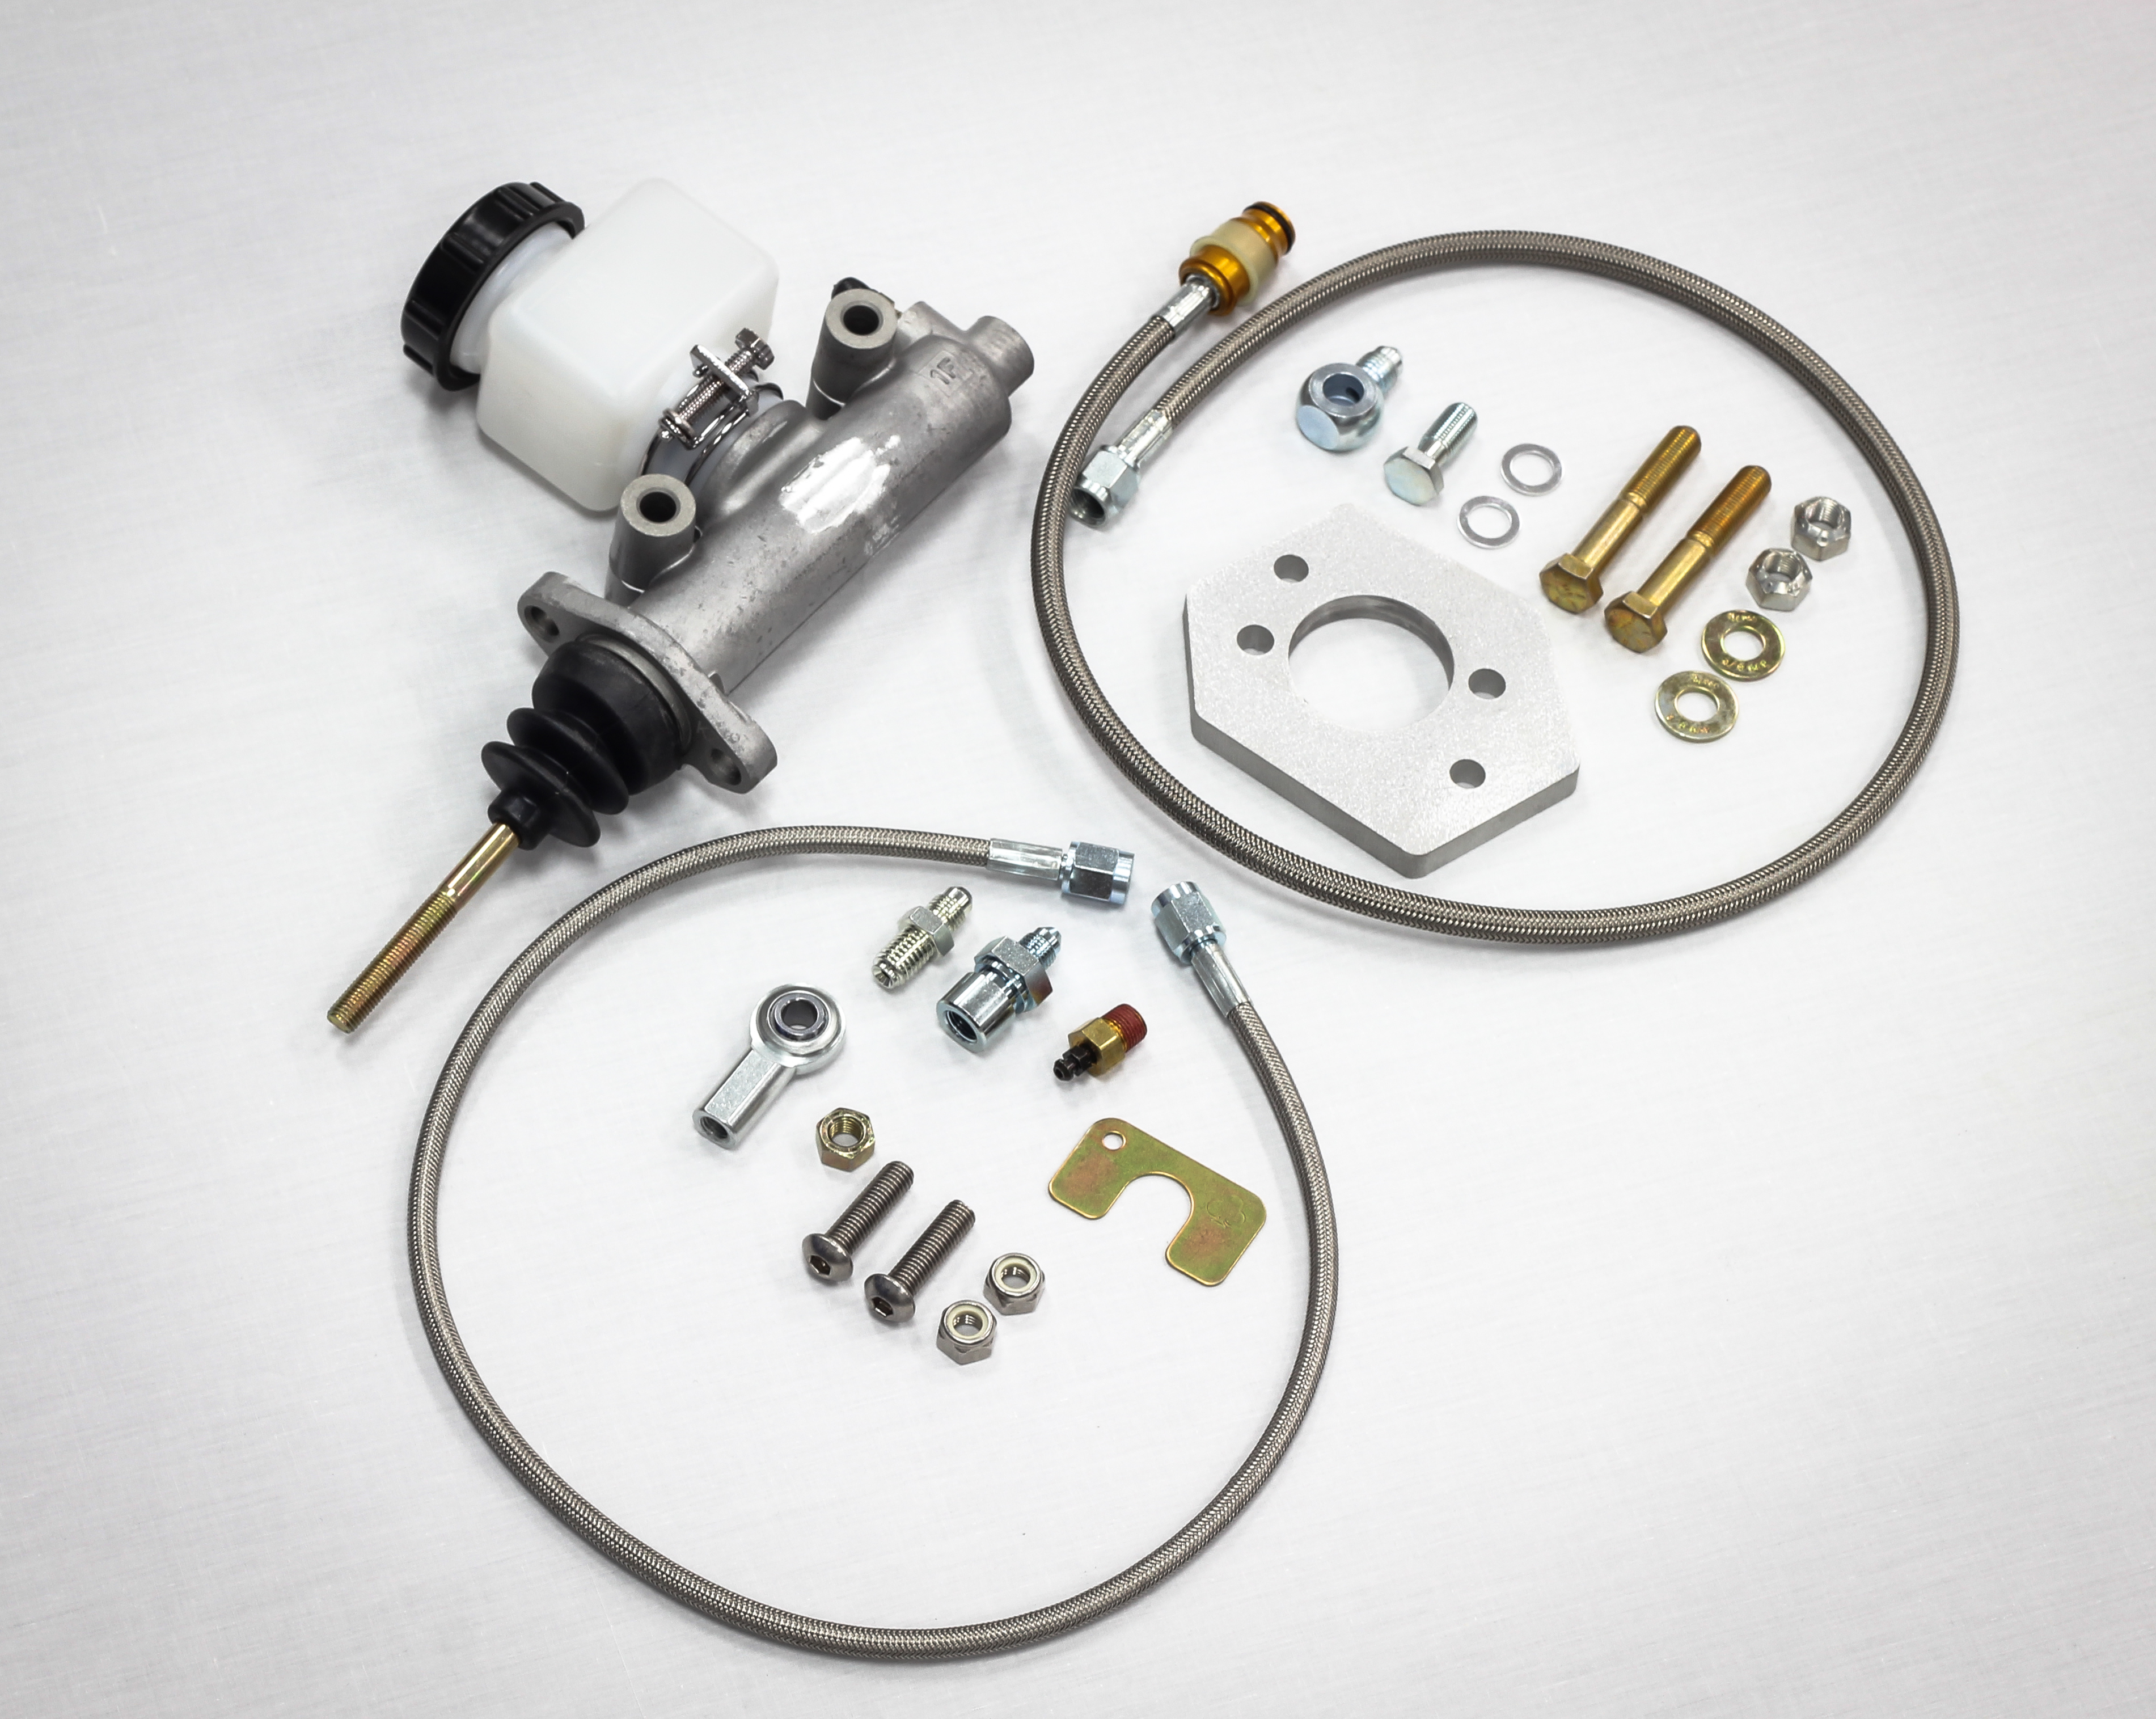
Even if you got lucky enough to find a 5 speed is300 you'll still need to upgrade the master cylinder to a 7/8 bore.
This picture illustrates the the tail housing and shifter location differences between 3 of the most common T56 transmissions. Its easy to see why the F-body trans works so well for the IS300. For those of you that don't know the Corvette places the transmission the rear of the vehicle using a "torque tube" to connect the engine and trans. This would require even more unnecessary spending.
Without going into a lengthy explanation I'll share some part numbers to delete the Skip shift and reverse lock out feature on the T-56 trans. Not only are these features annoying but they don't fit in the Is300 trans tunnel very well. The list of parts is short and cheap.
Reverse Lockout Delete:
Dorman 555-086
CAGS Delete:
Dorman 090-040
Planning to make some serious power or drag racing on slicks? The T-56 has some weak spots in stock form. If you're planning to make over 500ft lbs of torque I suggest you look into the viper mainshaft upgrade or the next Topic. The TR6060 found in the newer Camaros and Cadillac CTS-V models. The CTS-V trans being the stronger of the two. These will require some work to make them fit but I know it can be done. RPM did the trans for my drag lexus project.
Info on the Tr-6060 can be found in this link, you'll also the the "Tremec Magnum TR-60606" which may offer some nice shifter location options for a good price.
http://www.hotrod.com/how-to/transmi...-transmission/
CTS-v and Camaro lengths.
This is my modified CTS-v tr-6060 with f-body tail housing.
This would be a good time to change the clutch since the stockers don't hold much power. I've chose the stock LS7 clutch and flywheel combo since this clutch is known to hold good power while retaining stock driveablity, not too hard on the wallet either.
Clutch and pressure plate: 24255748
Flywheel: 12571611
Even if you got lucky enough to find a 5 speed is300 you'll still need to upgrade the master cylinder to a 7/8 bore.
11-30-2014 | 02:20 PM
#4
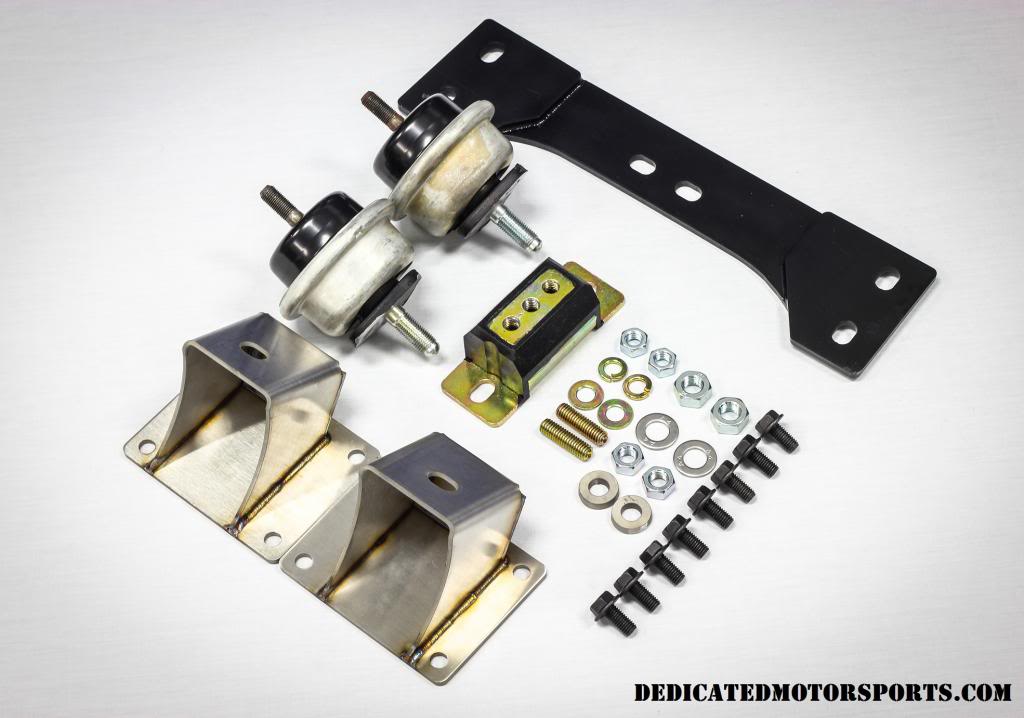
When it comes to the mounts you have a couple choices. You can make your own assuming you have the tools, skills and time necessary to do so. Word of advice the stock Is300 engine isolators are weak so avoid using them if you build mounts yourself.
I'm partial to this kit. The hard work is done for you and includes all mounting hardware.
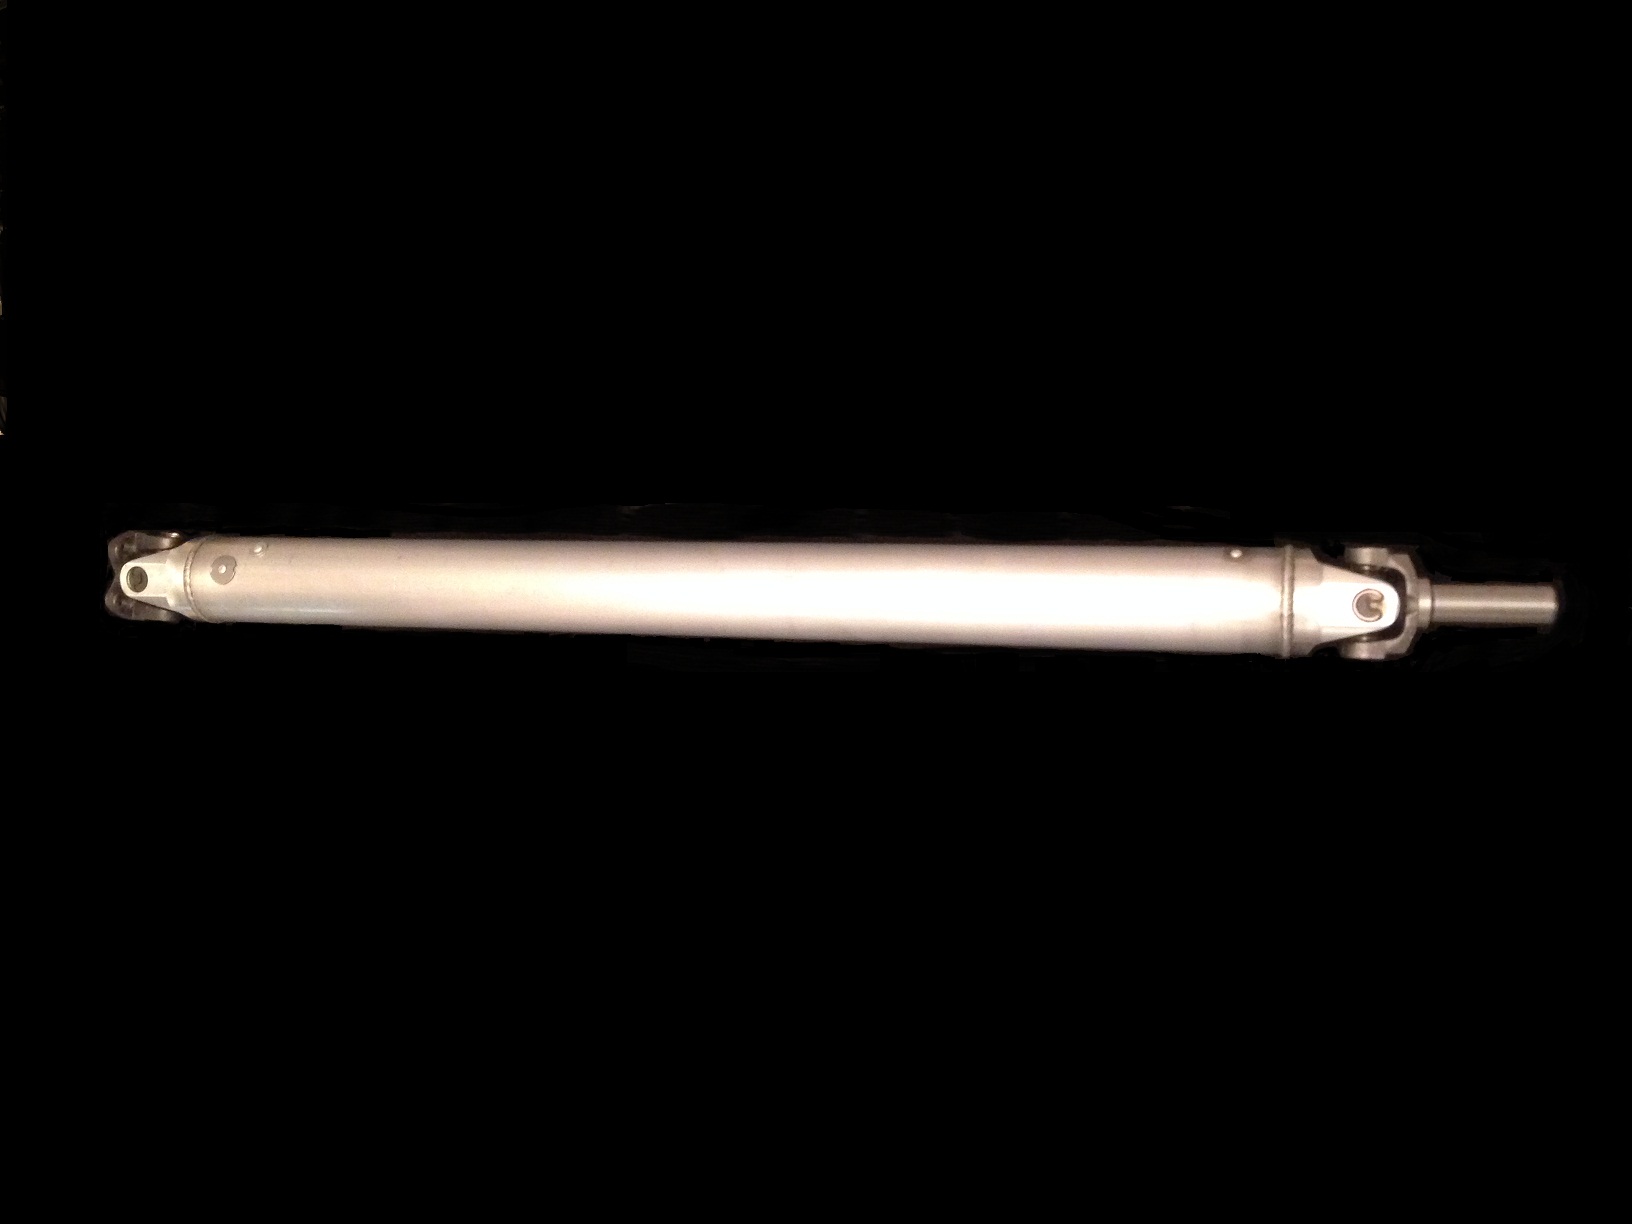
You'll also need a driveshaft, these can be made to your spec locally or purchased from the site above.
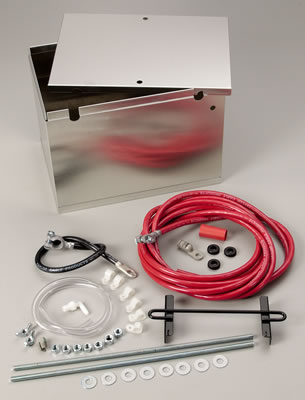
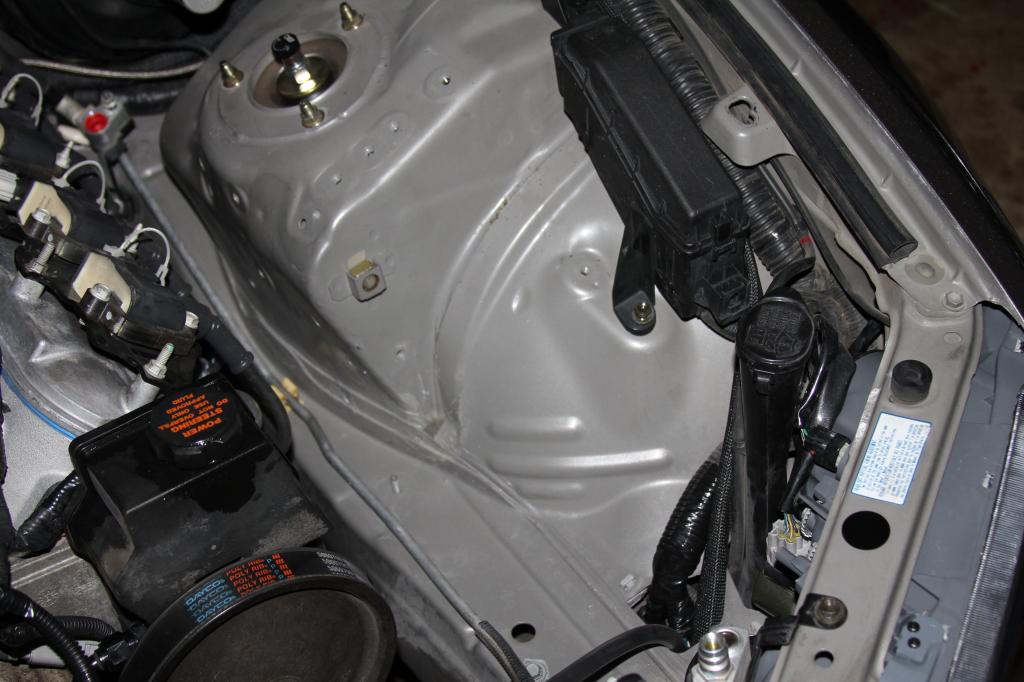
I've confirmed ABS relocation is NOT necessary but it does help to clean up the engine bay substantially if moved. The LS1 ecu is big and bulky with no real protrusions for mounting. For years I've mounted mine in the stock battery location to do so you'll need to relocate the batter to the truck.
This battery box is a nice choice. Taylor part number 48101
http://www.summitracing.com/parts/tay-48101
I know I touched on the fact that the Miles per gallon and coolant temp gauges will no longer be working. However I've found the use of this inexpensive Scangauge to be quite convenient. Not only does it display a digital signal of what the GM ecu is reading but you can also read codes and reset the ecu on the fly.

I'm partial to this kit. The hard work is done for you and includes all mounting hardware.
You'll also need a driveshaft, these can be made to your spec locally or purchased from the site above.
I've confirmed ABS relocation is NOT necessary but it does help to clean up the engine bay substantially if moved. The LS1 ecu is big and bulky with no real protrusions for mounting. For years I've mounted mine in the stock battery location to do so you'll need to relocate the batter to the truck.
This battery box is a nice choice. Taylor part number 48101
http://www.summitracing.com/parts/tay-48101
I know I touched on the fact that the Miles per gallon and coolant temp gauges will no longer be working. However I've found the use of this inexpensive Scangauge to be quite convenient. Not only does it display a digital signal of what the GM ecu is reading but you can also read codes and reset the ecu on the fly.
12-03-2014 | 08:05 PM
#5
Thanks Matt! If you don't mind I'll add a bit of the info I learned as I did my swap.
By keeping the Lexus ECU and some of the wiring hooked up I was able to retain the stock coolant temp gauge, the outside temperature display (by the clock), and my fuel gauge reads smooth. I can't confirm but have read about the fuel gauge dropping by 1/4 tank increments, mounting the Lexus MAF in the intake plumbing makes it think the 2JZ is running and smooths the gauge out.
I also found that the upper radiator hose from a 2005-2010 Cobalt fits this swap perfect. I never did find a good fit for the lower, it is just spliced together.
If I think of anything else I will add it. And once again, thank you Matt for all the work you have put into making this swap possible.
12-03-2014 | 11:22 PM
#6
Thanks Matt! If you don't mind I'll add a bit of the info I learned as I did my swap.
By keeping the Lexus ECU and some of the wiring hooked up I was able to retain the stock coolant temp gauge, the outside temperature display (by the clock), and my fuel gauge reads smooth. I can't confirm but have read about the fuel gauge dropping by 1/4 tank increments, mounting the Lexus MAF in the intake plumbing makes it think the 2JZ is running and smooths the gauge out.
I also found that the upper radiator hose from a 2005-2010 Cobalt fits this swap perfect. I never did find a good fit for the lower, it is just spliced together.
If I think of anything else I will add it. And once again, thank you Matt for all the work you have put into making this swap possible.
By keeping the Lexus ECU and some of the wiring hooked up I was able to retain the stock coolant temp gauge, the outside temperature display (by the clock), and my fuel gauge reads smooth. I can't confirm but have read about the fuel gauge dropping by 1/4 tank increments, mounting the Lexus MAF in the intake plumbing makes it think the 2JZ is running and smooths the gauge out.
I also found that the upper radiator hose from a 2005-2010 Cobalt fits this swap perfect. I never did find a good fit for the lower, it is just spliced together.
If I think of anything else I will add it. And once again, thank you Matt for all the work you have put into making this swap possible.
I've left the stock ecu in place for some other builds like a 1200hp GTE powered Is300 but I just didn't like having all the extra wires and what not still in the chassis. Did you leave it in the engine bay or get crafty and stash it under the seat or something?
Matt
12-04-2014 | 05:19 AM
#7
I say post it up! People like options and I know a lot of people want all the gauges functioning. As for the fuel gauge I do notice the quarter drops in level. Considering I never pass a fuel station I guess it never bothered me lol.
I've left the stock ecu in place for some other builds like a 1200hp GTE powered Is300 but I just didn't like having all the extra wires and what not still in the chassis. Did you leave it in the engine bay or get crafty and stash it under the seat or something?
Matt
I've left the stock ecu in place for some other builds like a 1200hp GTE powered Is300 but I just didn't like having all the extra wires and what not still in the chassis. Did you leave it in the engine bay or get crafty and stash it under the seat or something?
Matt
I wasn't going for show car, or super clean engine bay. My goal was to make it look more or less like it was a factory install so I left it in the bay in the factory location. Have a look.

Last edited by eng1nerd; 12-04-2014 at 05:26 AM.
Trending Topics
12-04-2014 | 10:11 AM
#8

I can't wait till you get to the wiring side of this I removed my factory ecu n such and trying to do a wire tuck on the driver side but can't seem to find a good way to route the headlight /fan wiring. I'm pretty low and I'm worried I'll start rubbing the wires away if I go close the wheel well, the fender sits way high if I go in line with them.. How did u go about this Matt I looked at all ur builds u posted and I know u did it very nicely but can't see how..
12-04-2014 | 07:21 PM
#9
I can't wait till you get to the wiring side of this I removed my factory ecu n such and trying to do a wire tuck on the driver side but can't seem to find a good way to route the headlight /fan wiring. I'm pretty low and I'm worried I'll start rubbing the wires away if I go close the wheel well, the fender sits way high if I go in line with them.. How did u go about this Matt I looked at all ur builds u posted and I know u did it very nicely but can't see how..
Matt
12-04-2014 | 10:19 PM
#10
I did that just if u can point me in the right direction of best way to route them would be appreciated.
12-07-2014 | 02:58 PM
#12
12-07-2014 | 05:36 PM
#13
Now onto the part everyone seems to fear "the wiring". After looking at some of my old build threads I can see why this part may look intimidating. Truth be told its actually incredibly easy.
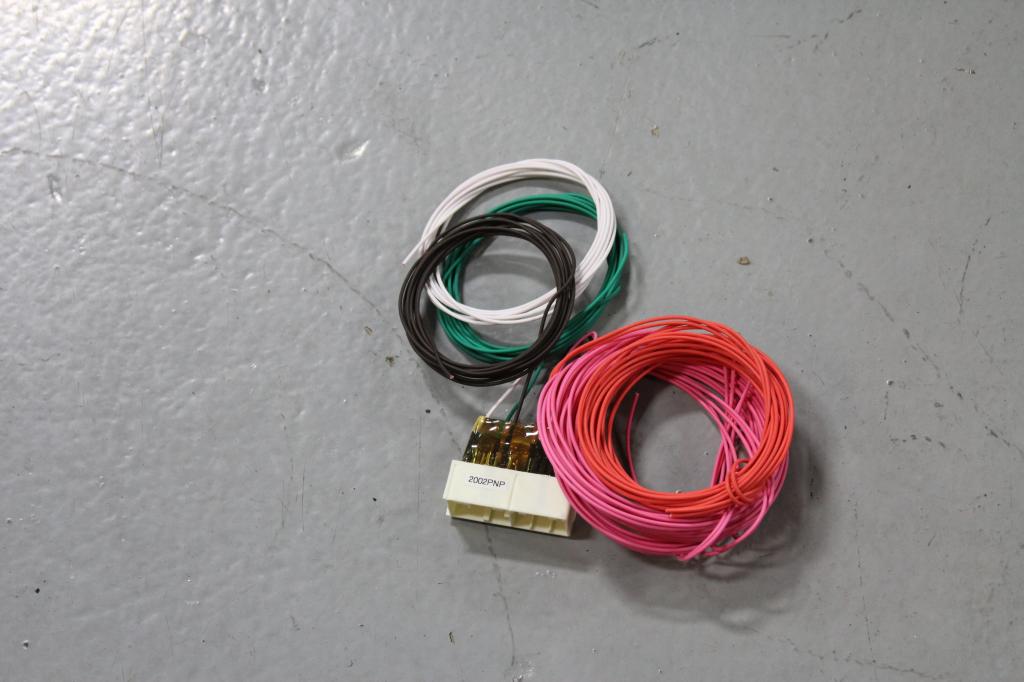
I've taking the liberty of making a "flying lead harness". This harness will utilize all the factory Lexus circuits available on the ecu header connector while also tricking some of the circuits to work with the GM ecu.
GM Ecu pinouts and body harness connectors can be found on here.
http://lt1swap.com/wiringharness.htm
Is300 wiring can be found in this link but I highly suggest purchasing the Lexus wiring manual if you're serious about wiring.
http://www.2jzgarage.com/2013/04/is300-wiring-diagrams/
http://www.2jzgarage.com/2013/04/lex...0-ecu-pinouts/
These are my go to books.

Keeping with the theme, the 1998-2002 Camaro and Trans-Am F-body wiring will be the only harness I'll cover.
The color coding on my fling lead harness matches the Gm wires as close as possible. These connections are made on the body harness side of the GM wiring harness.
Found here: http://lt1swap.com/ls1_wiring_harnes...connectors.htm
Pink = Switched 12v
Orange = Constant 12v
Brown = Check engine light
Green= Data stream output to the OBD2 port
White= Tachometer
Hook up the pick and orange wires and your car will run. Imagine that..
I've highlighted the circuit required. Some of these are for the a/c system I'll cover later.


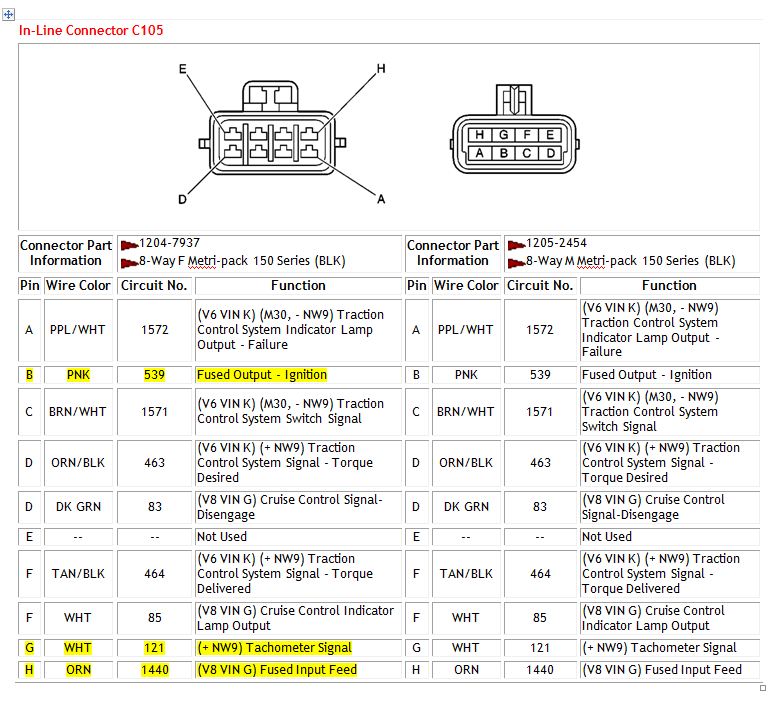
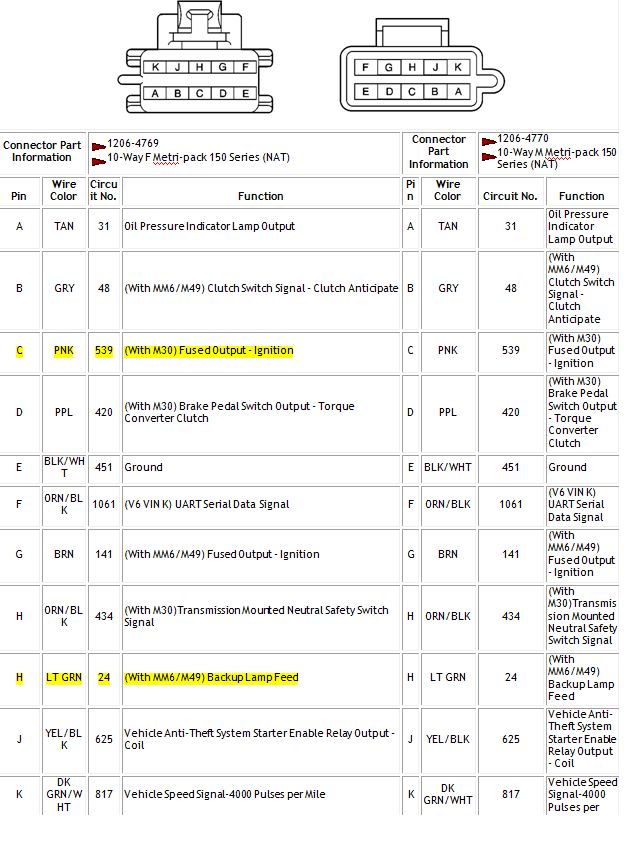
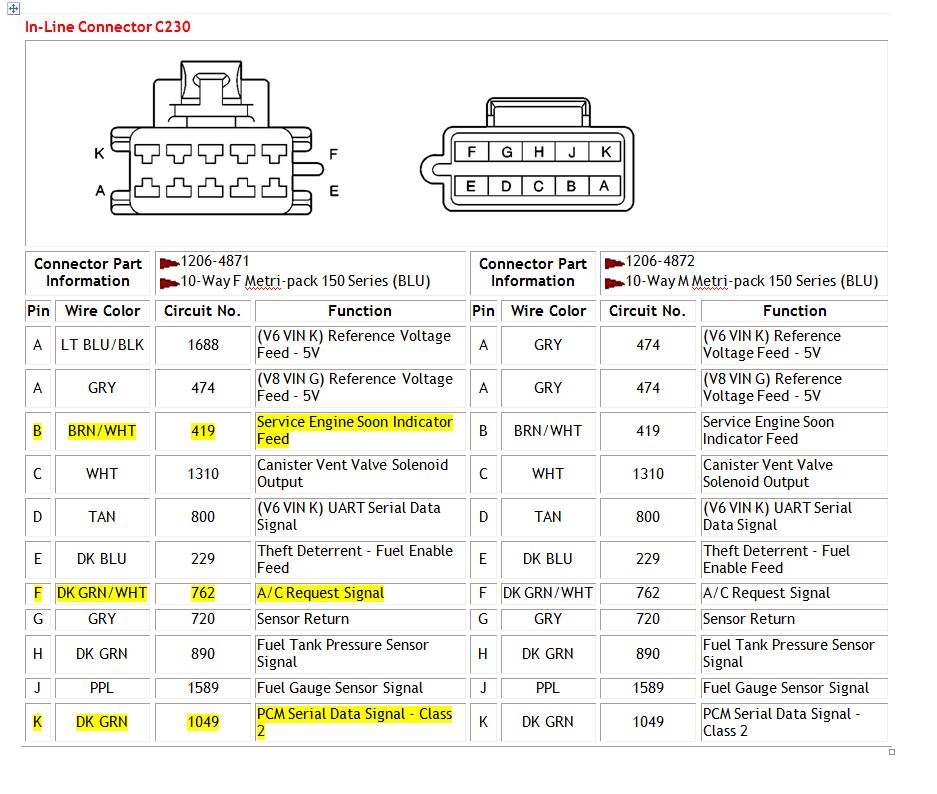
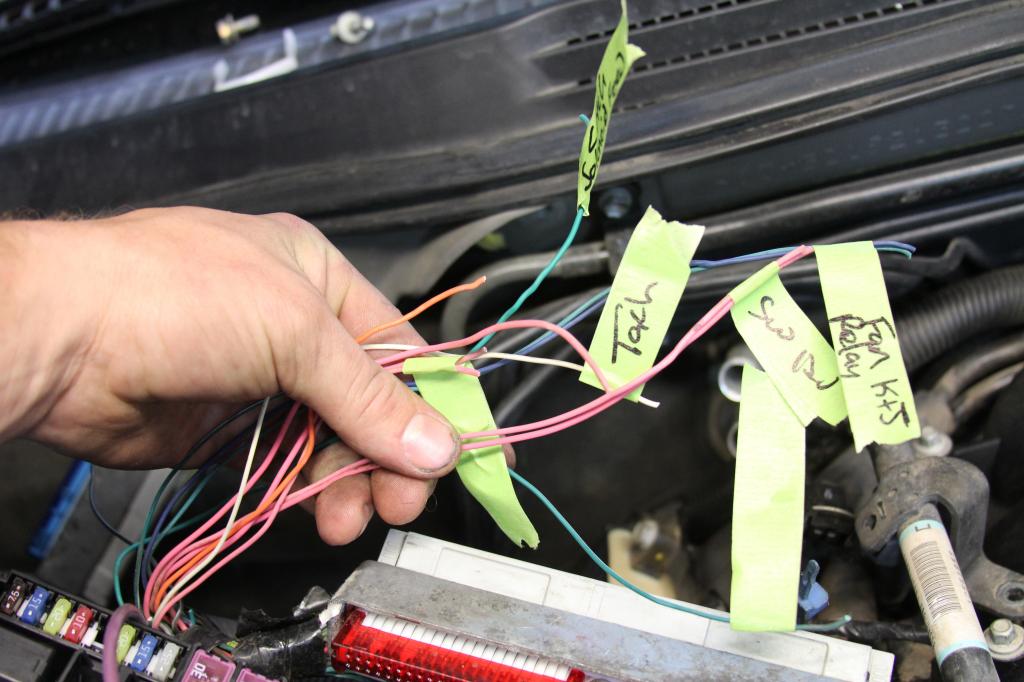
I'll go through all crucial GM wires and label them making my connections easier. This is what you should end up with following the guide above.
The GM body harness connectors. If you have the opposing side of these connectors you can use them for the splice.
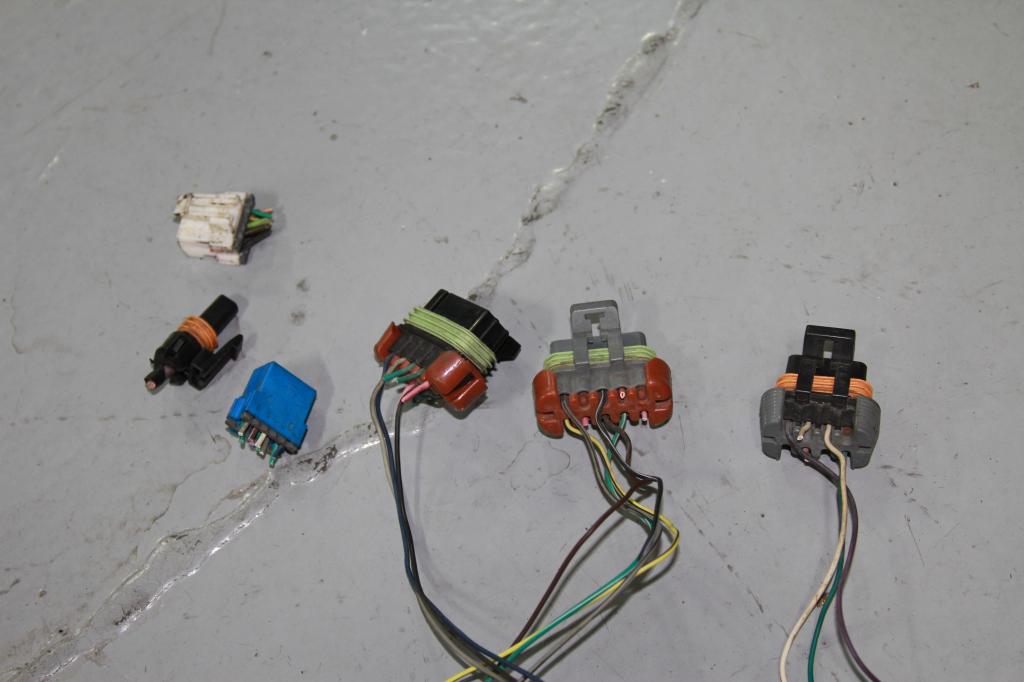
I used a Deutsch dtm connector to make my 11-12 connections here.
My harness plugs directly into the stock lexus ecu header connectors. With enough length to run these wires nearly anywhere in the engine bay. With the F-body harness I typically install it where the battery sits.
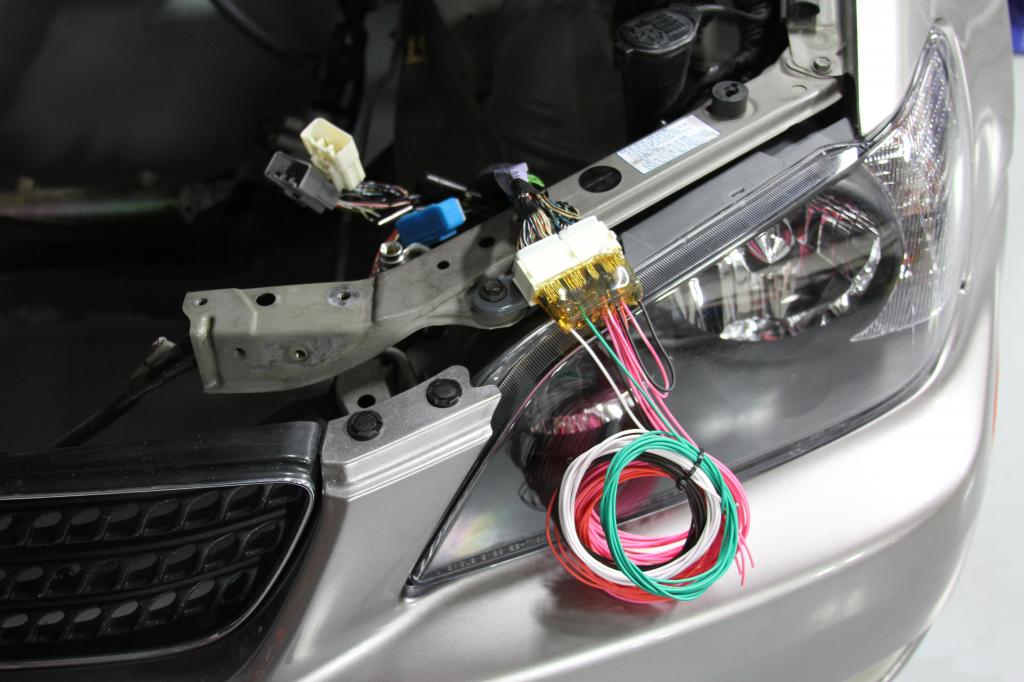
Some additional wiring will need to be performed in the stock Lexus ecu location. The park position switch will need to be jumpered (if an auto chassis) and the reverse lights. Send these wires to the ecu locations with the rest of the jumper harness. It would take too many pictures to illustrate every step of this process.
For the 2001:
EA1 Jumper pin 2 to pin 6 (Park Position switch)
EA2 Pin 2 (Tacho)
J1 Pin 3 feed power through reverse switch to Pin 2 (Reverse lights)
For 2002-2005:
EA1 Jumper pin 2 to pin 6 (Park Position switch)
J1 Pin 3 feed power through reverse switch to Pin 2 (Auto Reverse lights)
J1 Pin 2 feed power through reverse switch to Pin 1 (manual Reverse lights)
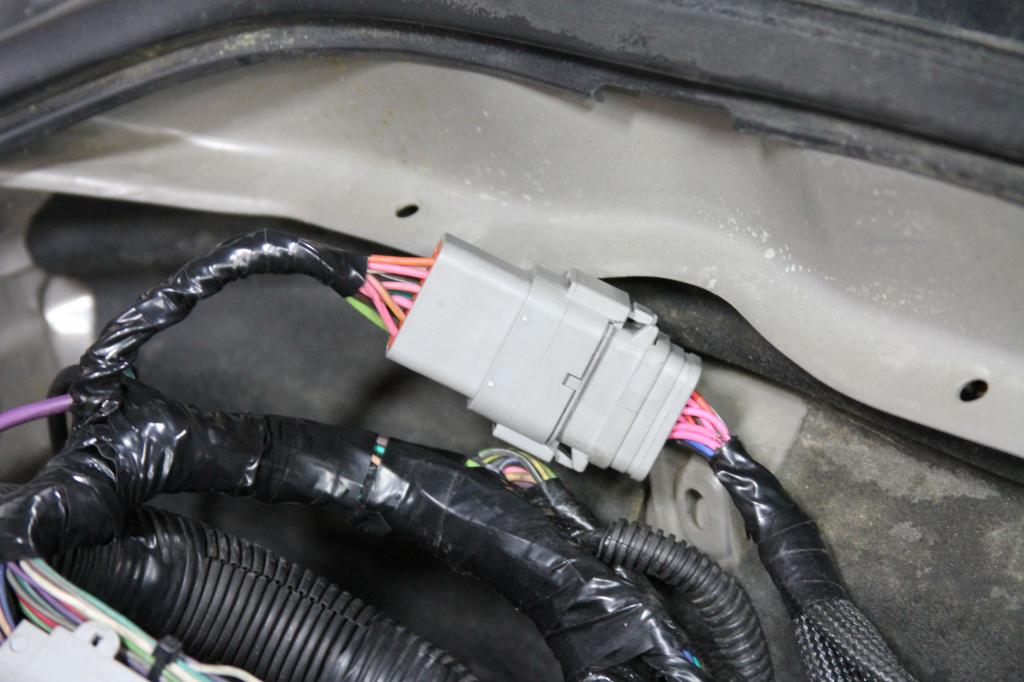
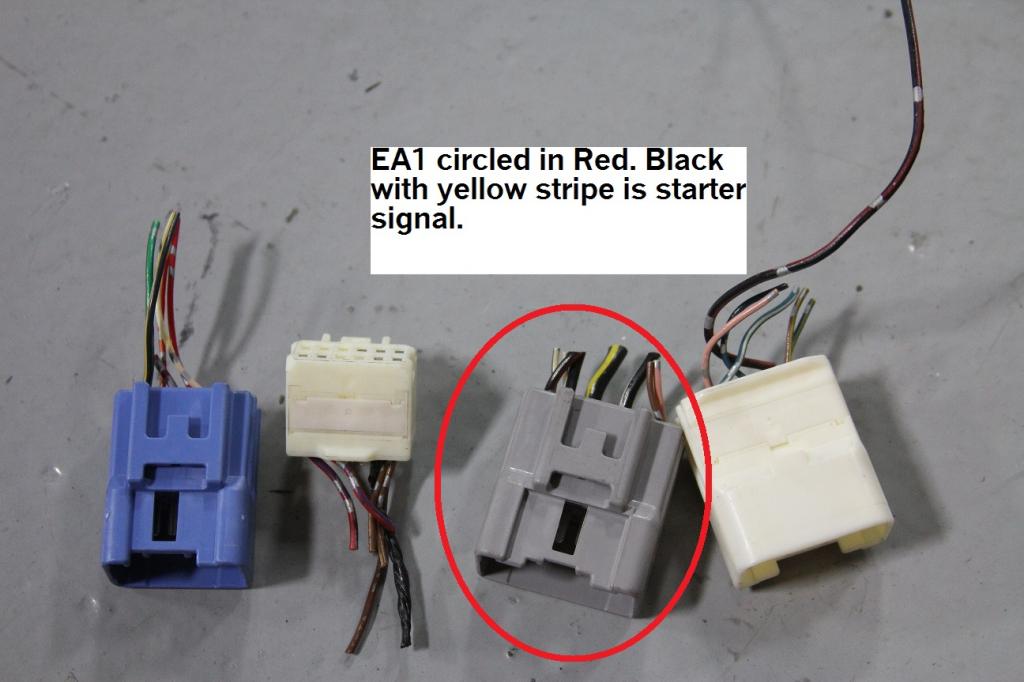
You will actually need two additional wires from the Lexus ecu location to the GM ecu location. These are the Pin J1 reverse light wires. Basically a power to the reverse light switch (GM) and a return power to the reverse lights (Lexus).
You can see EA1 in this picture and also the white connector to the left of EA1 is the J1 connector.
Once my wiring is complete I tuck the connectors down the old ECU box vent hole in the body.
I've taking the liberty of making a "flying lead harness". This harness will utilize all the factory Lexus circuits available on the ecu header connector while also tricking some of the circuits to work with the GM ecu.
GM Ecu pinouts and body harness connectors can be found on here.
http://lt1swap.com/wiringharness.htm
Is300 wiring can be found in this link but I highly suggest purchasing the Lexus wiring manual if you're serious about wiring.
http://www.2jzgarage.com/2013/04/is300-wiring-diagrams/
http://www.2jzgarage.com/2013/04/lex...0-ecu-pinouts/
These are my go to books.
Keeping with the theme, the 1998-2002 Camaro and Trans-Am F-body wiring will be the only harness I'll cover.
The color coding on my fling lead harness matches the Gm wires as close as possible. These connections are made on the body harness side of the GM wiring harness.
Found here: http://lt1swap.com/ls1_wiring_harnes...connectors.htm
Pink = Switched 12v
Orange = Constant 12v
Brown = Check engine light
Green= Data stream output to the OBD2 port
White= Tachometer
Hook up the pick and orange wires and your car will run. Imagine that..
I've highlighted the circuit required. Some of these are for the a/c system I'll cover later.
I'll go through all crucial GM wires and label them making my connections easier. This is what you should end up with following the guide above.
The GM body harness connectors. If you have the opposing side of these connectors you can use them for the splice.
I used a Deutsch dtm connector to make my 11-12 connections here.
My harness plugs directly into the stock lexus ecu header connectors. With enough length to run these wires nearly anywhere in the engine bay. With the F-body harness I typically install it where the battery sits.
Some additional wiring will need to be performed in the stock Lexus ecu location. The park position switch will need to be jumpered (if an auto chassis) and the reverse lights. Send these wires to the ecu locations with the rest of the jumper harness. It would take too many pictures to illustrate every step of this process.
For the 2001:
EA1 Jumper pin 2 to pin 6 (Park Position switch)
EA2 Pin 2 (Tacho)
J1 Pin 3 feed power through reverse switch to Pin 2 (Reverse lights)
For 2002-2005:
EA1 Jumper pin 2 to pin 6 (Park Position switch)
J1 Pin 3 feed power through reverse switch to Pin 2 (Auto Reverse lights)
J1 Pin 2 feed power through reverse switch to Pin 1 (manual Reverse lights)
You will actually need two additional wires from the Lexus ecu location to the GM ecu location. These are the Pin J1 reverse light wires. Basically a power to the reverse light switch (GM) and a return power to the reverse lights (Lexus).
You can see EA1 in this picture and also the white connector to the left of EA1 is the J1 connector.
Once my wiring is complete I tuck the connectors down the old ECU box vent hole in the body.
Last edited by ATSMATT; 12-07-2014 at 08:06 PM.


