

6.0L + S475 into E46 BMW
 05-18-2015, 09:27 PM
#1

Gonna try to keep this intro short. I race drifty cars, work as a mechanic and I've built a bunch LSx motors/swaps like most of y'all on here. Started this thread on the BMW forum but figured it'll get more attention here. First couple posts are copied/pasted but current post will be the last one haha.
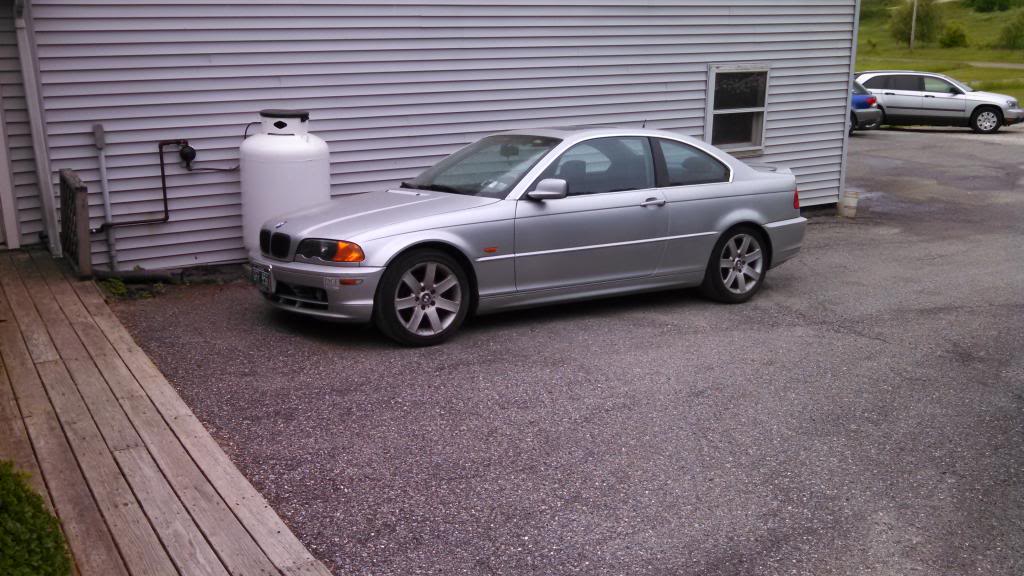
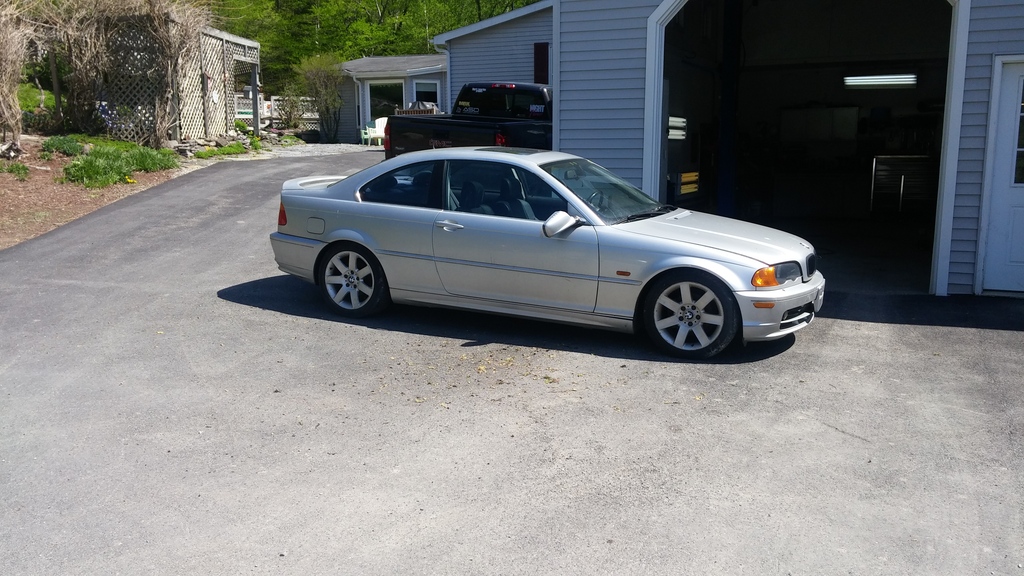
Anyway, I got this 2000 323ci with a rough running motor due to secondary air pump and misc vacuum leaks for pretty cheap. It's a sport edition, seats are in OKAY shape, not great but not horrible, they'll do for a while. Factory upgraded HK sound system, xenons, etc etc.
Snagged a LS2 with spun rod bearing AND T56 with bad input shaft bearing for $1300. Sourced a local crank for $100, have rods in the shop, pistons are still good, gonna throw TSP ported shimmed LS6 oil pump, MS3 cam, PRC dual valvesprings, 7.400" pushrods and 42lb injectors on as well as some nitrous. At least that's the current plan. T56 is off being rebuilt as I type. Certain M3 bits will eventually make their way into/onto the car, BC racing coils at some point, blah blah.

The car basically needs a bunch of small stuff/tlc as it's sat for a while and been neglected. Door handles sucked and it was thrashed inside. Fixed the door handles right away, simply removed the outer handle and bent the metal rod/action lever back inwards towards the inside of the car as years of use had taken its toll and you had to pull really hard and fast to get them to open.
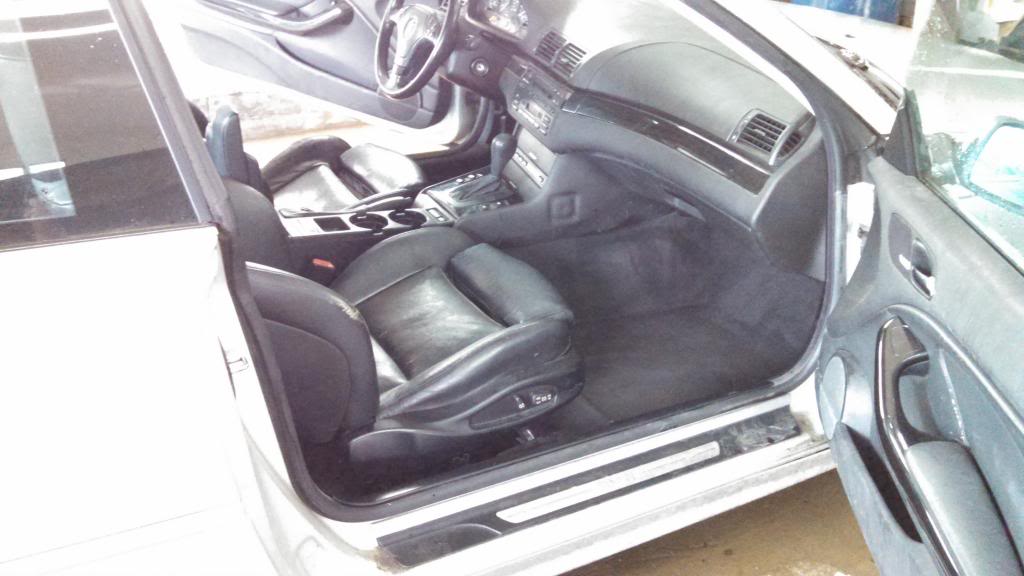
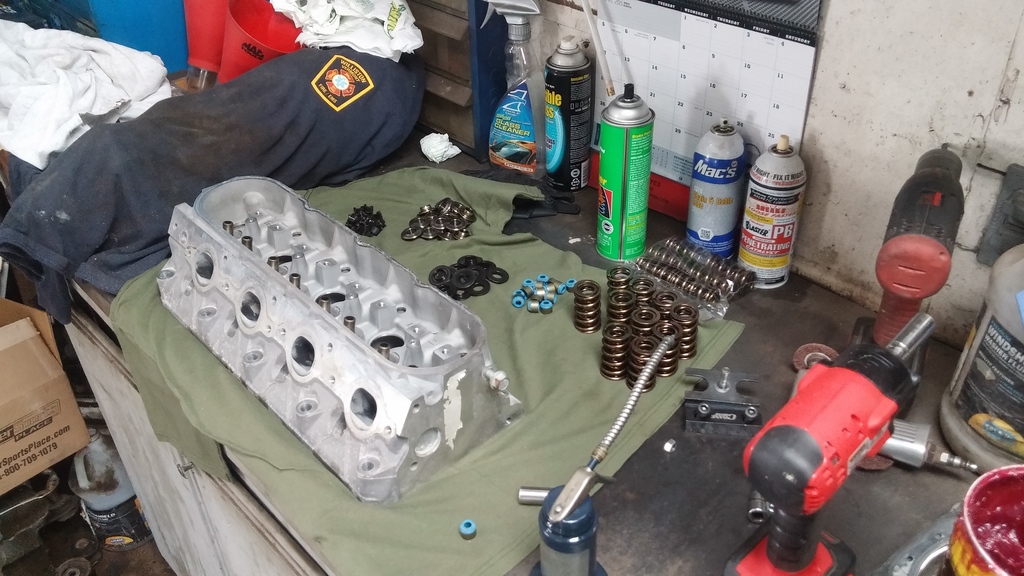
Cleaned the interior up too, took some before pics, gotta take some afters.

Partially cleaned
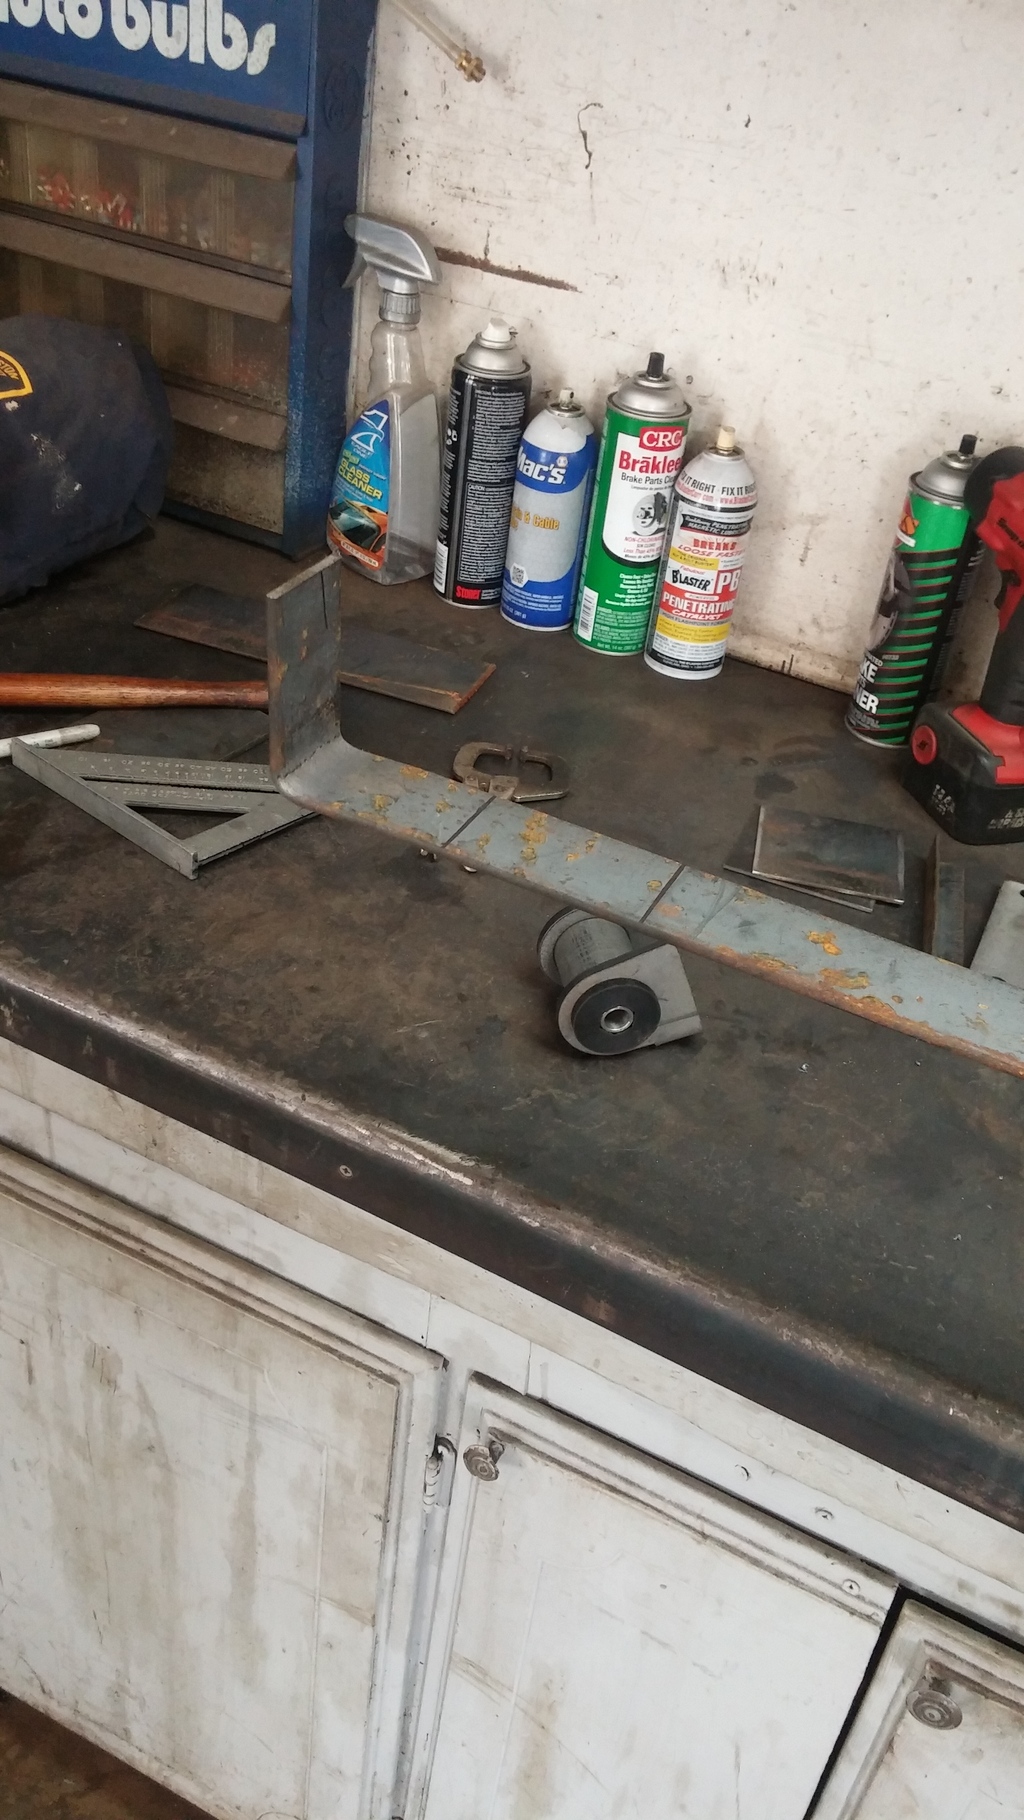
Holley swap pan showed up today. Mount materials ordered last night (will be making a jig for mounts and headers for anyone that will want a set). Afco Dual pass rad and fan leftover from last years drift car build in the shop. Aeromotive 340lph in tank fuel pump leftover from last years build as well. Meziere electric waterpump too haha.
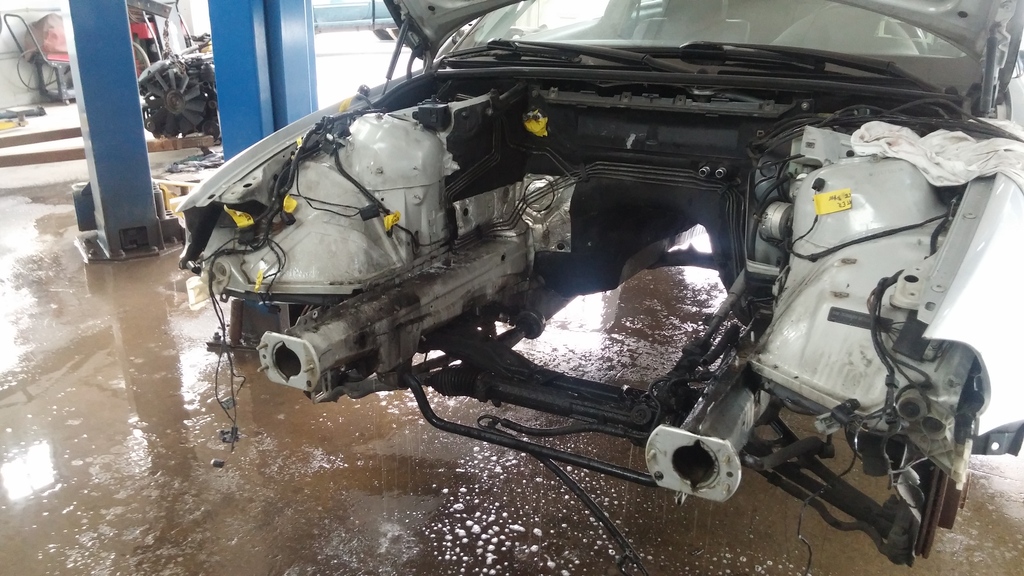
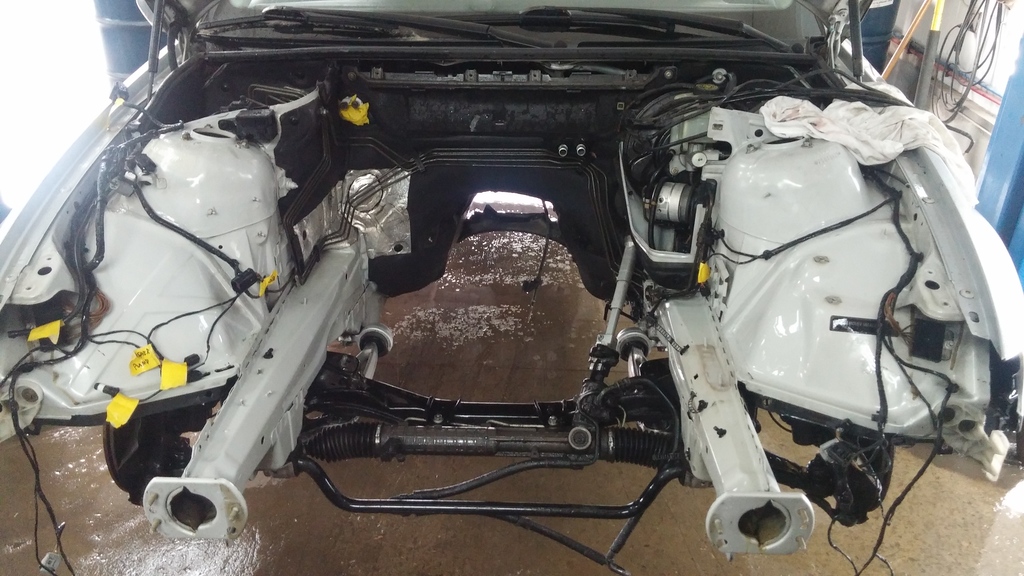
Stock motor and auto trans will be coming out soon.
-Tanner
Anyway, I got this 2000 323ci with a rough running motor due to secondary air pump and misc vacuum leaks for pretty cheap. It's a sport edition, seats are in OKAY shape, not great but not horrible, they'll do for a while. Factory upgraded HK sound system, xenons, etc etc.
Snagged a LS2 with spun rod bearing AND T56 with bad input shaft bearing for $1300. Sourced a local crank for $100, have rods in the shop, pistons are still good, gonna throw TSP ported shimmed LS6 oil pump, MS3 cam, PRC dual valvesprings, 7.400" pushrods and 42lb injectors on as well as some nitrous. At least that's the current plan. T56 is off being rebuilt as I type. Certain M3 bits will eventually make their way into/onto the car, BC racing coils at some point, blah blah.
The car basically needs a bunch of small stuff/tlc as it's sat for a while and been neglected. Door handles sucked and it was thrashed inside. Fixed the door handles right away, simply removed the outer handle and bent the metal rod/action lever back inwards towards the inside of the car as years of use had taken its toll and you had to pull really hard and fast to get them to open.
Cleaned the interior up too, took some before pics, gotta take some afters.
Partially cleaned
Holley swap pan showed up today. Mount materials ordered last night (will be making a jig for mounts and headers for anyone that will want a set). Afco Dual pass rad and fan leftover from last years drift car build in the shop. Aeromotive 340lph in tank fuel pump leftover from last years build as well. Meziere electric waterpump too haha.
Stock motor and auto trans will be coming out soon.
-Tanner
 05-18-2015, 09:28 PM
#2
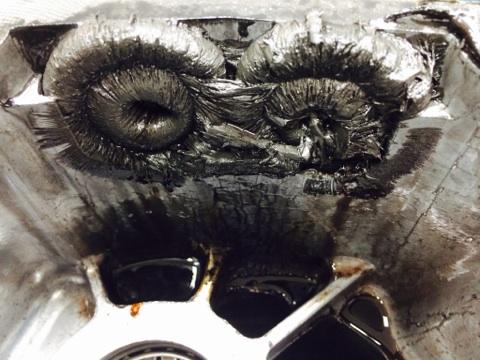
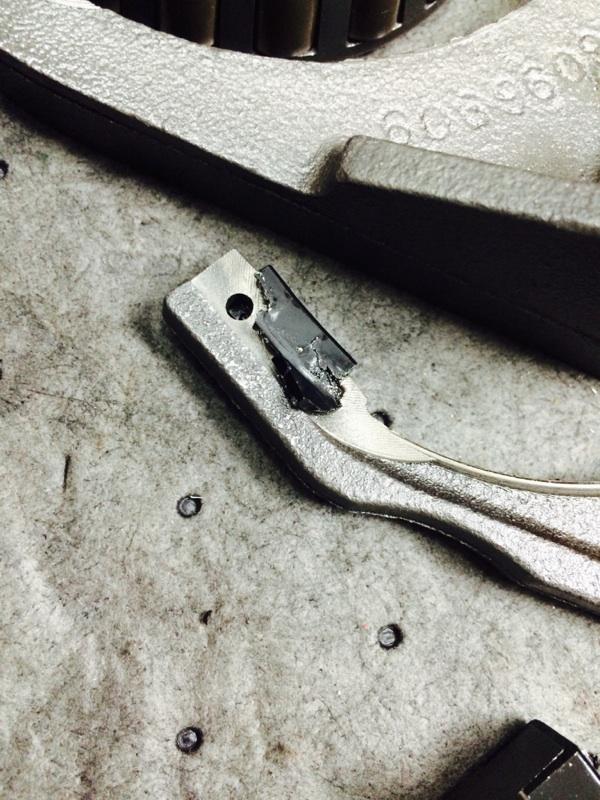
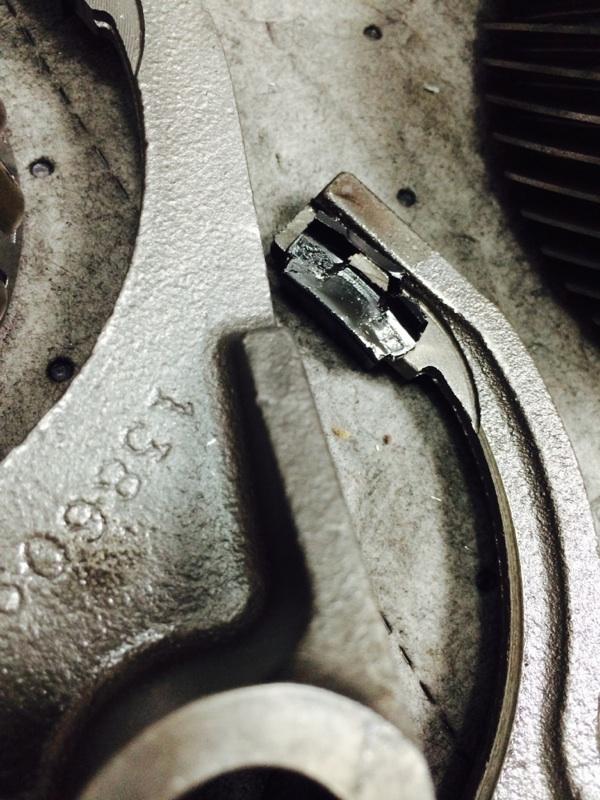
Got good news and bad news today. Rick from RKT Performance got a chance to tear down the GTO T56 I sent him. Well, long story short everything except for 1st gear, the main shaft and the case were destroyed. I was told this unit only needed an input shaft and bearing unit when I bought it, but luckily I got it in a package with a LS2 long block for $1300 so luckily the motor itself is worth that. Upgraded rebuild estimate was $3500, I can't swing that right now so this trans is scrapped. Luckily a local buddy has a complete Fbody T56 with bellhousing and clutch I'm gonna snag. So that issue is solved but ended up costing me a bit more than anticipated haha.
Here's some pics of the destroyed T56:
In other news complete M3 rear end dropout (subframe, diff, axles, brakes, etc) is sourced in CT, deposit made, headed out to get it soon.
Here's some pics of the destroyed T56:
In other news complete M3 rear end dropout (subframe, diff, axles, brakes, etc) is sourced in CT, deposit made, headed out to get it soon.
05-18-2015, 09:30 PM
#3
Back from the dead. Build is still happening, just not as fast as I had originally hoped. Life got in the way but I've been slowly acquiring parts and am starting the main task of swapping motors/building mounts this weekend.
Picking up from where I left off:
-Acquired a new supposed to be in good shape T56. No shifter so I'll be picking up a MGW unit. Came with a stock LS6 flywheel and Spec stage 3 clutch, but I dunno if that clutch will hold my intended power but I might toss it in and try it anyway.
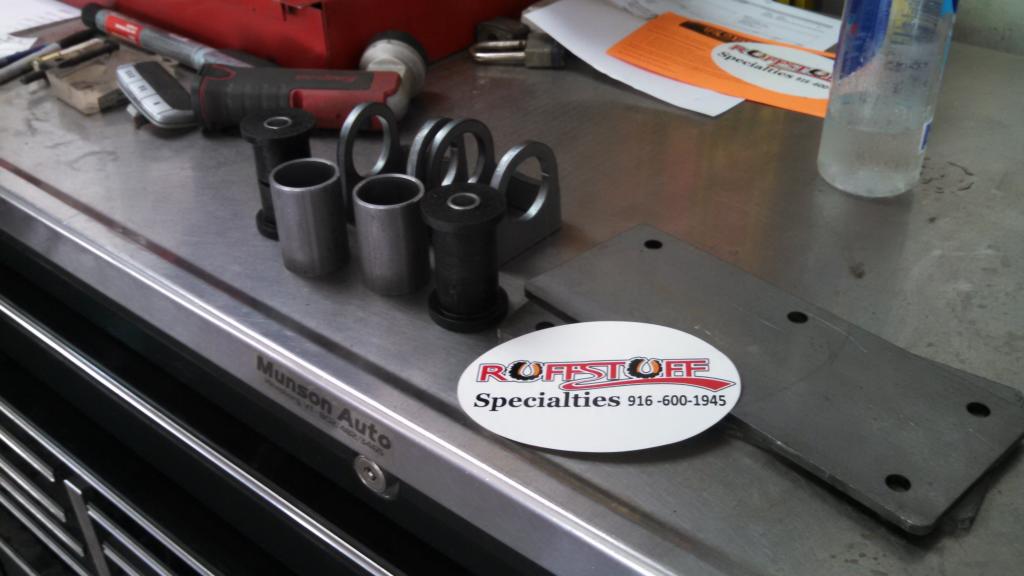
-Got some Ruff Stuff Specialties LSx motor mounts, not sure if I'll end up using them or not, have a few ideas floating around, gotta get the motor in and see whats what.
-Manual clutch pedal and slave is here. Using aftermarket clutch line from master cylinder to a standard male to male type fitting to an aftermarket GM line.
-LS1 intake and fancy EGR port plug thing acquired. Stock throttle body and sensors too. I think I stated earlier but I've got some 60lb/hr seimens deka injectors already.
-
Gotta nab some fuel rails or use stock LS1 rail I've got laying around *shrug*.
-6spd wiring harness is in the shed. Debating whether to buy an ECU or reflash one I've already got.
Original plan was to just do a simple heads/cam LS2 build, but that's boring.
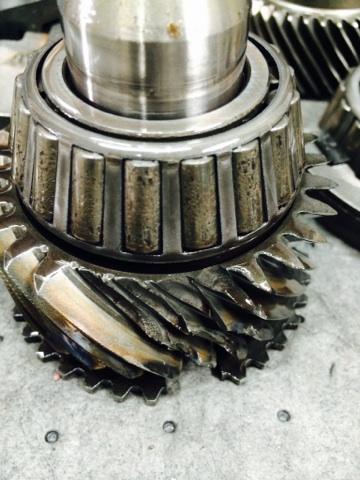
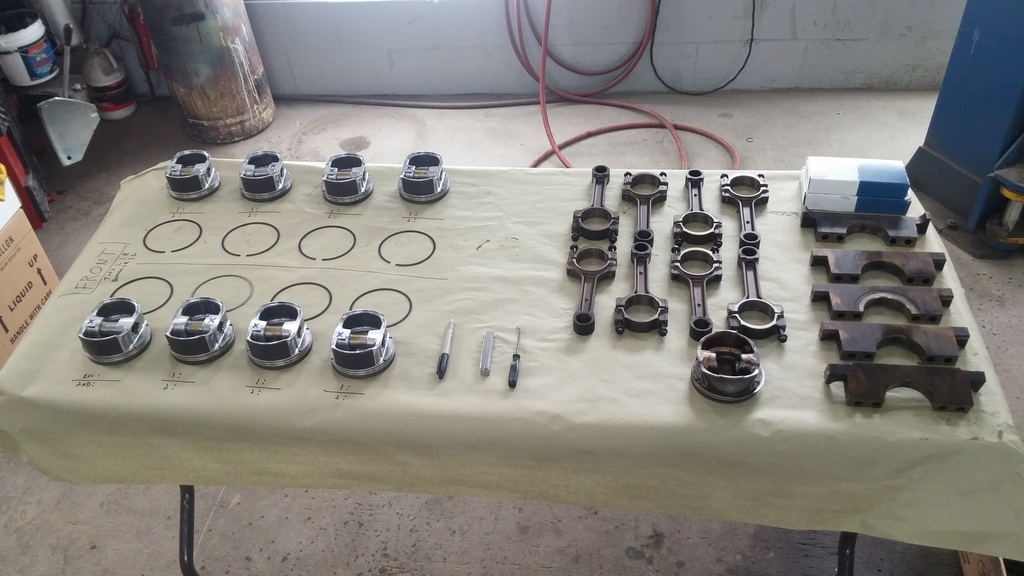
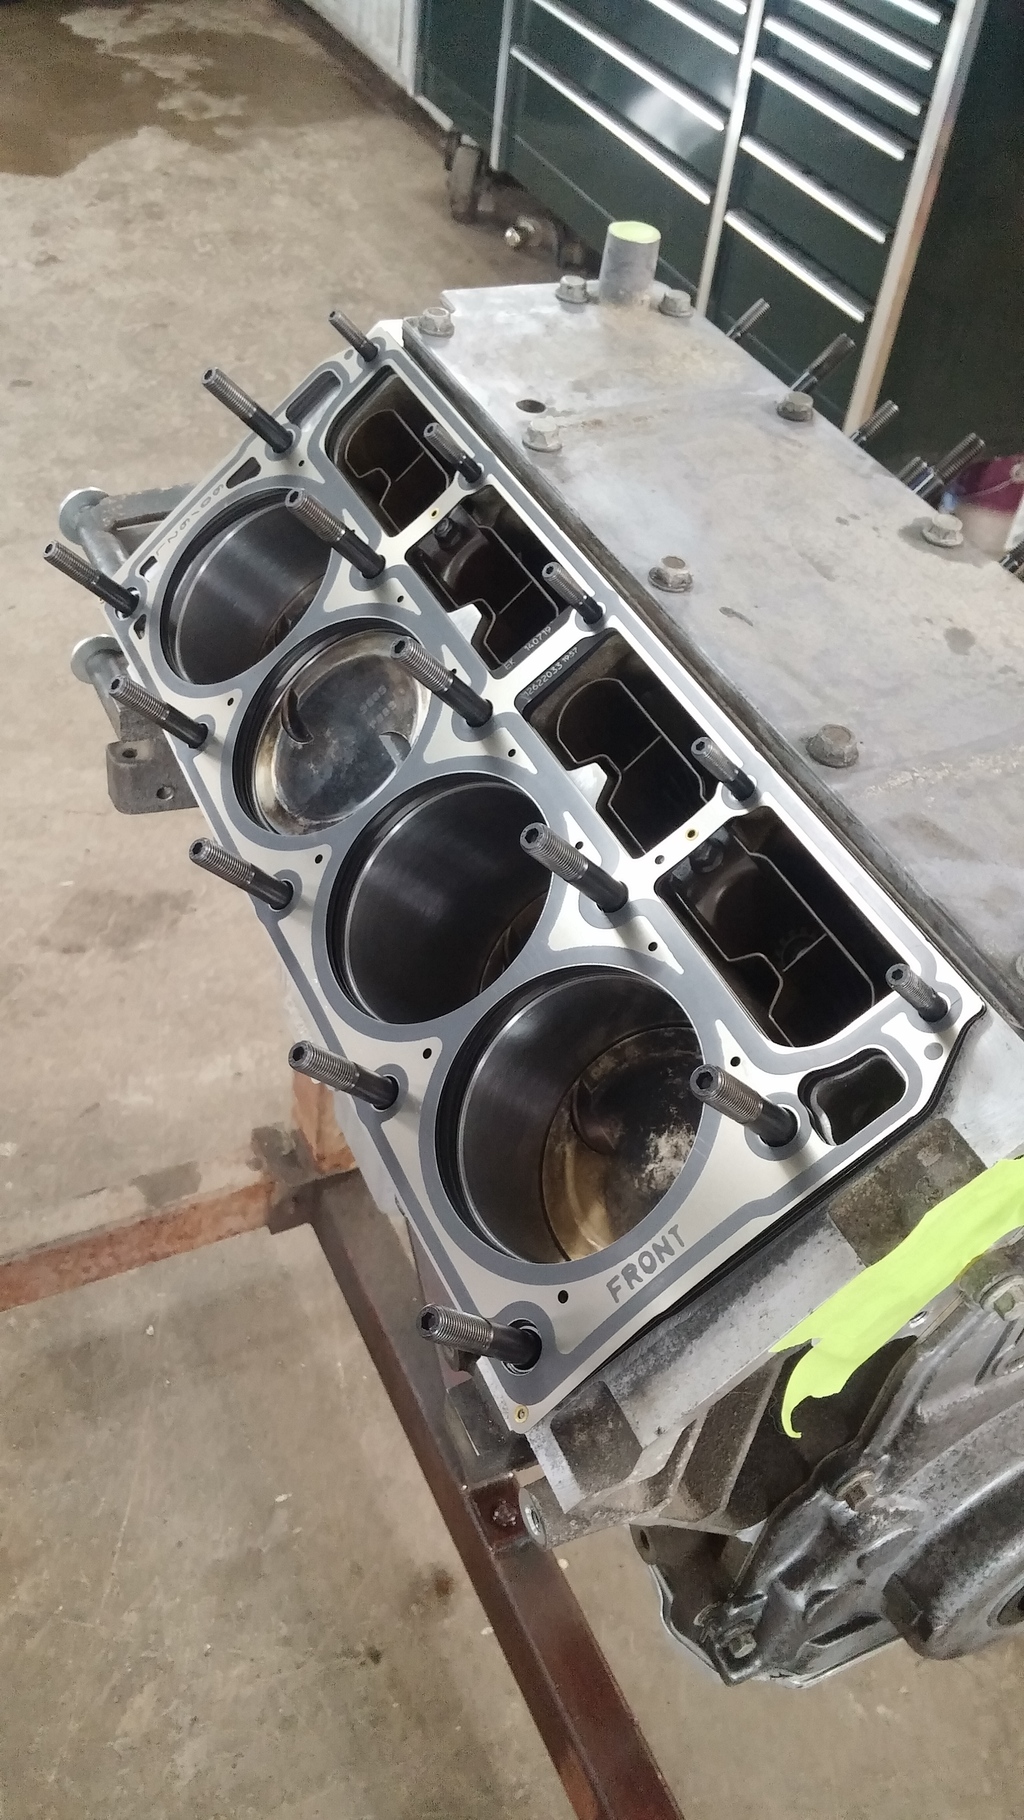
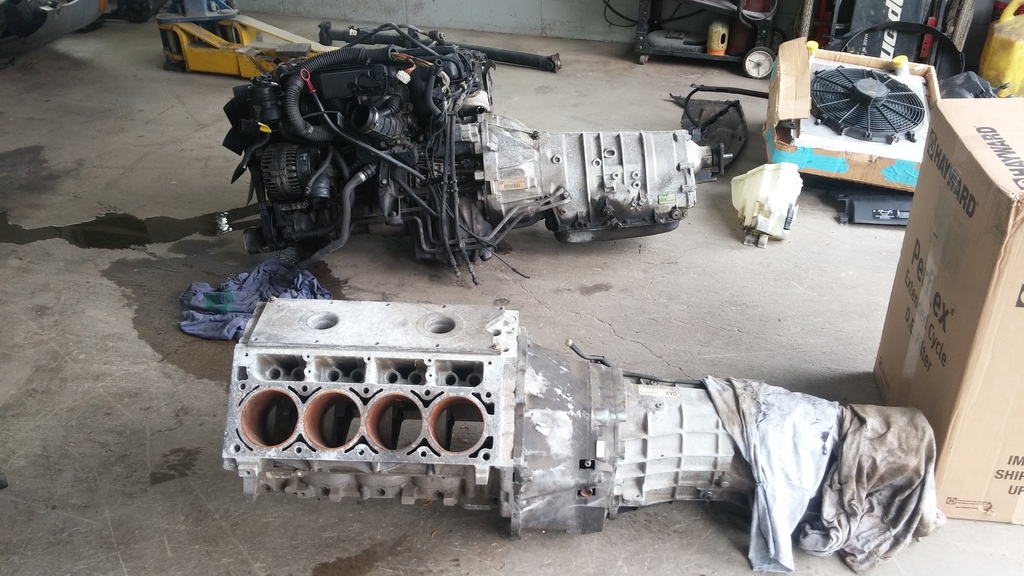
I just went off the assumption everything in the "spun rod bearing LS2" was junk and started slowly acquired parts for the motor build over the winter. Nabbed a stock mint LQ4 crank for $100. I had some good LQ9 rods laying around from when I built my forged drift car motor. And I also had some brand new LY6 pistons (dished with valve reliefs) in the shed from a previous build. Reused my LQ9 oil pump. Stock #317 heads reused. Brian Tooley dual valve springs I nabbed off a blown LS1. Comp 7.400" pushrods off LS1tech. Used ARP headstuds. LS9 head gaskets. Regapped the stock piston rings. Ready to rip!
Stock form TBSS LS2
Bare block
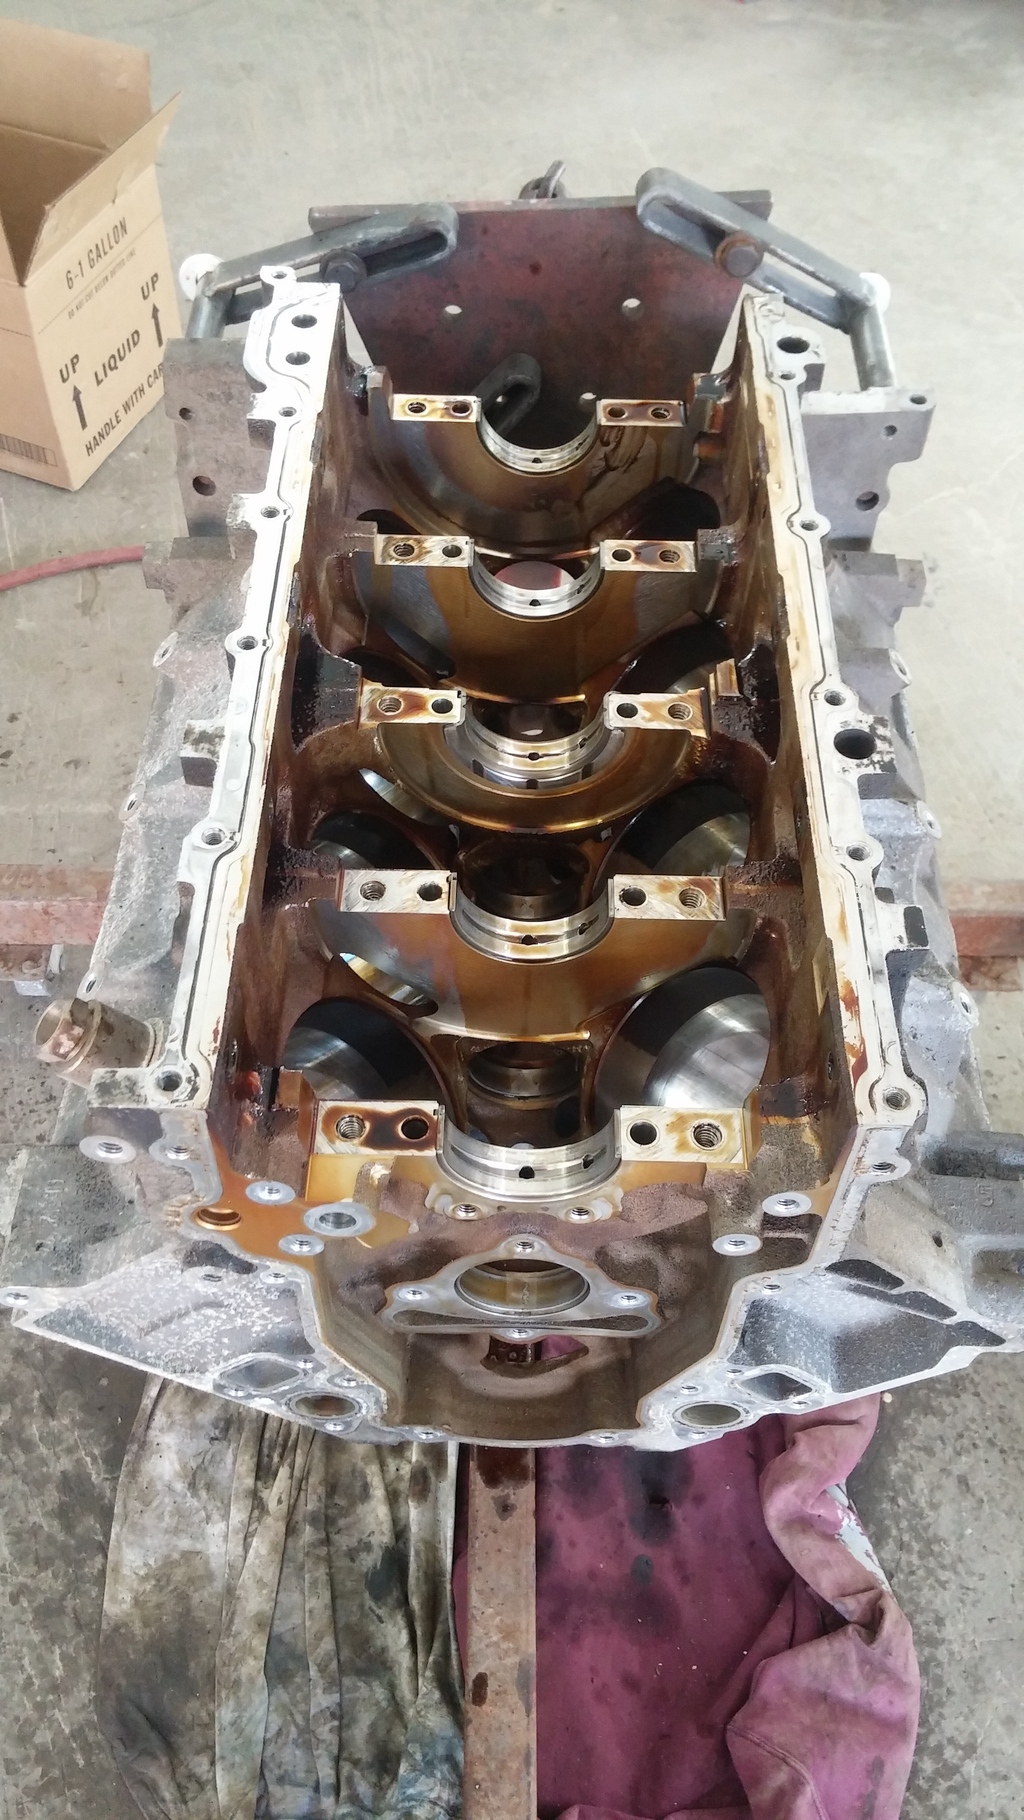
Cylinder 5 had some wear/scuffing from the spun rod bearing....run the hone through it and go...if you think I care you're wrong.

Honing things

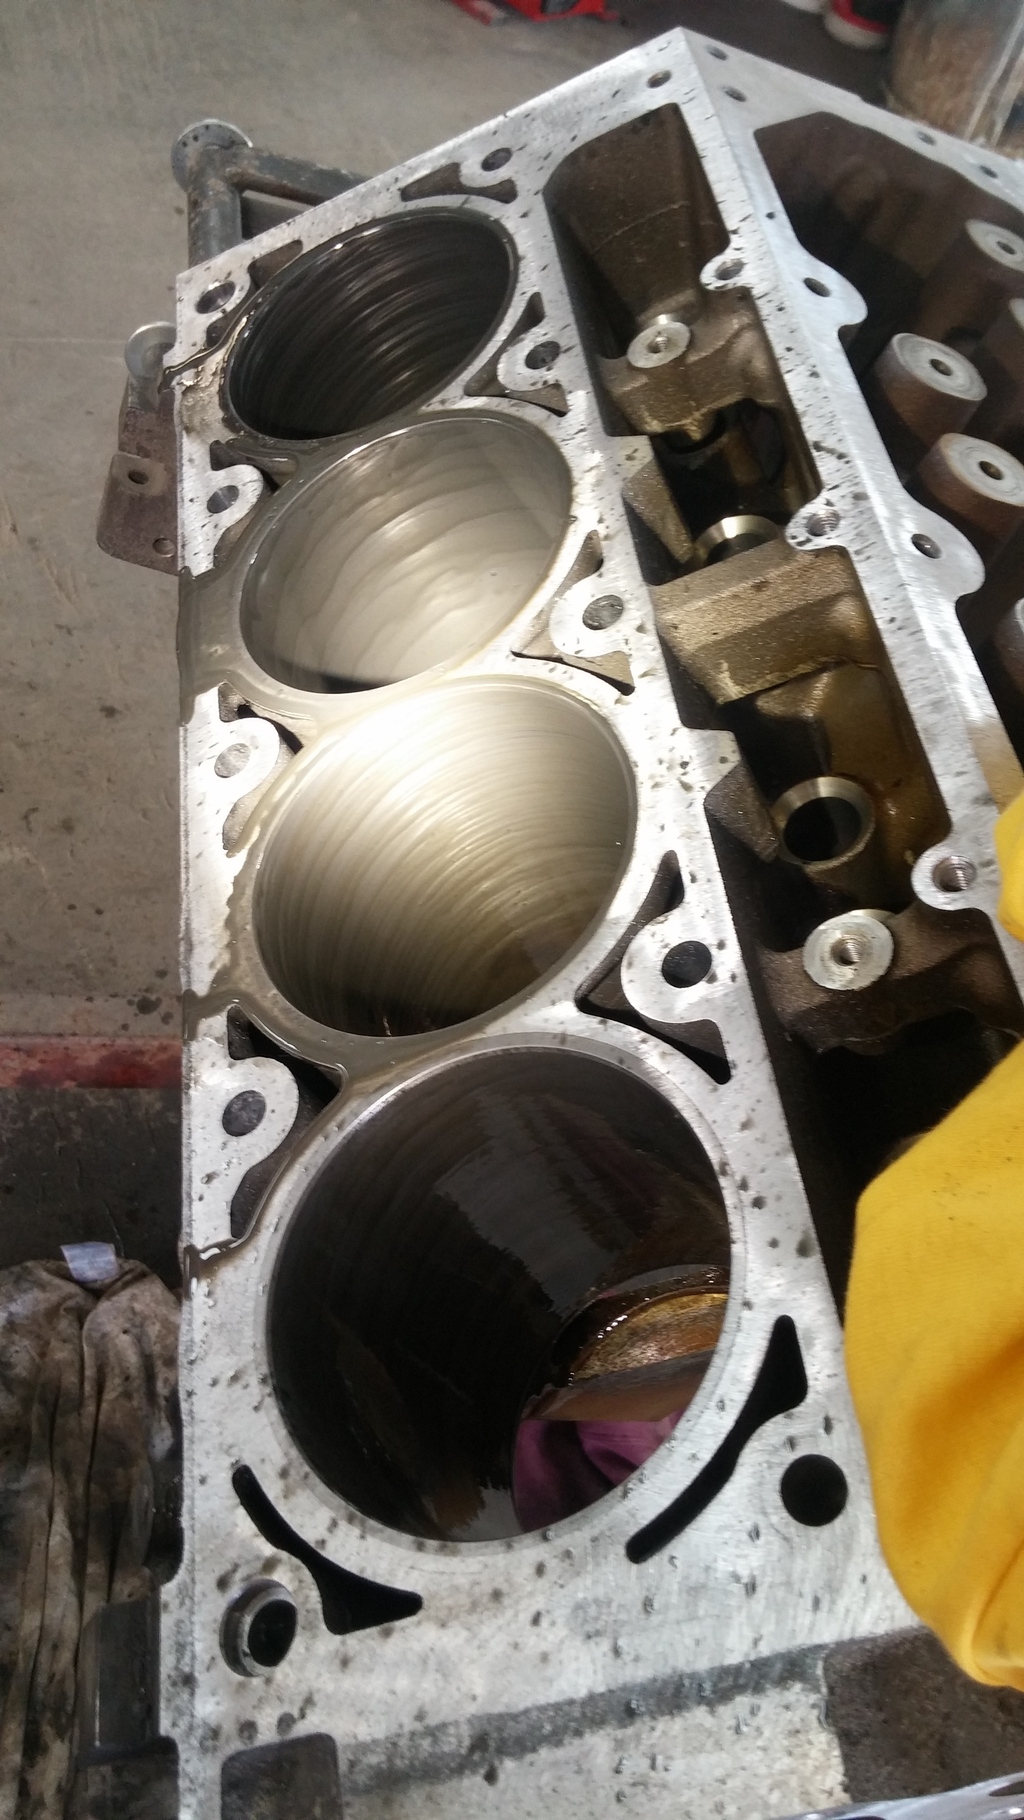
All honed and cleaned and ready for assembly.
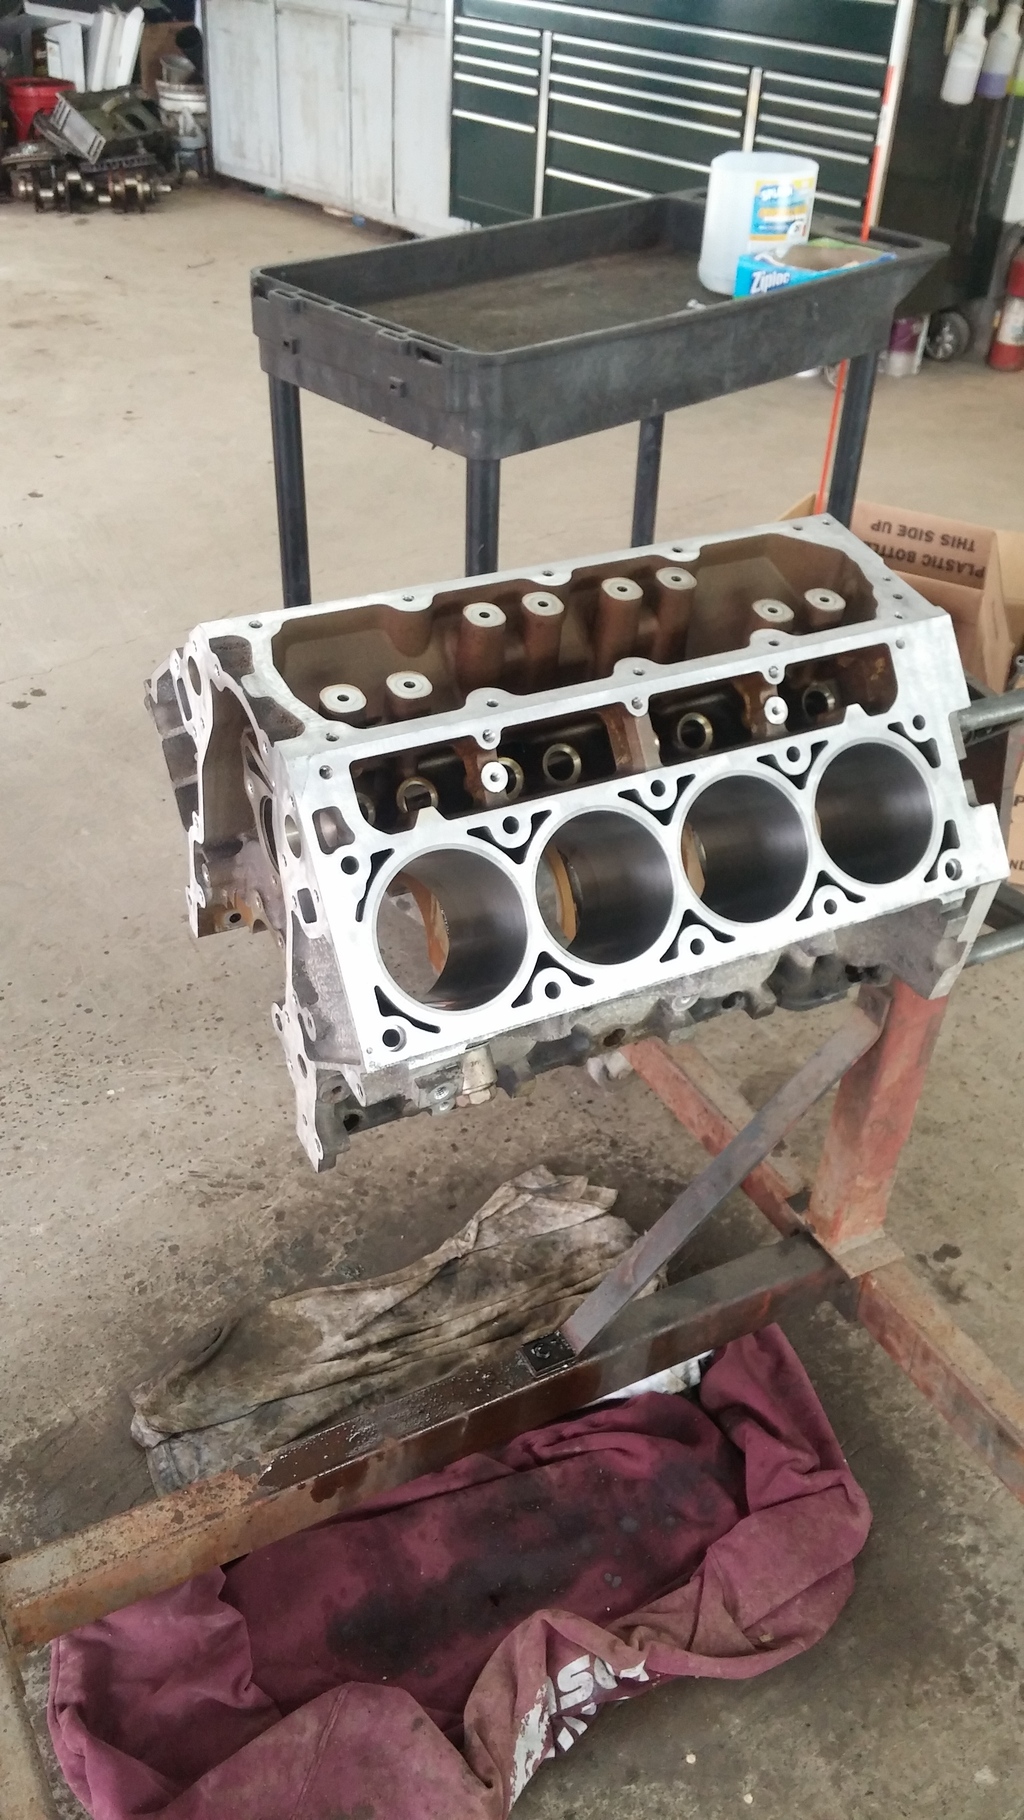

Bottom end assembled

After building the bottom end up I gave Jon @ Lil Jon's Motorsports a call and got his opinion on camshaft and turbo. Ended up with his Stage 2 camshaft and a BW S475, T6 flange 1.10 A/R.


Once I got the camshaft here and in it was time to put the top end together. Heads back from the hot tank and reassembling with BTR springs and cleaned up valves...aka I spun them against the wire wheel on the bench grinder.
Headstuds in and LS9 gaskets
Metal porcupine


Nabbed these original Nasty Performance sheet metal valve covers for cheeaappp. Coil stands and -10an breathers already there. The hydrodipping is flaking pretty bad so I'll have to blast them and recoat them...probably just gonna do gloss black *shrug*.

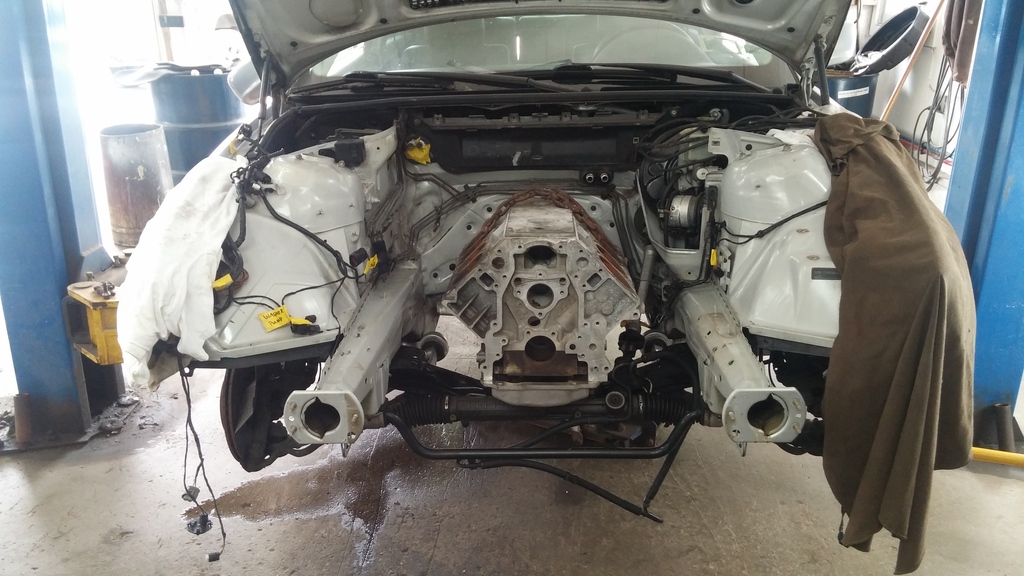
Got the car out and blew all the leaves off and degreased the engine bay in prep for this weekend.
-Peep the dumbo mirror. M3 mirrors already here for it. Shadowline trim, M3 sideskirts, etc etc.
-Ambit Wheels RE18's are ordered. 18x9.5+22 fronts, 18x10.5+22 rears. Gonna pick up some Hard Motorsports flares and make 265 fronts and 295 or 315 rears fit this scraper.
-Ordered soft poly diff bushings, stiff poly subframe bushings and spherical bearings for the RTAB's last night from AKG Motorsports.
-Also ordered all the chassis braces from Turner motorsports and bullet nose style 90mm wheel studs.
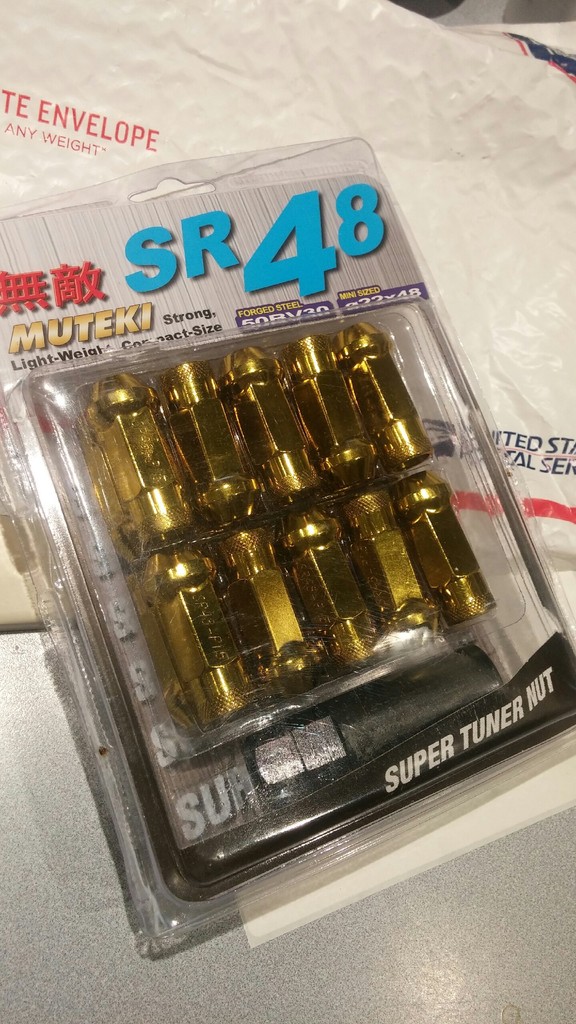
-Muteki SR48 gold lug nuts ordered.
-Radium Engineering fuel pump adapter thinger ordered too. Gonna run an Aeromotive Stealth 340lph pump and stock fuel line and see where I run out of fuel. Expecting to make it to the high 600 low 700hp mark but who knows.
-AFCO dual pass radiator and fan is in the shed from an old build
-Mezeire electric water pump also in the shed
I think that's about it? I've got a million AN lines and fittings and spare parts from racing/swaps all over so I've gotta take inventory before I start wasting money on small knick knacks I've already got.
Picking up from where I left off:
-Acquired a new supposed to be in good shape T56. No shifter so I'll be picking up a MGW unit. Came with a stock LS6 flywheel and Spec stage 3 clutch, but I dunno if that clutch will hold my intended power but I might toss it in and try it anyway.
-Got some Ruff Stuff Specialties LSx motor mounts, not sure if I'll end up using them or not, have a few ideas floating around, gotta get the motor in and see whats what.
-Manual clutch pedal and slave is here. Using aftermarket clutch line from master cylinder to a standard male to male type fitting to an aftermarket GM line.
-LS1 intake and fancy EGR port plug thing acquired. Stock throttle body and sensors too. I think I stated earlier but I've got some 60lb/hr seimens deka injectors already.
-
Gotta nab some fuel rails or use stock LS1 rail I've got laying around *shrug*.
-6spd wiring harness is in the shed. Debating whether to buy an ECU or reflash one I've already got.
Original plan was to just do a simple heads/cam LS2 build, but that's boring.
I just went off the assumption everything in the "spun rod bearing LS2" was junk and started slowly acquired parts for the motor build over the winter. Nabbed a stock mint LQ4 crank for $100. I had some good LQ9 rods laying around from when I built my forged drift car motor. And I also had some brand new LY6 pistons (dished with valve reliefs) in the shed from a previous build. Reused my LQ9 oil pump. Stock #317 heads reused. Brian Tooley dual valve springs I nabbed off a blown LS1. Comp 7.400" pushrods off LS1tech. Used ARP headstuds. LS9 head gaskets. Regapped the stock piston rings. Ready to rip!
Stock form TBSS LS2
Bare block
Cylinder 5 had some wear/scuffing from the spun rod bearing....run the hone through it and go...if you think I care you're wrong.
Honing things
All honed and cleaned and ready for assembly.
Bottom end assembled
After building the bottom end up I gave Jon @ Lil Jon's Motorsports a call and got his opinion on camshaft and turbo. Ended up with his Stage 2 camshaft and a BW S475, T6 flange 1.10 A/R.
Once I got the camshaft here and in it was time to put the top end together. Heads back from the hot tank and reassembling with BTR springs and cleaned up valves...aka I spun them against the wire wheel on the bench grinder.
Headstuds in and LS9 gaskets
Metal porcupine
Nabbed these original Nasty Performance sheet metal valve covers for cheeaappp. Coil stands and -10an breathers already there. The hydrodipping is flaking pretty bad so I'll have to blast them and recoat them...probably just gonna do gloss black *shrug*.
Got the car out and blew all the leaves off and degreased the engine bay in prep for this weekend.
-Peep the dumbo mirror. M3 mirrors already here for it. Shadowline trim, M3 sideskirts, etc etc.
-Ambit Wheels RE18's are ordered. 18x9.5+22 fronts, 18x10.5+22 rears. Gonna pick up some Hard Motorsports flares and make 265 fronts and 295 or 315 rears fit this scraper.
-Ordered soft poly diff bushings, stiff poly subframe bushings and spherical bearings for the RTAB's last night from AKG Motorsports.
-Also ordered all the chassis braces from Turner motorsports and bullet nose style 90mm wheel studs.
-Muteki SR48 gold lug nuts ordered.
-Radium Engineering fuel pump adapter thinger ordered too. Gonna run an Aeromotive Stealth 340lph pump and stock fuel line and see where I run out of fuel. Expecting to make it to the high 600 low 700hp mark but who knows.
-AFCO dual pass radiator and fan is in the shed from an old build
-Mezeire electric water pump also in the shed
I think that's about it? I've got a million AN lines and fittings and spare parts from racing/swaps all over so I've gotta take inventory before I start wasting money on small knick knacks I've already got.
05-18-2015, 09:33 PM
#4
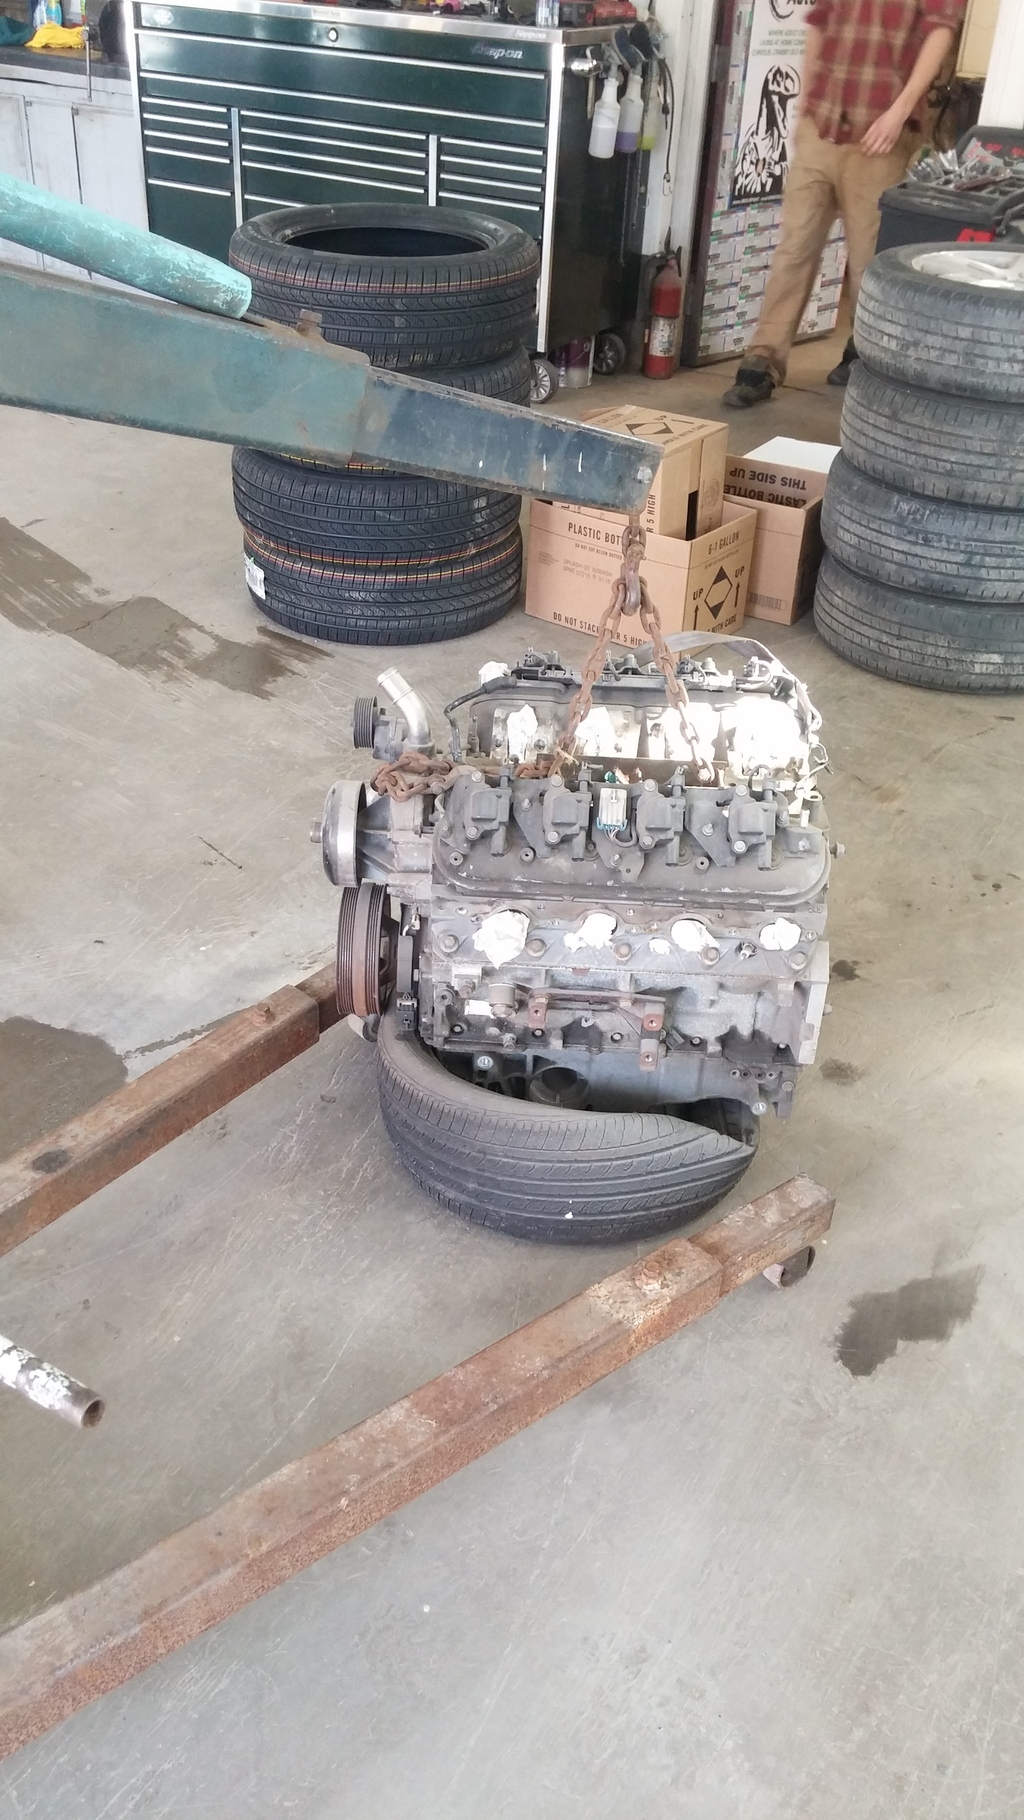
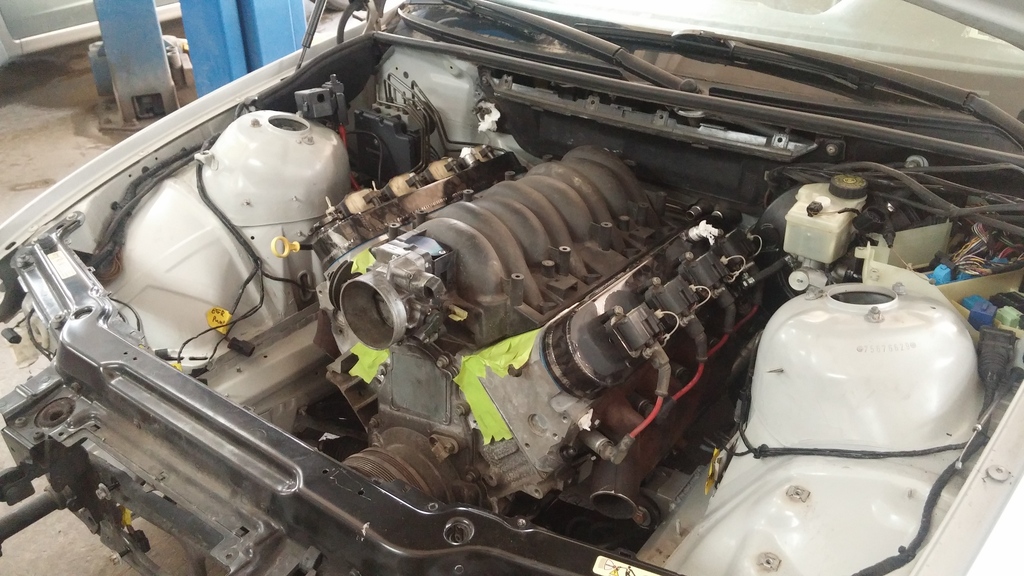
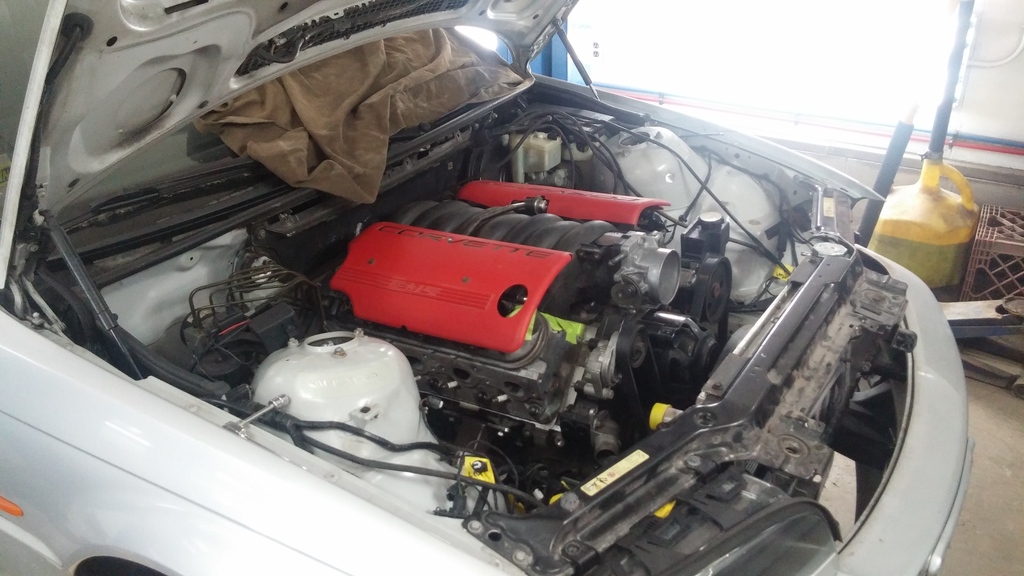
Got a lot done on the swap this weekend. Cliff notes, stock drivetrain came out Friday. All mounts made and LSx motor is in and stuff.
Friday some goodies from Turner Motorsports showed up.

Started Friday after work my father and I started ripping the stock drivetrain out. Once it was out I degreased the bay and left it to dry for the night.


Saturday morning I dug the old crusty mockup bare ls1 block and my T56 and bolted them together
I also threw my holley pan on, seeing's how that was kind of important for mockup haha. After a couple attempts at positioning the setup and removing sound deadening and air hammering one spot, 3rd try was the charm and I had everything where I wanted it.
Trans is centered in the tunnel, shifter is offest on T56 so it's off to the drivers side of the shifter hole a tad, but otherwise it's dead on for T56 style shifter.

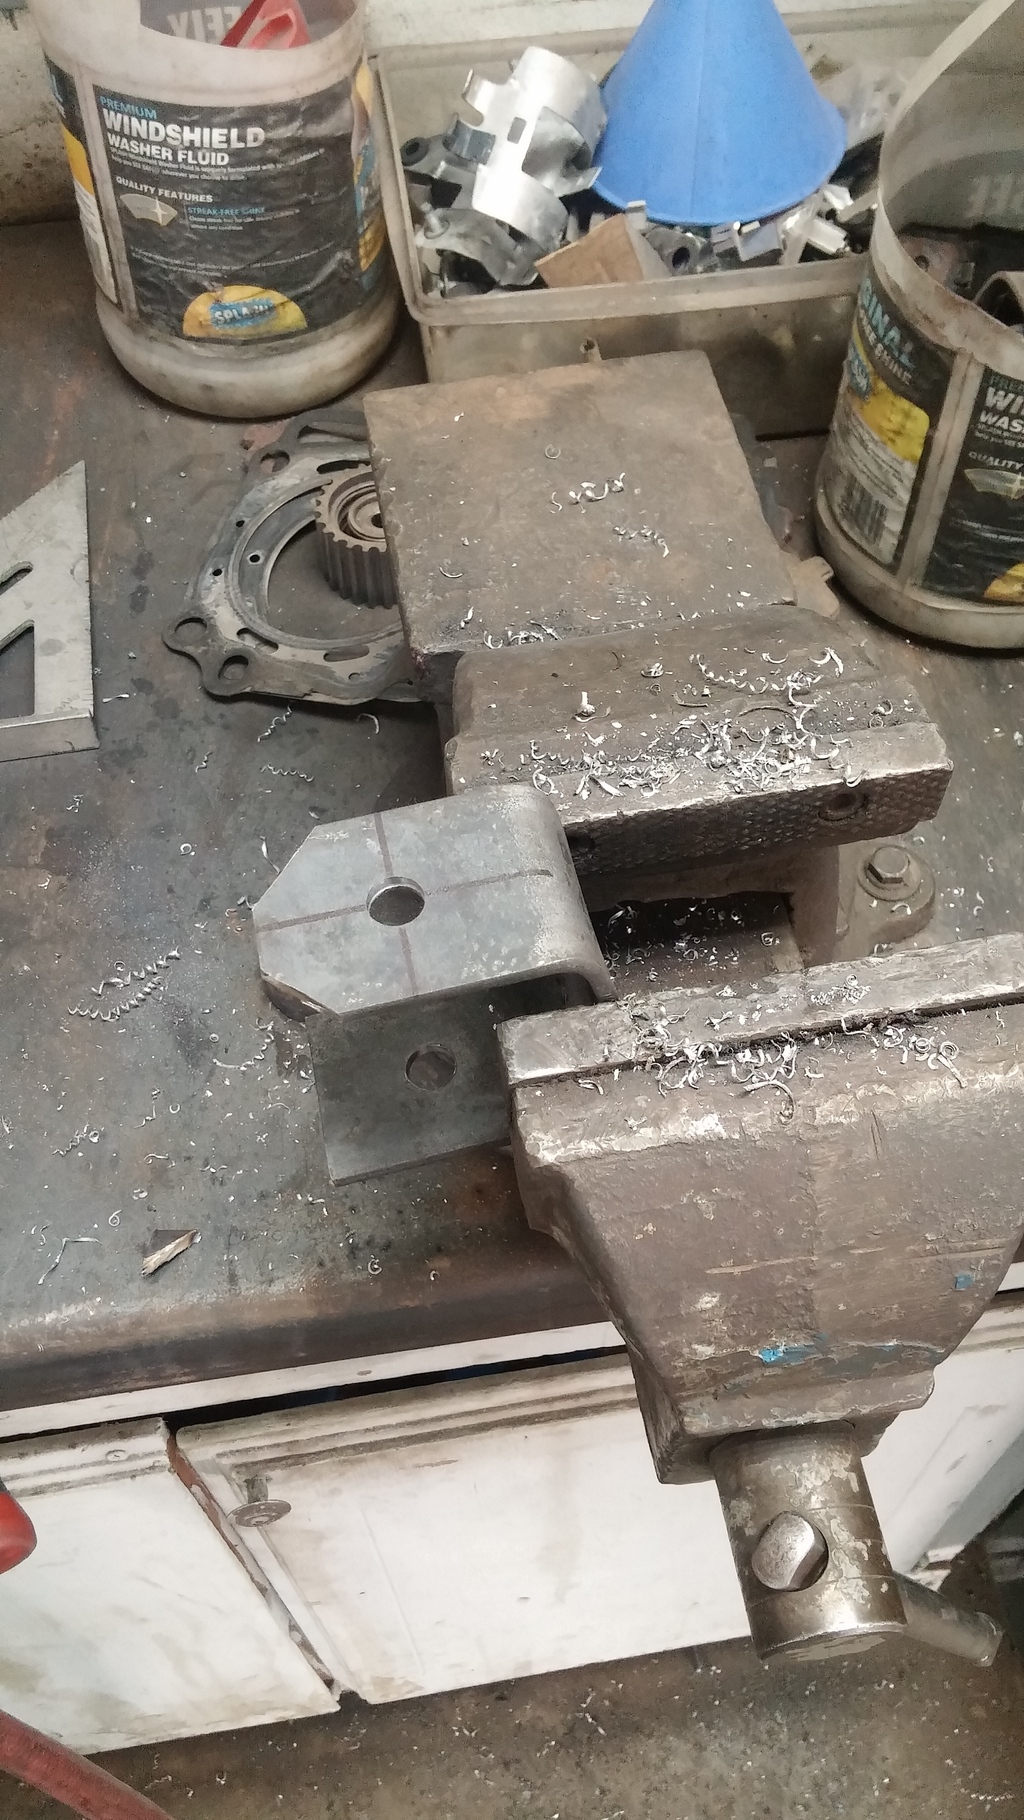
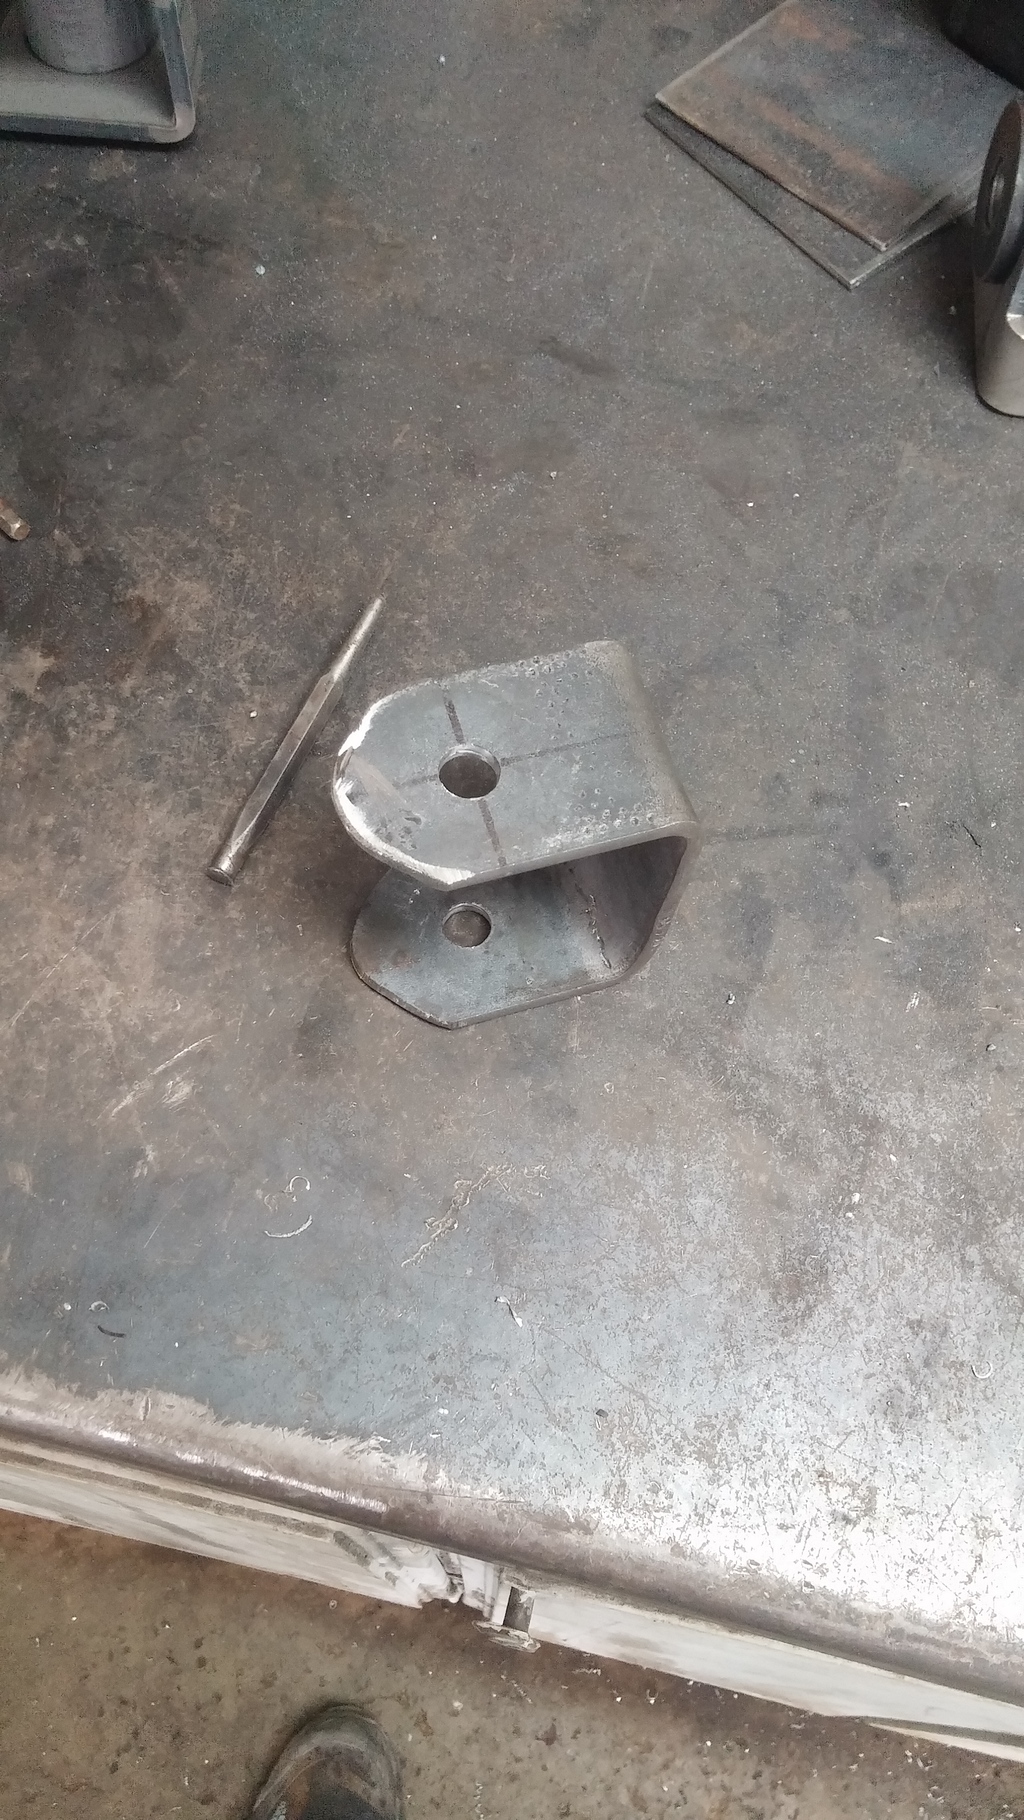
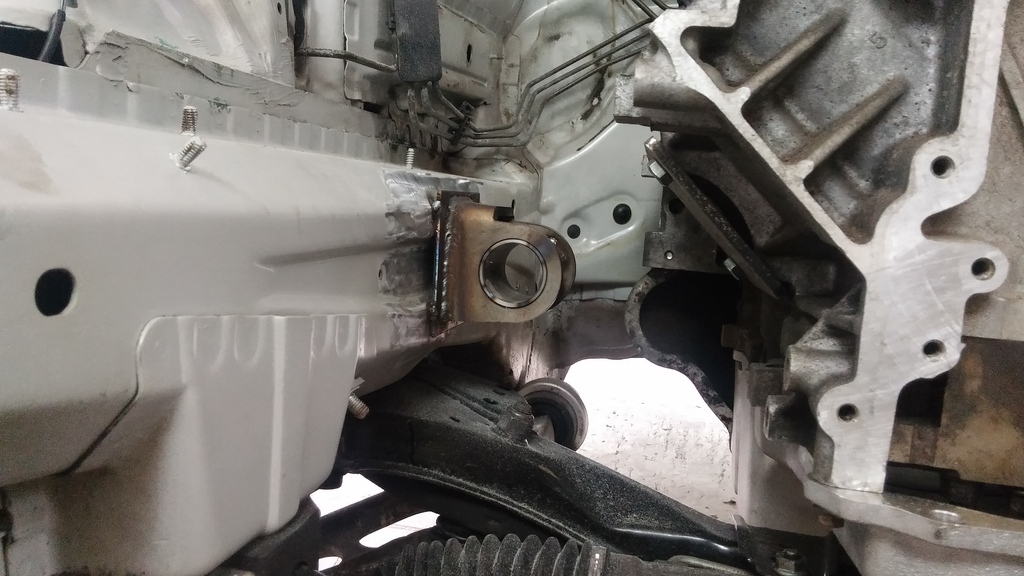
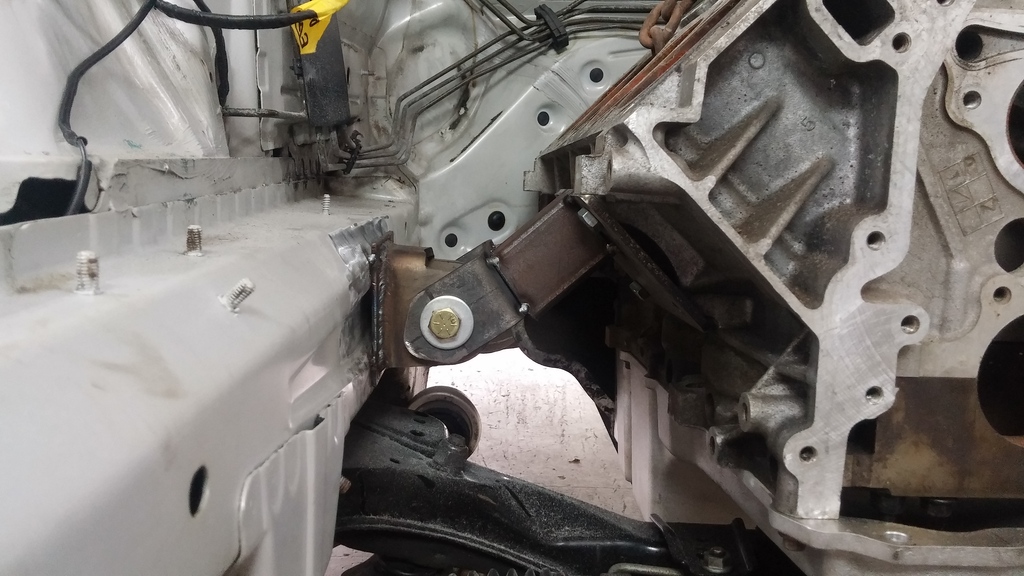
Then I started making some mounts. Decided to weld the Ruff Stuff bushing housings to a plate, then weld said plate to the frame rail. Then bent up some flat stock into brackets to bolt to the bushings. Welded some square tube to the brackets onto to the motor plates and boom. Simple. Making the mounts this way made for the easiest solution as well as giving me the most amount of clearance for my 3" exhaust pipe to run out through in the stock chassis location, or close to it.

Cleaned up the frame rails and tacked these bad johnnies in
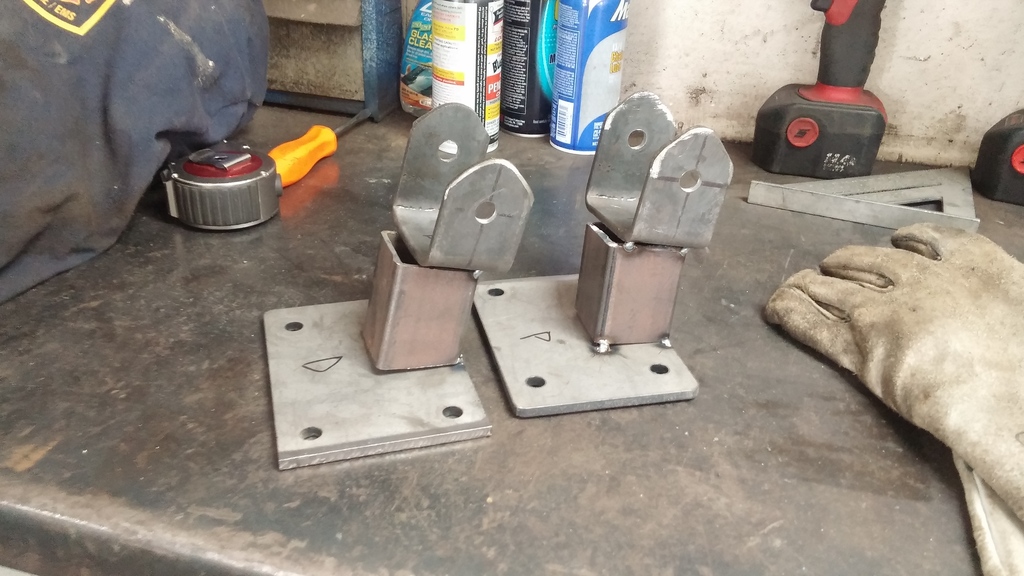
Got the other parts tacked together
Pulled out and ready to weld
Frame rail bushing housings welded up for good

Mounty mounts all welded up


Mounts all in and donezo.
Trans mount done

This stupid thing has to go. ABS pump/block is coming out and I'll be running all new lines...Ain't got time for that noise.

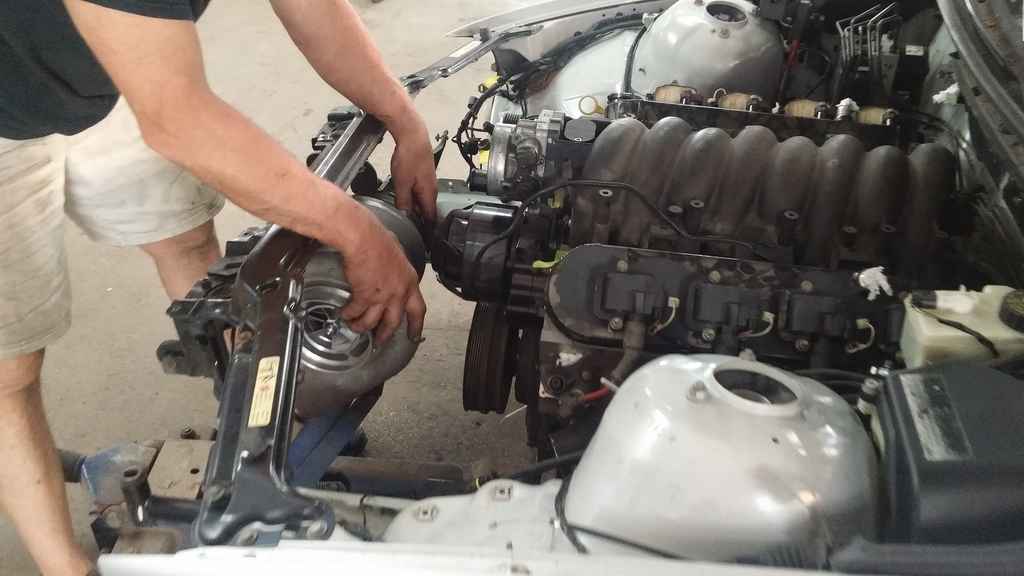
Motor pulled back out, my father had finished mowing the lawn and wanted to get hands on so he started going at all the spot welds with the air chisel.

Meanwhile I had a couple ears/tabs to cut off the T56 to gain a little extra clearance in the trans tunnel. Not 100% necessary but I didn't need the tabs and the extra clearance is nice for if I ever have to pull the trans.
These two got smoothed out after, not left raw haha.
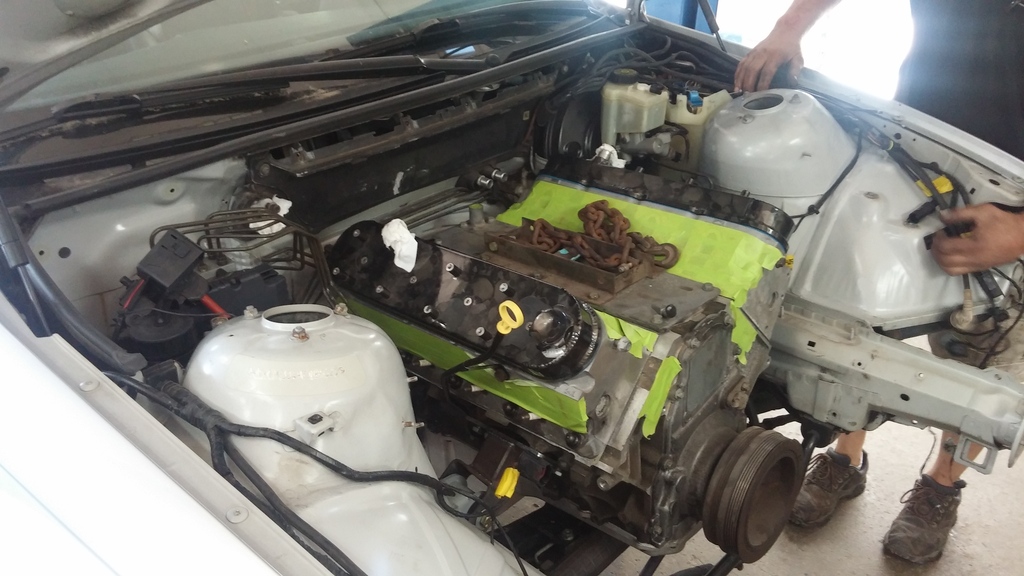
Main motor and trans bolted together and fitted into the car. It all has to come out to install the clutch/slave setup....and so I can paint the bay and run the new brake lines.

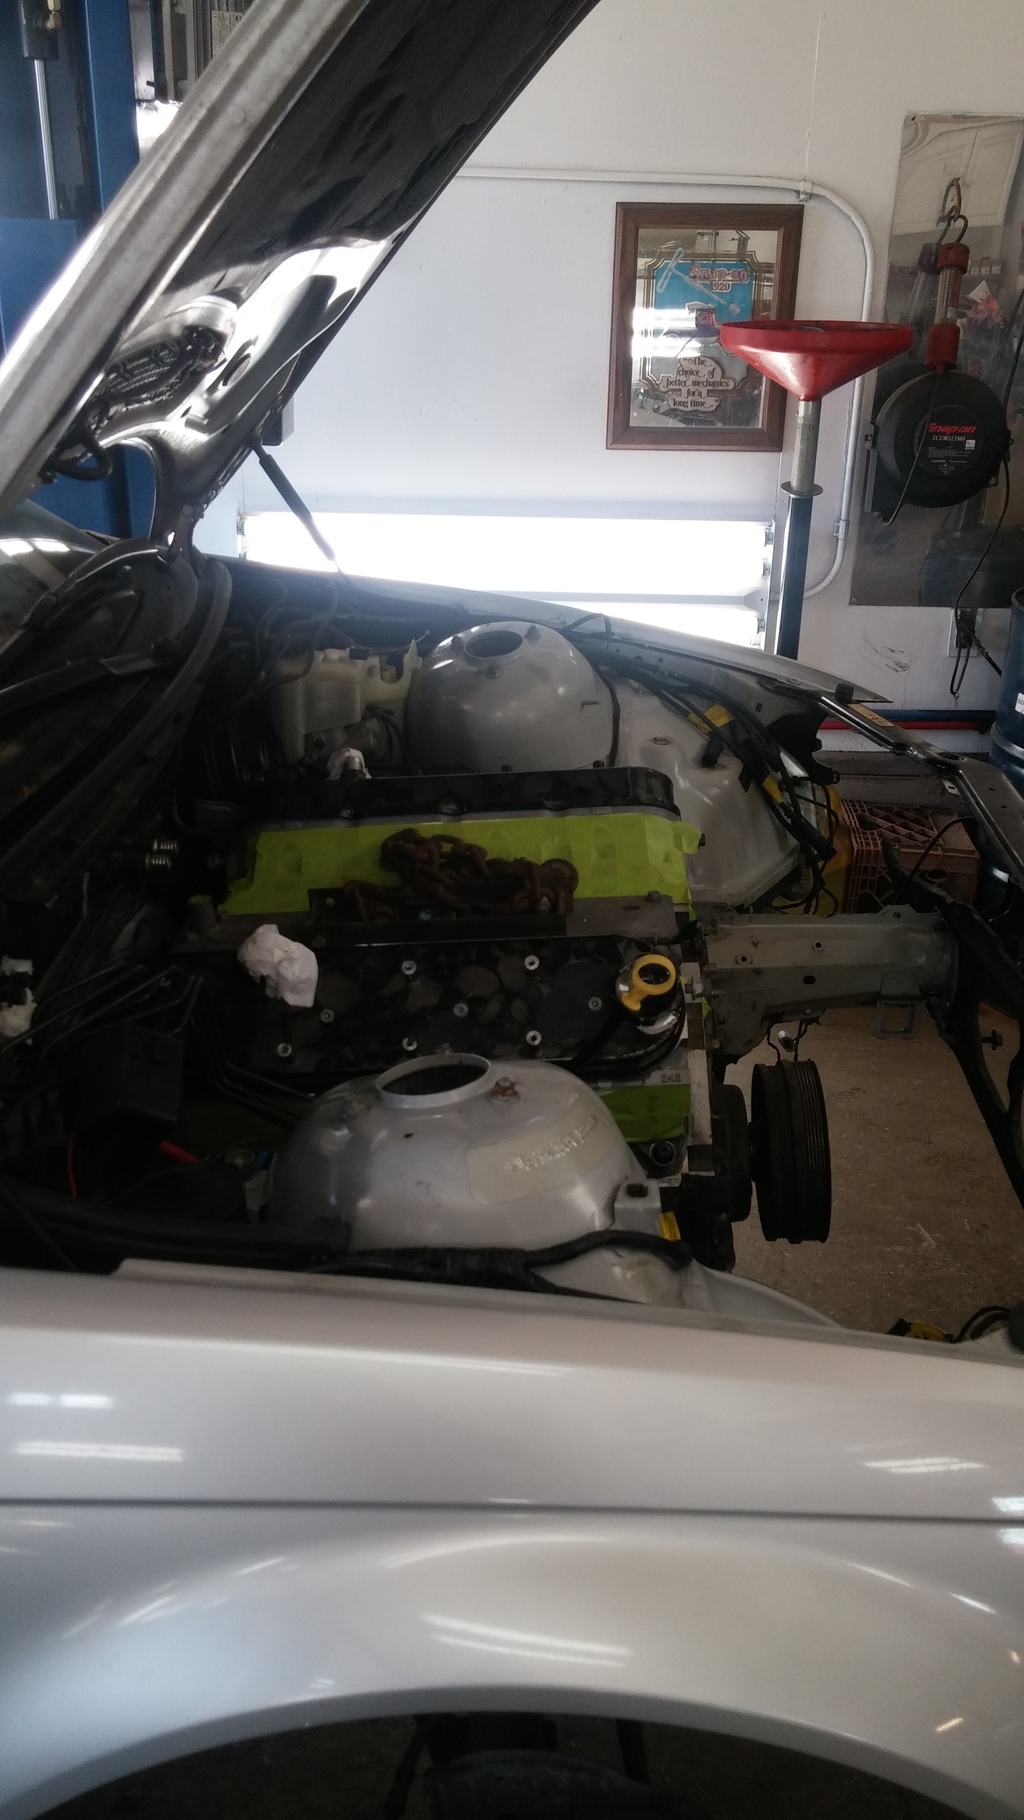
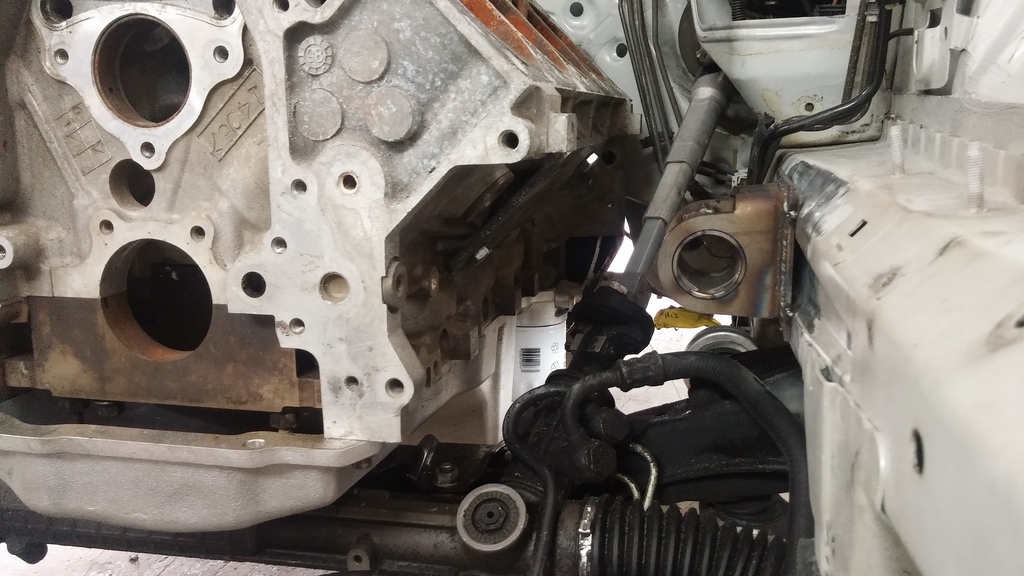
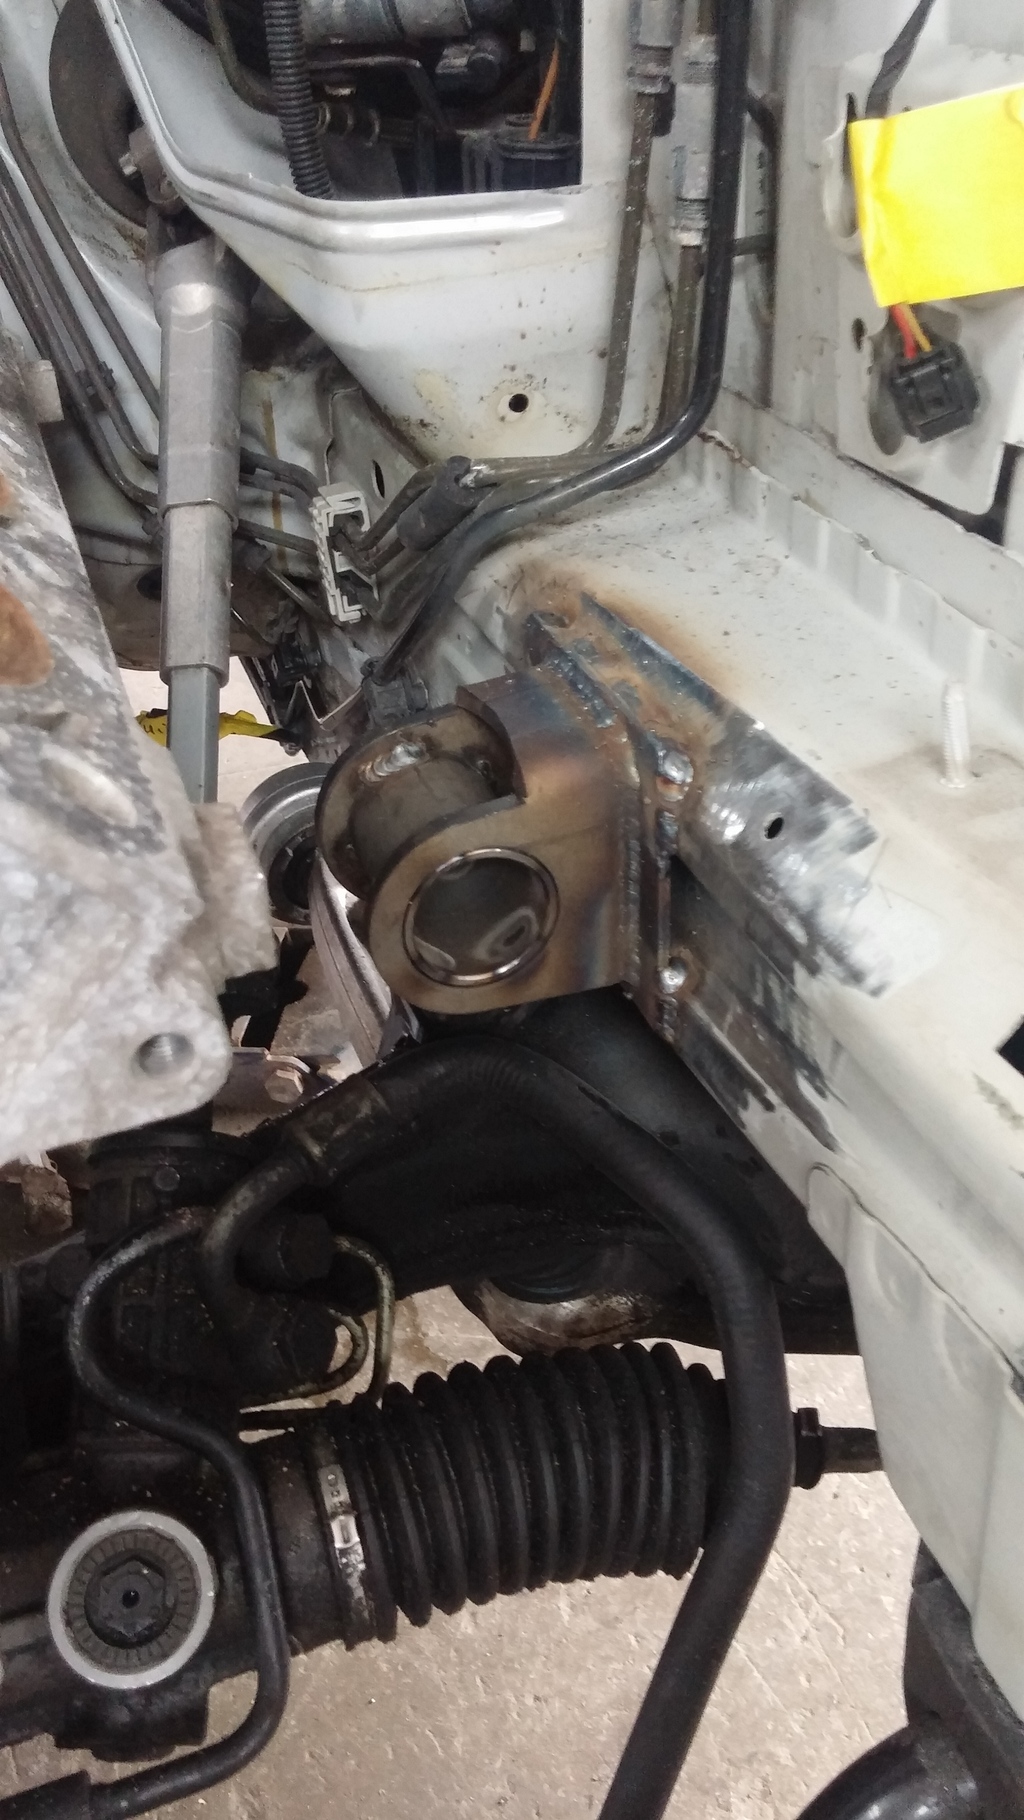
Pan to rack clearance
Another shot of trans location


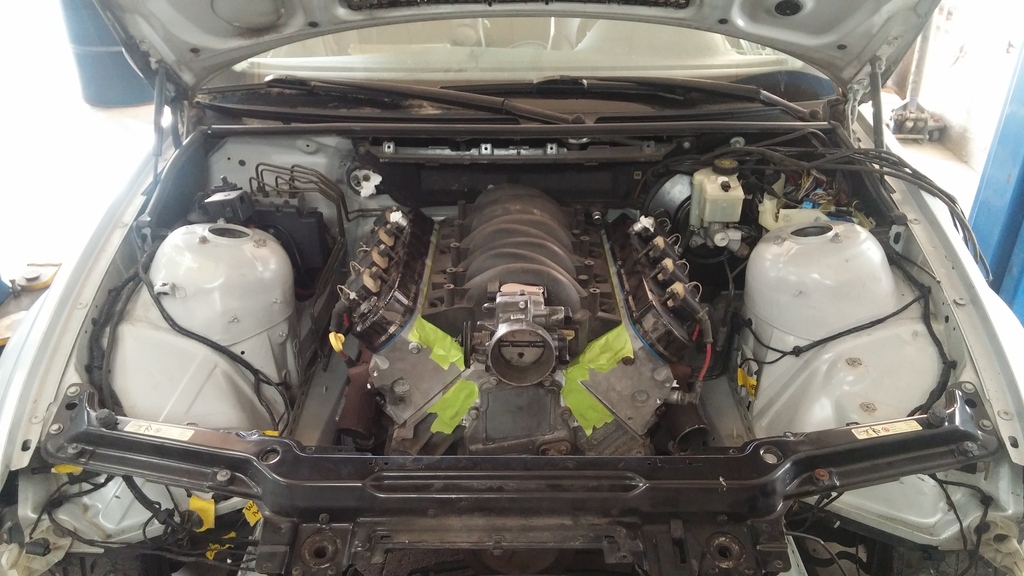
Front rad support on real quick
Pretty stoked on how centered I landed this thing first try.
Friday some goodies from Turner Motorsports showed up.
Started Friday after work my father and I started ripping the stock drivetrain out. Once it was out I degreased the bay and left it to dry for the night.
Saturday morning I dug the old crusty mockup bare ls1 block and my T56 and bolted them together
I also threw my holley pan on, seeing's how that was kind of important for mockup haha. After a couple attempts at positioning the setup and removing sound deadening and air hammering one spot, 3rd try was the charm and I had everything where I wanted it.
Trans is centered in the tunnel, shifter is offest on T56 so it's off to the drivers side of the shifter hole a tad, but otherwise it's dead on for T56 style shifter.
Then I started making some mounts. Decided to weld the Ruff Stuff bushing housings to a plate, then weld said plate to the frame rail. Then bent up some flat stock into brackets to bolt to the bushings. Welded some square tube to the brackets onto to the motor plates and boom. Simple. Making the mounts this way made for the easiest solution as well as giving me the most amount of clearance for my 3" exhaust pipe to run out through in the stock chassis location, or close to it.
Cleaned up the frame rails and tacked these bad johnnies in
Got the other parts tacked together
Pulled out and ready to weld
Frame rail bushing housings welded up for good
Mounty mounts all welded up
Mounts all in and donezo.
Trans mount done
This stupid thing has to go. ABS pump/block is coming out and I'll be running all new lines...Ain't got time for that noise.
Motor pulled back out, my father had finished mowing the lawn and wanted to get hands on so he started going at all the spot welds with the air chisel.
Meanwhile I had a couple ears/tabs to cut off the T56 to gain a little extra clearance in the trans tunnel. Not 100% necessary but I didn't need the tabs and the extra clearance is nice for if I ever have to pull the trans.
These two got smoothed out after, not left raw haha.
Main motor and trans bolted together and fitted into the car. It all has to come out to install the clutch/slave setup....and so I can paint the bay and run the new brake lines.
Pan to rack clearance
Another shot of trans location
Front rad support on real quick
Pretty stoked on how centered I landed this thing first try.
05-18-2015, 09:36 PM
#5
Stock cabin filter still fits
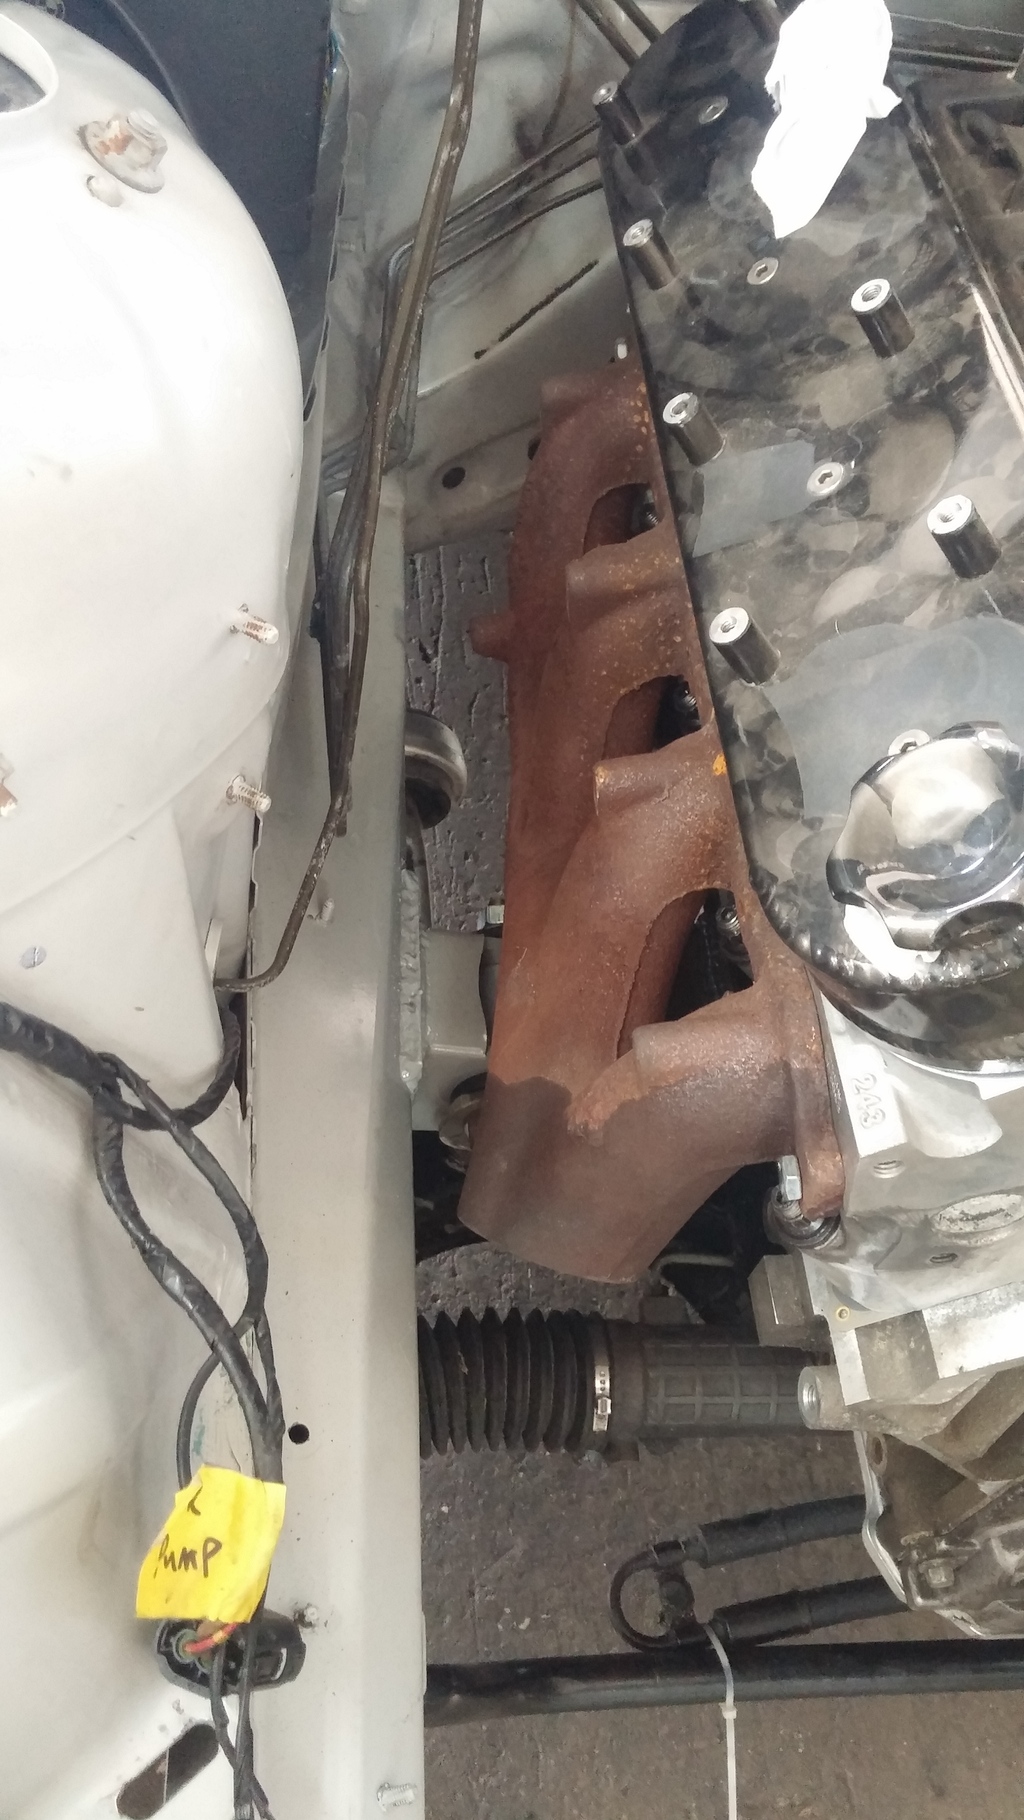
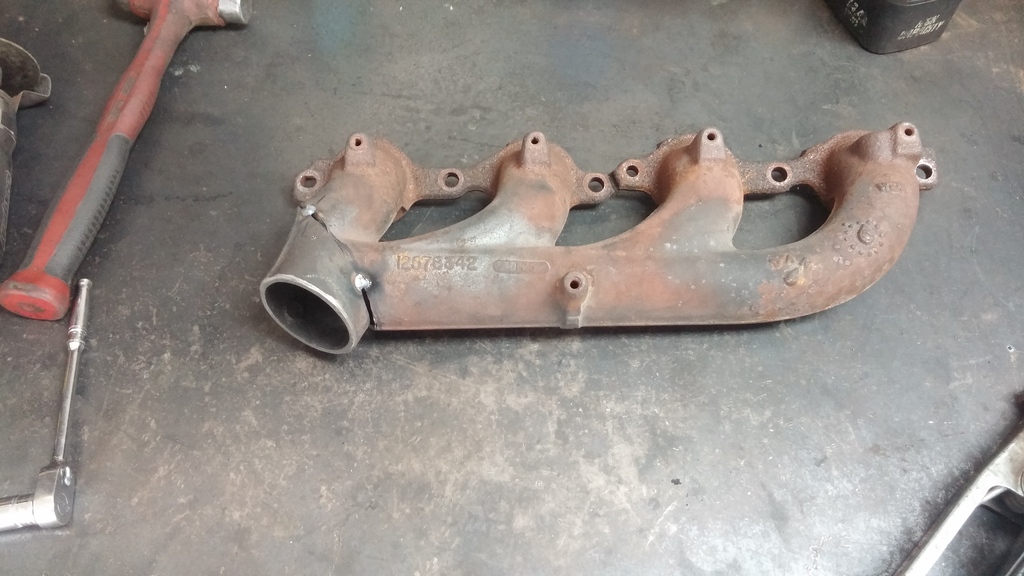
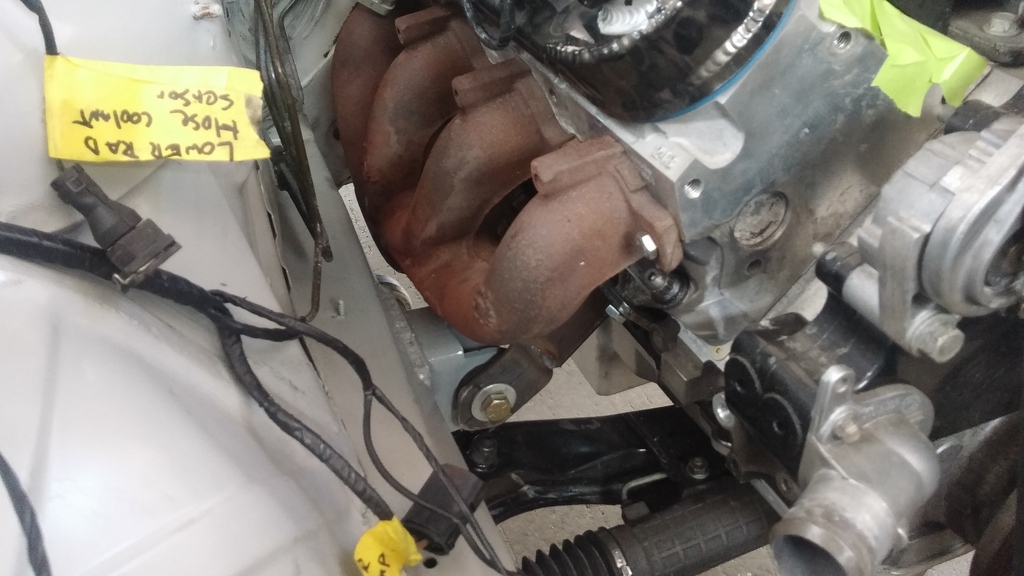
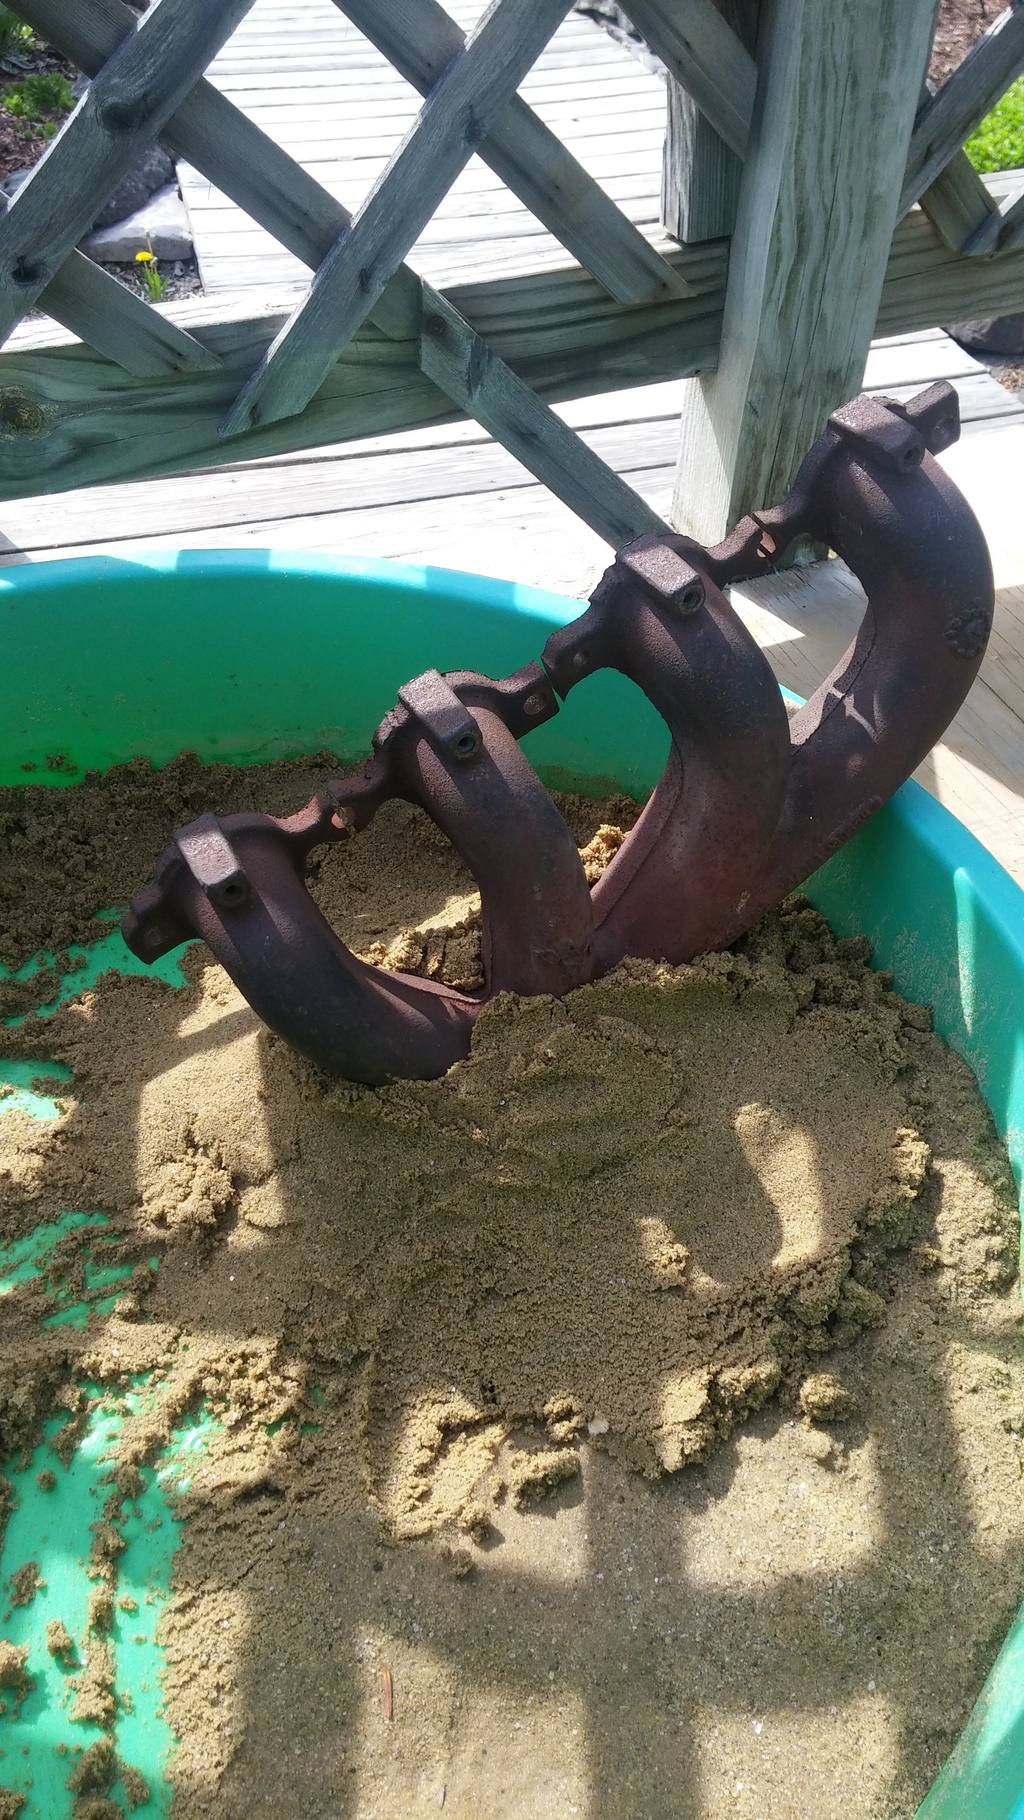
Cut the flanges off some truck manifolds and tossed them on to start getting an idea of what I'll be working with
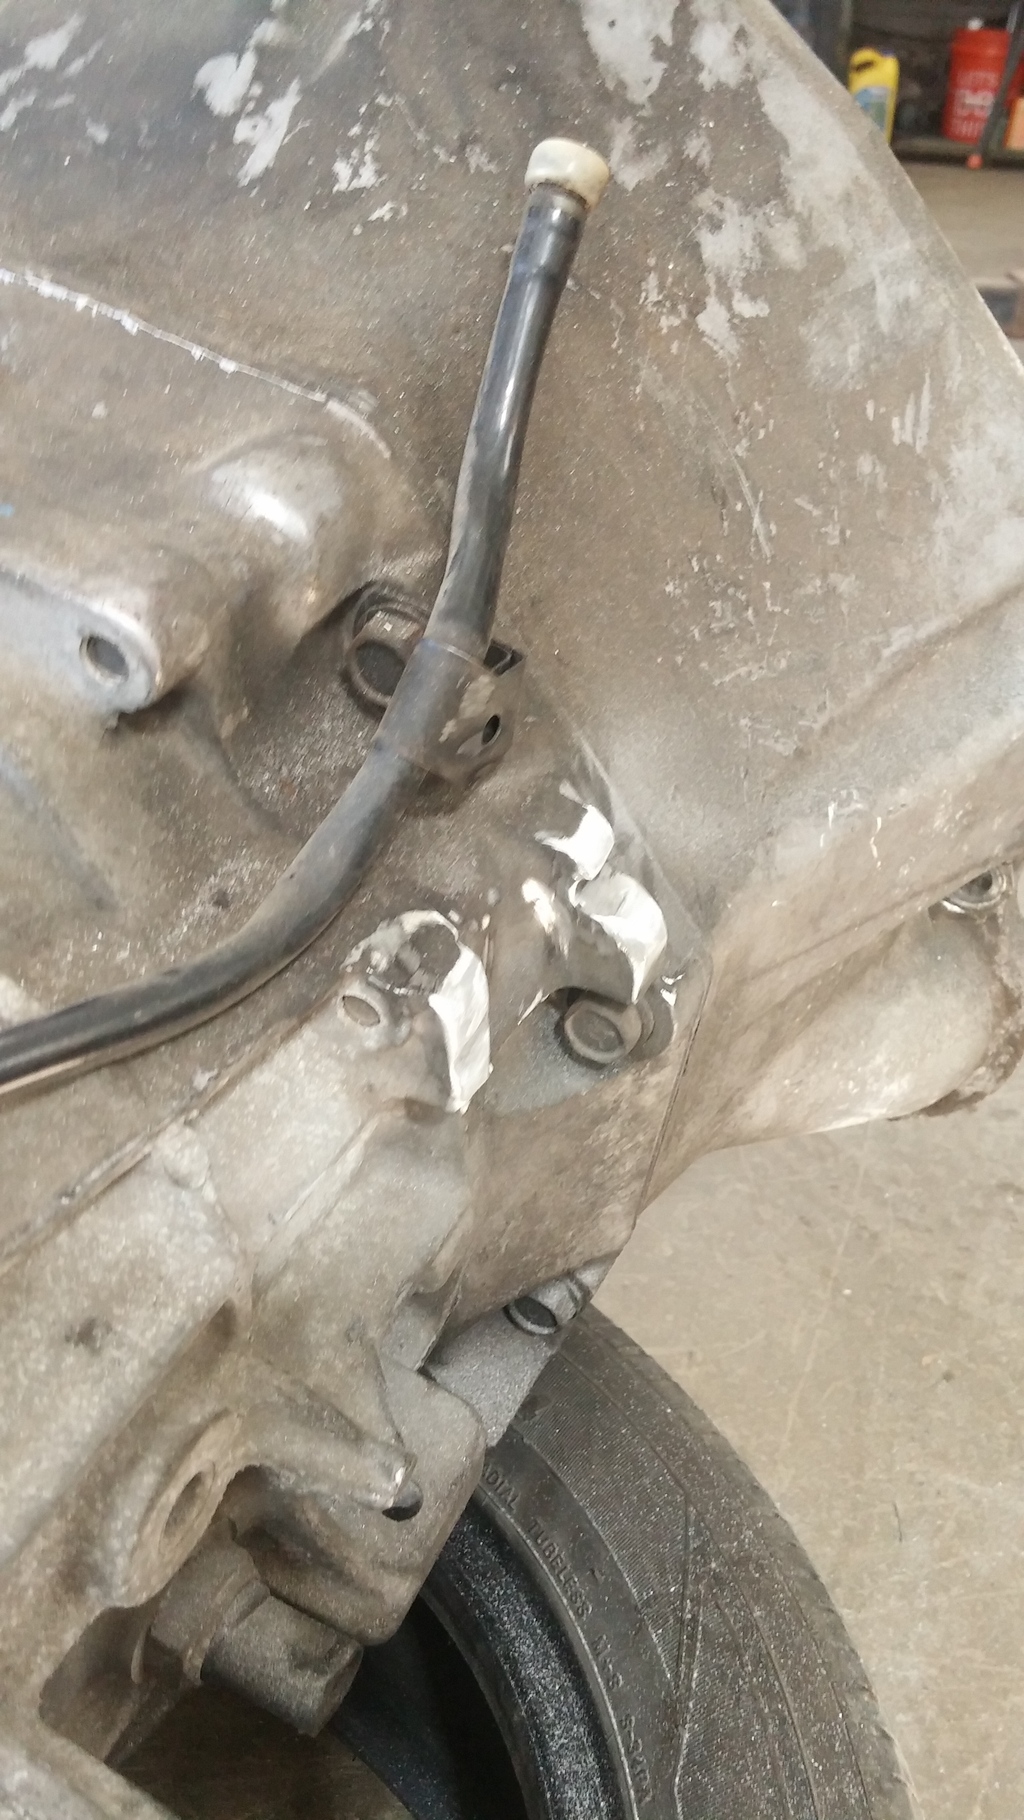
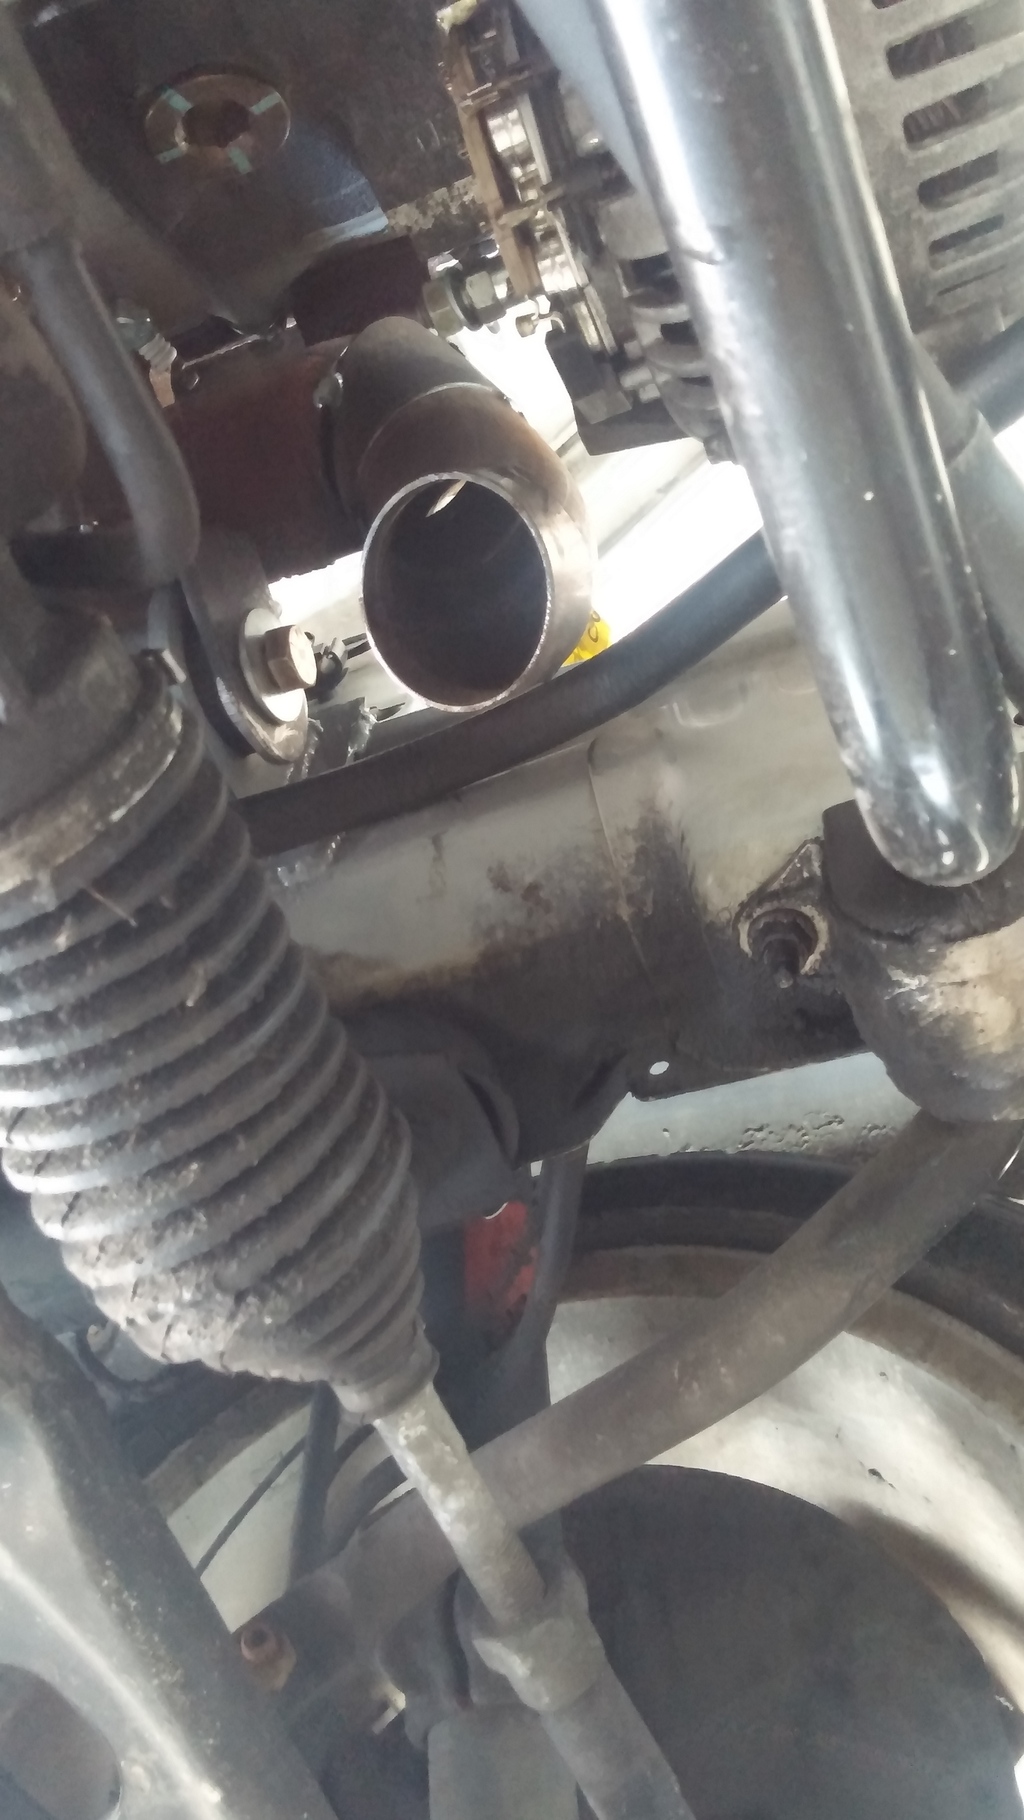
Steering shaft clearance

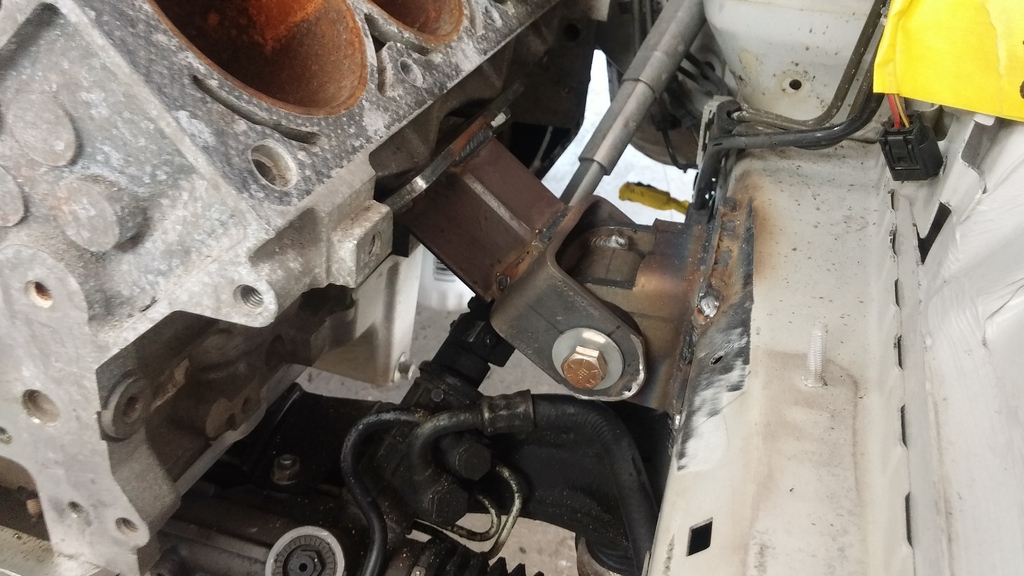
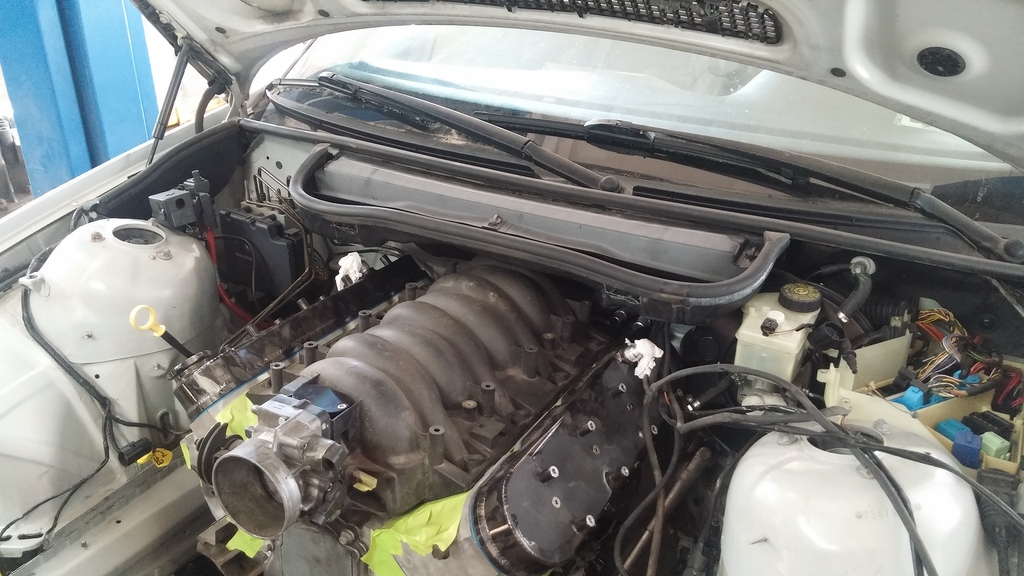
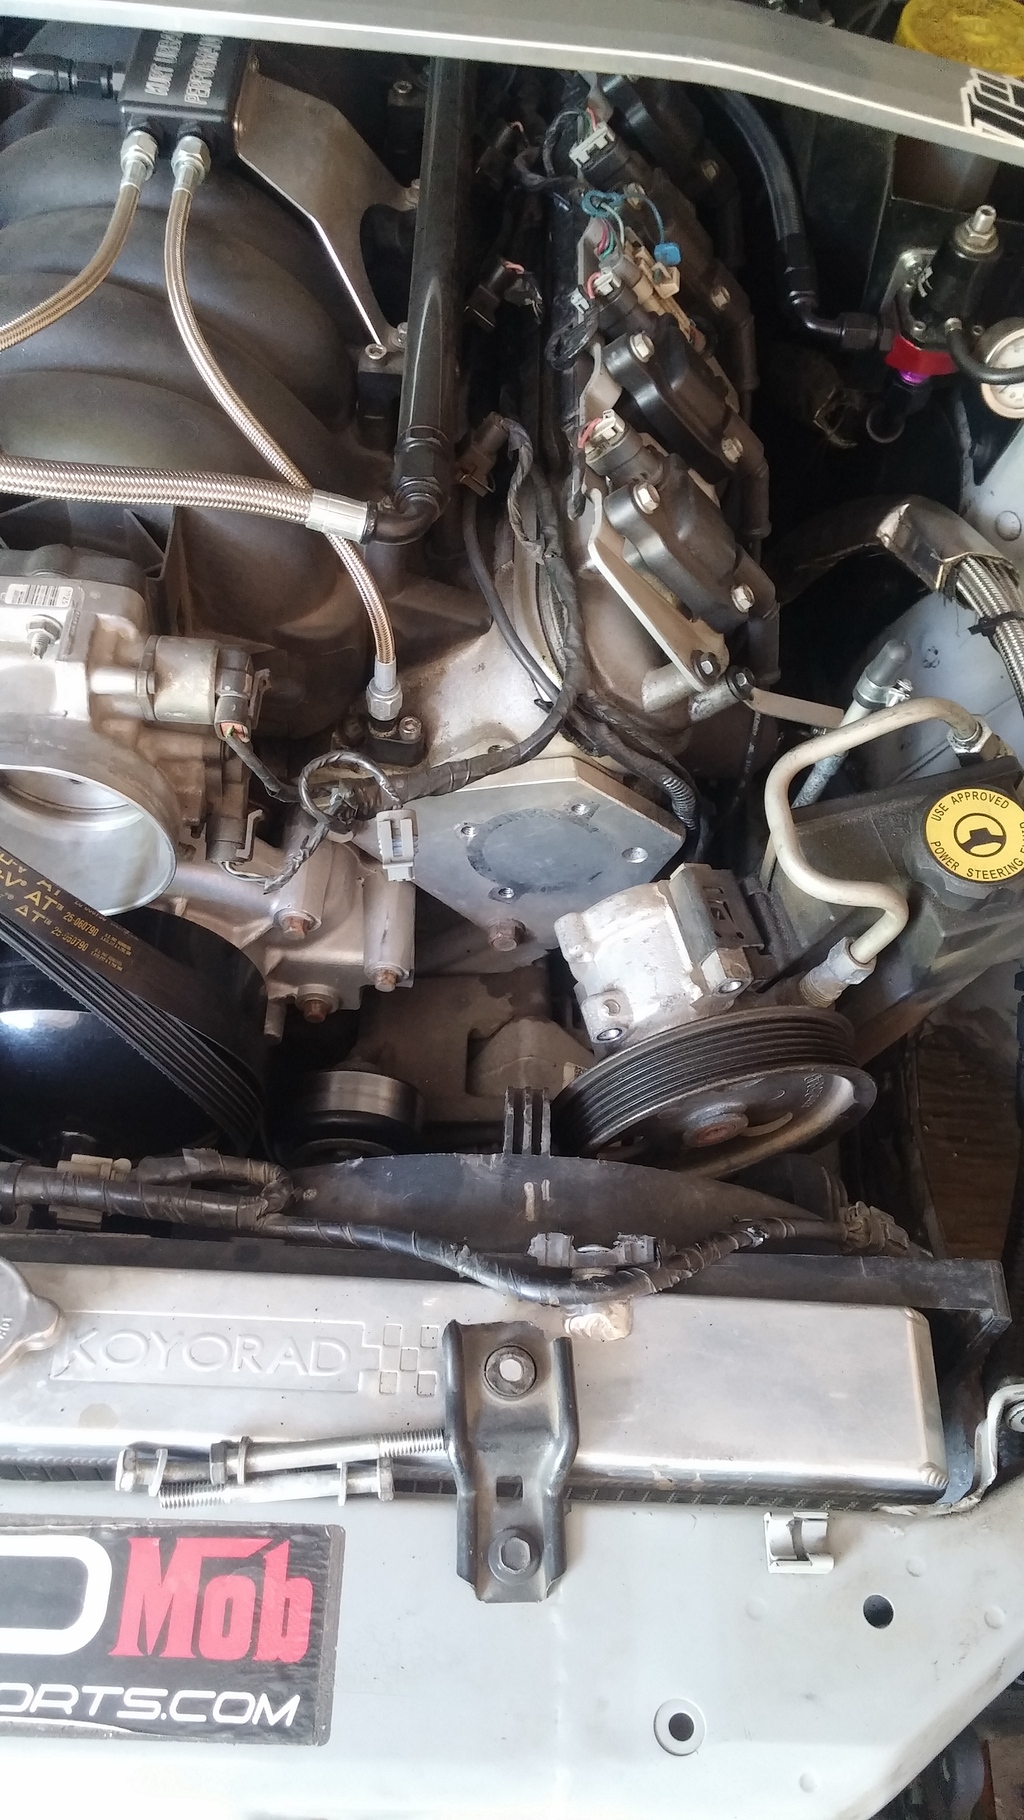
Also got sidetracked a bit and mounted up the coils and reran the wiring, it's all just below the coils, pretty stoked on that.

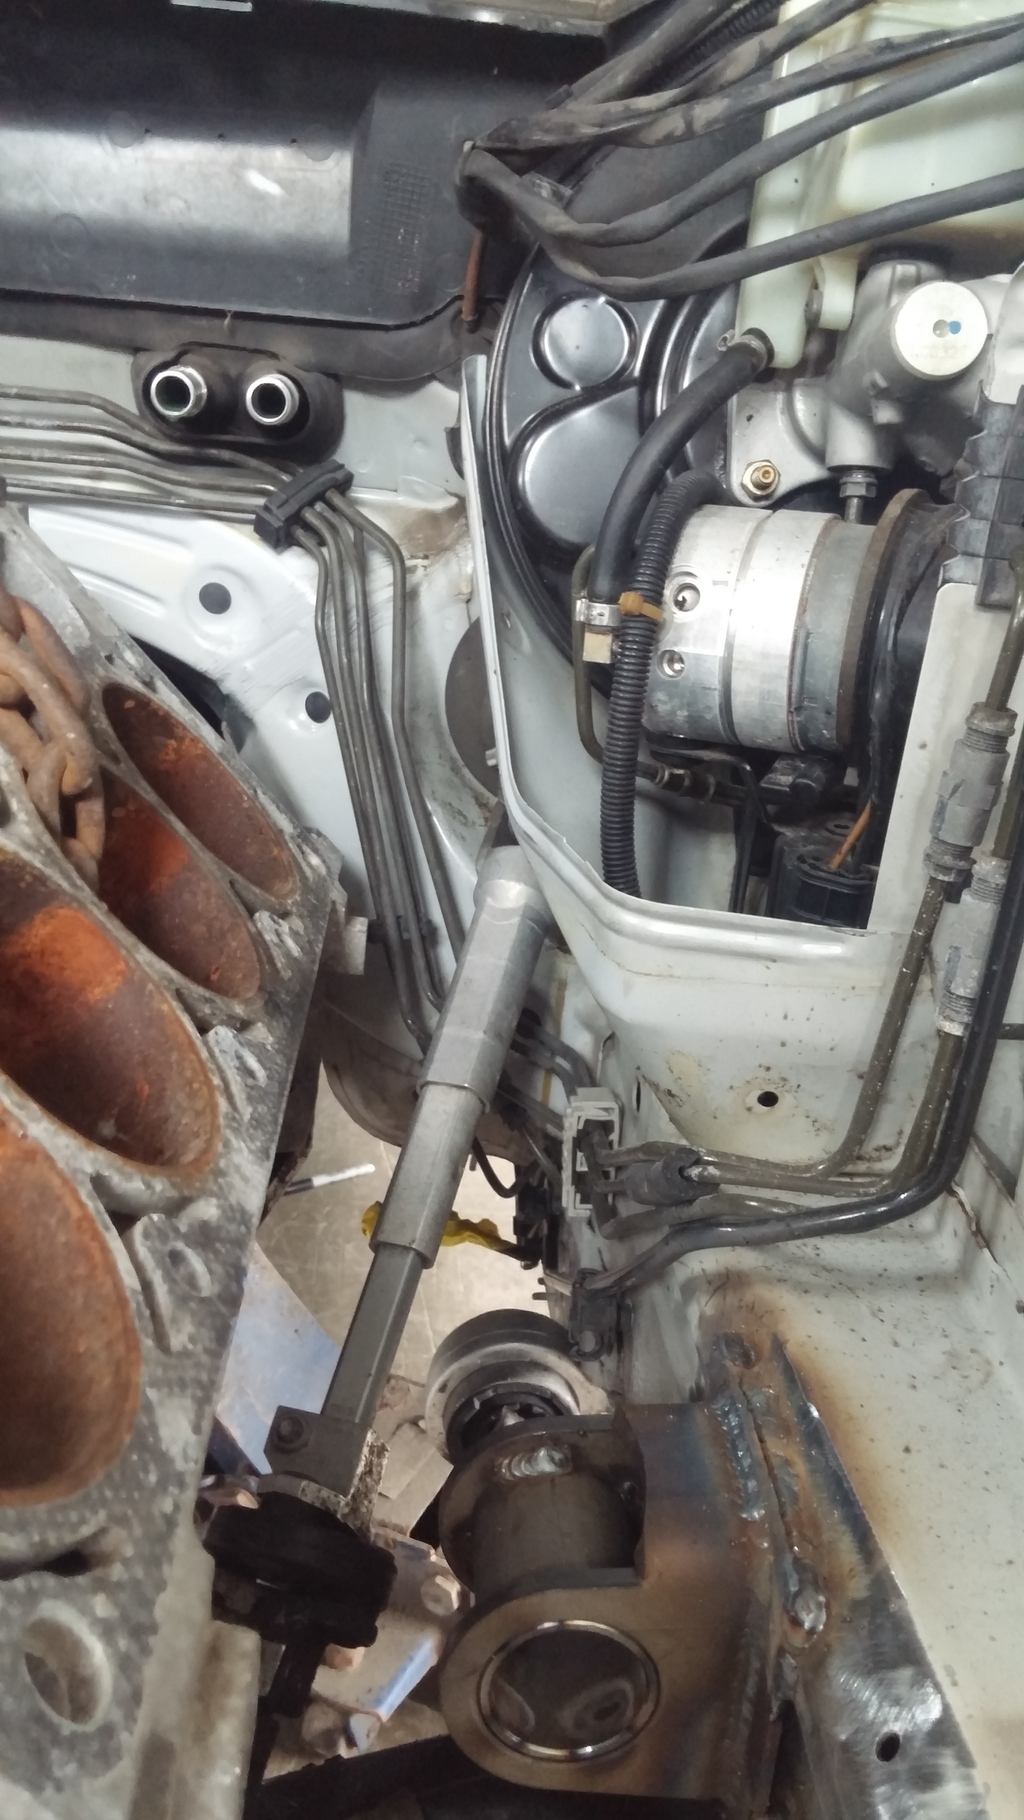
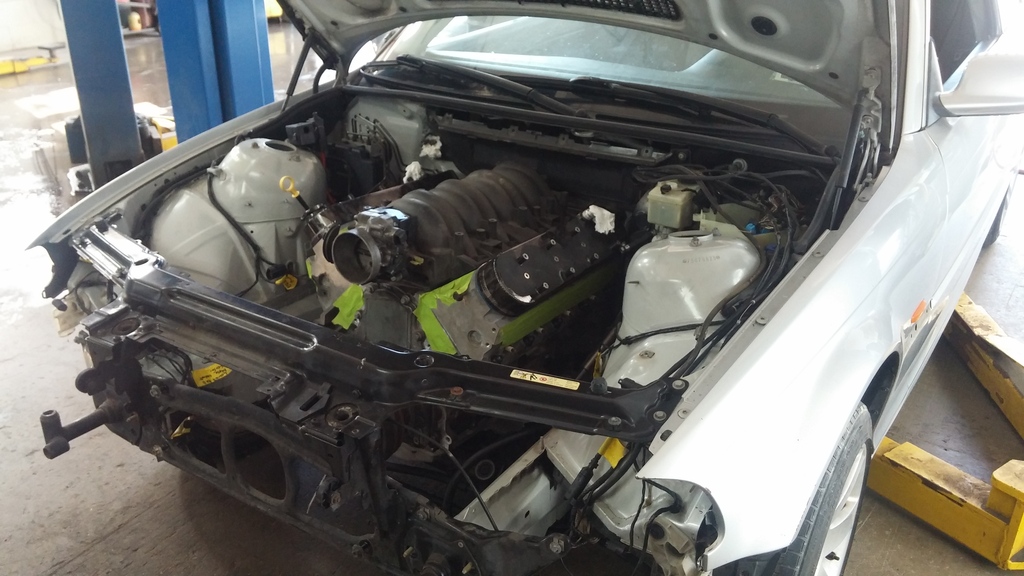
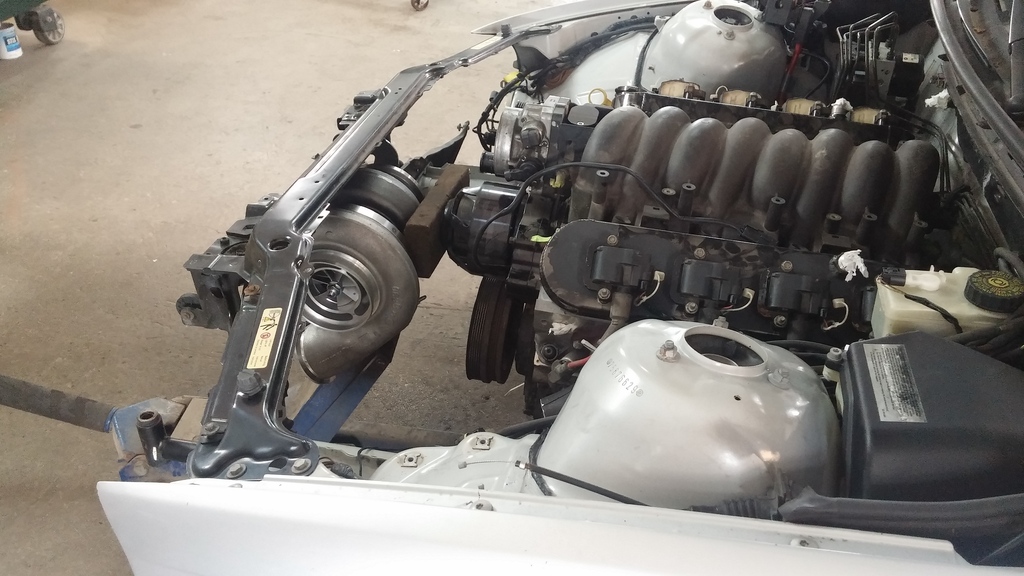
Next dad and I decided to see if this huge S475 will fit anywhere. Basically gonna have to run it up front and center, cut out the center of the rad support and lay the radiator forward. I hope i can find a way to keep stock hood latch assembly, otherwise I'll be forced to run some Aerocatch latches
Cut the flanges off some truck manifolds and tossed them on to start getting an idea of what I'll be working with
Steering shaft clearance
Also got sidetracked a bit and mounted up the coils and reran the wiring, it's all just below the coils, pretty stoked on that.
Next dad and I decided to see if this huge S475 will fit anywhere. Basically gonna have to run it up front and center, cut out the center of the rad support and lay the radiator forward. I hope i can find a way to keep stock hood latch assembly, otherwise I'll be forced to run some Aerocatch latches

Trending Topics
05-20-2015, 09:27 PM
#8
Some gold thingies showed up
Some bearing and plastic type thingies showed up

I've always run a Jeep Grand Cherokee power steering pump on my 240sx swaps because the flow rates are closer to the factory nissan setup than the fbody stuff aka it feels better maaaannnn. Haven't looked into nerdy specs but gonna be running the same style pump on the E46 because I have one laying around. Pulled the bracket/plate thinger off the racecar and dropped off at the local machine shop to have a few copies made.
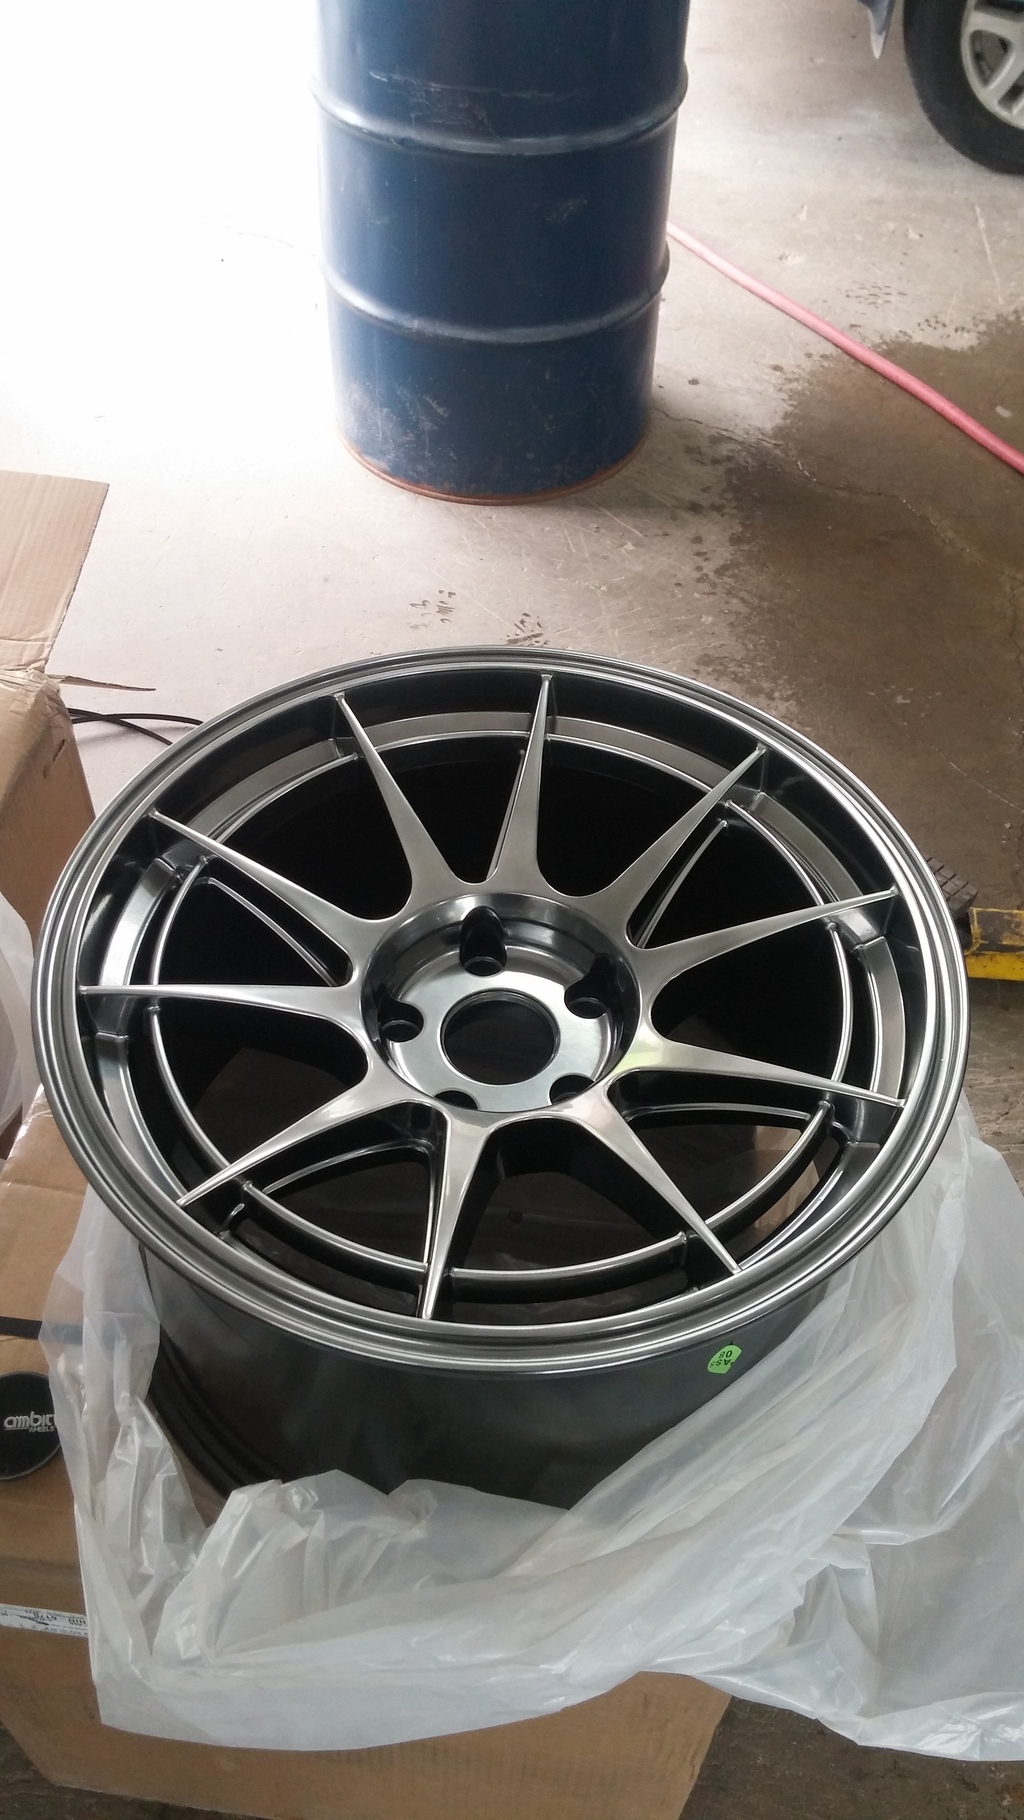
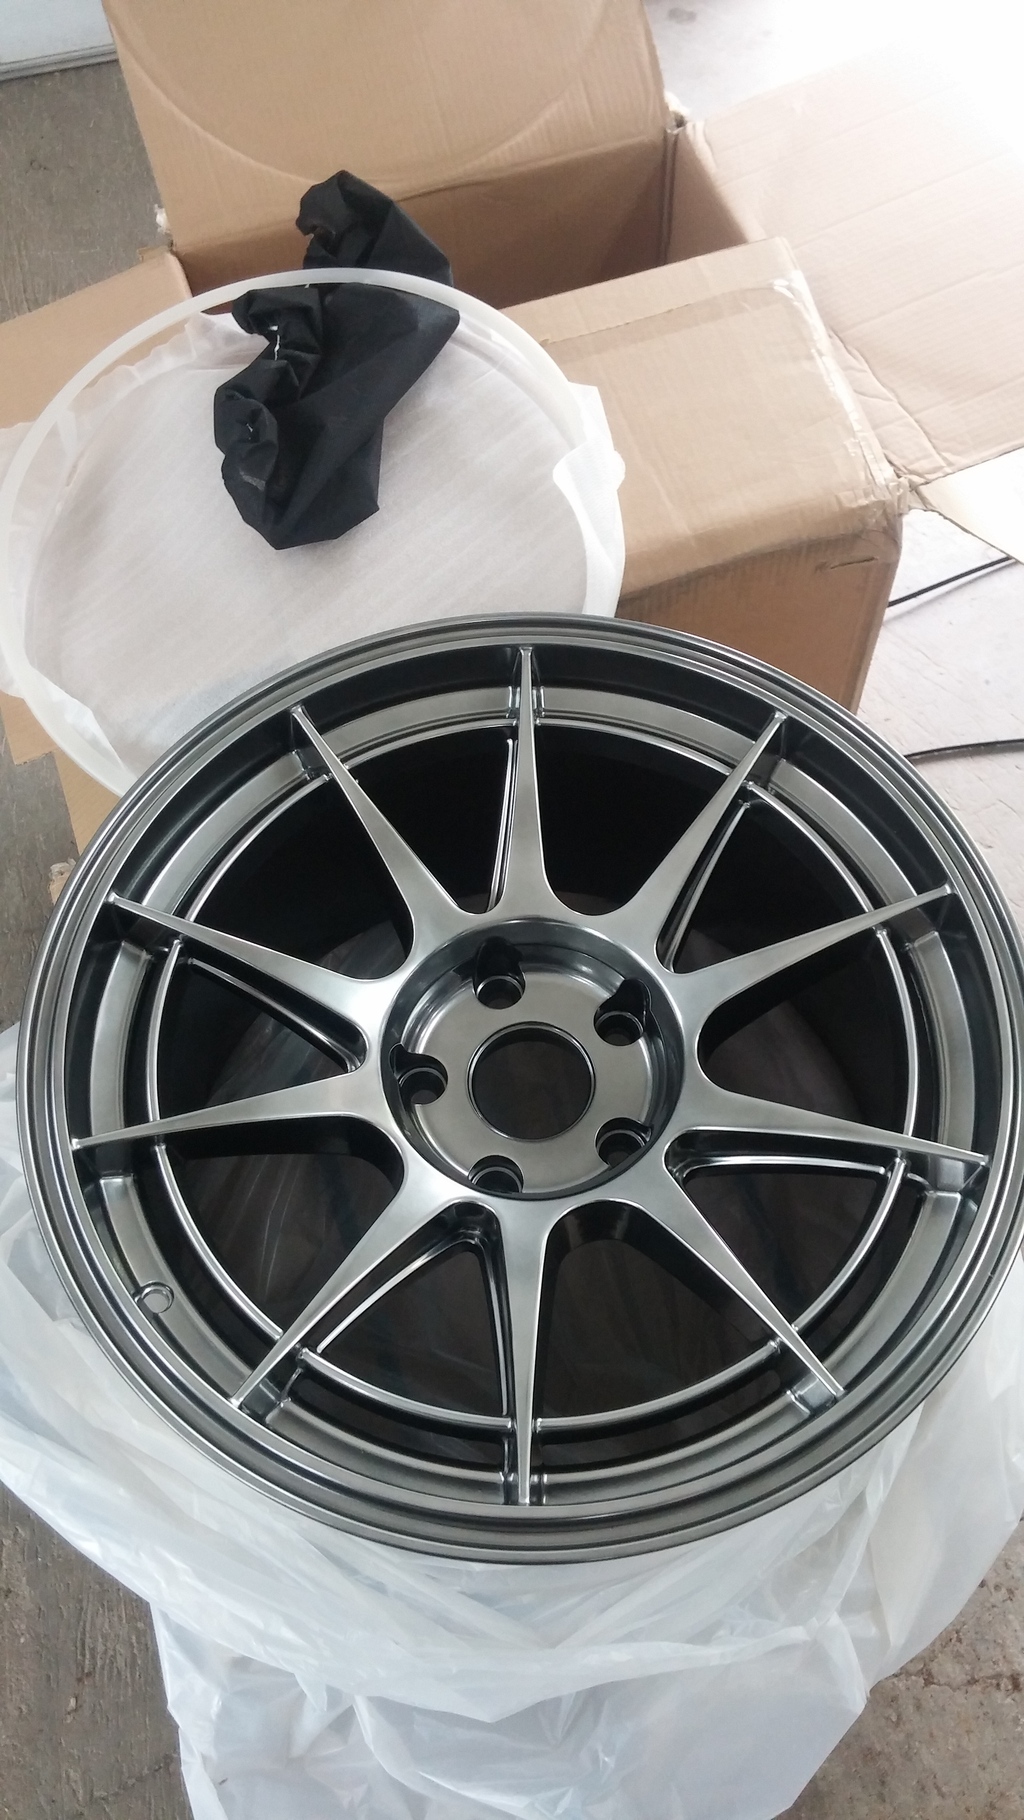
My wheels showed up, stokeeedddddd. Ambit RE18's. 18x9.5 +22 front, 18x10.5+22 rears. HyperBlack which is like a black chromey type deal.
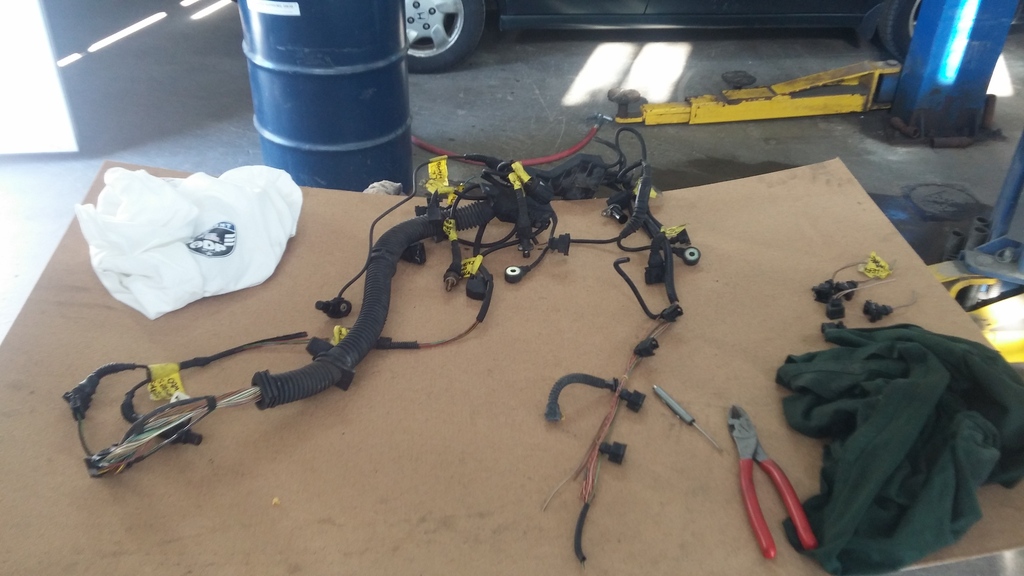
After work today I spent a couple hours trimming the stock E46 engine harness. Started with this mess

Just about done
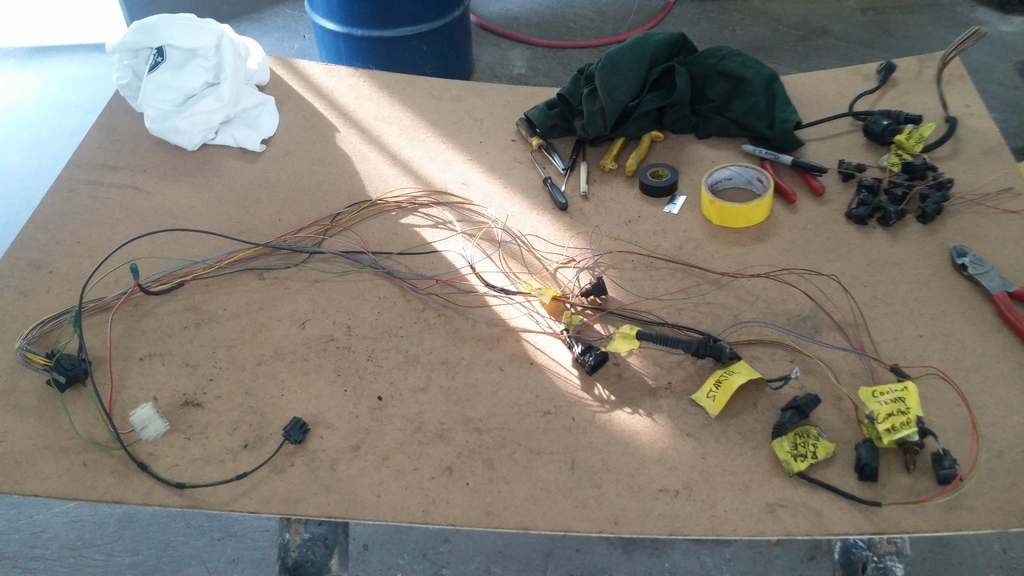
And all done
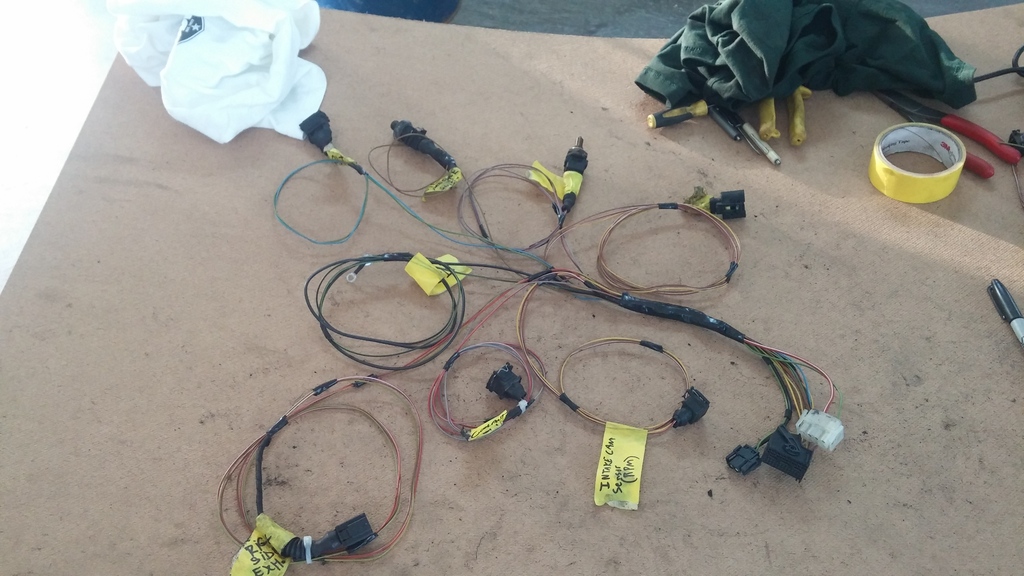
I mainly need the intake cam sensor plug to feed my tach signal into. I left the exhaust cam side and the crank position sensor in case the intake side cam sensor doesn't work for some reason. Once I can verify the tach works I can yank the other plugs and finish up the harness.
M3 rear end and subframe braces and all that jazz happening this weekend.
Some bearing and plastic type thingies showed up
I've always run a Jeep Grand Cherokee power steering pump on my 240sx swaps because the flow rates are closer to the factory nissan setup than the fbody stuff aka it feels better maaaannnn. Haven't looked into nerdy specs but gonna be running the same style pump on the E46 because I have one laying around. Pulled the bracket/plate thinger off the racecar and dropped off at the local machine shop to have a few copies made.
My wheels showed up, stokeeedddddd. Ambit RE18's. 18x9.5 +22 front, 18x10.5+22 rears. HyperBlack which is like a black chromey type deal.
After work today I spent a couple hours trimming the stock E46 engine harness. Started with this mess
Just about done
And all done
I mainly need the intake cam sensor plug to feed my tach signal into. I left the exhaust cam side and the crank position sensor in case the intake side cam sensor doesn't work for some reason. Once I can verify the tach works I can yank the other plugs and finish up the harness.
M3 rear end and subframe braces and all that jazz happening this weekend.
05-20-2015, 10:14 PM
#9
11 Second Club
Nice! Can't wait to see it start..
05-22-2015, 10:38 PM
#10
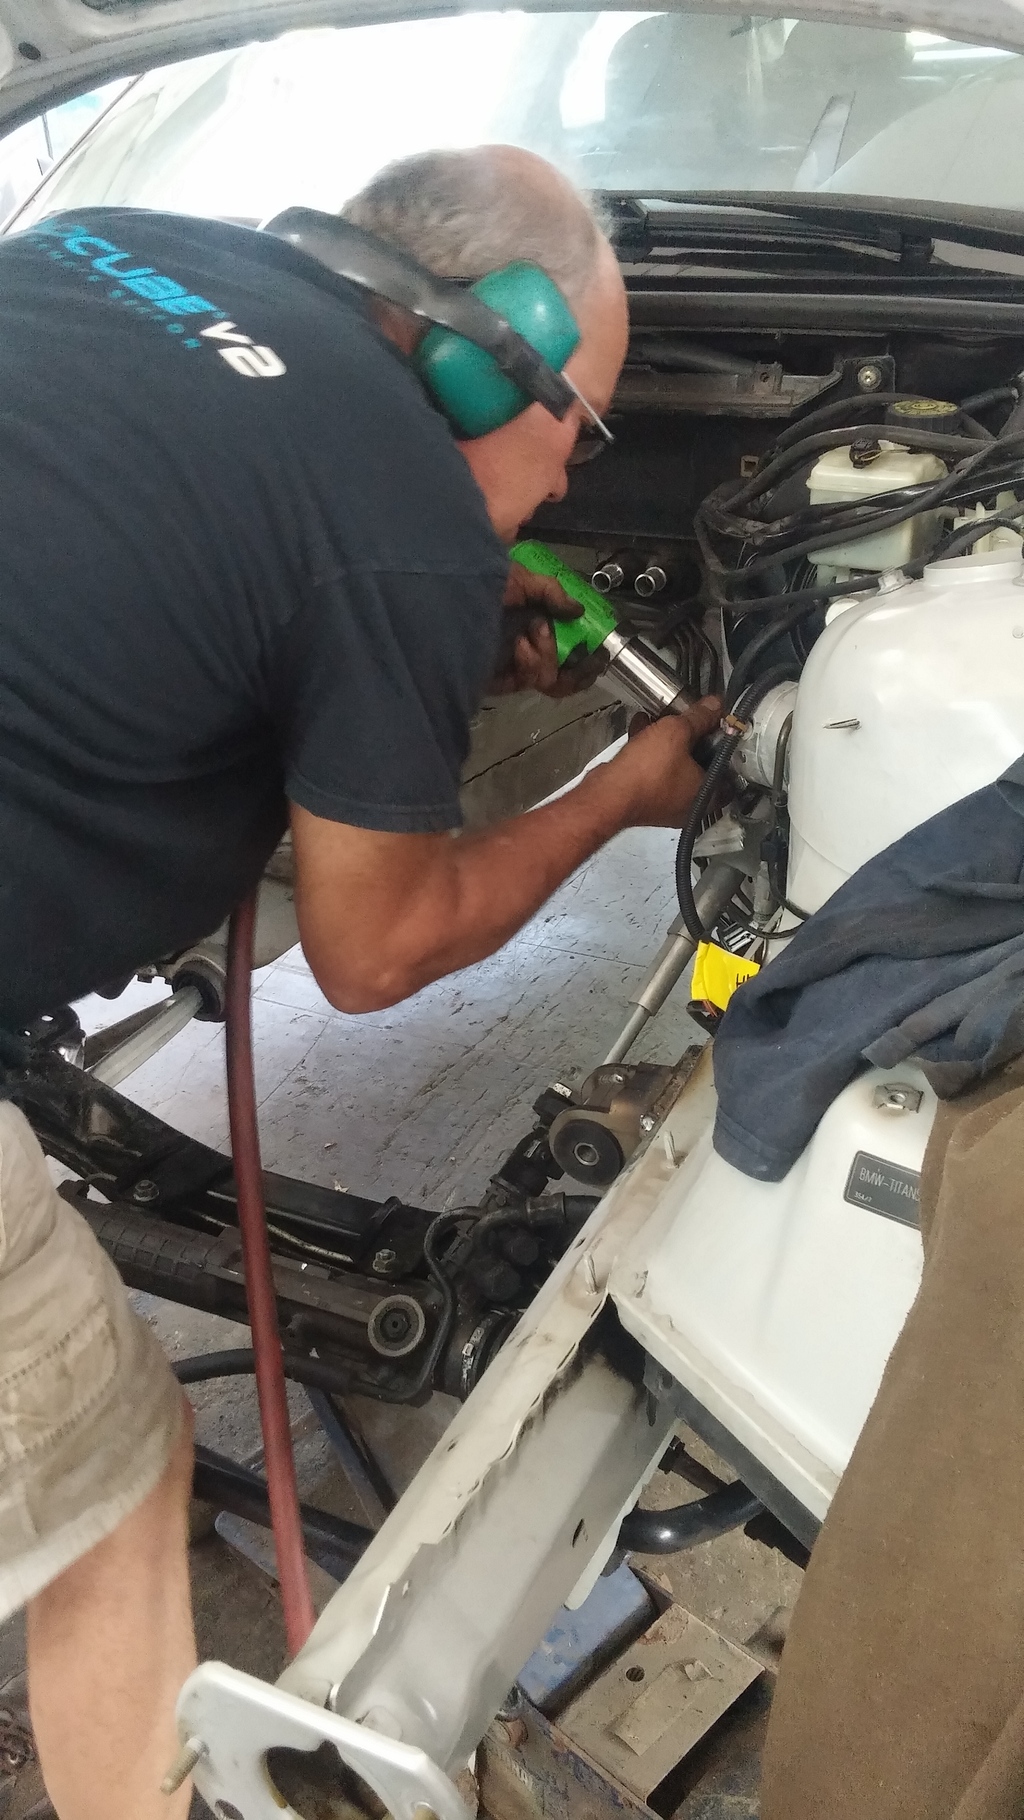
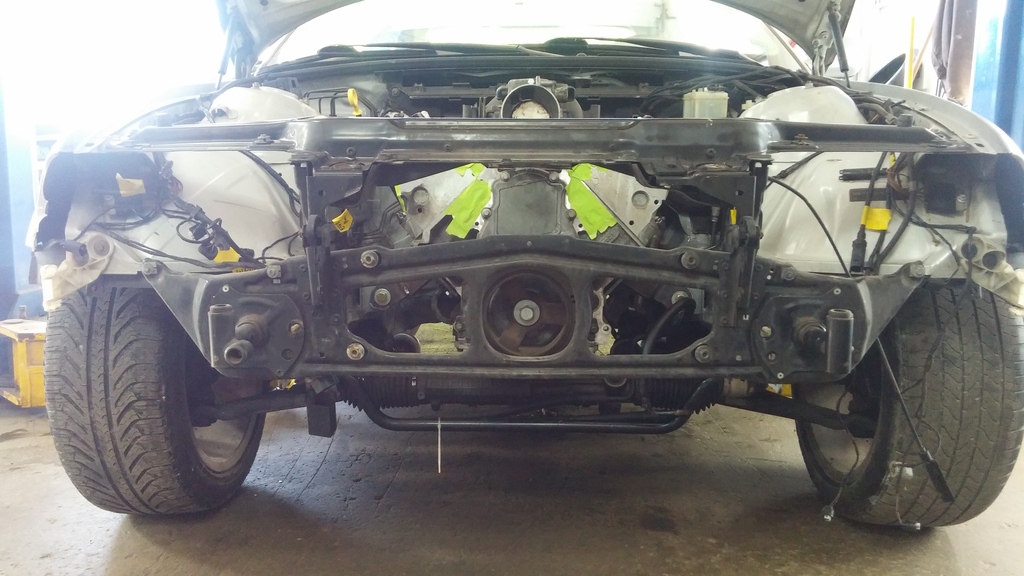
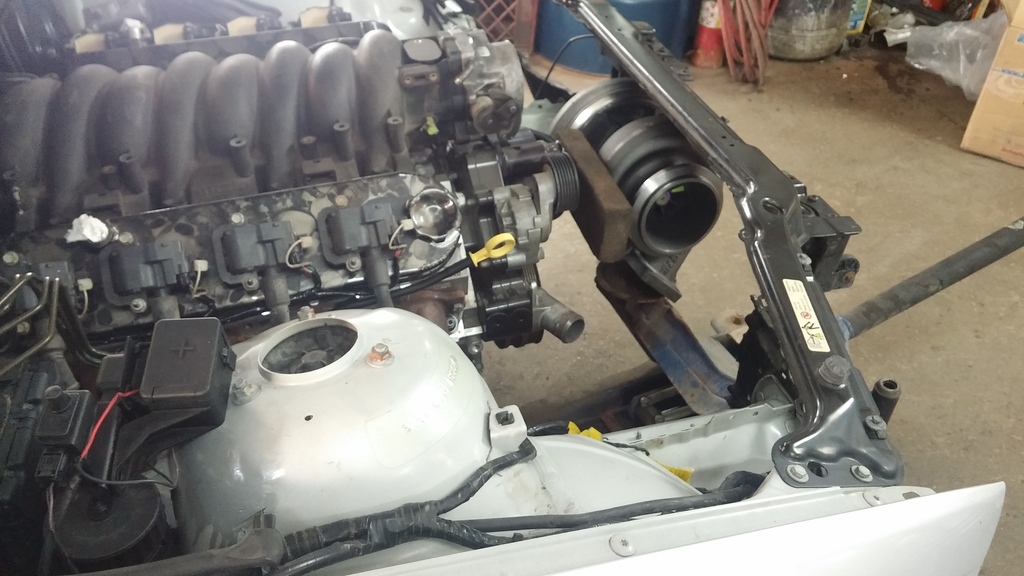
Had a bit of a rough day. Hacked the front of the car all up today in an attempt to mock up the radiator and S475....spent about 3hrs and finally realized this gigantic thing will not fit up front without some serious modifications/retrofitting of headlights and remote waterpump and just more effort than I'm interested in. With that said, the car will still be getting the S475, it will just be rear mounted, and that will happen later this year. I'll now be getting the car up and running on the boost ready motor in N/A mode so I can at least enjoy the car/swap for some of the summer haha.
Pics of my work today
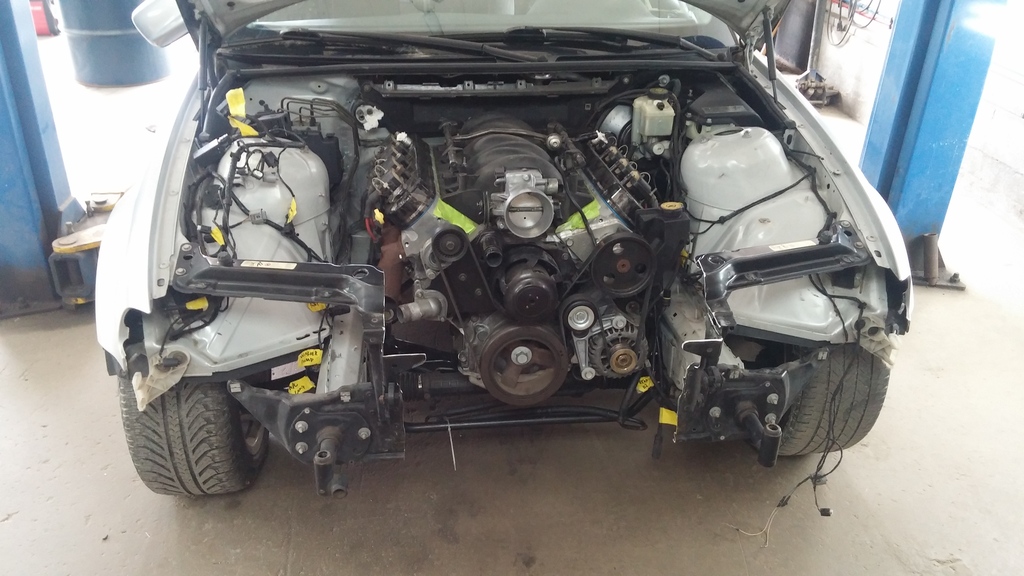

Even with all that upper rad/crash support hacked up and removed and the radiator pushed as far forward as possible, the turbo still wont begin to fit without hitting the waterpump....or the radiator fan...or the headlights....or the power steering pump...or the "name any other object in the engine bay".
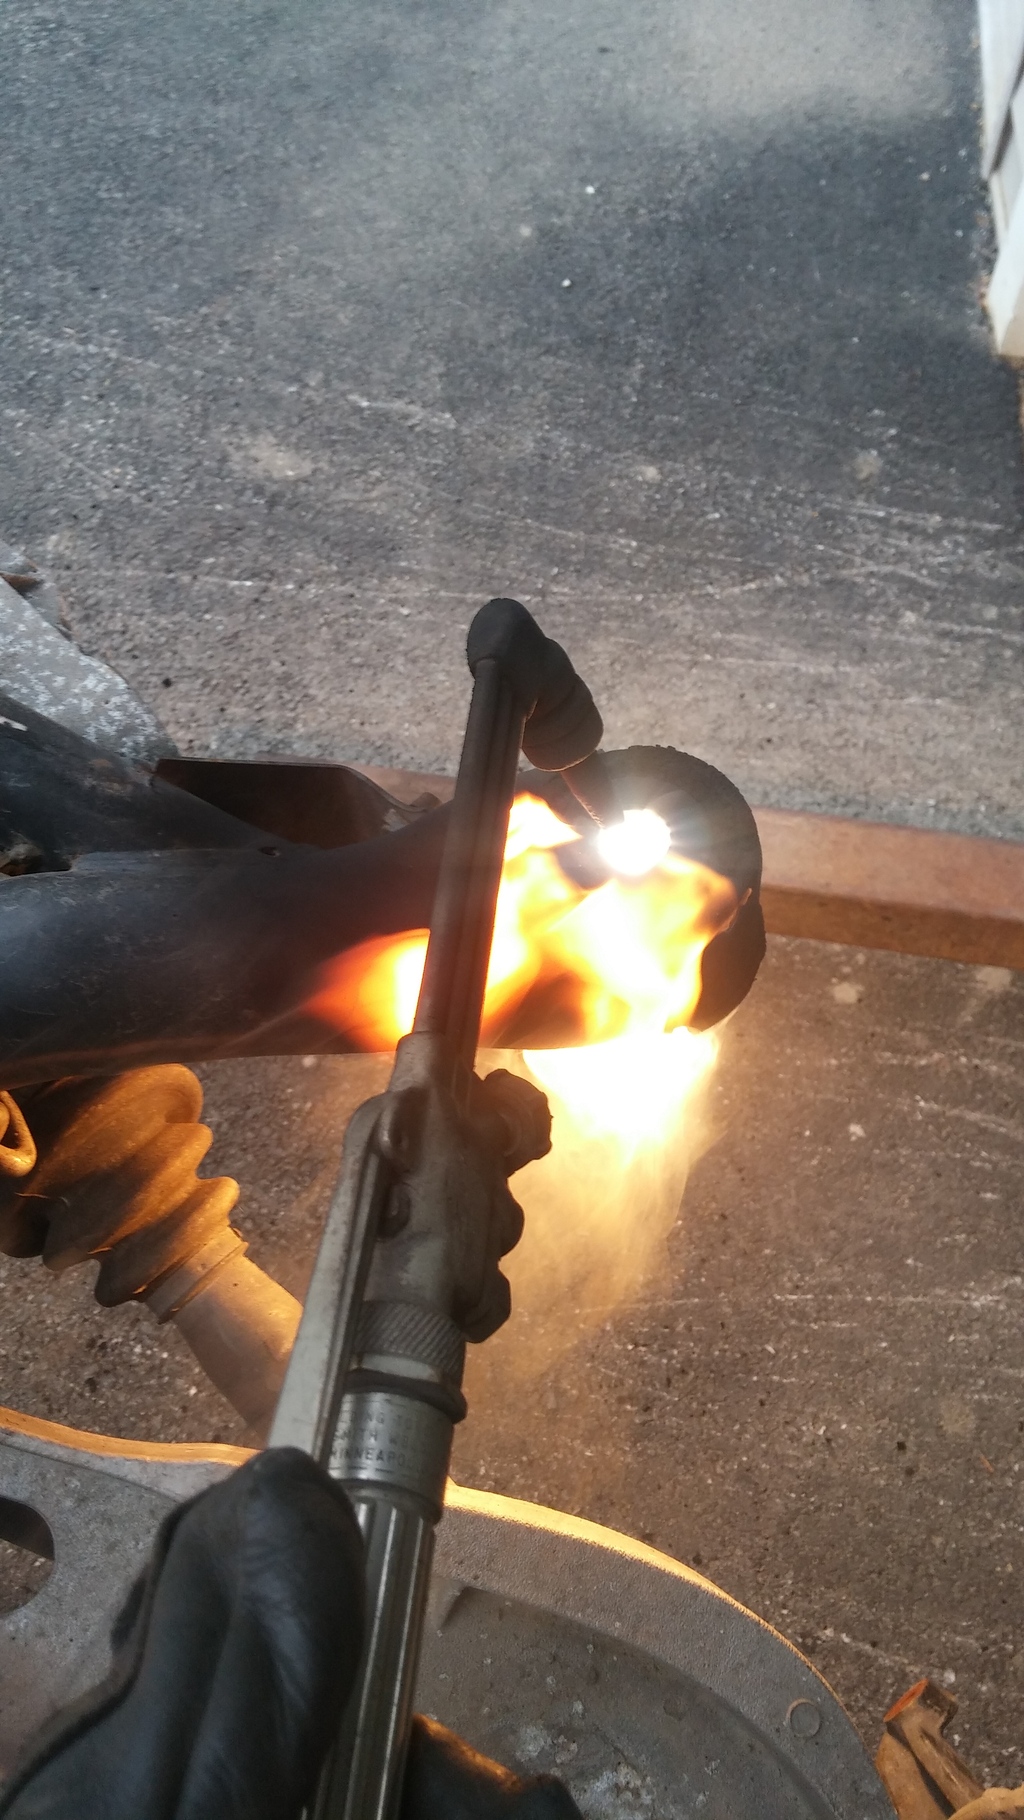
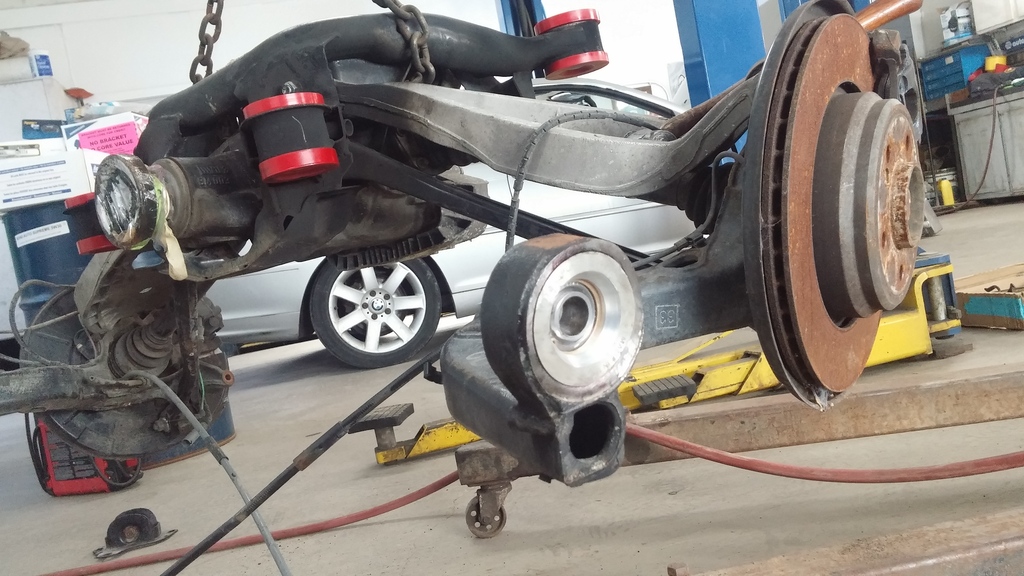
After feeling a bit defeated, I decided to tackle the rear subframe bushings and RTABS so I could at least feel somewhat productive. My father had already gotten the M3 rear end into the shop for me, so I suspended it off the engine crane and dragged it out the shop door a bit and started playing with fire.


The trick for burning these out, for anyone who hasn't done it, is to heat up the center aluminum sleeve/support bushing. Really put the heat to that for a good while all around and inside the sleeve. I ended up just putting the torch inside, angling it around and letting it eat until the whole bushing caught on fire....once its flaming good just let it ride. It SHOULD keep burning until the sleeve falls out. Sometimes it'll just keep burning and a little tap will get the sleeve out, but just let it burn. Now, I had one of the four bushing housings (the pressed in part that's hard to get out) fall out with the tap of a screwdriver. The others I had to use the air hammer/chisel bit but they came out pretty easily.
Torch inside the sleeve like so
This is the one that fell out with a tap of the screwdriver, you can see the big outer housing on the ground below

Rear uppers were being stubborn....got the sleeve a little too hot I'd say

RTABS turn
Luckily our OTC hub tamer rod just barely fit inside the RTAB spherical bearing so I was able to press them in without an issue. These fit REALLY tight, you wont be getting them in without a proper press type tool.
The poly subframe bushings fit snug and I was able to finesse them in with a dead blow hammer.
Thats about it for today. Also noticed the lower camber arms on the rear end are bent...probably from the fork lift (rear end from totaled car, most salvage yards move cars with fork lifts and the forks hit and bend these arms all up). They'll be fine to roll the car around the shop parking lot for now.
Pics of my work today
Even with all that upper rad/crash support hacked up and removed and the radiator pushed as far forward as possible, the turbo still wont begin to fit without hitting the waterpump....or the radiator fan...or the headlights....or the power steering pump...or the "name any other object in the engine bay".
After feeling a bit defeated, I decided to tackle the rear subframe bushings and RTABS so I could at least feel somewhat productive. My father had already gotten the M3 rear end into the shop for me, so I suspended it off the engine crane and dragged it out the shop door a bit and started playing with fire.
The trick for burning these out, for anyone who hasn't done it, is to heat up the center aluminum sleeve/support bushing. Really put the heat to that for a good while all around and inside the sleeve. I ended up just putting the torch inside, angling it around and letting it eat until the whole bushing caught on fire....once its flaming good just let it ride. It SHOULD keep burning until the sleeve falls out. Sometimes it'll just keep burning and a little tap will get the sleeve out, but just let it burn. Now, I had one of the four bushing housings (the pressed in part that's hard to get out) fall out with the tap of a screwdriver. The others I had to use the air hammer/chisel bit but they came out pretty easily.
Torch inside the sleeve like so
This is the one that fell out with a tap of the screwdriver, you can see the big outer housing on the ground below
Rear uppers were being stubborn....got the sleeve a little too hot I'd say
RTABS turn
Luckily our OTC hub tamer rod just barely fit inside the RTAB spherical bearing so I was able to press them in without an issue. These fit REALLY tight, you wont be getting them in without a proper press type tool.
The poly subframe bushings fit snug and I was able to finesse them in with a dead blow hammer.
Thats about it for today. Also noticed the lower camber arms on the rear end are bent...probably from the fork lift (rear end from totaled car, most salvage yards move cars with fork lifts and the forks hit and bend these arms all up). They'll be fine to roll the car around the shop parking lot for now.

 05-27-2015, 01:36 PM
#13
Teching In

Join Date: Aug 2014
Posts: 13
Likes: 0
Received 0 Likes
on
0 Posts
I'm wanting to do this same build pretty much! I have a 6.0 sitting in my garage waiting for me to save up the rest of the money lol.
I have seen one person put a turbo inside the engine bay. Its A LOT of fab. If you are interested I can send you the pictures of his piping. He had to do a low mount turbo with custom piping.
I have seen one person put a turbo inside the engine bay. Its A LOT of fab. If you are interested I can send you the pictures of his piping. He had to do a low mount turbo with custom piping.
05-27-2015, 05:52 PM
#14
I thought about low mounting/hanging it off the frame rail down in the passenger side, but then oil drain because a worrying thought haha. I think my plans for rear mount should be pretty trick and will be just as fun, time will tell!
Huge update hurrrrrr....three day weekend meant for 3 12hr days in the shop :craig:
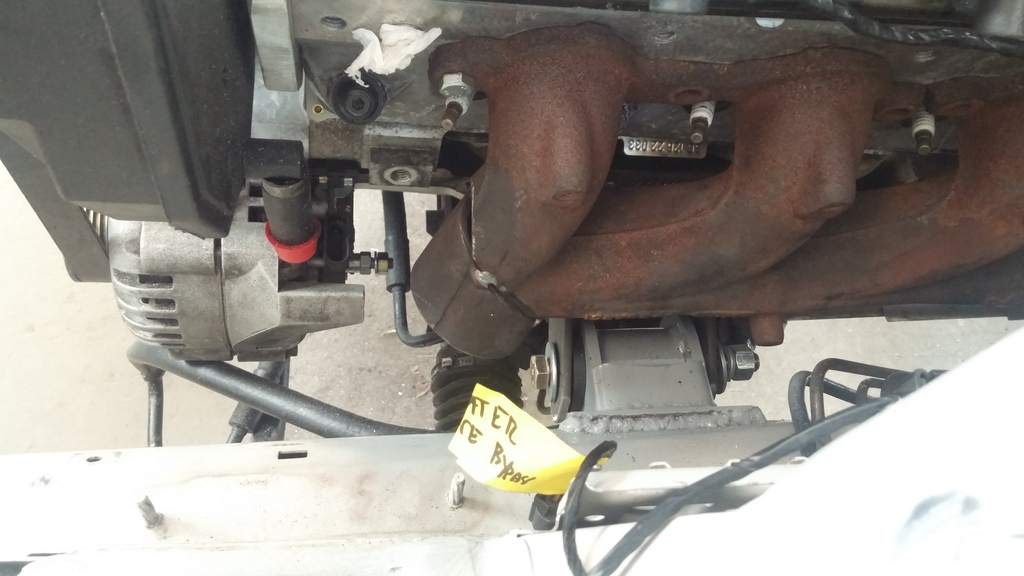
Started Friday night by starting on the drivers side exhaust manifold. Gonna try to dump down behind the alternator, 180* ish sweeping bend towards the block and past the steering shaft and out. Then merge with the passenger side at the back of the trans.
Cut the manifold again and flipped the cut portion around, not too shabby
Rough idea of what this will look like
Passenger side, CTSV manifold with the stock flange cut off and modified.
Welded a 2.5" piece of stainless to the factory cast, had to weld it real hot, let it cool slowly by sticking it in sand. Only sand I had around was from the nieces toy turtle sand box haha. My buddy who runs a fab shop took the other manifold off to TIG it up real nice since it was a more serious cut/weld.
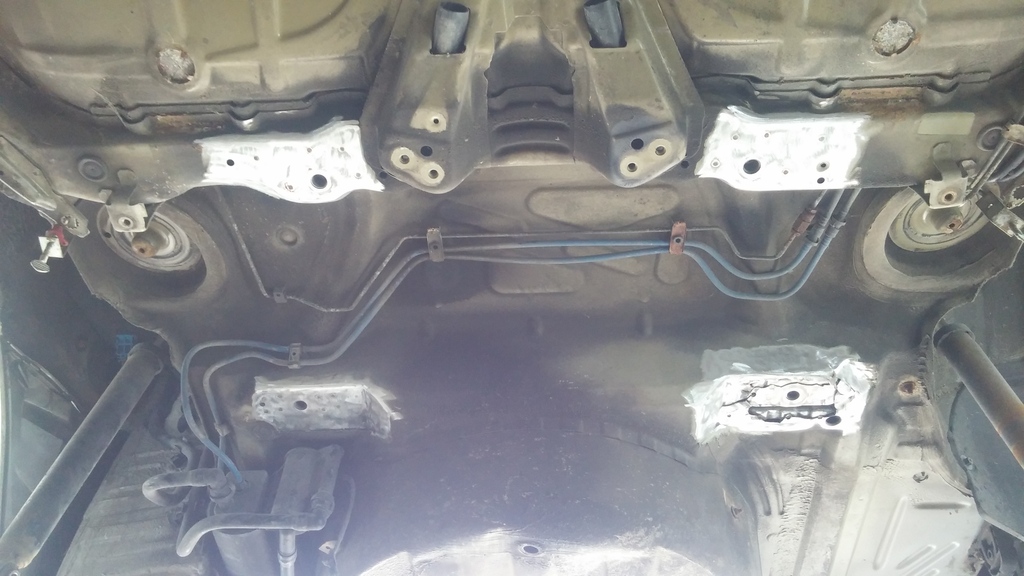
While that was cooling, I'd sourced another rad support and got to fitting the radiator in. Got the upper mounts roughed out. Will be made out of one piece of angle aluminum in the end.

Bottom mount done up. Not the prettiest piece but it really doesn't matter as it will most likely get redone when a front mount intercooler goes on

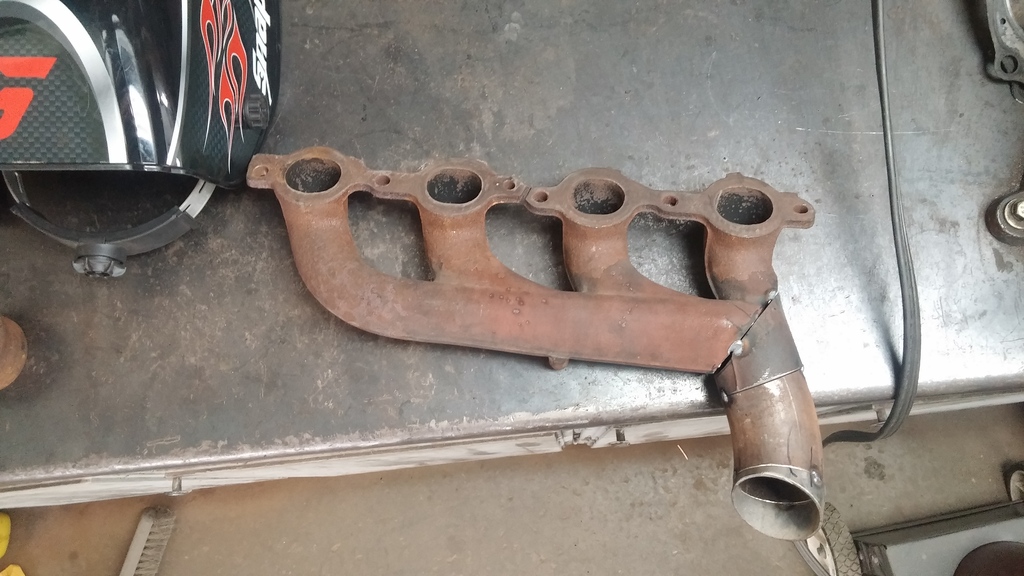
Passenger manifold done and added onto.

Exits here, still allowing room for 3" charge pipe to go up between block and mount later on when rear mount setup gets built.
All mocked/mounted. And that's it for Friday night.

Huge update hurrrrrr....three day weekend meant for 3 12hr days in the shop :craig:
Started Friday night by starting on the drivers side exhaust manifold. Gonna try to dump down behind the alternator, 180* ish sweeping bend towards the block and past the steering shaft and out. Then merge with the passenger side at the back of the trans.
Cut the manifold again and flipped the cut portion around, not too shabby
Rough idea of what this will look like
Passenger side, CTSV manifold with the stock flange cut off and modified.
Welded a 2.5" piece of stainless to the factory cast, had to weld it real hot, let it cool slowly by sticking it in sand. Only sand I had around was from the nieces toy turtle sand box haha. My buddy who runs a fab shop took the other manifold off to TIG it up real nice since it was a more serious cut/weld.
While that was cooling, I'd sourced another rad support and got to fitting the radiator in. Got the upper mounts roughed out. Will be made out of one piece of angle aluminum in the end.
Bottom mount done up. Not the prettiest piece but it really doesn't matter as it will most likely get redone when a front mount intercooler goes on
Passenger manifold done and added onto.
Exits here, still allowing room for 3" charge pipe to go up between block and mount later on when rear mount setup gets built.
All mocked/mounted. And that's it for Friday night.
05-27-2015, 06:12 PM
#15
Saturday morning saw my father and I pulling the rear subframe and what not.
I started by tacking these plates in place on the rear camber arms, that way they didn't get bent if we dropped one or something....seeings how they're basically made of two pieces of paper held together with some elmers glue

No real pictures of yanking stuff out, nothing exciting really, just stock parts coming out haha. Got everything off and began to tackle this issue...
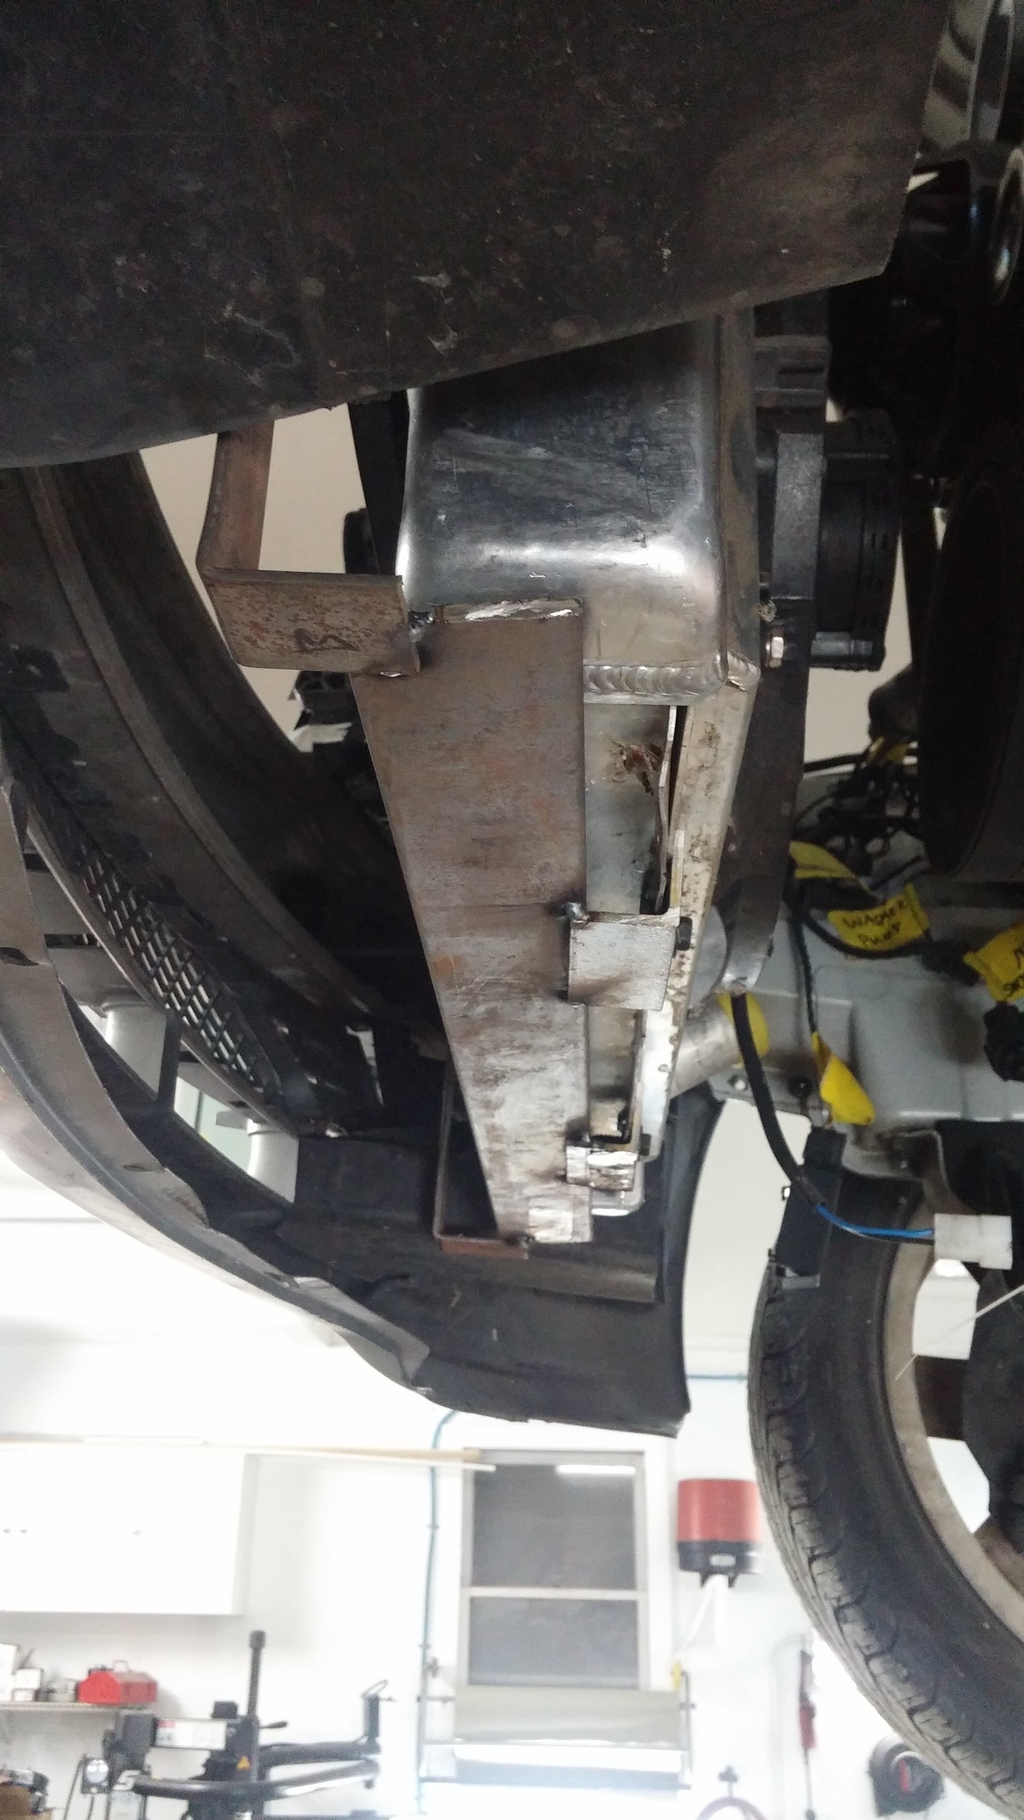
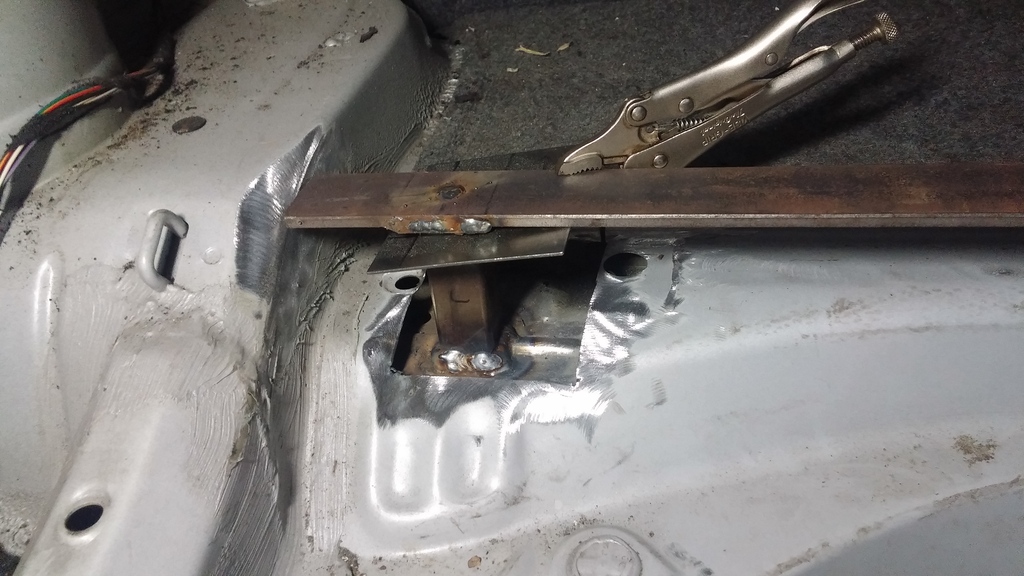
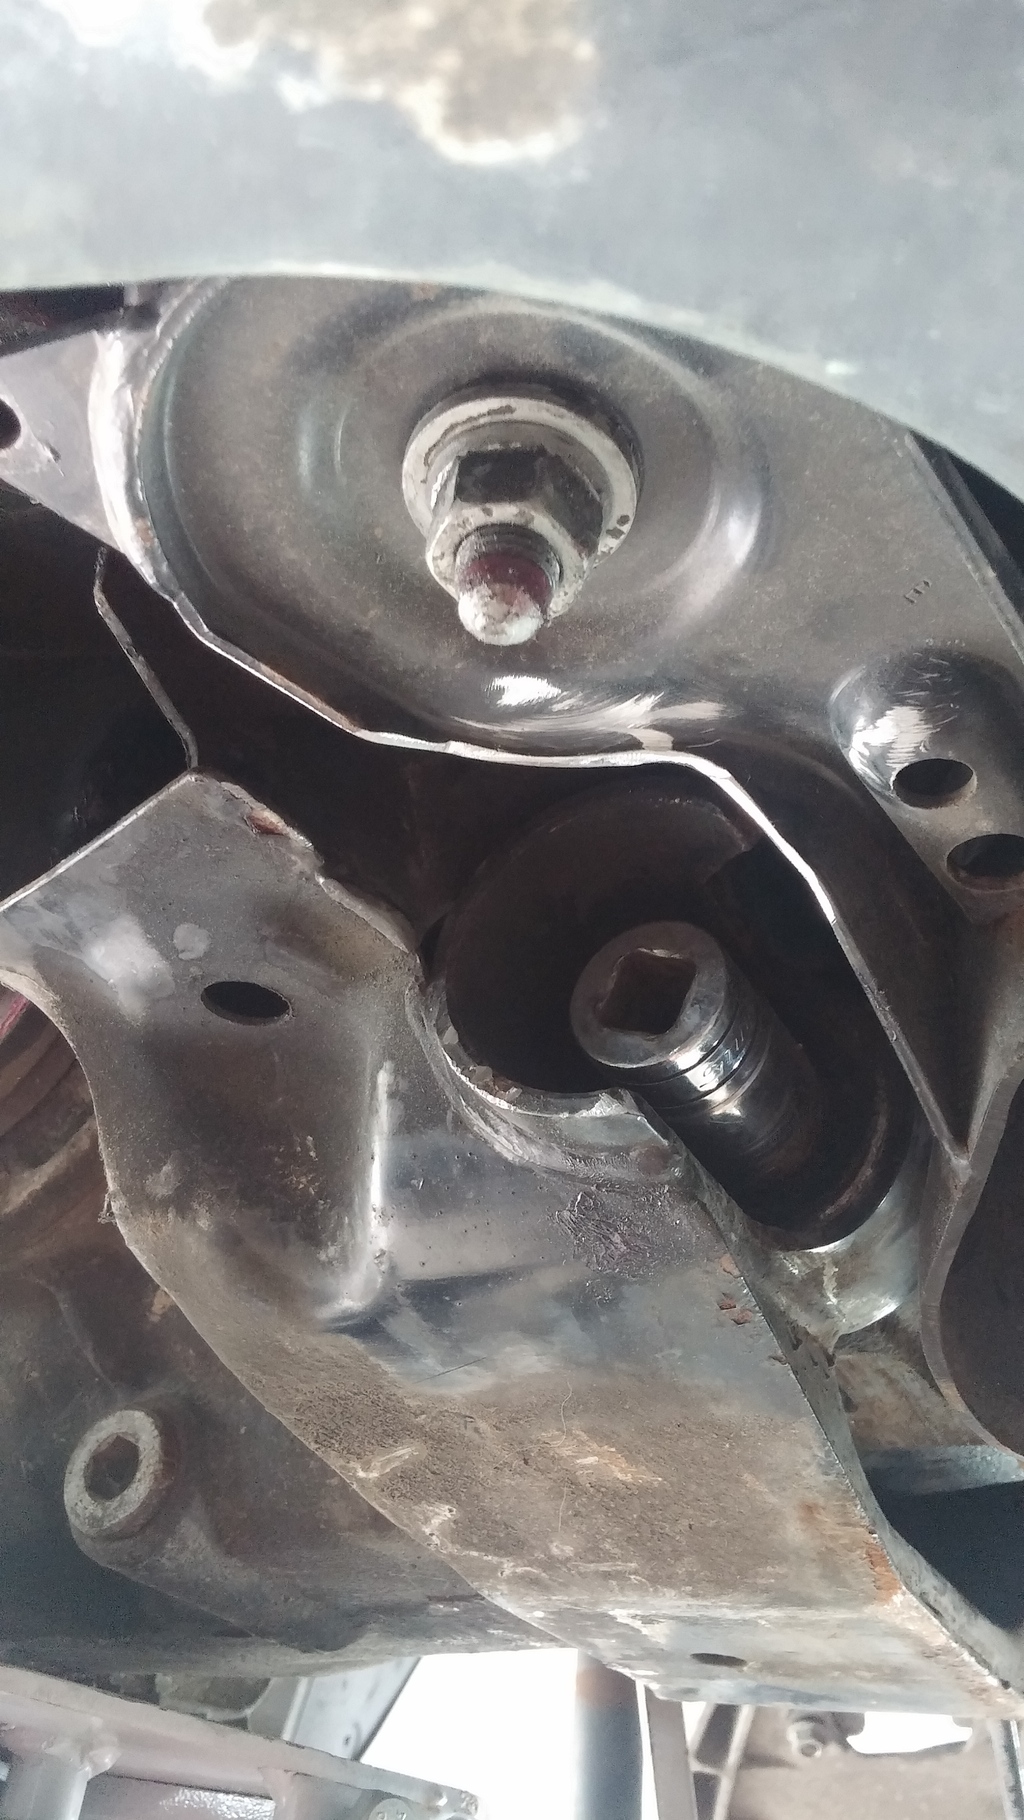
So I'm sure most of y'all on here know about the rear subframe issue....but I doubt many know how cheesy the mounts really are....it's insane...I figured it'd be weak...but not this bad haha. For those of you that aren't too familiar with the mounting design, I'll try to cover it pretty well/detailed. Some of this is in the Turner Motorsports or other companies bracing instructions, but nothing to do with the inner cage is covered as hopefully people can prevent their car from getting as bad as mine was haha. Oh, and this was an automatic 3 owner car, dealer serviced by owners 1 & 2 haha.
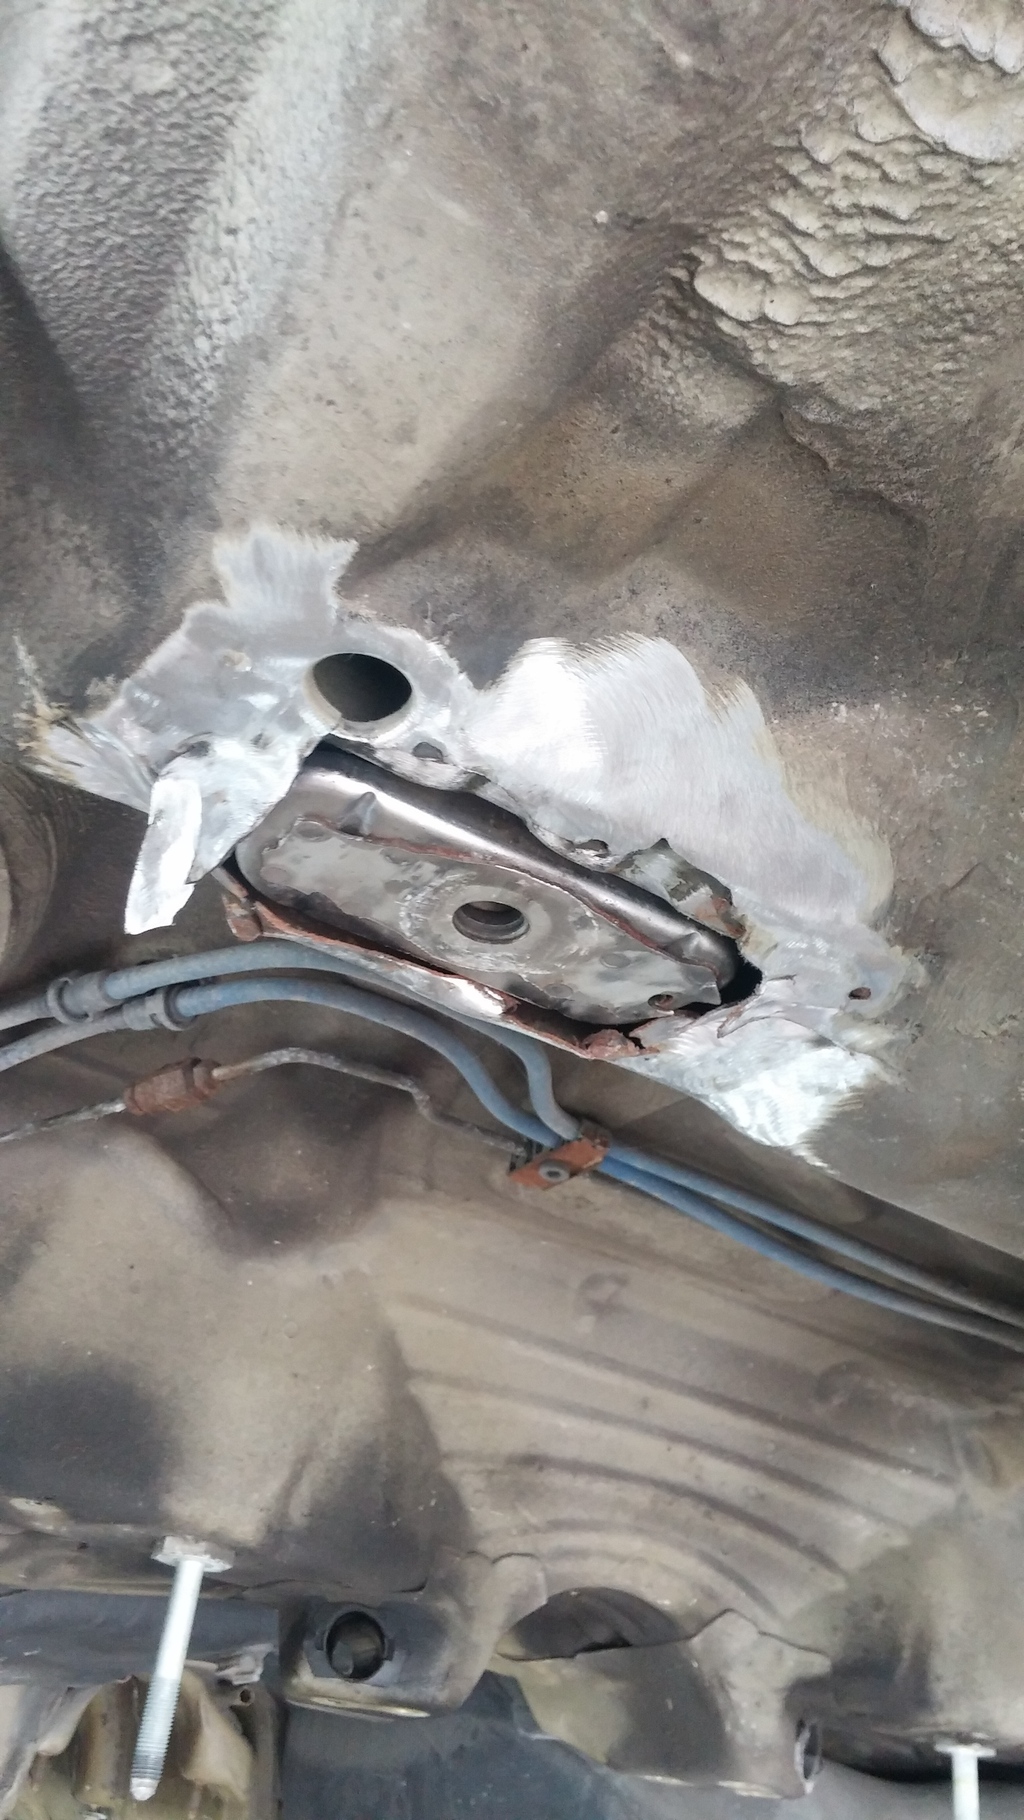
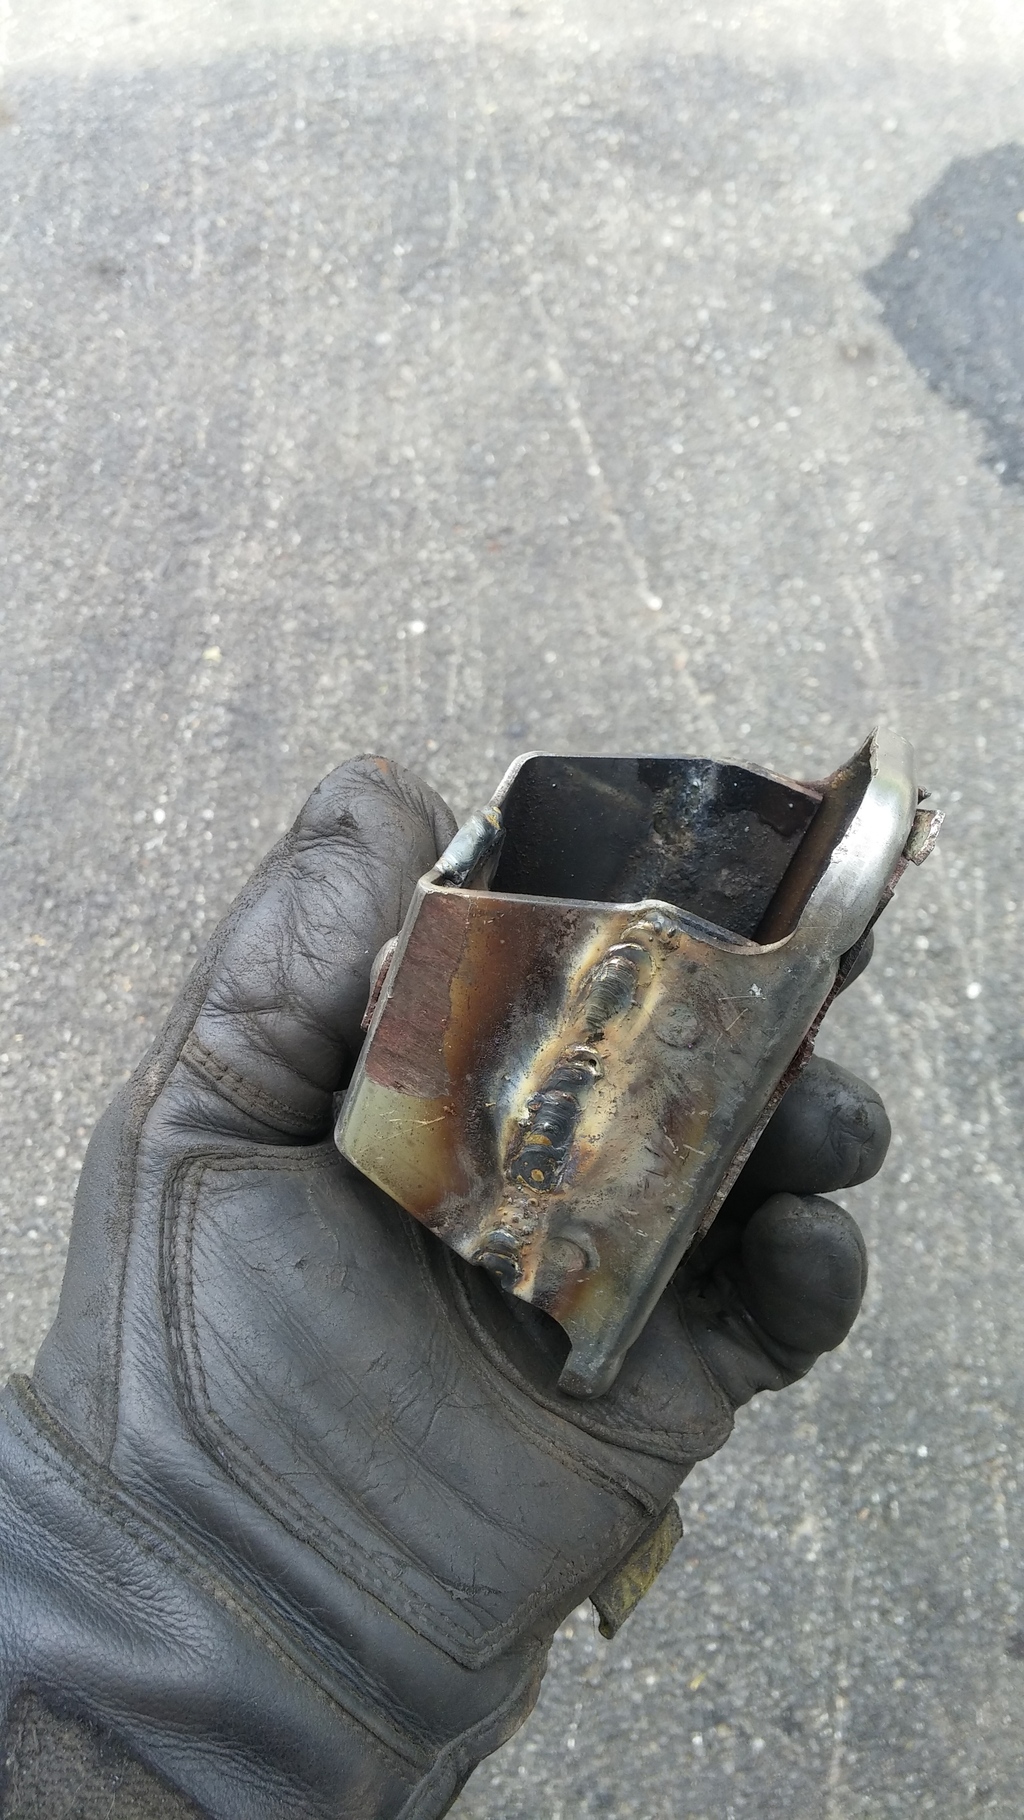
So this is the bottom of the mount, the part you look at under the car. It's held to the 16ga'ish sheet metal of the floor pan by those 8 spot welds you see still holding a patch of floor panel on.
With that spot welded to the floor pan, it's then welded to an upper layer of 16ga'ish metal inside the car/unibody by only these three small welds.

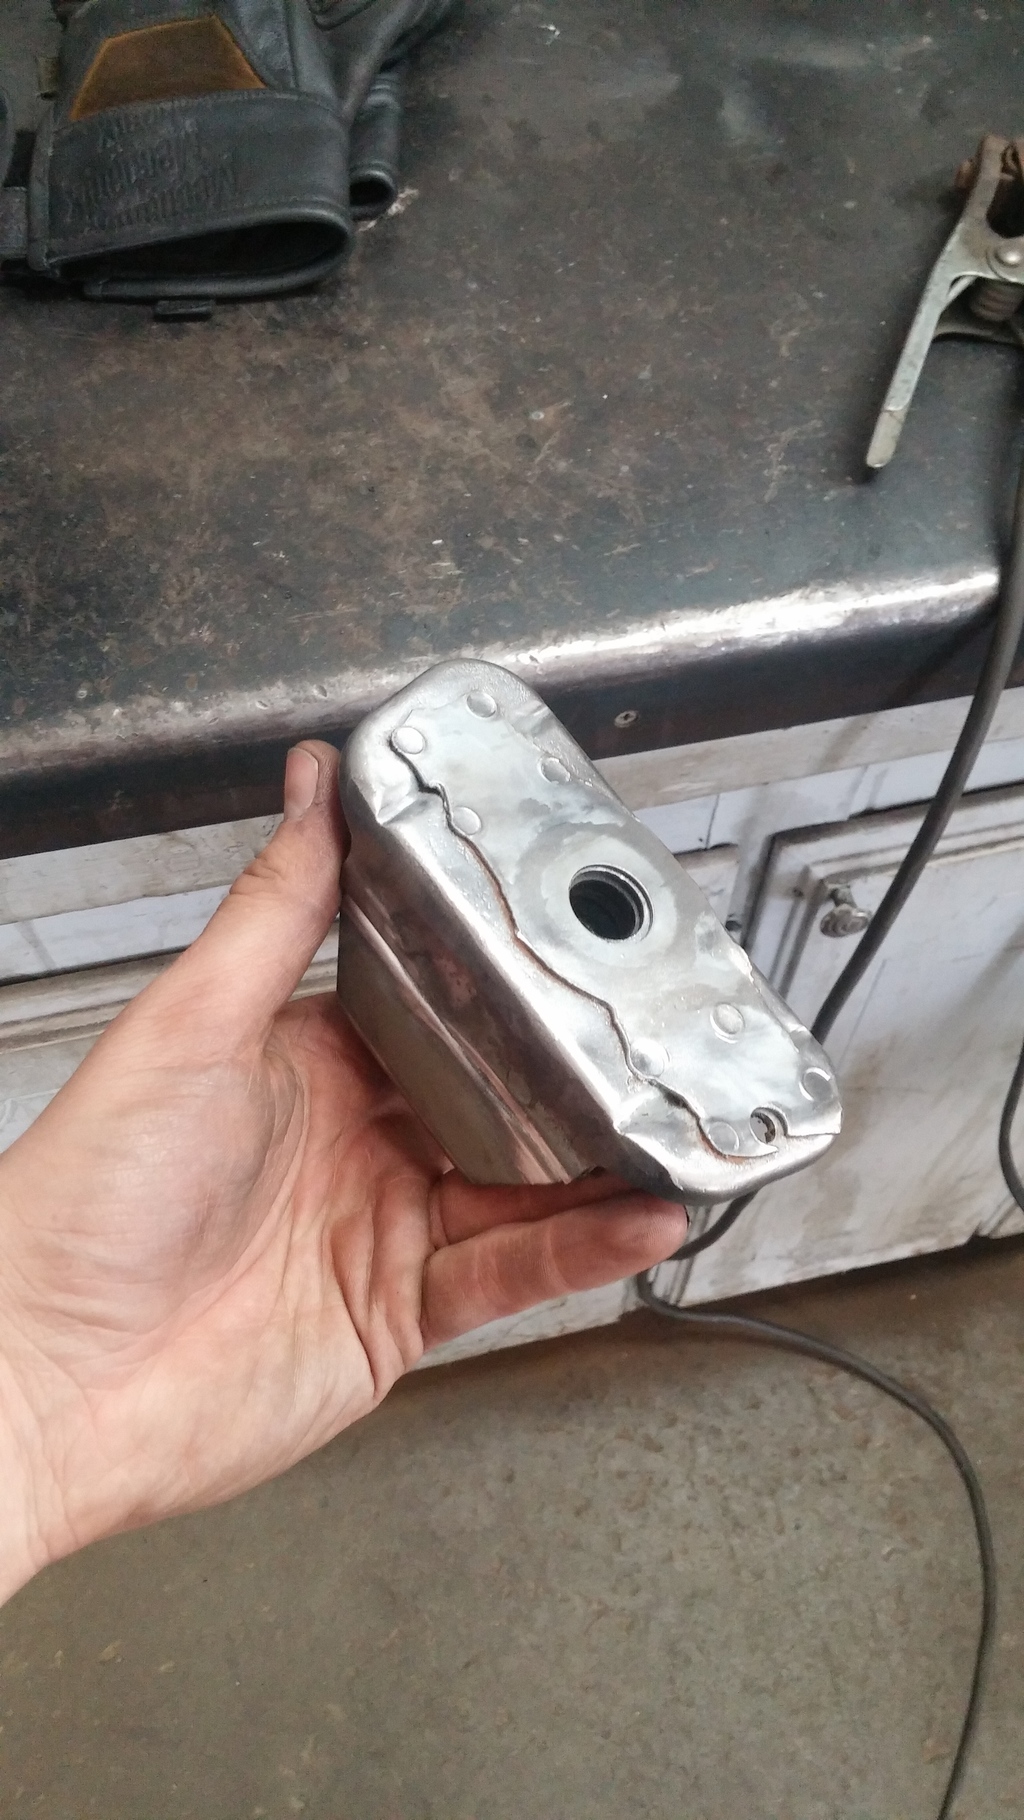
The threaded stud inside that bracket, the part that your subframe bolt threads into, is just tacked in there between the two halves of stamped metal that make up the mount cage thinger. I welded both seams (they're only spot welded factory) and welded the stud to the cage as you can see here.
Now, back to the top section, if you cut away the small top section you see where those three welds I mentioned earlier are.
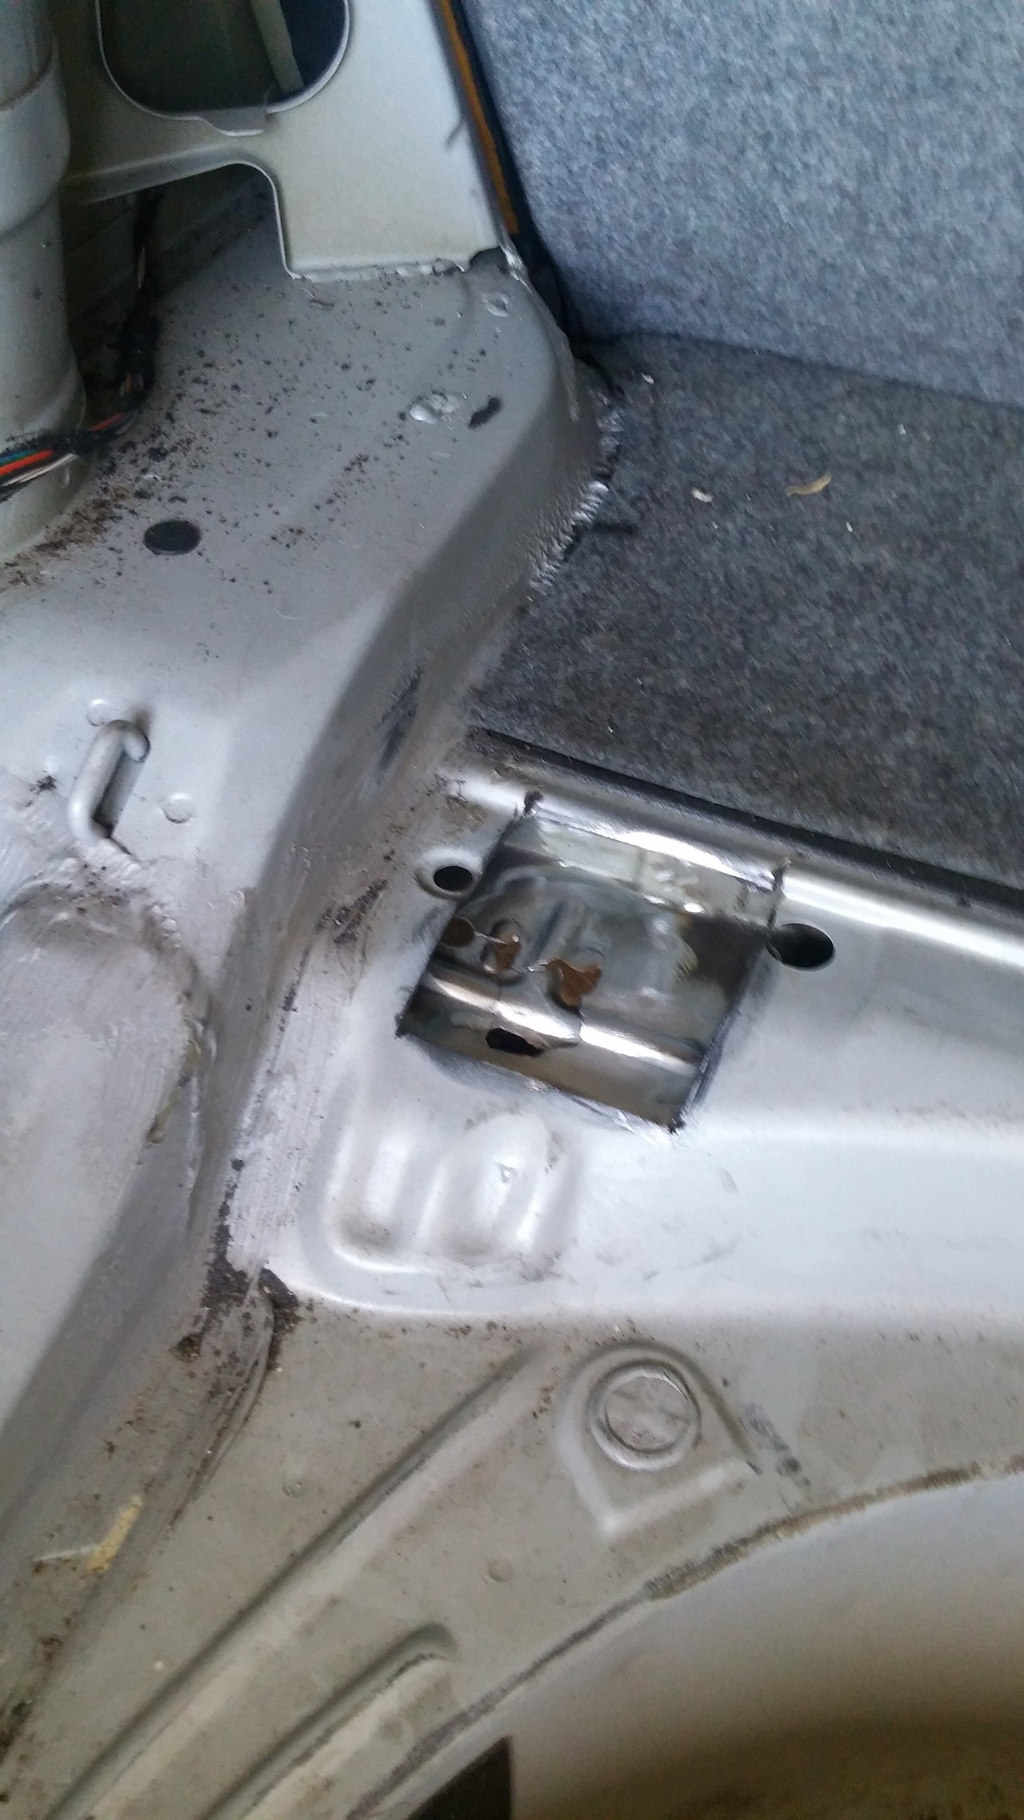
With the bolt in the cage, and the cage pushed up as close as possible to it's stock location, I welded the factory cage welds back to the upper sheet metal.

Once the three welds were rewelded, I then broke that center piece of sheetmetal out and really welded it all together. With that center out, that leaves the top of the mount cage directly exposed.

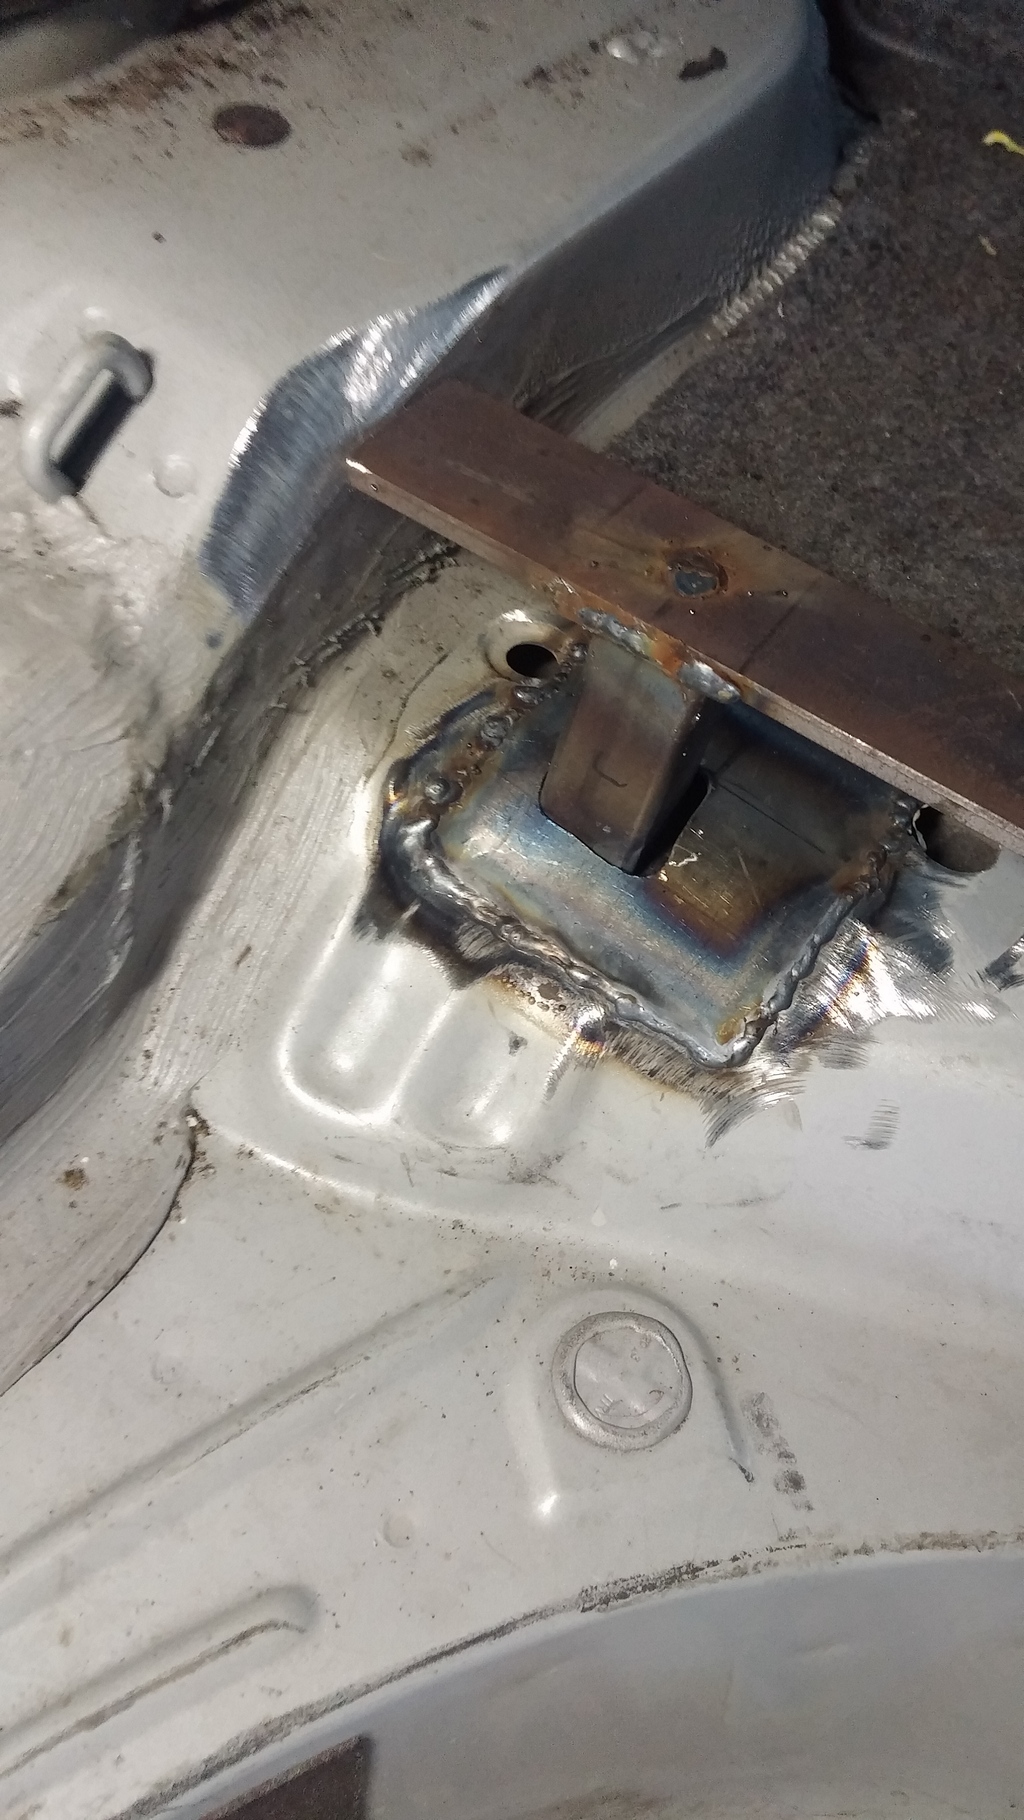
With upper sheet metal work done to both sides, I decided to tackle the bottom plates. All spots cleaned
I dont really have an in progress pic, my shoulders were smoked from welding and cleaning and I just wanted it done. I got the subframe mount bracket welded back up, pops ground it flat while I started tackling the fuel pump stuff, but I'll get into that seperately.
All the plates welded on.


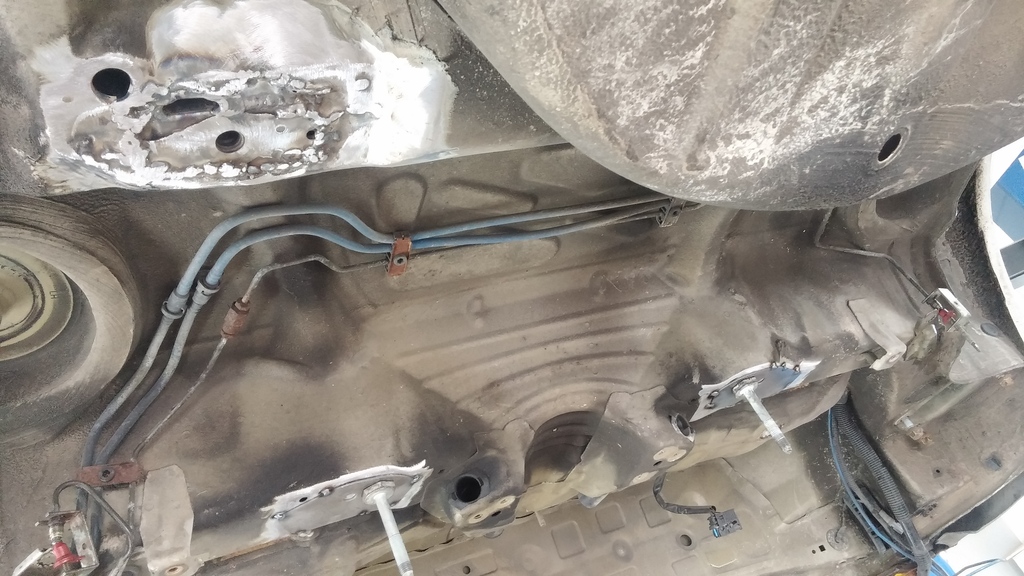
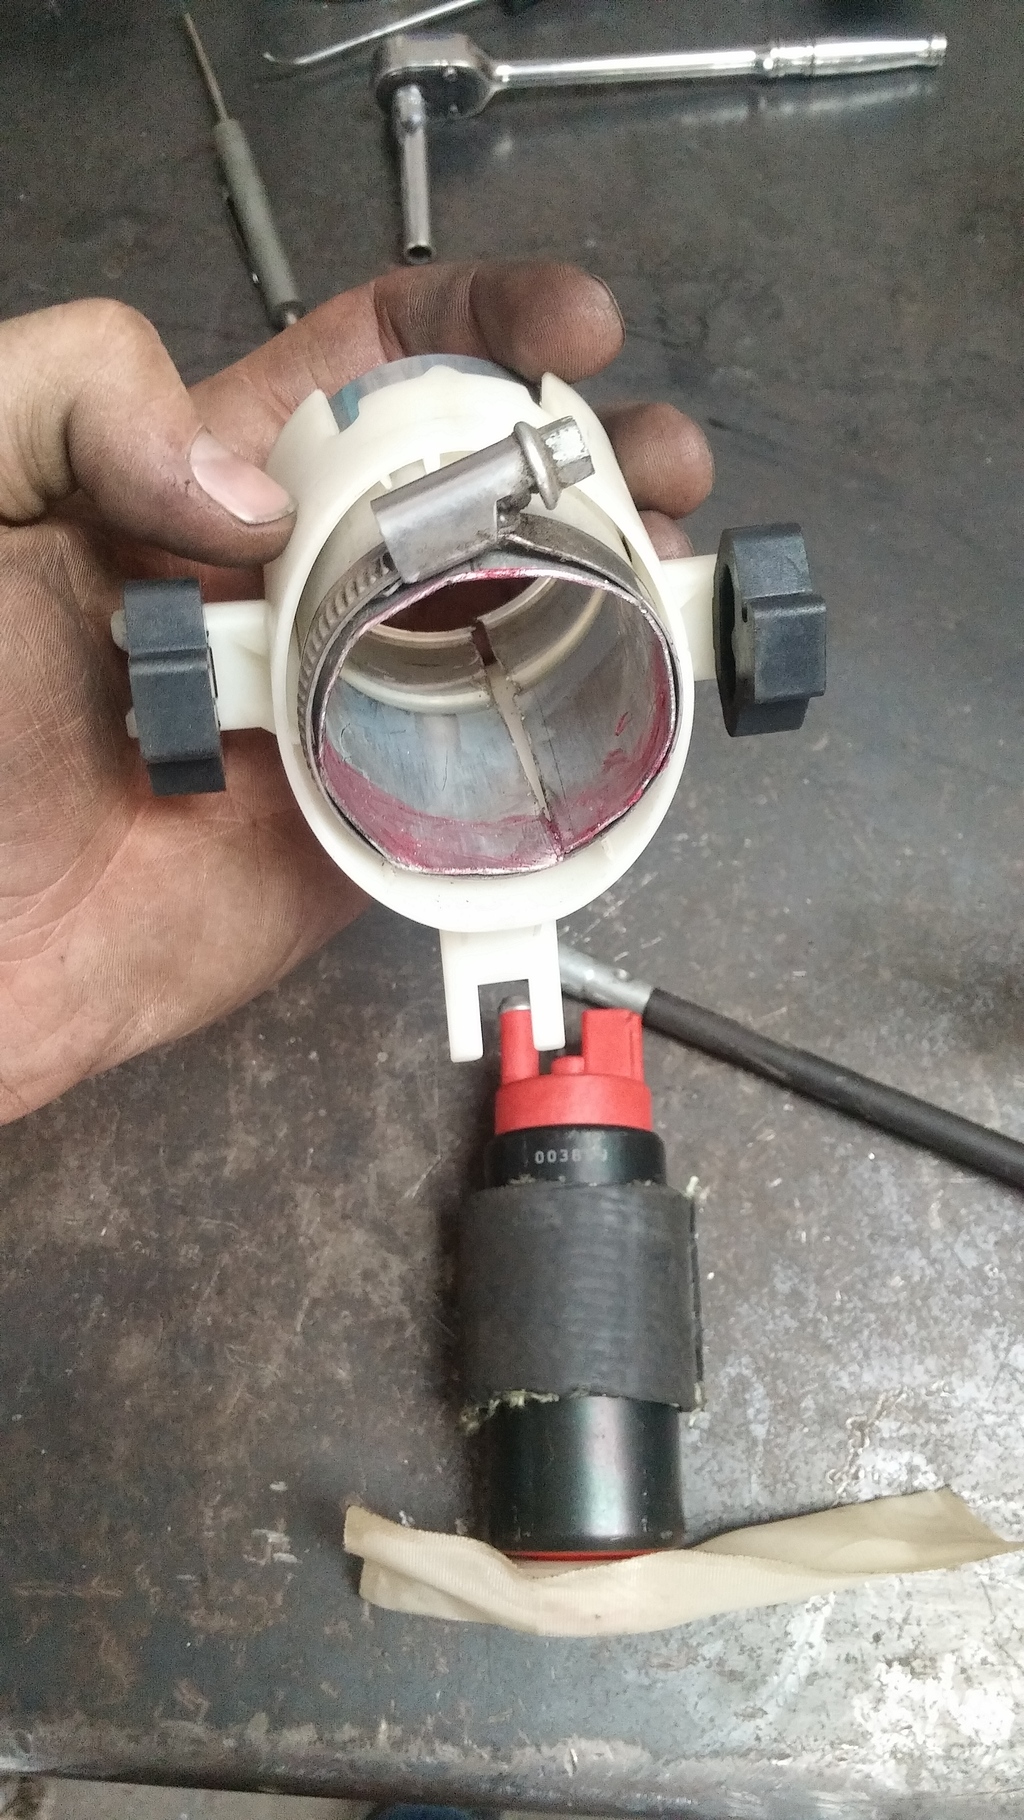
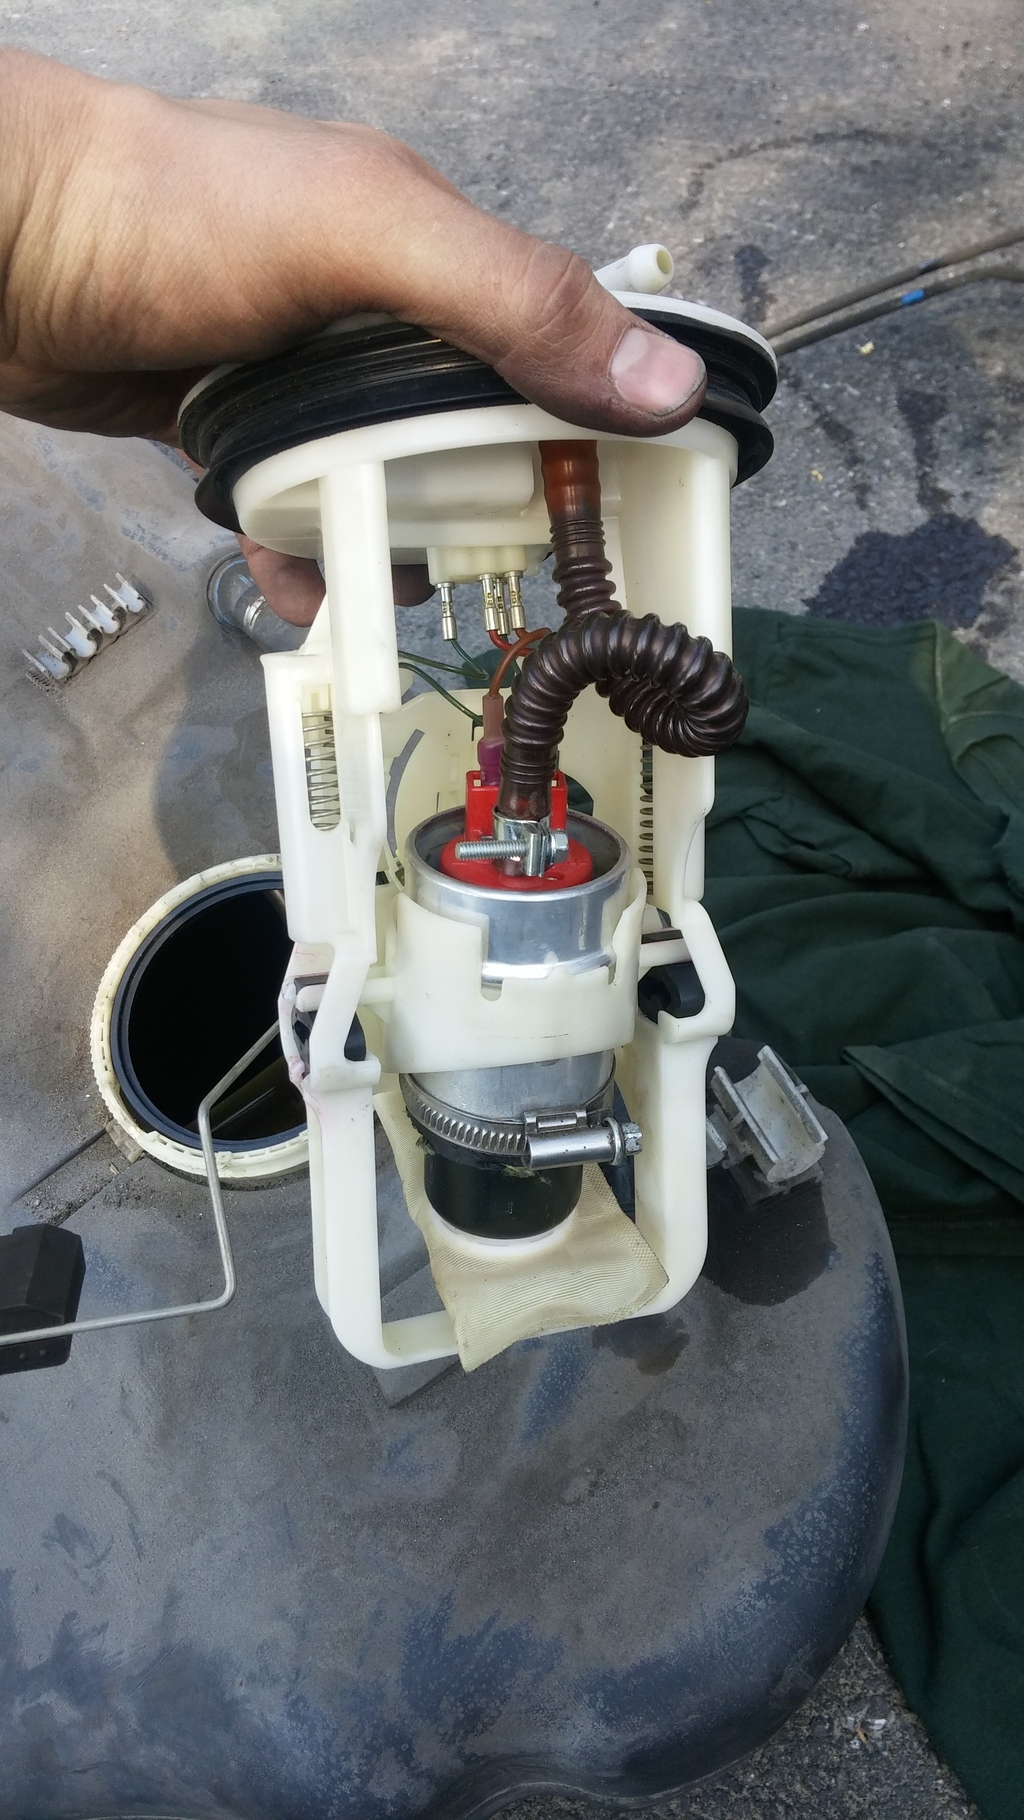
With the plates done, lets talk fuel system real quick. For now since it's gonna be N/A for a bit. I'm tossing a spare Aeromotive 340lph pump in the drivers side sump. Later on down the road when I go boosted I might run another aeromotive 340 in the passenger side and tee them together and open up the extra port on the drivers sending unit for my return, but we'll see.
I purchased a Radium Engineering pump housing/sleeve thinger not knowing the M3 sender and pump is overall smaller diameter than the stock 323 one, so we had to improvise. We ended up cutting the stock aluminum sleeve off the stock pump and used it and a 3/16" thick rubber hose to insulate the Aero pump with the same theory as the Radium Engineering sleeve. All worked out fine.
I started by tacking these plates in place on the rear camber arms, that way they didn't get bent if we dropped one or something....seeings how they're basically made of two pieces of paper held together with some elmers glue
No real pictures of yanking stuff out, nothing exciting really, just stock parts coming out haha. Got everything off and began to tackle this issue...
So I'm sure most of y'all on here know about the rear subframe issue....but I doubt many know how cheesy the mounts really are....it's insane...I figured it'd be weak...but not this bad haha. For those of you that aren't too familiar with the mounting design, I'll try to cover it pretty well/detailed. Some of this is in the Turner Motorsports or other companies bracing instructions, but nothing to do with the inner cage is covered as hopefully people can prevent their car from getting as bad as mine was haha. Oh, and this was an automatic 3 owner car, dealer serviced by owners 1 & 2 haha.
So this is the bottom of the mount, the part you look at under the car. It's held to the 16ga'ish sheet metal of the floor pan by those 8 spot welds you see still holding a patch of floor panel on.
With that spot welded to the floor pan, it's then welded to an upper layer of 16ga'ish metal inside the car/unibody by only these three small welds.
The threaded stud inside that bracket, the part that your subframe bolt threads into, is just tacked in there between the two halves of stamped metal that make up the mount cage thinger. I welded both seams (they're only spot welded factory) and welded the stud to the cage as you can see here.
Now, back to the top section, if you cut away the small top section you see where those three welds I mentioned earlier are.
With the bolt in the cage, and the cage pushed up as close as possible to it's stock location, I welded the factory cage welds back to the upper sheet metal.
Once the three welds were rewelded, I then broke that center piece of sheetmetal out and really welded it all together. With that center out, that leaves the top of the mount cage directly exposed.
With upper sheet metal work done to both sides, I decided to tackle the bottom plates. All spots cleaned
I dont really have an in progress pic, my shoulders were smoked from welding and cleaning and I just wanted it done. I got the subframe mount bracket welded back up, pops ground it flat while I started tackling the fuel pump stuff, but I'll get into that seperately.
All the plates welded on.
With the plates done, lets talk fuel system real quick. For now since it's gonna be N/A for a bit. I'm tossing a spare Aeromotive 340lph pump in the drivers side sump. Later on down the road when I go boosted I might run another aeromotive 340 in the passenger side and tee them together and open up the extra port on the drivers sending unit for my return, but we'll see.
I purchased a Radium Engineering pump housing/sleeve thinger not knowing the M3 sender and pump is overall smaller diameter than the stock 323 one, so we had to improvise. We ended up cutting the stock aluminum sleeve off the stock pump and used it and a 3/16" thick rubber hose to insulate the Aero pump with the same theory as the Radium Engineering sleeve. All worked out fine.
05-27-2015, 06:26 PM
#16
LBird with the grinder checking things out haha

Ballast in the trunk in a feeble attempt to keep the car from doing a sick front flip off the lift

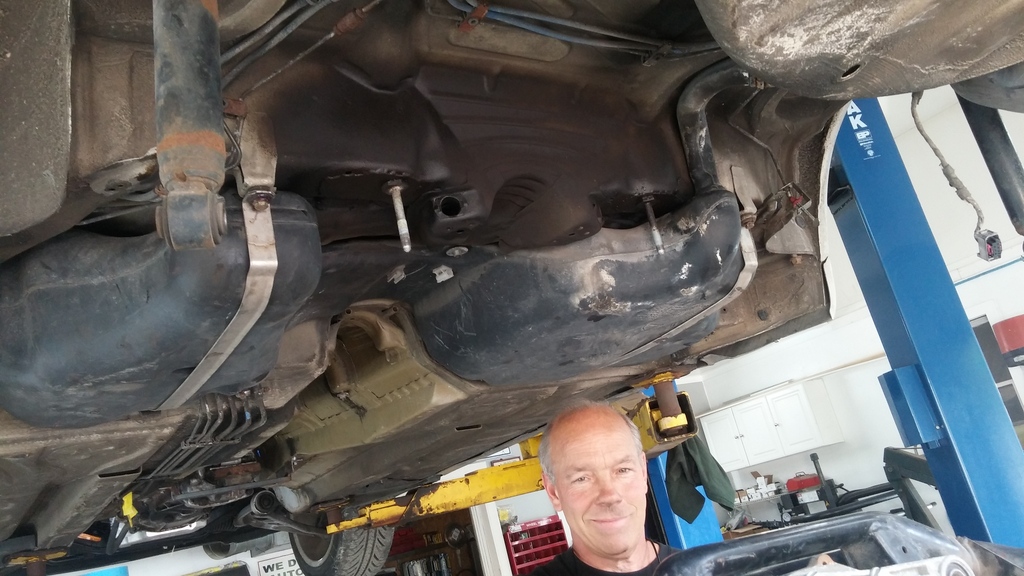
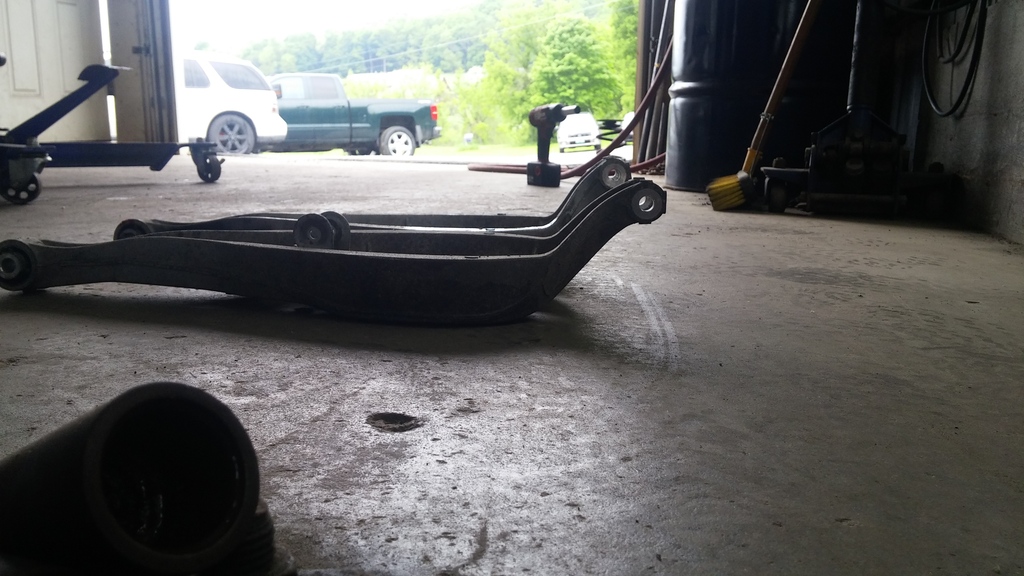
With the fuel pump all squared away we threw the tank back in. Then it was time for the M3 rear drop out. After disassembling the stock rear end setup for removal, we decided piece by piece would be easier for reassembly as well. M3 subframe and poly bushings.

At some point throughout the day I also cut my temporary braces off and got my good Turner Motorsports braces welded onto the rear camber arms.

Lbird pumped on things going back together so he can get out of the shop haha
Subframe, diff, upper arms and rta/spindle assemblies on. Little did we know at the time you can't get the camber arm bolts in or out with the diff mounted in place...but that's where dad stopped for the night so I went back to my subframe bracing.
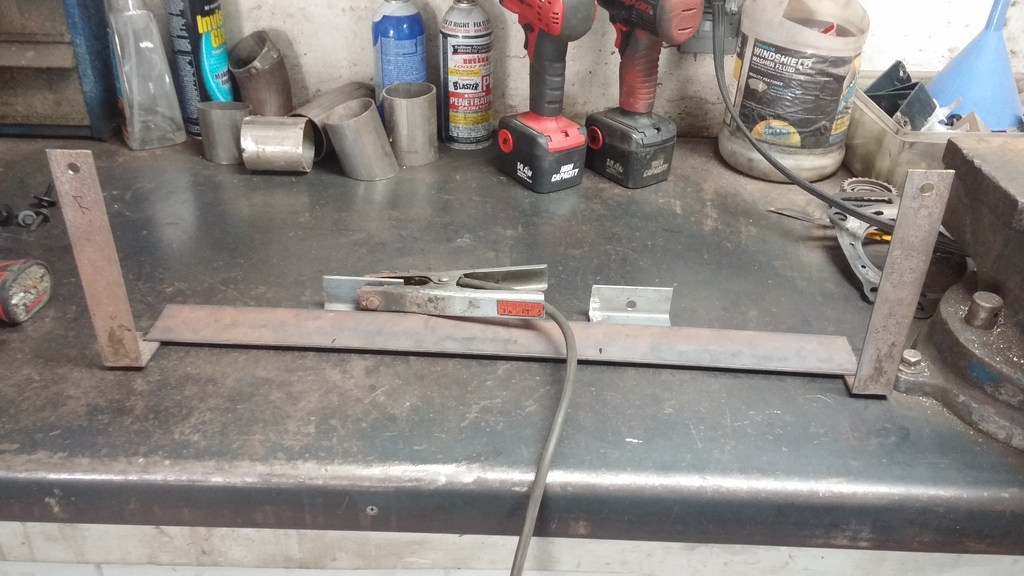
As discussed way back in some of my first posts and with the opinions of others from the forum, I didn't feel the just bracing the subframe mounts on the bottom and rewelding the tops would be enough so I came up with a quick plan to tie things together a bit better.
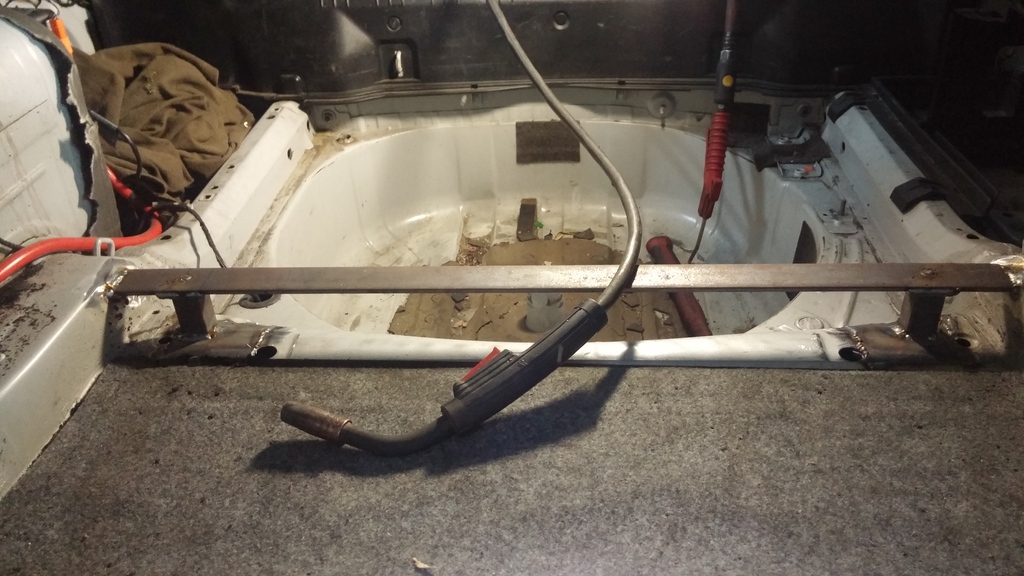
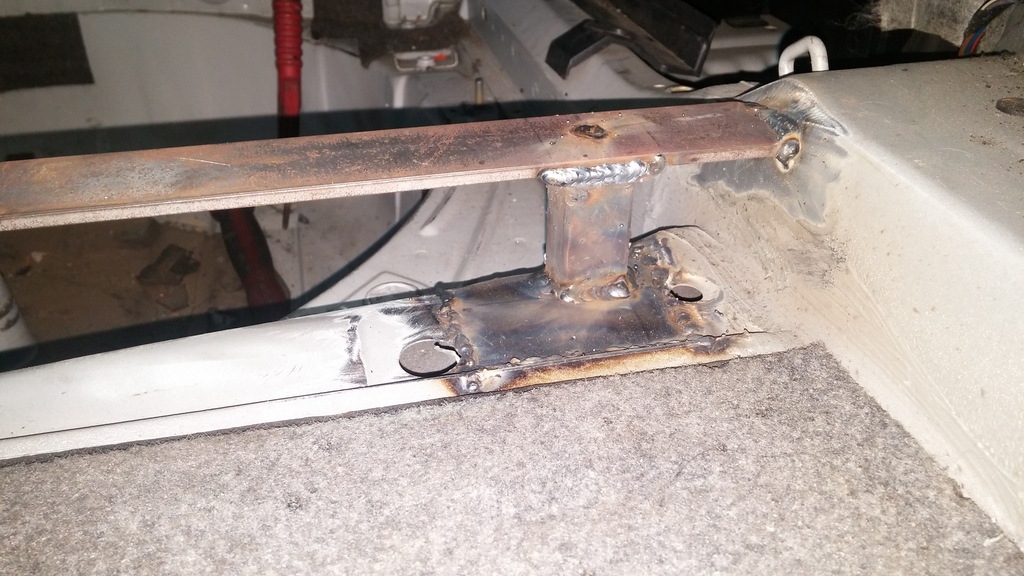
1/4" flat stock
1x1" square tube stock, with 1/8" flat stock plates welded to the top of the square stock, measured out and welded to the 1/4" flat stock...holes drilled in the flat stock so I can rosette weld the 1/4" stock to the plates that are on top of the 1x1 squares haha, probably overkill, but that's the whole goal of this build. Also, you can see what's basically my entire work station here, nothing fancy for tools really.
Cover plates marked

So with all this measured out somewhat carefully, it was like, 11hrs into a 12hr workday haha....it all fit! I was able to really put some heat into the welds when welding the 1x1 square stock to the top section of the subframe mount brackets and the welds attaching them to the sheet metal unibody.
Luckily my car has the winter package or whatever so I was able to fold the rear seats down and climb in to weld the back sides

Cover up plates welded on
Then the 1/4 flat stock welded to the frame rails

End of Saturdays work.
Ballast in the trunk in a feeble attempt to keep the car from doing a sick front flip off the lift
With the fuel pump all squared away we threw the tank back in. Then it was time for the M3 rear drop out. After disassembling the stock rear end setup for removal, we decided piece by piece would be easier for reassembly as well. M3 subframe and poly bushings.
At some point throughout the day I also cut my temporary braces off and got my good Turner Motorsports braces welded onto the rear camber arms.
Lbird pumped on things going back together so he can get out of the shop haha
Subframe, diff, upper arms and rta/spindle assemblies on. Little did we know at the time you can't get the camber arm bolts in or out with the diff mounted in place...but that's where dad stopped for the night so I went back to my subframe bracing.
As discussed way back in some of my first posts and with the opinions of others from the forum, I didn't feel the just bracing the subframe mounts on the bottom and rewelding the tops would be enough so I came up with a quick plan to tie things together a bit better.
1/4" flat stock
1x1" square tube stock, with 1/8" flat stock plates welded to the top of the square stock, measured out and welded to the 1/4" flat stock...holes drilled in the flat stock so I can rosette weld the 1/4" stock to the plates that are on top of the 1x1 squares haha, probably overkill, but that's the whole goal of this build. Also, you can see what's basically my entire work station here, nothing fancy for tools really.
Cover plates marked
So with all this measured out somewhat carefully, it was like, 11hrs into a 12hr workday haha....it all fit! I was able to really put some heat into the welds when welding the 1x1 square stock to the top section of the subframe mount brackets and the welds attaching them to the sheet metal unibody.
Luckily my car has the winter package or whatever so I was able to fold the rear seats down and climb in to weld the back sides
Cover up plates welded on
Then the 1/4 flat stock welded to the frame rails
End of Saturdays work.
05-27-2015, 06:38 PM
#17
Maybe that last post was the end of Sunday...I dunno, it's all a blurr. So this is either sunday or monday, probably monday haha.


Painted and carpet back in

So as I mentioned earlier, yeah, sick, can't get the inner camber arm bolts in with the diff mounted. Rad. Front diff bolt is a pain to get too with the factory front subframe mount connector thinger in place, didn't wanna remove it and deal with frame hanging a bit and the spacers on top of the connector now that the brace plates are installed (in retrospect, I should have just welded the spacers to the body as well, oh well). Simple solution, trim the lip off the subframe connector.
Now you can easily get to the bolt yaaayyyyy

So with that easy access we were able to use the transmission jack, unbolt the diff, and slide it side to side enough to get the inner bolts for the camber arms in and out.
All that installed and we notice the left rear axle is just about touching the upper rear arm/spring perch....wtf. When we installed the knuckle into that arm it did take a lot of effort compared to the right side...and after some looking and measuring we realized it was bent. great. pull the diff bolts again and swap the arm out.
Bent arm closest to uh, us? the picture? me while taking the pic? whatever, you get it haha.

Bent arm farthest away
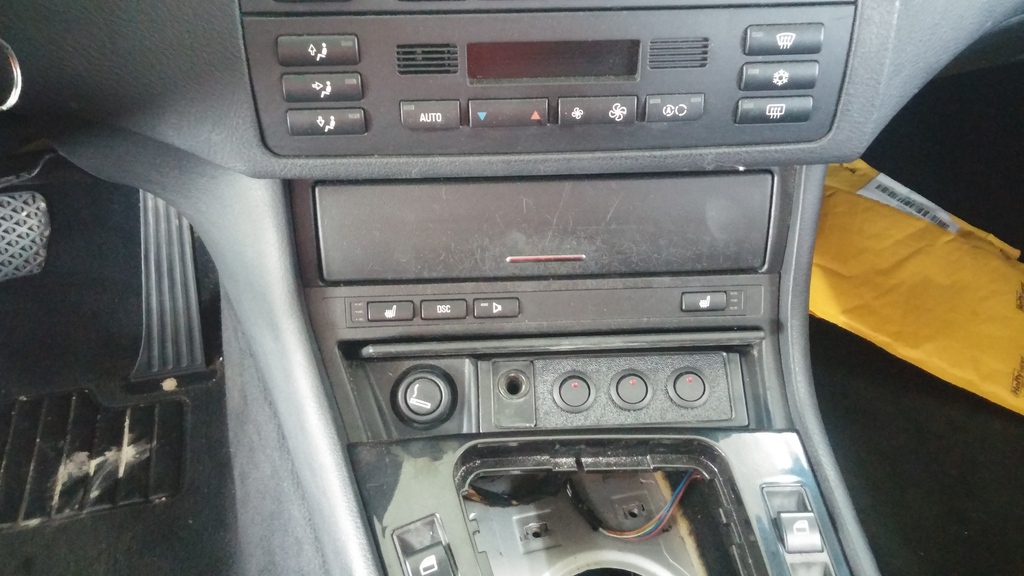
After that all was well and everything else went smoothly. I put the interior back together (had to remove center console for ebrake cables) and put in this switch panel I got off the forum...not sure what I'm gonna run to it yet haha.
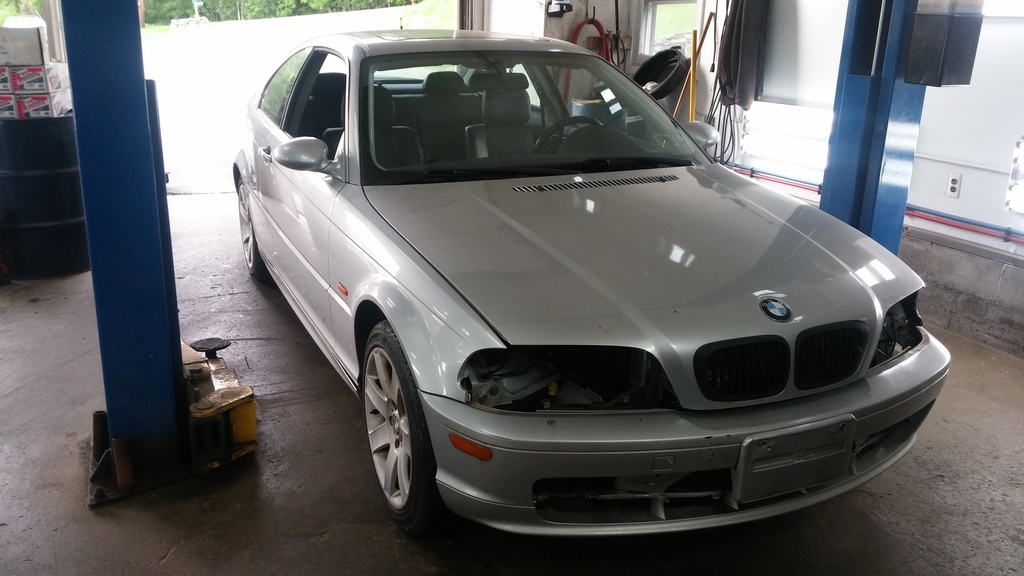
M3 mirrors on, no more dumbo ear/broken mirror!
Anndddd that's it for the weekends work!
With my power goals in mind, and my father expressing his safety concerns, I broke down and ordered up a DriveShaft Shop shaft. $850 later, chromoly balanced shaft being built. 5-6 week build time. But at least I wont have to worry about the drive shaft trying to come through the floor and say hi after I rick roll some dude in his Z06.
That being said I'll be hodge podging something together so I can move the car in and out of the shop under it's own power haha.
Painted and carpet back in
So as I mentioned earlier, yeah, sick, can't get the inner camber arm bolts in with the diff mounted. Rad. Front diff bolt is a pain to get too with the factory front subframe mount connector thinger in place, didn't wanna remove it and deal with frame hanging a bit and the spacers on top of the connector now that the brace plates are installed (in retrospect, I should have just welded the spacers to the body as well, oh well). Simple solution, trim the lip off the subframe connector.
Now you can easily get to the bolt yaaayyyyy
So with that easy access we were able to use the transmission jack, unbolt the diff, and slide it side to side enough to get the inner bolts for the camber arms in and out.
All that installed and we notice the left rear axle is just about touching the upper rear arm/spring perch....wtf. When we installed the knuckle into that arm it did take a lot of effort compared to the right side...and after some looking and measuring we realized it was bent. great. pull the diff bolts again and swap the arm out.
Bent arm closest to uh, us? the picture? me while taking the pic? whatever, you get it haha.
Bent arm farthest away
After that all was well and everything else went smoothly. I put the interior back together (had to remove center console for ebrake cables) and put in this switch panel I got off the forum...not sure what I'm gonna run to it yet haha.
M3 mirrors on, no more dumbo ear/broken mirror!
Anndddd that's it for the weekends work!
With my power goals in mind, and my father expressing his safety concerns, I broke down and ordered up a DriveShaft Shop shaft. $850 later, chromoly balanced shaft being built. 5-6 week build time. But at least I wont have to worry about the drive shaft trying to come through the floor and say hi after I rick roll some dude in his Z06.
That being said I'll be hodge podging something together so I can move the car in and out of the shop under it's own power haha.
The following users liked this post:
Homer_Simpson (07-13-2022)
05-28-2015, 09:31 AM
#19
Teching In

Join Date: Jan 2015
Posts: 2
Likes: 0
Received 0 Likes
on
0 Posts
love this build! I'm working on a 325xi, but no LS for me, the AWD wouldn't allow it. just fixing it as a stock DD.
I like how you've fixed the rear subframe issue, it's a big problem on the early e46 cars.
I like how you've fixed the rear subframe issue, it's a big problem on the early e46 cars.