
LQ4/4L80 swap 1969 Mercedes
 12-13-2016, 12:42 PM
#81
TECH Resident

The tools to fill and drain the AC system are pretty cheap. Based on the rest of the work you are doing, I'm sure you can handle it! If you haven't evacuated first, then the system is already contaminated with air from the atmosphere.
I bought my stuff from harbor freight, and they have worked fine even though I realize their quality on many items is suspect. The evacuator vacuum pump is $75 to $100 depending upon sale pricing. And the manifold gauges about $50. And a $30 infrared temp gun.
I've done 2 cars' worth of AC work and haven't messed anything up !
!
To be clear... not trying to be a know it all. The message I'm trying to send is: I am SURE you could do it based on the rest of your work here. The tools + freon will probably cost the same as what a shop charges and I think you probably will end up with a better or equivalent job quality.
Side note: The one thing I will have a shop do is remove the refrigerant if I need to work as it isn't right to vent direct to the atmosphere.
Cheers,
Doug
I bought my stuff from harbor freight, and they have worked fine even though I realize their quality on many items is suspect. The evacuator vacuum pump is $75 to $100 depending upon sale pricing. And the manifold gauges about $50. And a $30 infrared temp gun.
I've done 2 cars' worth of AC work and haven't messed anything up
! To be clear... not trying to be a know it all. The message I'm trying to send is: I am SURE you could do it based on the rest of your work here. The tools + freon will probably cost the same as what a shop charges and I think you probably will end up with a better or equivalent job quality.
Side note: The one thing I will have a shop do is remove the refrigerant if I need to work as it isn't right to vent direct to the atmosphere.
Cheers,
Doug
 12-20-2016, 01:15 AM
#82
Staging Lane
Thread Starter

The tools to fill and drain the AC system are pretty cheap. Based on the rest of the work you are doing, I'm sure you can handle it! If you haven't evacuated first, then the system is already contaminated with air from the atmosphere.
I bought my stuff from harbor freight, and they have worked fine even though I realize their quality on many items is suspect. The evacuator vacuum pump is $75 to $100 depending upon sale pricing. And the manifold gauges about $50. And a $30 infrared temp gun.
I've done 2 cars' worth of AC work and haven't messed anything up !
To be clear... not trying to be a know it all. The message I'm trying to send is: I am SURE you could do it based on the rest of your work here. The tools + freon will probably cost the same as what a shop charges and I think you probably will end up with a better or equivalent job quality.
Side note: The one thing I will have a shop do is remove the refrigerant if I need to work as it isn't right to vent direct to the atmosphere.
Cheers,
Doug
I bought my stuff from harbor freight, and they have worked fine even though I realize their quality on many items is suspect. The evacuator vacuum pump is $75 to $100 depending upon sale pricing. And the manifold gauges about $50. And a $30 infrared temp gun.
I've done 2 cars' worth of AC work and haven't messed anything up
! To be clear... not trying to be a know it all. The message I'm trying to send is: I am SURE you could do it based on the rest of your work here. The tools + freon will probably cost the same as what a shop charges and I think you probably will end up with a better or equivalent job quality.
Side note: The one thing I will have a shop do is remove the refrigerant if I need to work as it isn't right to vent direct to the atmosphere.
Cheers,
Doug
Sorry, sometimes I write partial info for brevity, in this case mentioning "shop" for the A/C charging. For a living I'm in commercial construction management and have a few friends in the A/C business. For some malasadas I'm sure one of them will properly evacuate and charge the car for me.
12-20-2016, 01:37 AM
#83
Staging Lane
Thread Starter
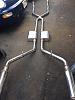
When I put together the exhaust I welded full sections together out from under the car where I could and then tacked the final pieces. I built the system and the mounting hooks in a way that the entire system can be removed from the car as a unit for final welding, but left in place tacked while I routed fuel, and batter positive cables, etc.
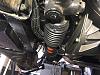
As part of this project I'm replacing the steering system with a DIY Cavalier rack and pinion. After determining the final placement and possible conflicts with the exhaust, I removed the exhaust to complete the rack install.
Had a great weekend and finished the steering system, including using the steering column of a slightly newer Mercedes (my year had a foot pump for windshield fluid squirters and a weird design column/column shift linkage, the new one is conventionally shaped and has the column mounted washer switch), built the power steering hoses, and filled with fluid. The heim joints arrived today that will connect my stock tie rods to the new rack.
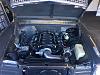
So with the steering rack mounts built/welded and the rack installed and plumbed I welded up the exhaust and O2 bungs and slid back in place. I had left the spark plugs hand tight and the exhaust manifold bolts hand tight until I was sure they would not have to be removed again to give access for some reason. So now that all engine systems are in place along with all the plumping, spark plugs and manifolds were torqued down.
So say a prayer this week for me that the pre-start checklist goes well, along with the first start!
As part of this project I'm replacing the steering system with a DIY Cavalier rack and pinion. After determining the final placement and possible conflicts with the exhaust, I removed the exhaust to complete the rack install.
Had a great weekend and finished the steering system, including using the steering column of a slightly newer Mercedes (my year had a foot pump for windshield fluid squirters and a weird design column/column shift linkage, the new one is conventionally shaped and has the column mounted washer switch), built the power steering hoses, and filled with fluid. The heim joints arrived today that will connect my stock tie rods to the new rack.
So with the steering rack mounts built/welded and the rack installed and plumbed I welded up the exhaust and O2 bungs and slid back in place. I had left the spark plugs hand tight and the exhaust manifold bolts hand tight until I was sure they would not have to be removed again to give access for some reason. So now that all engine systems are in place along with all the plumping, spark plugs and manifolds were torqued down.
So say a prayer this week for me that the pre-start checklist goes well, along with the first start!


 12-23-2016, 09:40 PM
#84
Staging Lane
Thread Starter
Started the holiday early and worked on the car today.
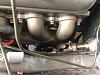
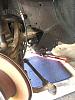
I dropped the fuel tank to add some sound deadening pads and rubber spacers. Then had one exhaust hanger that needed welded.
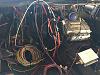
Electrical is the last major project. I'll be rewiring the whole car with a 22 circuit harness from Kwikwire, the stock GM engine harness that was modified for my project by 150tunes.com, and incorporating a keyless start/RFDI system w/remote start by Easyguard.
Takes a bit of time to figure out how to integrate all these different systems into one functioning unit. The Easyguard system has the ability to shunt circuits during engine start, which is what OEM systems do. Like radio, AC, etc. The Kwikwire kit is designed for novices basically connecting wire "A" to item "A" without providing a schematic that shows what is connected to what within their harness. So took me a little time with a meter to sketch it out.
So I connected what was minimum to start and run the engine. Since I need to run a wire from the harness in the front to the pump in the back, I cheated for today and used a mini jumper cable I made to wire the pump directly to the battery since it's in the trunk also.
After everything was ready I put 5 gallons of Premium in the tank and jumpered the pump to check for leaks. Had three on the fuel rail. I try to tighten things to what I think is tight enough, evidently I guessed wrong, took another quarter turn each.
Then without the fuel pump jumpered I tested out the new keyless Easyguard system. Engine cranked, yea!
This starting system will only let the starter crank for about 30 seconds. I ran it through 3 cycles, then let the starter cool while I checked/added fluids. This to get the oil pump primed.
Then ran another 3 cycles, but the circuit breaker kicked at the end. Still have the 130 amp breaker in place.
Then while the starter was cooling down again I got the GoPro setup.
FYI, my gauges are still 2 weeks out, I have the GM oil pressure sender in place, and I understand I should be able to relate pressure to voltage, but I haven't figured out how to hook that together yet.
Started the GoPro and hit the start button, cranked but didn't start. Went back through the wiring and realized I forgot to connect a 12v B+ wire on the engine harness. Hooked that up and started the GoPro again. Started right up this time! Yea!
Let it run for about 30 seconds. Then turned it off and refilled fluids. The oil was about a quart low. Checked for oil in the remote filter and it was full, so even though I have no idea about actual pressure I know I have enough that it filled the lines and the remote filter.
No other leaks in any of the other systems, then checked out the GoPro video, no sound. Frustrated with that I just took out my iPhone for the third start.
YouTube video here;
Pretty excited that the first start went basically to plan. Everything I wrote above was accomplished today in about 5 hours to give a basis.
Can't wait now to get it on the ground and driving, stay tuned!
Sent from my iPad using Tapatalk
I dropped the fuel tank to add some sound deadening pads and rubber spacers. Then had one exhaust hanger that needed welded.
Electrical is the last major project. I'll be rewiring the whole car with a 22 circuit harness from Kwikwire, the stock GM engine harness that was modified for my project by 150tunes.com, and incorporating a keyless start/RFDI system w/remote start by Easyguard.
Takes a bit of time to figure out how to integrate all these different systems into one functioning unit. The Easyguard system has the ability to shunt circuits during engine start, which is what OEM systems do. Like radio, AC, etc. The Kwikwire kit is designed for novices basically connecting wire "A" to item "A" without providing a schematic that shows what is connected to what within their harness. So took me a little time with a meter to sketch it out.
So I connected what was minimum to start and run the engine. Since I need to run a wire from the harness in the front to the pump in the back, I cheated for today and used a mini jumper cable I made to wire the pump directly to the battery since it's in the trunk also.
After everything was ready I put 5 gallons of Premium in the tank and jumpered the pump to check for leaks. Had three on the fuel rail. I try to tighten things to what I think is tight enough, evidently I guessed wrong, took another quarter turn each.

Then without the fuel pump jumpered I tested out the new keyless Easyguard system. Engine cranked, yea!
This starting system will only let the starter crank for about 30 seconds. I ran it through 3 cycles, then let the starter cool while I checked/added fluids. This to get the oil pump primed.
Then ran another 3 cycles, but the circuit breaker kicked at the end. Still have the 130 amp breaker in place.
Then while the starter was cooling down again I got the GoPro setup.
FYI, my gauges are still 2 weeks out, I have the GM oil pressure sender in place, and I understand I should be able to relate pressure to voltage, but I haven't figured out how to hook that together yet.
Started the GoPro and hit the start button, cranked but didn't start. Went back through the wiring and realized I forgot to connect a 12v B+ wire on the engine harness. Hooked that up and started the GoPro again. Started right up this time! Yea!
Let it run for about 30 seconds. Then turned it off and refilled fluids. The oil was about a quart low. Checked for oil in the remote filter and it was full, so even though I have no idea about actual pressure I know I have enough that it filled the lines and the remote filter.
No other leaks in any of the other systems, then checked out the GoPro video, no sound. Frustrated with that I just took out my iPhone for the third start.
YouTube video here;

Pretty excited that the first start went basically to plan. Everything I wrote above was accomplished today in about 5 hours to give a basis.
Can't wait now to get it on the ground and driving, stay tuned!
Sent from my iPad using Tapatalk
 01-05-2017, 10:03 PM
#88
Staging Lane
Thread Starter
A little. Thanks for asking.
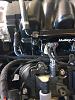
Have had to spend too much time finishing the rack and pinion swap. Lots of fabrication. And just when I thought I had it, found that the tie rod link would hit the hydraulic line coming out of the rack. Hit by maybe a 1/2" under compression. Bought another rack (so I wouldn't have to take this one out) and took to a local hydraulic hose shop to see if they either had a fitting with a shorter radius or could fab a new line with a shorter radius. They could supply neither.
So with a mapp gas torch, my mini tube bender, and an assortment of other items, carefully bent and re-shaped the line. Now it clears by a good quarter inch.
Then I dropped the car from the jackstands, first time since this project started. Installed the hood, cleaned up the garage and put a million tools away. Getting my mind focused on starting the wiring.
Today I ran the engine again, checked the steering, topped off fluids, and cycled the trans through the gears to fill trans fluid.
So now the engine runs, the steering steers, the trans moves the car and the brakes stop the car.
The custom gauges I ordered shipped today, second day air. In a few days I might just brave a test drive.
I'm coordinating with the local performance/dyno shop to break-in the engine and tune. Trying to organize a date.
Next Tuesday I drop off the dash to get modified and wrapped with leather.
 01-13-2017, 12:59 AM
#89
Staging Lane
Thread Starter
Going to be spending Saturday on the dyno. Going to break in the engine, final tune the ECU, and get some numbers.
Of course it's a little scary. Lots possible to go wrong. Also concerned that the stock rear diff can hold up to full pulls.
Stay tuned.
Of course it's a little scary. Lots possible to go wrong. Also concerned that the stock rear diff can hold up to full pulls.
Stay tuned.
01-13-2017, 05:53 PM
#92
If your initial tune allows driving it -- I'd want to put a few miles on over the road just to be sure there are no obvious bugs (leaks, noises, etc.) before I put it on the dyno. Hate to pay for the time and have it disrupted because of a little snafu that could have been ID'd/fixed before the session. As tdoug says -- no untoward noises, no leaks, pressures/temps ok -- drive it with plenty of long decelerations to seat the rings (2nd gear to 4500-5000 rpm and back off the gas multiple times). Once you're sure everything is working correctly -- then dyno time for final tune. Having popped a heater hose on the dyno after recent mods.....learned my lesson.
01-15-2017, 03:39 AM
#94
Staging Lane
Thread Starter
01-15-2017, 03:50 AM
#95
Staging Lane
Thread Starter
If your initial tune allows driving it -- I'd want to put a few miles on over the road just to be sure there are no obvious bugs (leaks, noises, etc.) before I put it on the dyno. Hate to pay for the time and have it disrupted because of a little snafu that could have been ID'd/fixed before the session. As tdoug says -- no untoward noises, no leaks, pressures/temps ok -- drive it with plenty of long decelerations to seat the rings (2nd gear to 4500-5000 rpm and back off the gas multiple times). Once you're sure everything is working correctly -- then dyno time for final tune. Having popped a heater hose on the dyno after recent mods.....learned my lesson.
Worldwind last couple days getting ready for and performing dyno breaking today.
Had to hurry up and get enough wiring done to run guages, trans lockup, radiator fan, etc.
I've been real reluctant to let the engine run as I'm nervous about lean/rich on base tune. Ran enough to get close on topping out fluids, that's about it.
Spent about 3 hours breaking in the engine. Tuning as they went.
The plan was 3 or 4 one quarter rpm pulls, 3 or 4 half rpm pulls, 2 or 3 full pulls. Letting the engine cool between sets, and a little longer cool down before a full pull to verify HP and torque. All went well except for the last planned pull.
Here is a sample
After the longer cool down we went over the engine to top off fluids and look for issues. Had a small leak on one of the -10 AN fitting going to the oil remote filter. Tried tightening and made much worse, so had to pass on the last pull. Sucks!
A few issues to resolve. Rack and pinion needs revisiting, need to move intake air temp sensor, right now its part of the MAF and is in the air stream from the radiator, to better tune the engine the tech wants me to add another O2 sensor bung, and of course, Change the bad AN fitting!
But sounds wicked mean, probably going to have to change one of the sets of mufflers if I want to keep a sleeper.
Bummed that I wasn't able to get numbers today, but all in all not a bad day. No dumb or forgotten items, and it didn't blow up!
Last edited by Coasttocoast; 01-15-2017 at 04:01 AM.
01-15-2017, 06:53 AM
#96
Congrats! Sounds like it all went reasonably well. Have you got a picture of the maf location? My start up was just a few months ago and it took 3-4 weeks of piddling to work out all the issues. Lots of experience with exhaust systems on "sleepers" like this (see sig) - after way too much money spent on all kinds of set ups over the years (SpinTech, Magnaflow, Dynamax, Flowmaster, Bassani, and various combinations of those with and without cats) I finally realized that using OEM mufflers was the only way I was going to quiet it down AND have a decent flowing set up. I'm using OEM 2014 5.0L Mustang Coyote mufflers on mine. No drone, very quiet at idle and part throttle - but you can definitely hear it when you open it up.
01-16-2017, 11:08 PM
#98
Staging Lane
Thread Starter
Congrats! Sounds like it all went reasonably well. Have you got a picture of the maf location? My start up was just a few months ago and it took 3-4 weeks of piddling to work out all the issues. Lots of experience with exhaust systems on "sleepers" like this (see sig) - after way too much money spent on all kinds of set ups over the years (SpinTech, Magnaflow, Dynamax, Flowmaster, Bassani, and various combinations of those with and without cats) I finally realized that using OEM mufflers was the only way I was going to quiet it down AND have a decent flowing set up. I'm using OEM 2014 5.0L Mustang Coyote mufflers on mine. No drone, very quiet at idle and part throttle - but you can definitely hear it when you open it up.

One of the items on my to do list from the dyno runs was to add a shroud to the fan. I worked on that today and after seeing it installed it might shield the MAF enough from the heat. On the dyno, the engine temps ran as high as 225 degrees. The MAP sensor was showing intake temps above 140 degrees on the ECU.
Exhaust sounds is an art. I'm hoping I'm not going to get on the merry go round trying. Thanks for your advise.
01-16-2017, 11:34 PM
#99
Staging Lane
Thread Starter
Here are a couple couple fun pics for you. Thanks for commenting!
Great car for Hawaii, I have been driving it to work 2 or 3 times a week. Days with no rain in the forecast. Wicked quick.


My 818 build thread is here;
http://thefactoryfiveforum.com/showt...-build)-Thread
01-16-2017, 11:54 PM
#100
Staging Lane
Thread Starter
Started on my dyno "punch list" today.
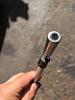
First up was to get some measurements and plan out some modifications to my rack and pinion install. Need to make some changes. Also needed to drop the rack to get to the bad -10 AN fitting on the remote oil filter line.
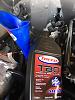
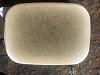
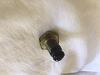
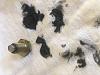
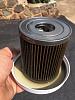
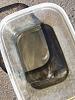
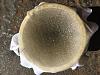
Since we were able to get the engine broken in the break in oil needed to be changed out anyway. I documented each step of the oil change to check for issues. I filtered all the oil drained through a white rag. Cleaned the magnetic oil plug. Cut open the filter, drained its contents through another white rag. And ran a magnet through the contents.
I've never checked out a new rebuild before, so no expert, but doesn't look too bad. The dyno tech felt good about how the engine performed, as to sounds, temps, pressures and reactions to computer changes.
Now to go online and order up some parts!
First up was to get some measurements and plan out some modifications to my rack and pinion install. Need to make some changes. Also needed to drop the rack to get to the bad -10 AN fitting on the remote oil filter line.
Since we were able to get the engine broken in the break in oil needed to be changed out anyway. I documented each step of the oil change to check for issues. I filtered all the oil drained through a white rag. Cleaned the magnetic oil plug. Cut open the filter, drained its contents through another white rag. And ran a magnet through the contents.
I've never checked out a new rebuild before, so no expert, but doesn't look too bad. The dyno tech felt good about how the engine performed, as to sounds, temps, pressures and reactions to computer changes.


Now to go online and order up some parts!