
kst8engineer - '71 Chevelle LS1/T56 build thread

 03-31-2009, 12:06 PM
#82
On The Tree
Thread Starter
iTrader: (6)

Join Date: Mar 2006
Location: Kansas
Posts: 192
Likes: 0
Received 0 Likes
on
0 Posts

Thanks, Stealth. They're a little lower than I was expecting, but hopefully they won't drag too much. The ball-flange collector should be an imrpovement over the huge 3-bolt flange on my previous headers. It seemed like the flange was a magnet for any bump in the road...
04-11-2009, 01:43 PM
#83
On The Tree
Thread Starter
iTrader: (6)
Join Date: Mar 2006
Location: Kansas
Posts: 192
Likes: 0
Received 0 Likes
on
0 Posts
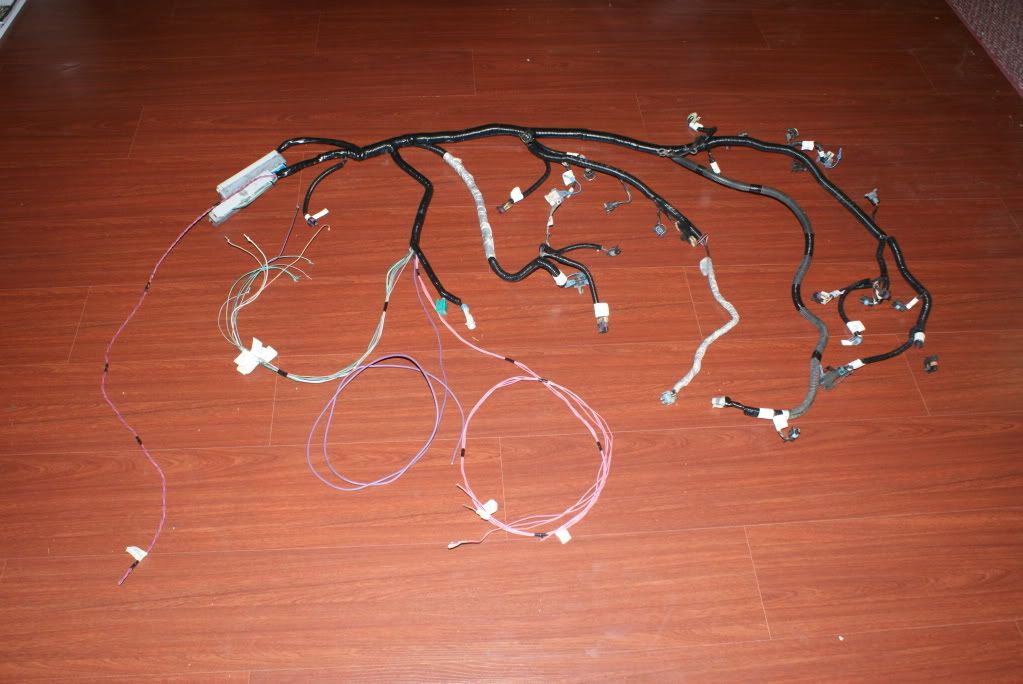
I've been working on wiring for the last week or two. I've got the engine harness ready to go now, except I still need to solder a connector in place for the wires which will feed the gauges, diagnostic port, check engine light, etc. When wait4me modified the harness, he had joined the 4 pink "hot with ignition" wires together into one to simplify installation. He said he typically protects this with a single 60A fuse.
I'm not a big fan of that idea as the small wires would fry long before they'd pull 60A, so I split them back out into separate circtuits. I also ran some longer wires through the harness for the backup light switch, and I extended the solenoid ign wire. Here's a pic of what the harness looks like right now:
I also reworked one of the two Trans Am underhood electrical centers to servce as my fuse/relay box. I used the one that originally housed the fan relays since the fan control circuit was already wired on this one. I used the other two small relays in this box for the A/C and fuel pump. I'm planning to mount this box under the dash, just to the right of the glove box where it won't be seen unless you stick your head in the floorboard, but it will still be easy to access if needed. I still need to extend the cooling fan leads before installation. Here's a pic:
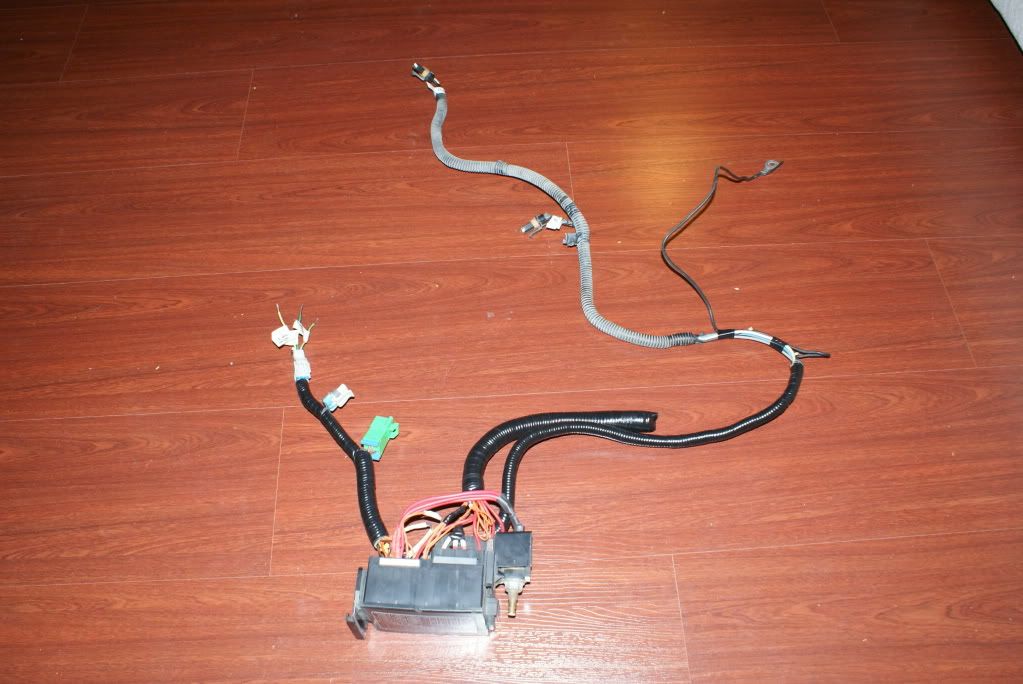
I ordered a 60A relay from Wiring Products which will switch IGN power for the 4 separate pink wires in the engine harness, and I'll have to use a small 4-fuse block for these fuses.
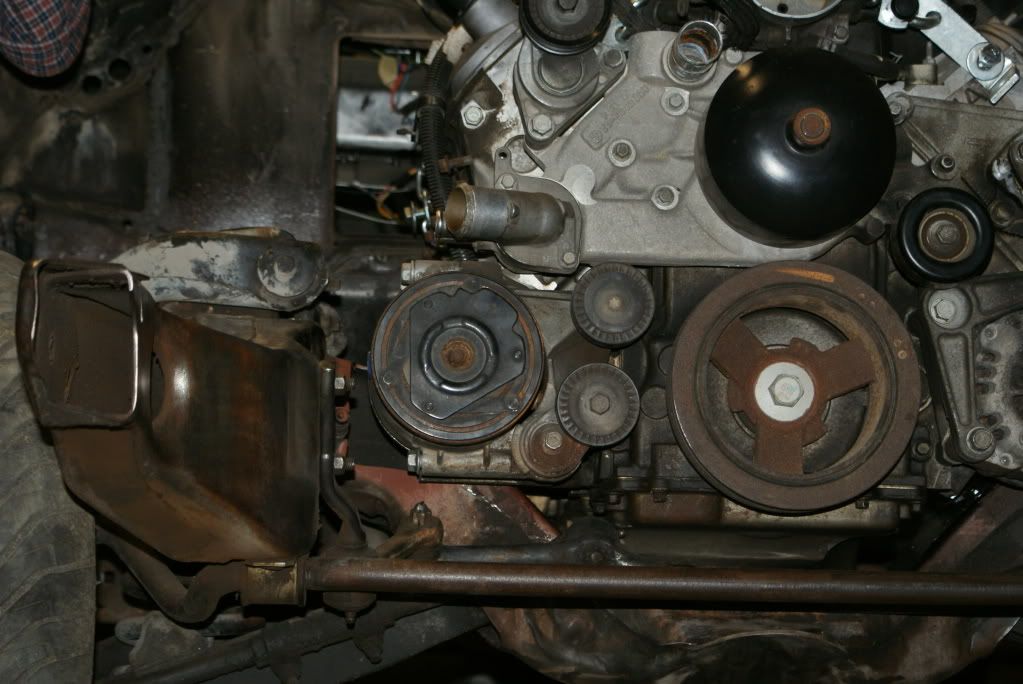
I also did some comparison work looking at the f-body A/C compressor versus a GTO compressor. As it turns out, I think the f-body compressor will work better in the A-body application. Surprisingly, the GTO compresor bolts right up to the F-body brackets. The pictures below show a comparison of the GTO compressor (mounted on the f-body bracket) to the f-body compressor.
First, the f-body setup:
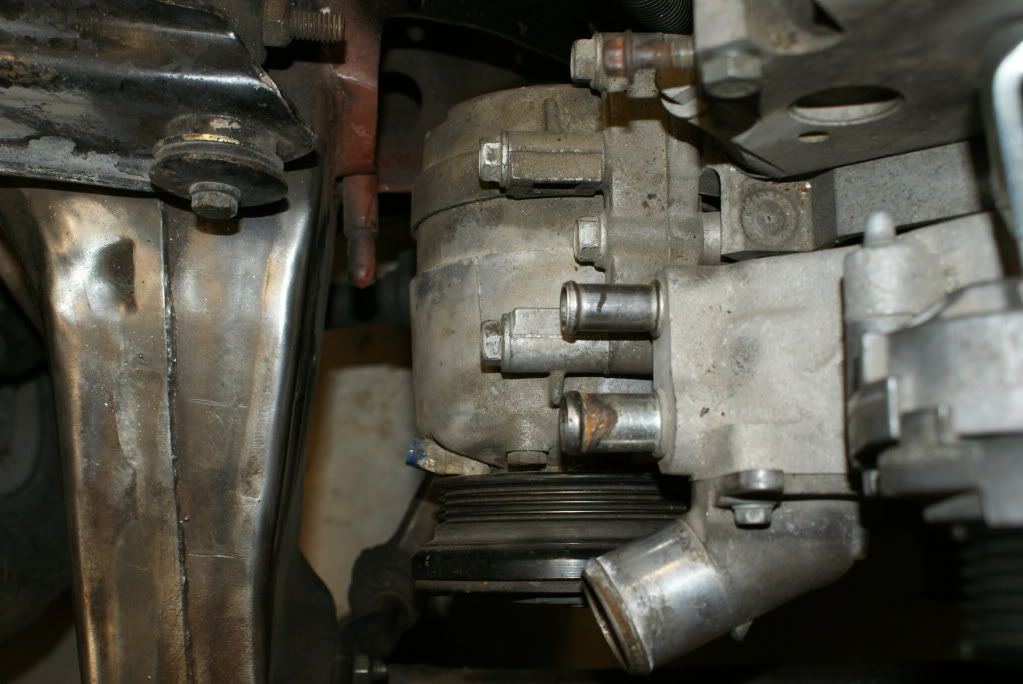

The GTO compressor mounted to F-body brackets:
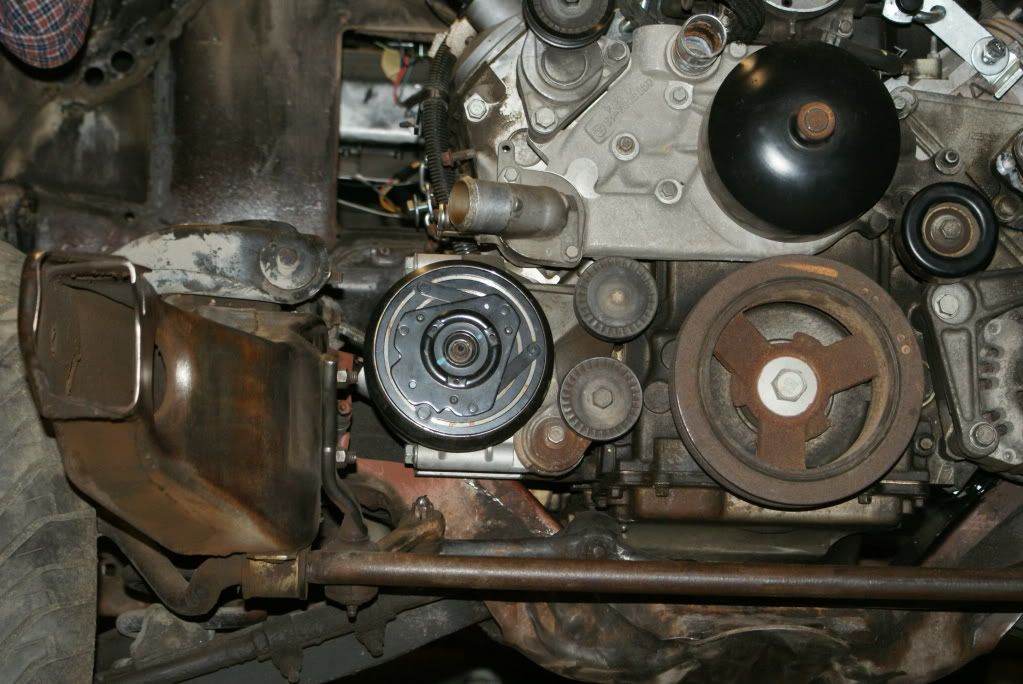
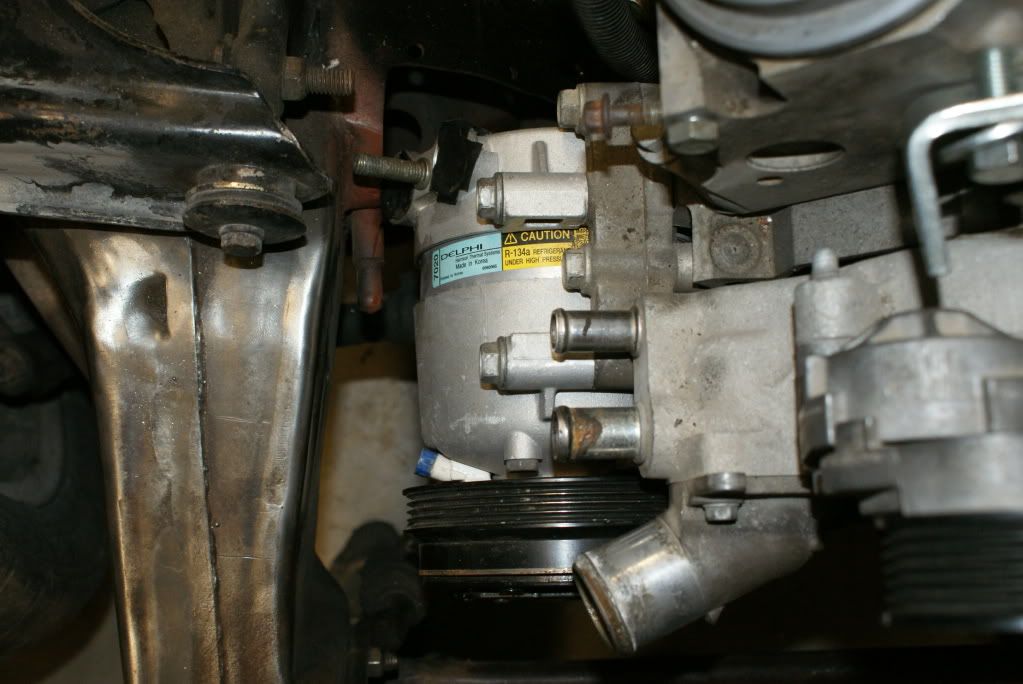
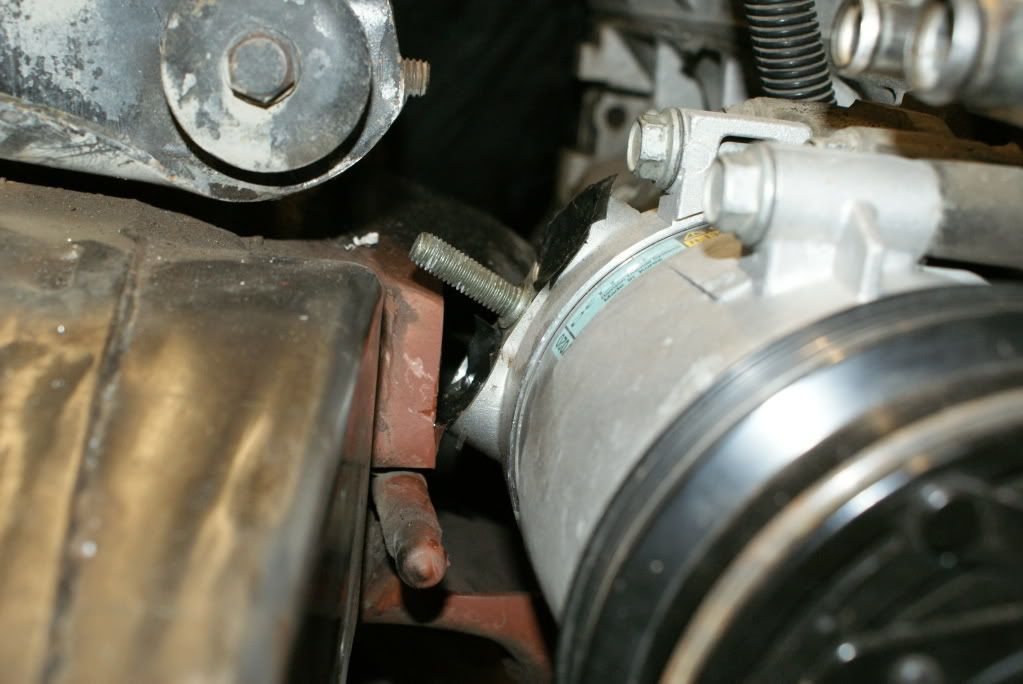
From what I can tell, I think the two compressors mount in the exact same location, with the only substantial difference being the location of the inlet/outlet (rear on the F-body, upper-side angle on the GTO).
I'm not a big fan of that idea as the small wires would fry long before they'd pull 60A, so I split them back out into separate circtuits. I also ran some longer wires through the harness for the backup light switch, and I extended the solenoid ign wire. Here's a pic of what the harness looks like right now:
I also reworked one of the two Trans Am underhood electrical centers to servce as my fuse/relay box. I used the one that originally housed the fan relays since the fan control circuit was already wired on this one. I used the other two small relays in this box for the A/C and fuel pump. I'm planning to mount this box under the dash, just to the right of the glove box where it won't be seen unless you stick your head in the floorboard, but it will still be easy to access if needed. I still need to extend the cooling fan leads before installation. Here's a pic:
I ordered a 60A relay from Wiring Products which will switch IGN power for the 4 separate pink wires in the engine harness, and I'll have to use a small 4-fuse block for these fuses.
I also did some comparison work looking at the f-body A/C compressor versus a GTO compressor. As it turns out, I think the f-body compressor will work better in the A-body application. Surprisingly, the GTO compresor bolts right up to the F-body brackets. The pictures below show a comparison of the GTO compressor (mounted on the f-body bracket) to the f-body compressor.
First, the f-body setup:
The GTO compressor mounted to F-body brackets:
From what I can tell, I think the two compressors mount in the exact same location, with the only substantial difference being the location of the inlet/outlet (rear on the F-body, upper-side angle on the GTO).
05-09-2009, 11:46 PM
#84
On The Tree
Thread Starter
iTrader: (6)
Join Date: Mar 2006
Location: Kansas
Posts: 192
Likes: 0
Received 0 Likes
on
0 Posts
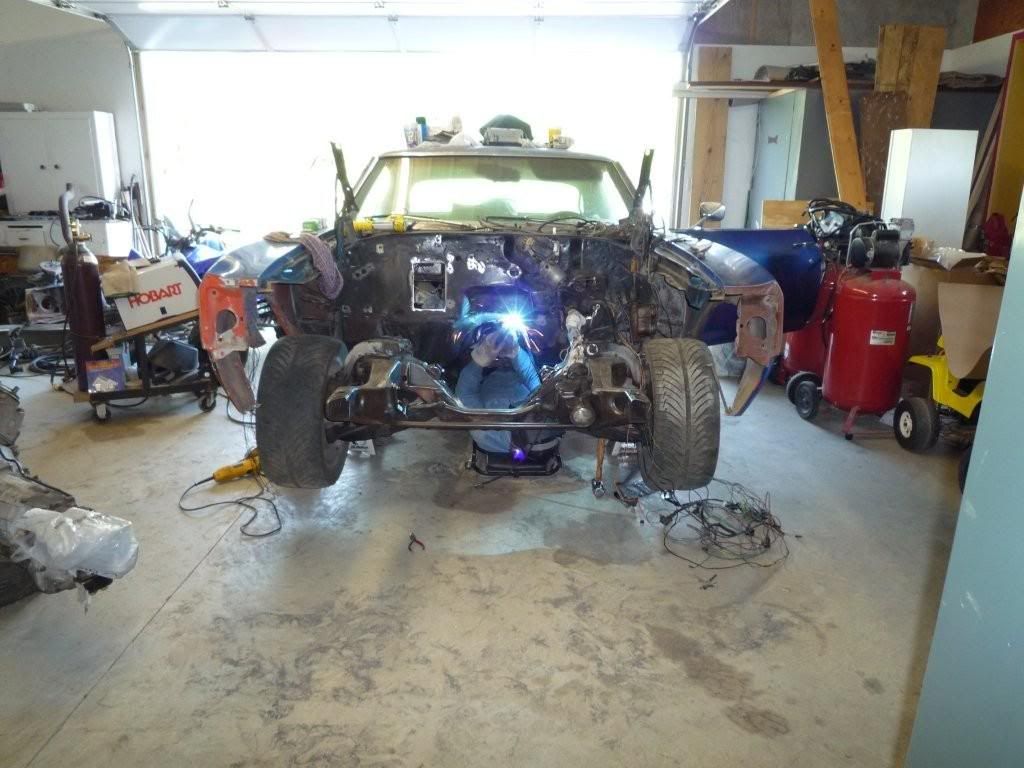
It's been a while since I've posted a reply and my deadline to have the Chevelle on the road is quickly approaching (June 19). The project will by no means be done by that time, but I'd like to have it on the road and drivable by then.
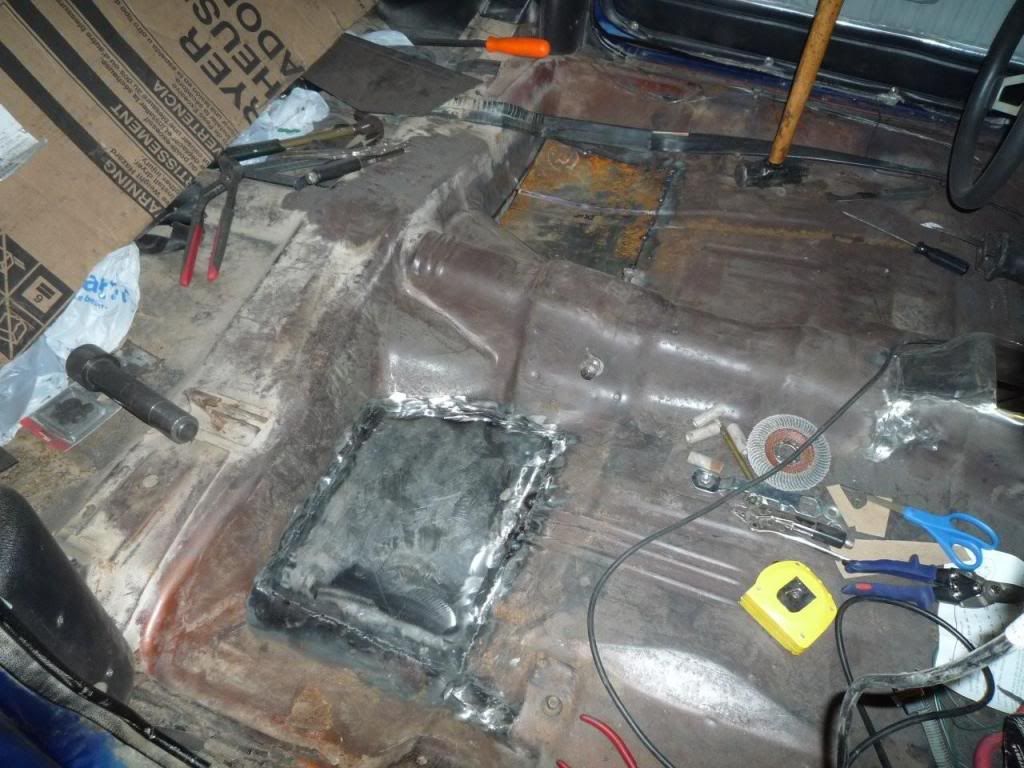
Thanks to Darren Crays of Designing Edge Graphics in Fort Scott, KS for all the help. Darren has great fabrication and welding skills, and they came in very useful the past couple of days. We were able to get the crossmember notch boxed in and finish up the transmission tunnel.
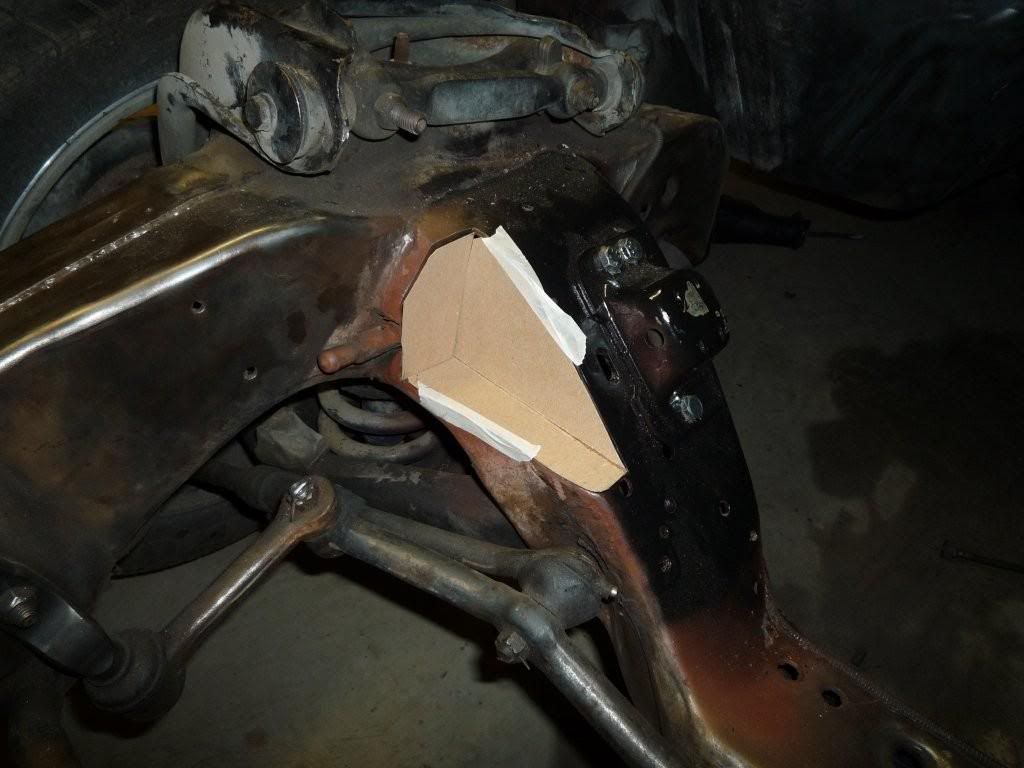
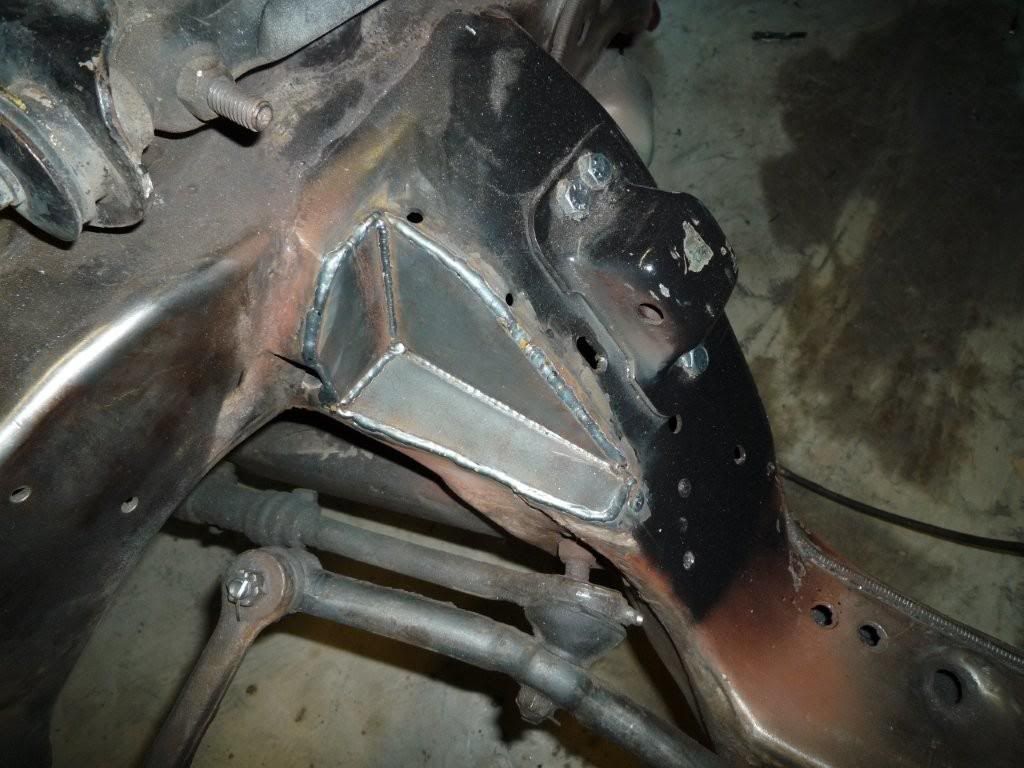
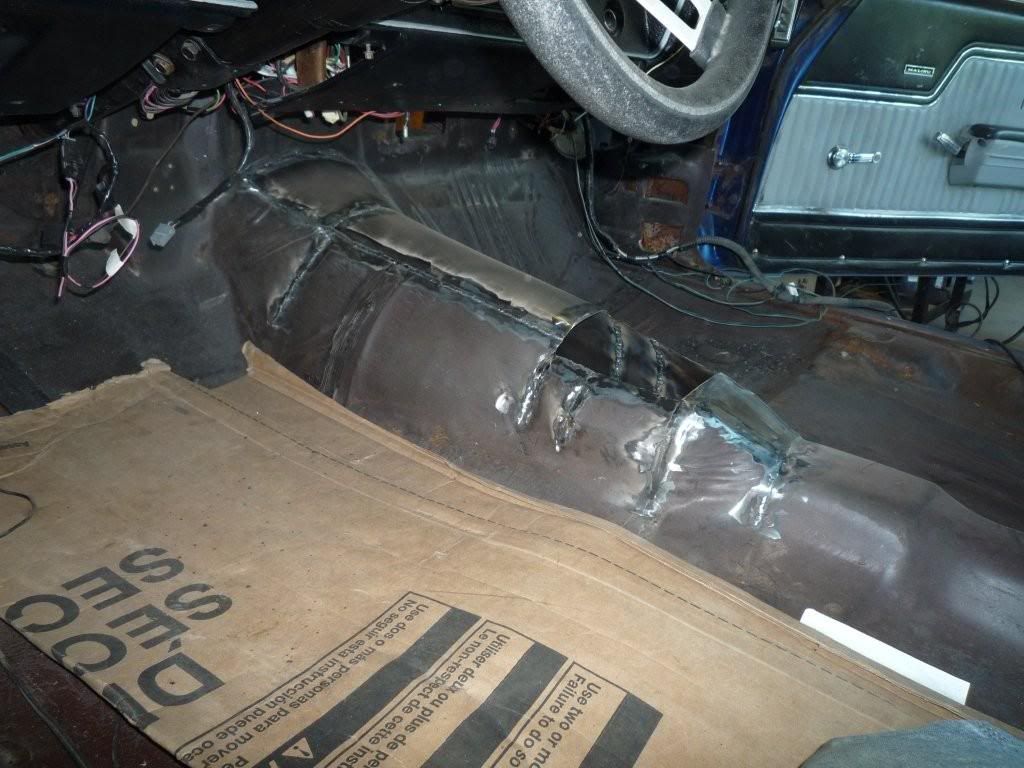
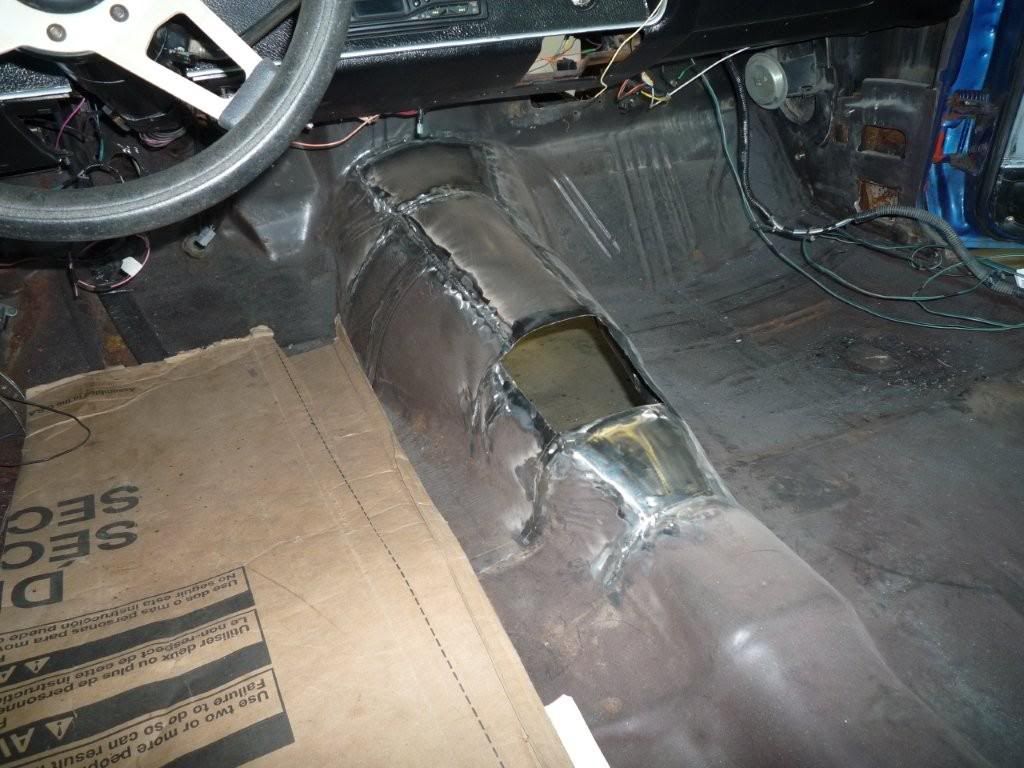

Darren is working on a plasma-cut piece to smooth the firewall for me as well. Hopefully I can pick it up later this week and get it welded in place.
Thanks to Darren Crays of Designing Edge Graphics in Fort Scott, KS for all the help. Darren has great fabrication and welding skills, and they came in very useful the past couple of days. We were able to get the crossmember notch boxed in and finish up the transmission tunnel.
Darren is working on a plasma-cut piece to smooth the firewall for me as well. Hopefully I can pick it up later this week and get it welded in place.
05-15-2009, 12:55 AM
#85
TECH Resident
iTrader: (3)

Join Date: Sep 2005
Location: Edmond, Oklahoma
Posts: 796
Likes: 0
Received 0 Likes
on
0 Posts
Haven't checked up on your swap in a while but looking good. Those are some nice welds/fabrication on the frame notch and tranny tunnel. Anything new to report?
05-15-2009, 10:29 PM
#86
On The Tree
Thread Starter
iTrader: (6)
Join Date: Mar 2006
Location: Kansas
Posts: 192
Likes: 0
Received 0 Likes
on
0 Posts
I've got an appointment early next week to get the bottom side of the floorpans blasted.
05-15-2009, 10:55 PM
#87
TECH Resident
iTrader: (3)
Join Date: Sep 2005
Location: Edmond, Oklahoma
Posts: 796
Likes: 0
Received 0 Likes
on
0 Posts
I hear ya rust repair(I assume you were fixing rust?) is not the most exciting thing in the world thats for sure. Looks like you had minimal damage to deal with though. I guess I am luck in that my car came from texas and that the various drivetrains that have been in it have kept the floorpans well oiled haha.
05-15-2009, 11:47 PM
#88
On The Tree
Thread Starter
iTrader: (6)
Join Date: Mar 2006
Location: Kansas
Posts: 192
Likes: 0
Received 0 Likes
on
0 Posts
Yep, rust it is. There were a few pinholes in each floorboard except the right front one, which seems to be in good shape. The underside was definitely well oiled by the old 350, but I'm thinking the floor damage may have been due to leaking weatherstripping.
I hear ya rust repair(I assume you were fixing rust?) is not the most exciting thing in the world thats for sure. Looks like you had minimal damage to deal with though. I guess I am luck in that my car came from texas and that the various drivetrains that have been in it have kept the floorpans well oiled haha.
05-25-2009, 04:13 PM
#89
On The Tree
Thread Starter
iTrader: (6)
Join Date: Mar 2006
Location: Kansas
Posts: 192
Likes: 0
Received 0 Likes
on
0 Posts
I got the new smooth firewall panel tacked in place. I plan on welding/grinding/finishing the curved edge on the driver's side of the panel, and the other three edges will probably be finished with seam sealer. If anybody is interested in one of these panels, send me a PM and let me know.
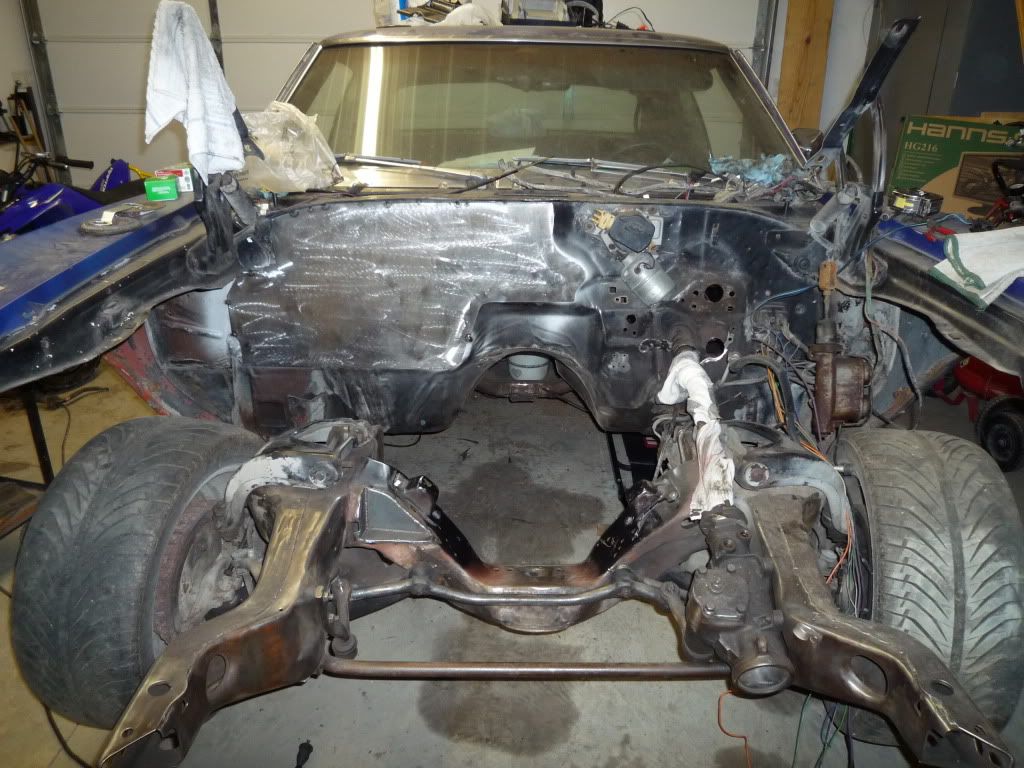
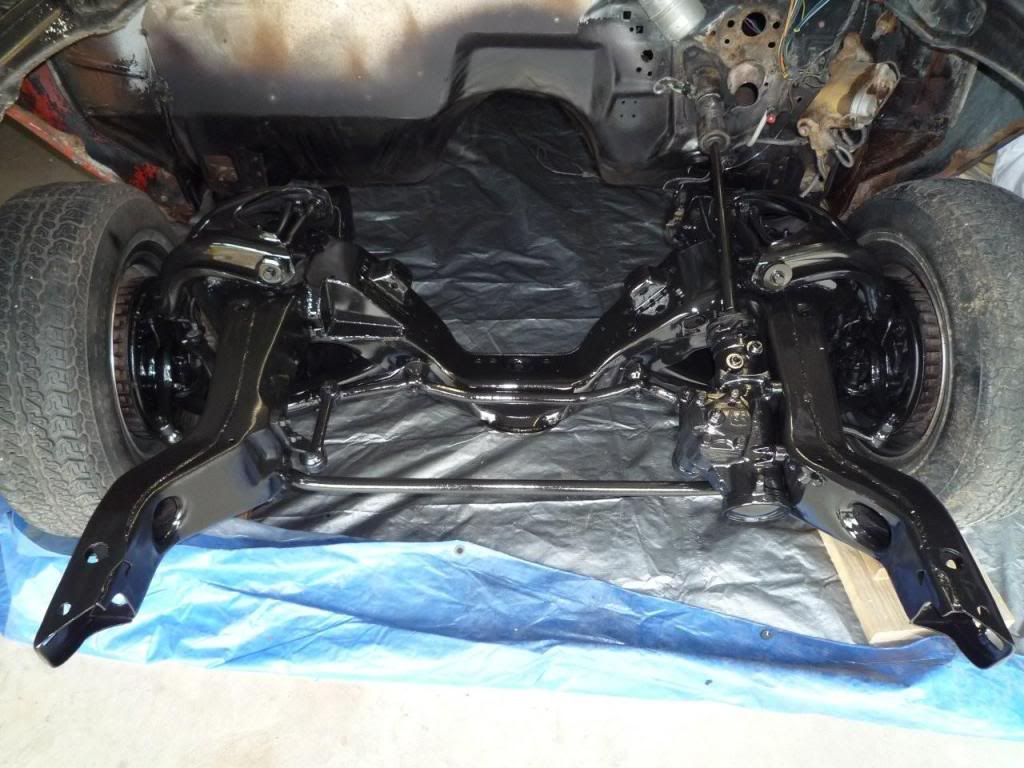
I had the chassis and floorpans blasted last week. As much as I would love to be able to do a true "frame off", the timeline just doesn't allow. So, this is as close as I can get for now.
I sprayed Eastwoods' rust converter on the frame, floorpans, and trunk pan. This picture shows the chassis and front suspension after the rust converter had been applied.
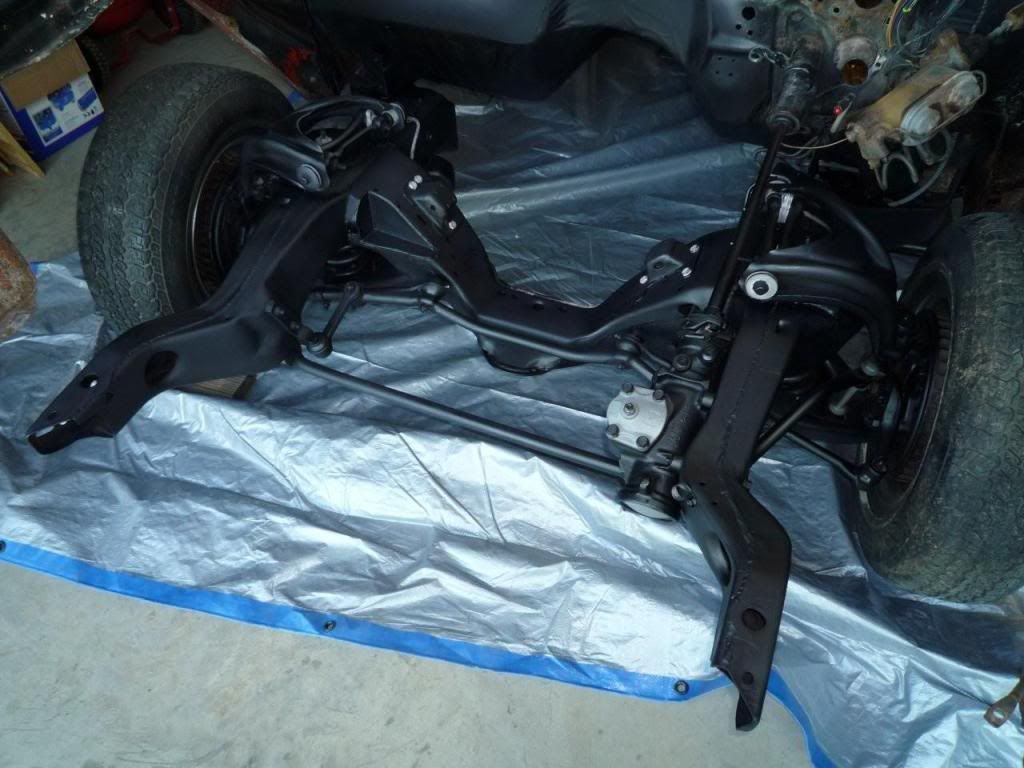
After the rust converter, I sprayed Eastwoods' Extreme Chassis Black on the frame and suspension.
I had the chassis and floorpans blasted last week. As much as I would love to be able to do a true "frame off", the timeline just doesn't allow. So, this is as close as I can get for now.
I sprayed Eastwoods' rust converter on the frame, floorpans, and trunk pan. This picture shows the chassis and front suspension after the rust converter had been applied.
After the rust converter, I sprayed Eastwoods' Extreme Chassis Black on the frame and suspension.
05-26-2009, 11:55 PM
#90
On The Tree
Thread Starter
iTrader: (6)
Join Date: Mar 2006
Location: Kansas
Posts: 192
Likes: 0
Received 0 Likes
on
0 Posts
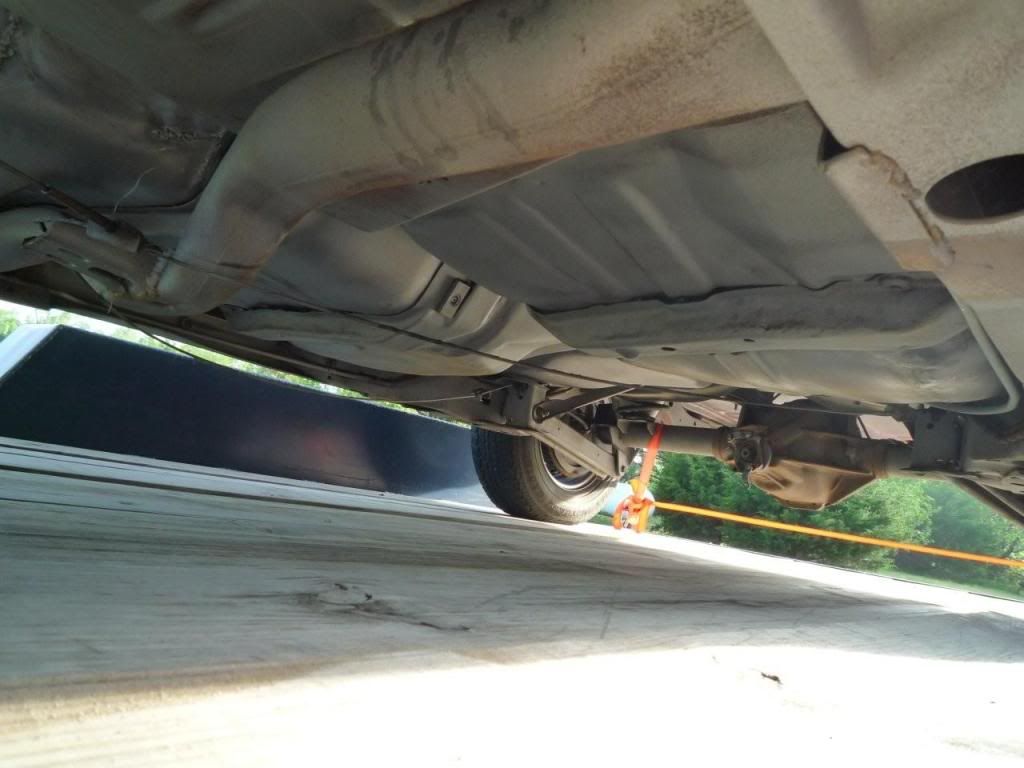
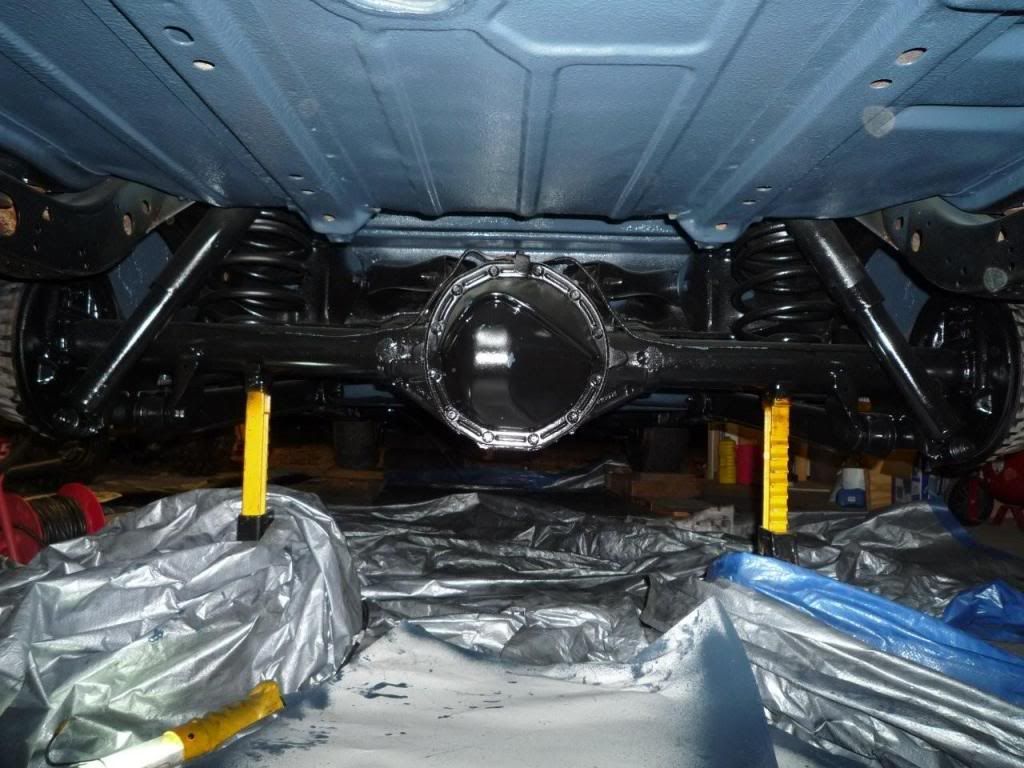
I sprayed Raptor liner on the bottom of the floorpans and trunkpan tonight. It's definitely a messy job. It would be much easier to apply if the body was on a rotisserie, but I'm happy with the way it turned out. The color was actually supposed to be a medium gray, but it turned out to have more blue tint than I was expecting.
06-04-2009, 01:25 AM
#91
On The Tree
Thread Starter
iTrader: (6)
Join Date: Mar 2006
Location: Kansas
Posts: 192
Likes: 0
Received 0 Likes
on
0 Posts
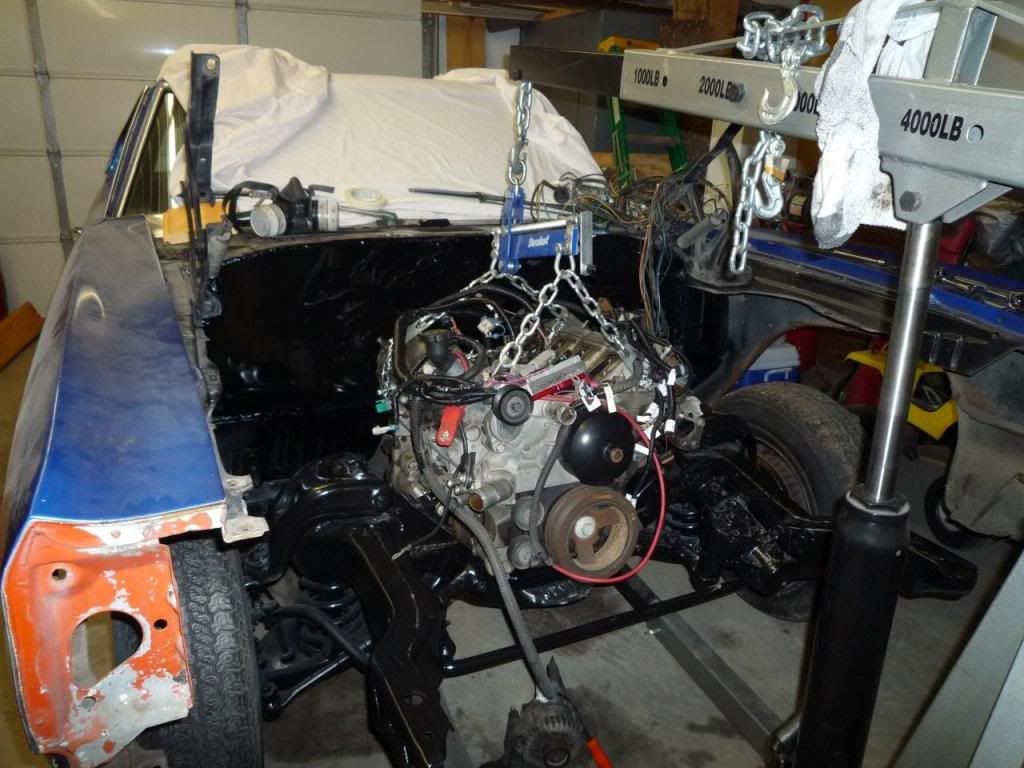
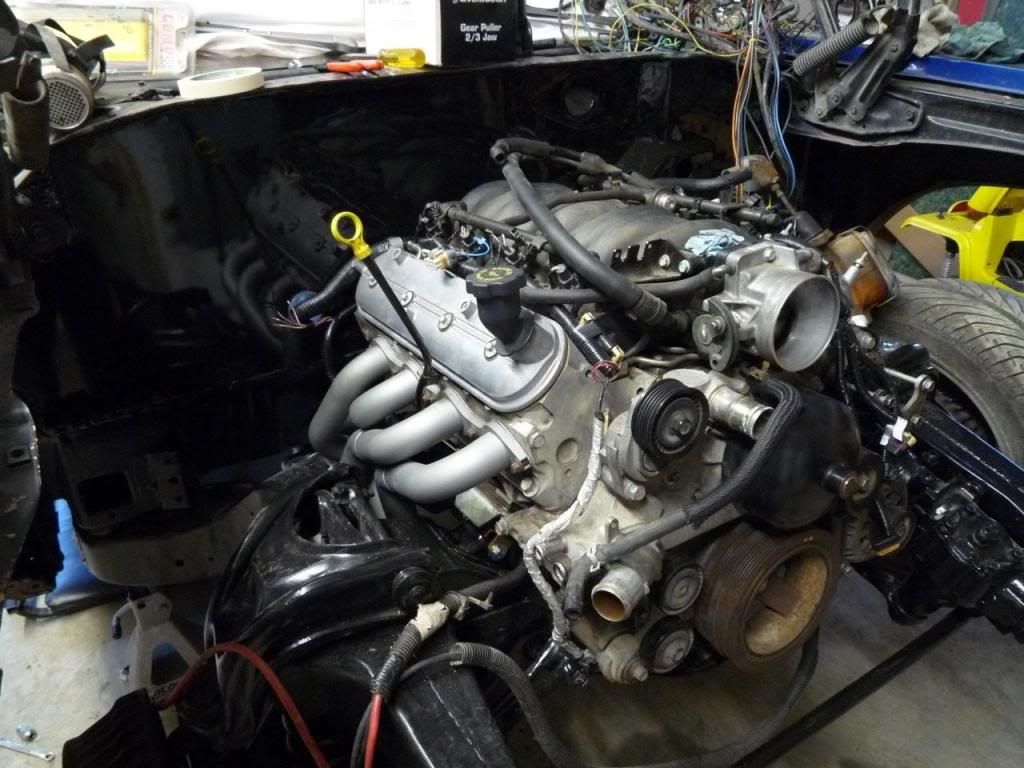
I got some paint on the firewall and dropped the engine back in place. My painting isn't the greatest on the firewall, so I'll probably want to come back and improve a portion of it later. It looks a lot better than it did before anyway!
06-07-2009, 09:22 AM
#92
On The Tree
Thread Starter
iTrader: (6)
Join Date: Mar 2006
Location: Kansas
Posts: 192
Likes: 0
Received 0 Likes
on
0 Posts
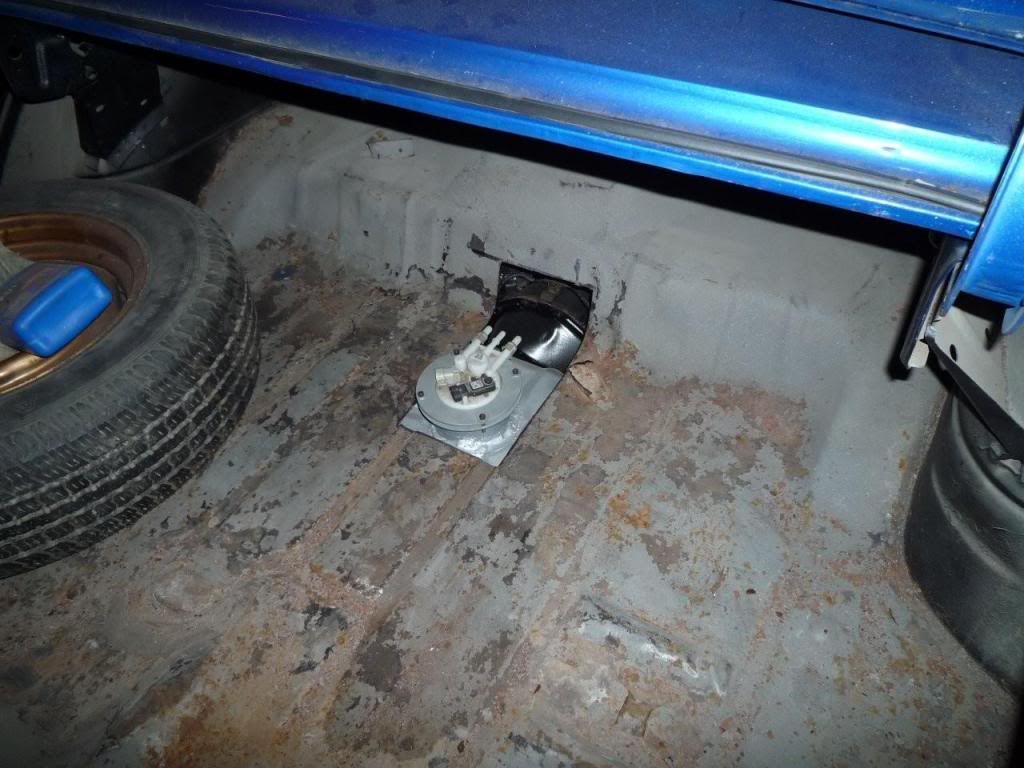
I got the tank installed a while back, but I hadn't had time to post a picture until now. I'll fabricate a sheetmetal cover to close this area in.
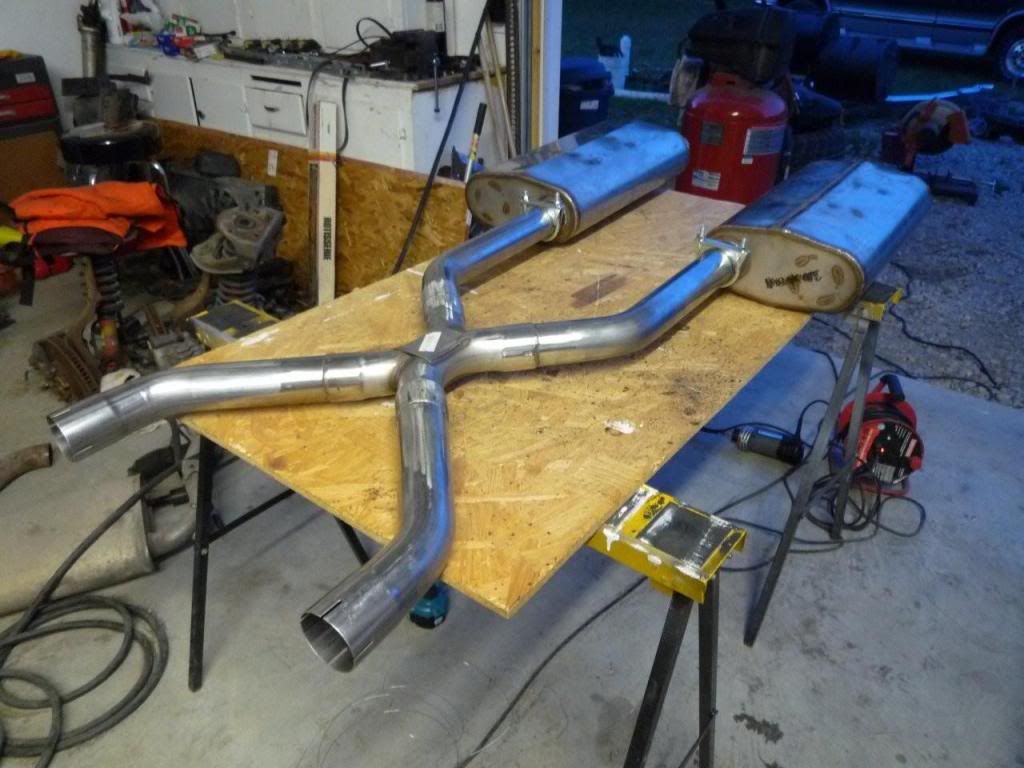
Darren came down again yesterday to help, and we got a bunch of work done. We installed a new cam (Futral/Motion 220/220 0.547"/0.547"), new Comp Cams hardened pushrods, got the Edelbrock headers installed, and fabricated the stainless exhaust system. As it turns out, the SLP mufflers I've planned to use aren't going to fit. They're too wide to fit between the framerails where it narrows down just in front of the rear axle, so I guess I'll be hunting for something different... I may throw the Flowmasters back on it temporarily until I find something different.
Darren came down again yesterday to help, and we got a bunch of work done. We installed a new cam (Futral/Motion 220/220 0.547"/0.547"), new Comp Cams hardened pushrods, got the Edelbrock headers installed, and fabricated the stainless exhaust system. As it turns out, the SLP mufflers I've planned to use aren't going to fit. They're too wide to fit between the framerails where it narrows down just in front of the rear axle, so I guess I'll be hunting for something different... I may throw the Flowmasters back on it temporarily until I find something different.
06-08-2009, 03:20 AM
#93
Looks like a great improvement from where you started, great job on the project. Keep up the good work and posting as you go along.
I wonder what your fuel tank reading will be like, seem like it is going to be always reading higher than what you might really have. Like 1/2 tank reading on the gauge will be really less than a 1/2 tank due to the sender being really the 2" above the tank. ??
I wonder what your fuel tank reading will be like, seem like it is going to be always reading higher than what you might really have. Like 1/2 tank reading on the gauge will be really less than a 1/2 tank due to the sender being really the 2" above the tank. ??
06-08-2009, 09:01 AM
#94
On The Tree
Thread Starter
iTrader: (6)
Join Date: Mar 2006
Location: Kansas
Posts: 192
Likes: 0
Received 0 Likes
on
0 Posts
You're right, Bczee. I haven't actually worked out the fuel tank sender issue yet.
My plan is to remove the float arm / sender from the original Chevelle unit and rivet it to the plastic fuel bucket that the F-body pump is mounted in. If I attach it at the same height at which it was originally mounted, it should give me a good reading.
My plan is to remove the float arm / sender from the original Chevelle unit and rivet it to the plastic fuel bucket that the F-body pump is mounted in. If I attach it at the same height at which it was originally mounted, it should give me a good reading.
06-08-2009, 12:30 PM
#95
On The Tree
Thread Starter
iTrader: (6)
Join Date: Mar 2006
Location: Kansas
Posts: 192
Likes: 0
Received 0 Likes
on
0 Posts
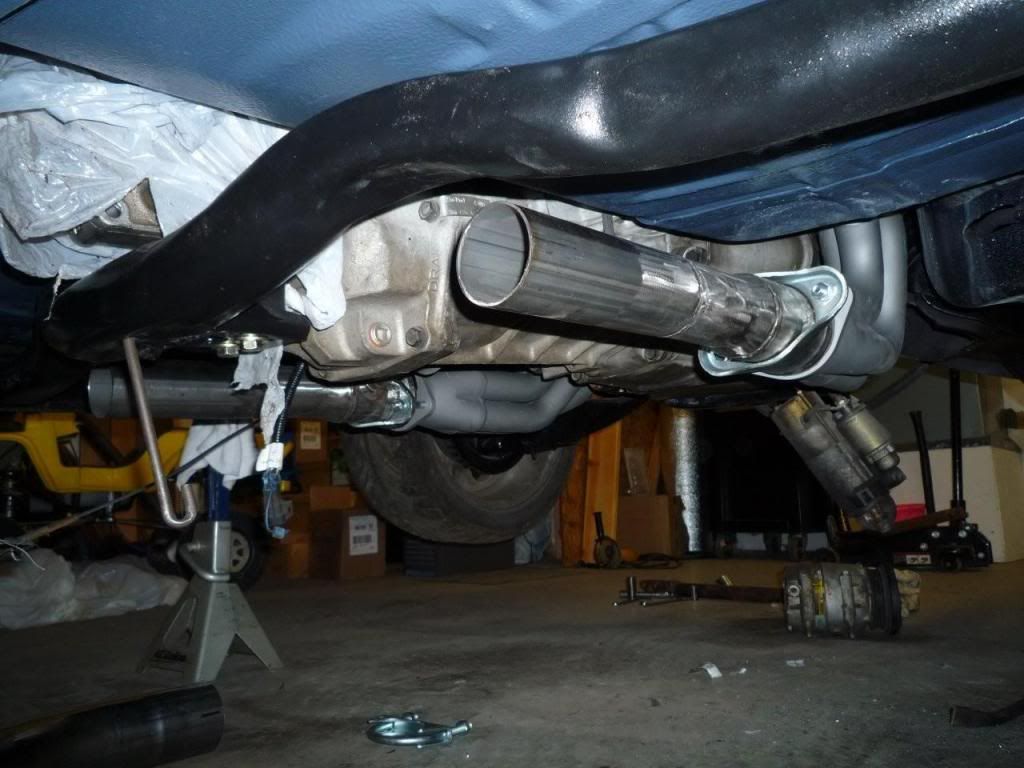
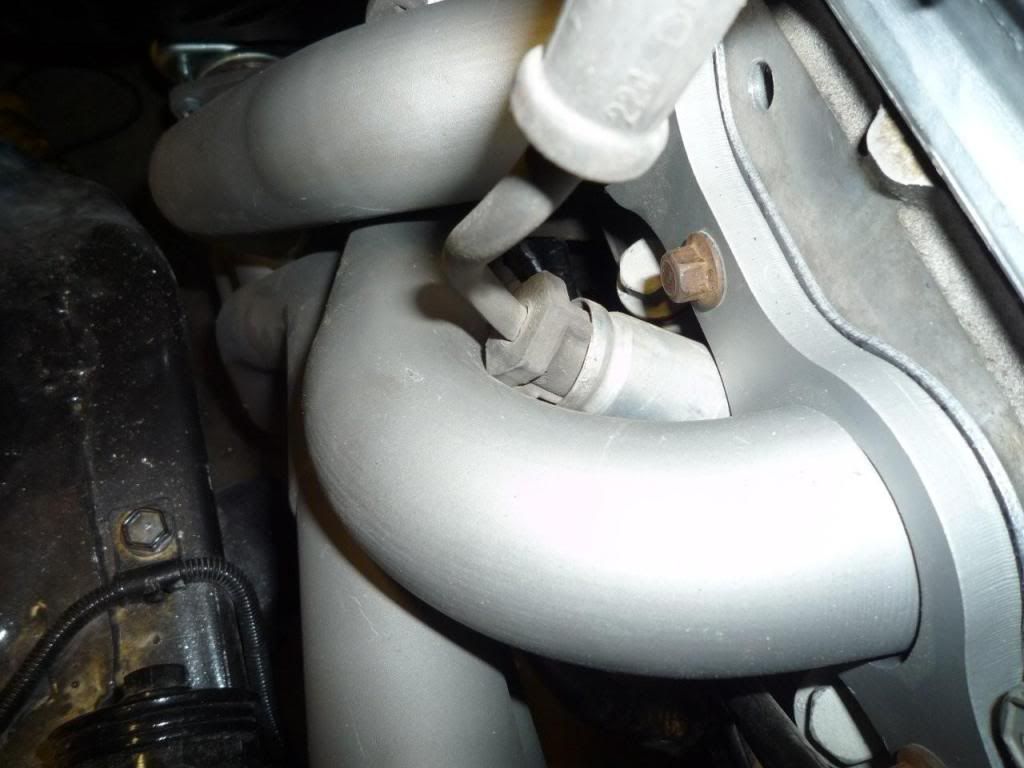
This picture shows the collector/reducers mounted to the headers. I'll have a slip-fit / clamp joint at the back of these pieces, so if I need drop the trans crossmember later, the exahust won't be an issue.
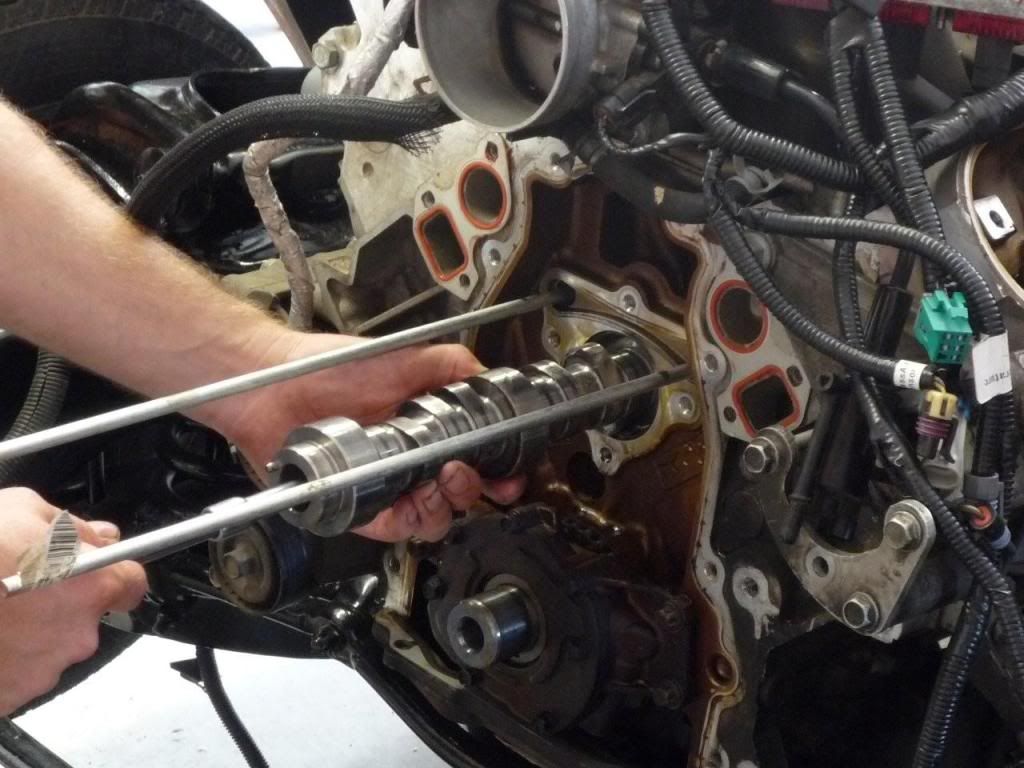
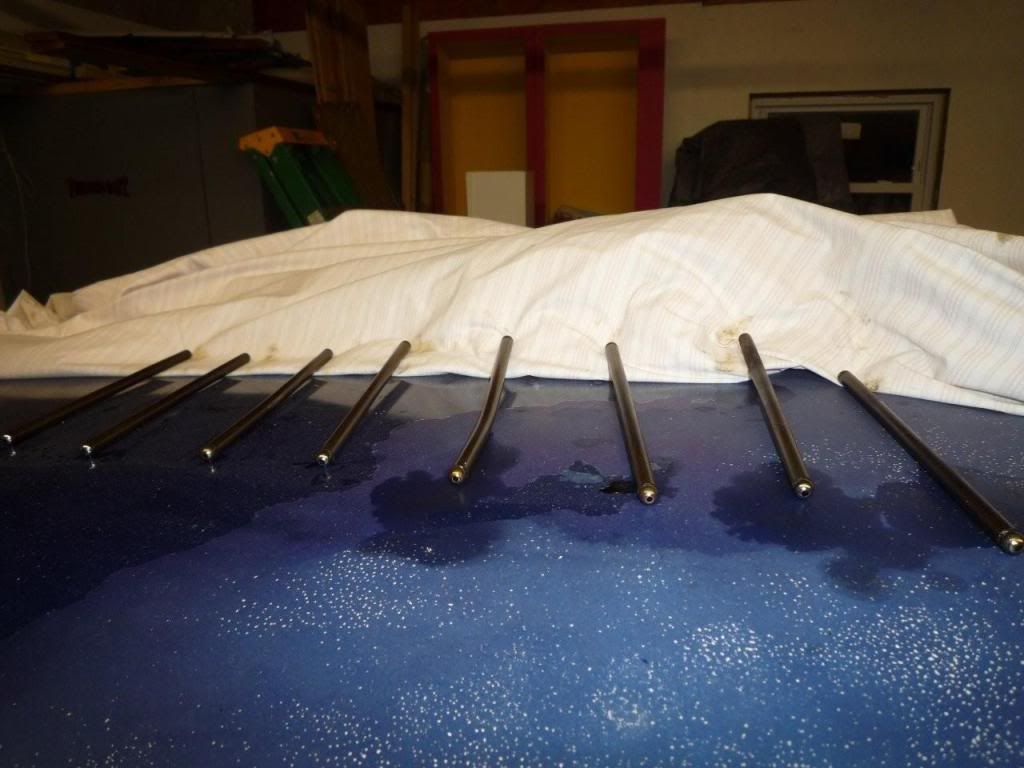
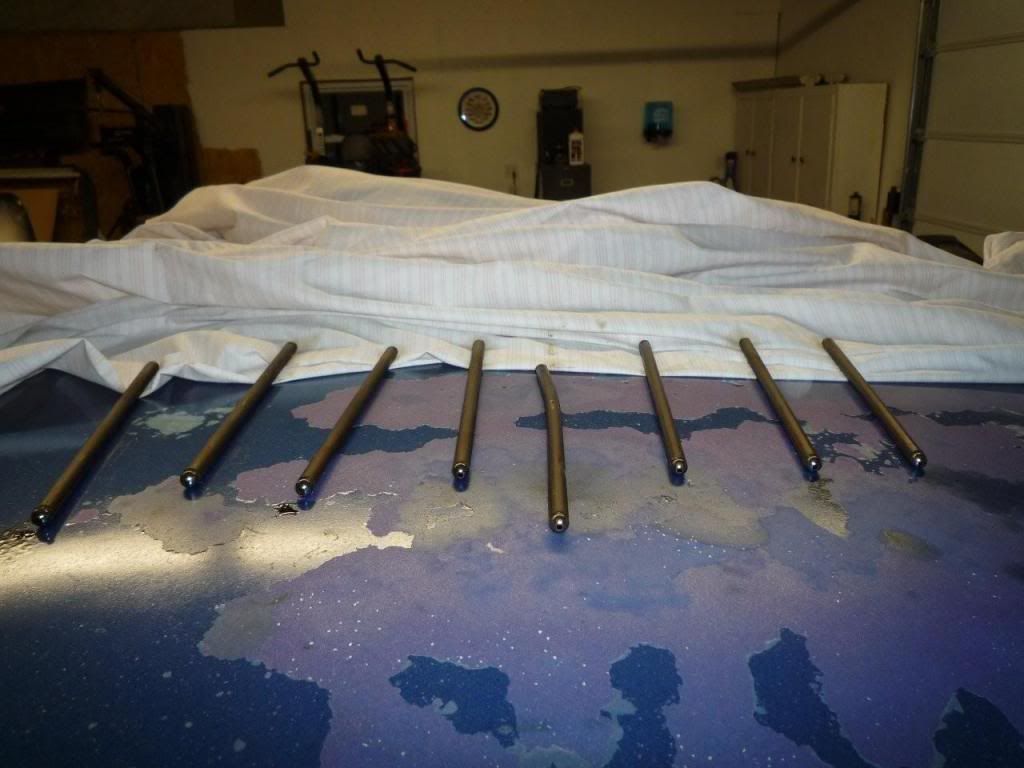
For a cam swap without removing the intake, I highly recommend the method shown in here. We used two 5/16" metal rods inserted through the holes behind the cam retaining plate. I ran across this idea here on LS1tech, and it worked great. We removed the rockers and pushrods, spun the cam a few revolutions, stuck the 5/16" rods in place, pulled the cam out, inserted the new cam, pulled the rods back out, and reinstalled the rockers along with new pushrods. It was a slick process and the 5/16" rods eliminate any chance of dropping a lifter into the oil pan. Total investment for the two 5/16" rods was about $7.00. For reference, I used 3' lengths, but I've heard that other guys have used 2' successfully as well.
For a cam swap without removing the intake, I highly recommend the method shown in here. We used two 5/16" metal rods inserted through the holes behind the cam retaining plate. I ran across this idea here on LS1tech, and it worked great. We removed the rockers and pushrods, spun the cam a few revolutions, stuck the 5/16" rods in place, pulled the cam out, inserted the new cam, pulled the rods back out, and reinstalled the rockers along with new pushrods. It was a slick process and the 5/16" rods eliminate any chance of dropping a lifter into the oil pan. Total investment for the two 5/16" rods was about $7.00. For reference, I used 3' lengths, but I've heard that other guys have used 2' successfully as well.
06-11-2009, 12:24 AM
#96
On The Tree
Thread Starter
iTrader: (6)
Join Date: Mar 2006
Location: Kansas
Posts: 192
Likes: 0
Received 0 Likes
on
0 Posts
I've heard before that the factory pushrods in GenIII engines are marginal, even on a stock engine. Now I know why they say that... When I did the cam swap, I also installed Comp Cams hardened pushrods. As I removed the original pushrods, we found three that were bent (all 3 were on intake valves).
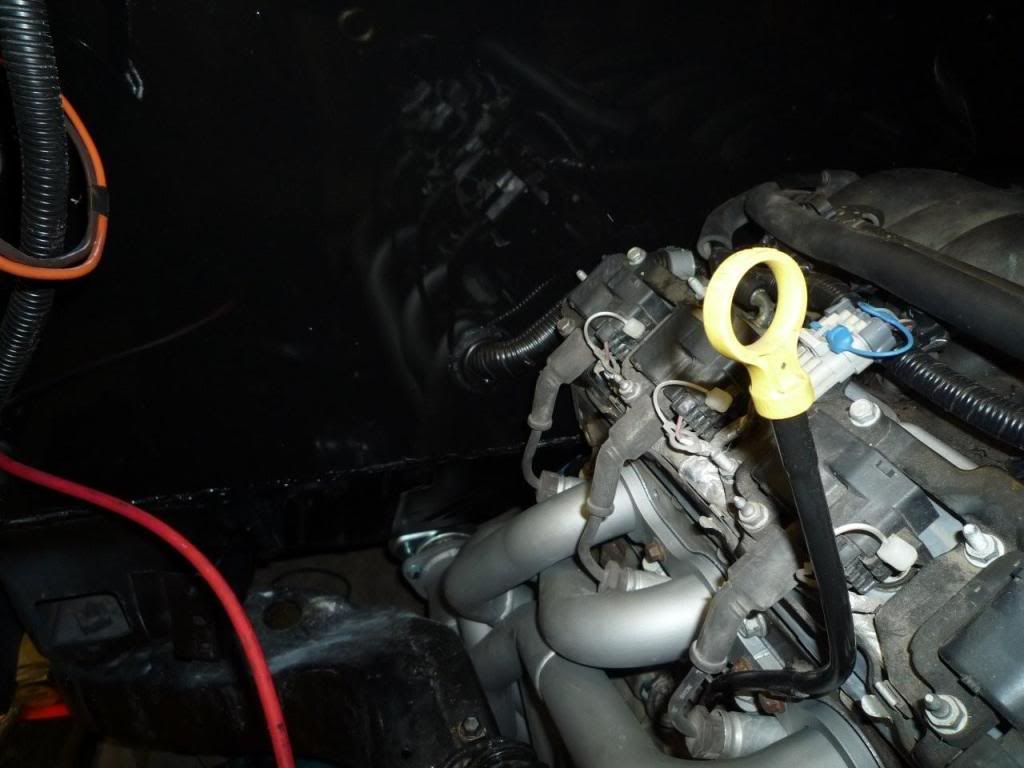
I located a grommet from McMaster-Carr for the main harness. The grommet is McMaster p/n 63595K35, has a 1" ID, and fits in a 2" hole. I cut a slit on one side of the grommet, slipped it over the harness and into the firewall opening, and then placed a small amount of silicone caulk on it from the interior side to seal the slit. The grommet has a flexible wall and allows the harness to pass through the firewall at an angle if needed.
By cutting the lower end off of the Trans-Am power steering lines and crimping on new fittings to mate up to the Chevelle steering gear, the local parts store got me set up for a total of $30.
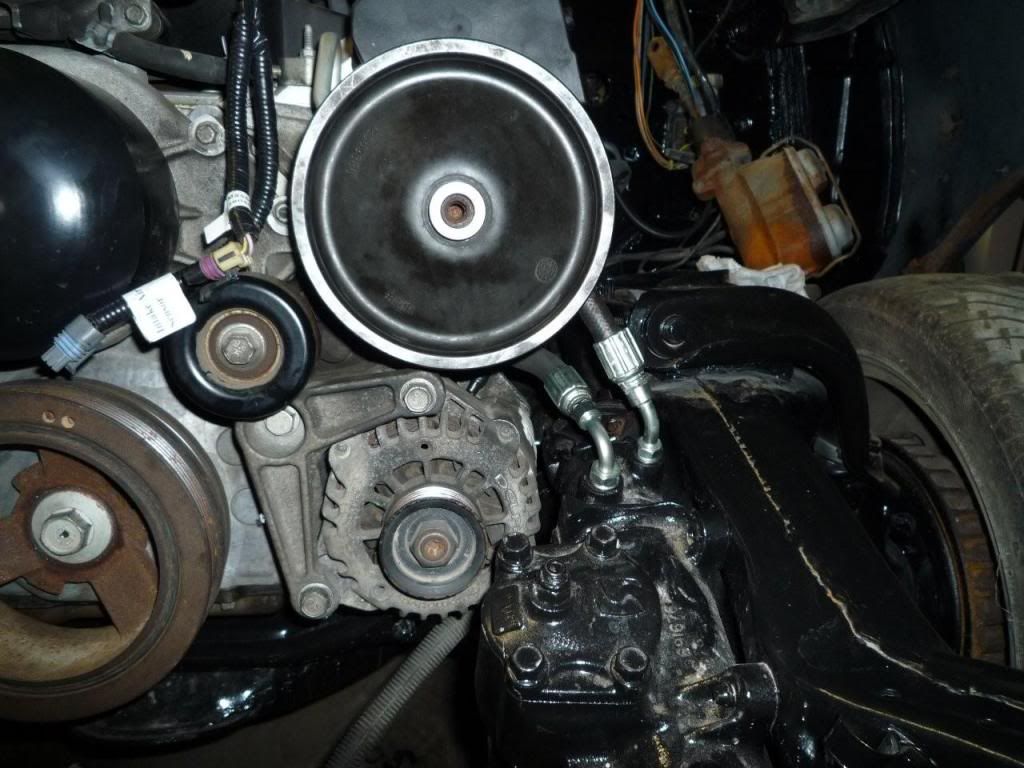
The stock plug wires fit very well with the Edelbrock headers, with the exception of cylinder #6. It appears that cyl #6 will need a plug wire with a 90 degree boot. Has anyone else run across this issue?
I located a grommet from McMaster-Carr for the main harness. The grommet is McMaster p/n 63595K35, has a 1" ID, and fits in a 2" hole. I cut a slit on one side of the grommet, slipped it over the harness and into the firewall opening, and then placed a small amount of silicone caulk on it from the interior side to seal the slit. The grommet has a flexible wall and allows the harness to pass through the firewall at an angle if needed.
By cutting the lower end off of the Trans-Am power steering lines and crimping on new fittings to mate up to the Chevelle steering gear, the local parts store got me set up for a total of $30.
The stock plug wires fit very well with the Edelbrock headers, with the exception of cylinder #6. It appears that cyl #6 will need a plug wire with a 90 degree boot. Has anyone else run across this issue?
06-11-2009, 06:37 AM
#98

First, make sure the boot and sleeve is completely seated. Next, take a brand new razor blade and trim the end of the boot until there is no contact. It will cut like butter if you use a new blade.
06-11-2009, 08:40 AM
#99
On The Tree
Thread Starter
iTrader: (6)
Join Date: Mar 2006
Location: Kansas
Posts: 192
Likes: 0
Received 0 Likes
on
0 Posts
Thanks for the recommendations, guys. Maybe I'll combine the two ideas -- a little trimming and some insulating tape. I had also wondered if in some other GenIII application GM had used plug wires with angled boots (and if there would be a way to buy just 1 of them).
06-14-2009, 12:59 AM
#100
On The Tree
Thread Starter
iTrader: (6)
Join Date: Mar 2006
Location: Kansas
Posts: 192
Likes: 0
Received 0 Likes
on
0 Posts
A few quick pics showing the latest progress:
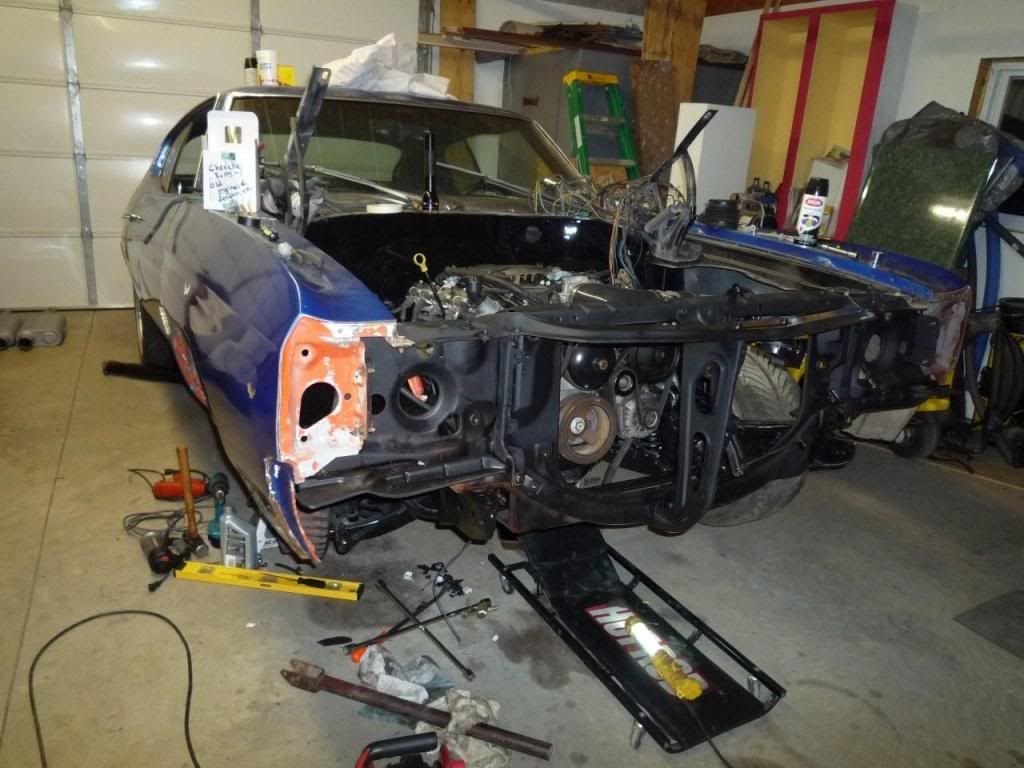
She definitely needs some new paint!

In the last pic, you can see that I've just got a loop on the heater hose inlet/outlet right now. I removed the factory A/C and heat system, and I've got a setup from Southern Air that I'll be installing after the Chevelle is back on the road.
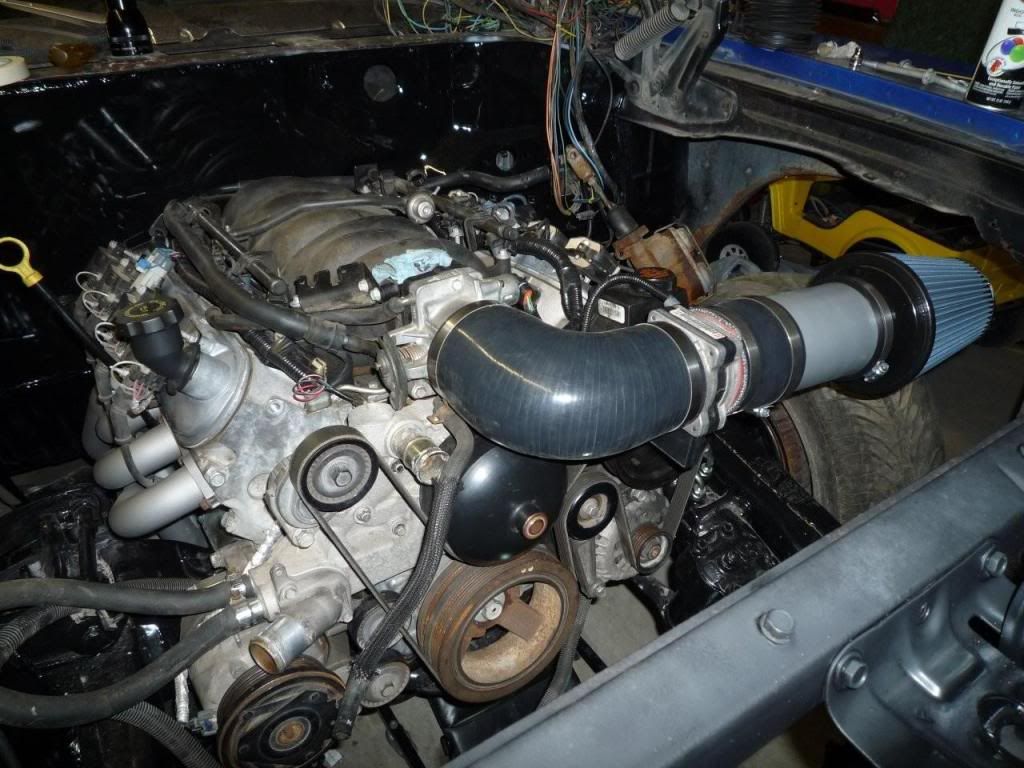
I'm trying to keep the positive battery lead that goes to the fusebox under the dash, the fan wiring, and all of the heat & A/C hoses hidden in the passenger-side fender. So far, it all seems to be working well. After it's on the road, I plan to build a block-off panel to go behind the passenger-side fender well, coming straight down from the inner edge of the fender, and leading back to the firewall. It should give it a nice, smooth look, and it should keep all of the hoses and wiring concealed.
Along the same lines, I plan to build a similar block-off panel for the area in front of the wheelwell on the driver's side. I'll isolate this area as a fresh air / cold air cavity, and I'll use a longer piece of 4" tubing to locate the air filter inside this area. If I'm lucky, maybe I can rig up some type of ram-air system to force air into this area.
My intake system is made up of a silicone 4" to 3.5" elbow, the factory MAF from the Trans-Am, a silicone 3.75" to 4" adapter (I installed the IAT sensor in this adapter), a section of 4" exhaust tubing, and an Amsoil air filter (p/n EaAU4070).
She definitely needs some new paint!
In the last pic, you can see that I've just got a loop on the heater hose inlet/outlet right now. I removed the factory A/C and heat system, and I've got a setup from Southern Air that I'll be installing after the Chevelle is back on the road.
I'm trying to keep the positive battery lead that goes to the fusebox under the dash, the fan wiring, and all of the heat & A/C hoses hidden in the passenger-side fender. So far, it all seems to be working well. After it's on the road, I plan to build a block-off panel to go behind the passenger-side fender well, coming straight down from the inner edge of the fender, and leading back to the firewall. It should give it a nice, smooth look, and it should keep all of the hoses and wiring concealed.
Along the same lines, I plan to build a similar block-off panel for the area in front of the wheelwell on the driver's side. I'll isolate this area as a fresh air / cold air cavity, and I'll use a longer piece of 4" tubing to locate the air filter inside this area. If I'm lucky, maybe I can rig up some type of ram-air system to force air into this area.
My intake system is made up of a silicone 4" to 3.5" elbow, the factory MAF from the Trans-Am, a silicone 3.75" to 4" adapter (I installed the IAT sensor in this adapter), a section of 4" exhaust tubing, and an Amsoil air filter (p/n EaAU4070).