

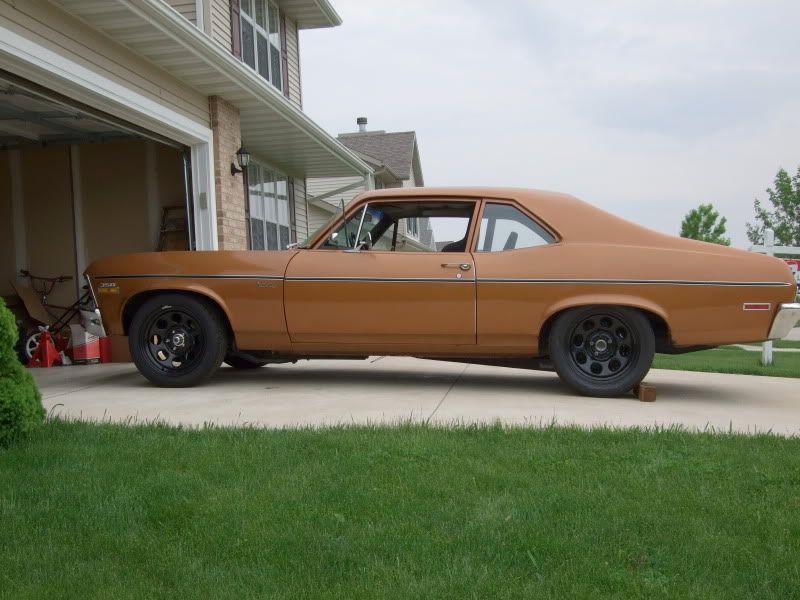
'72 Nova LQ4/ Richmond 5 speed
 03-11-2009 | 02:14 AM
#1

Thread Starter
Teching In

Joined: Mar 2006
Posts: 35
Likes: 0
From: Wisconsin
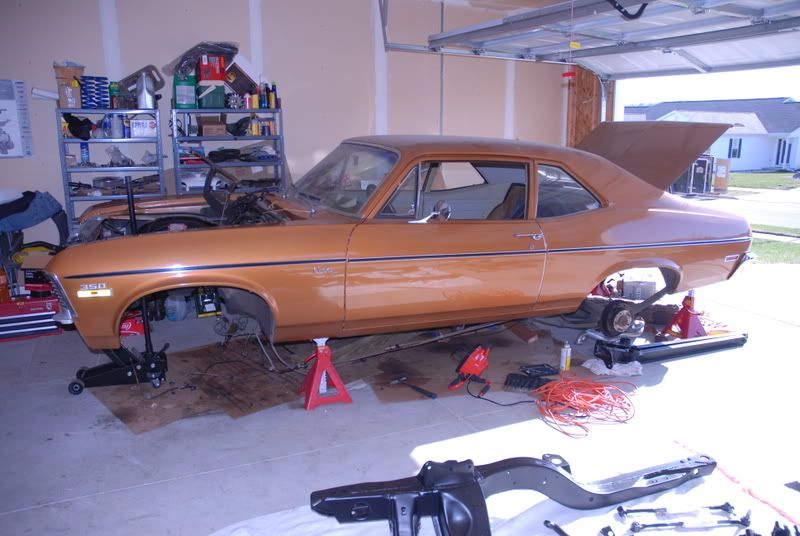
I figure it is time for me to start my own thread about my project. I am building a '72 Nova pro-touring style. It started as an update of the front suspension in the fall of '07 and has snowballed to now.
To date modifications:
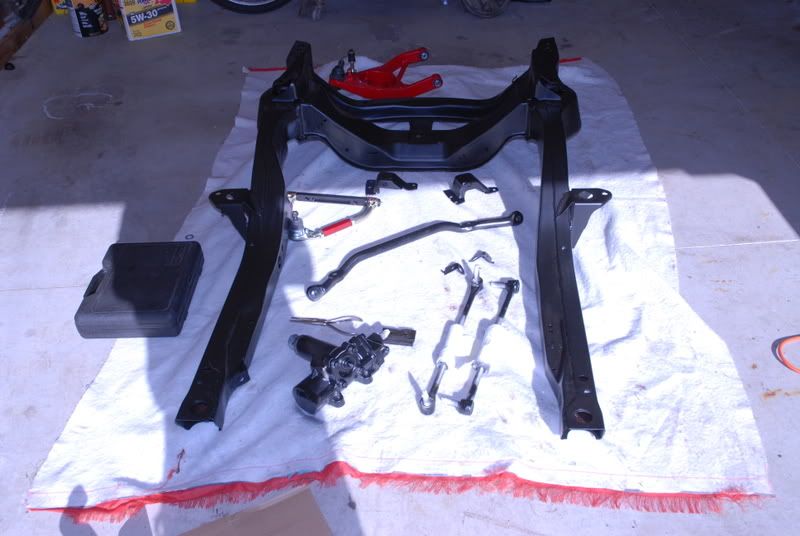
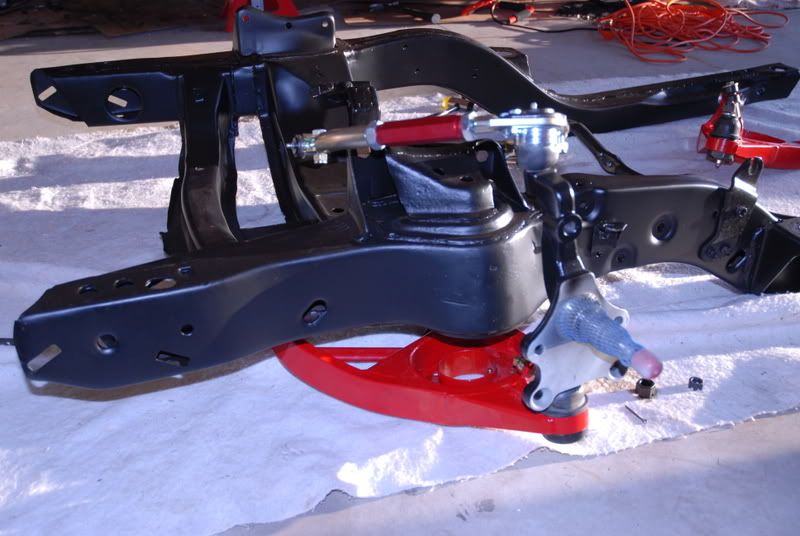
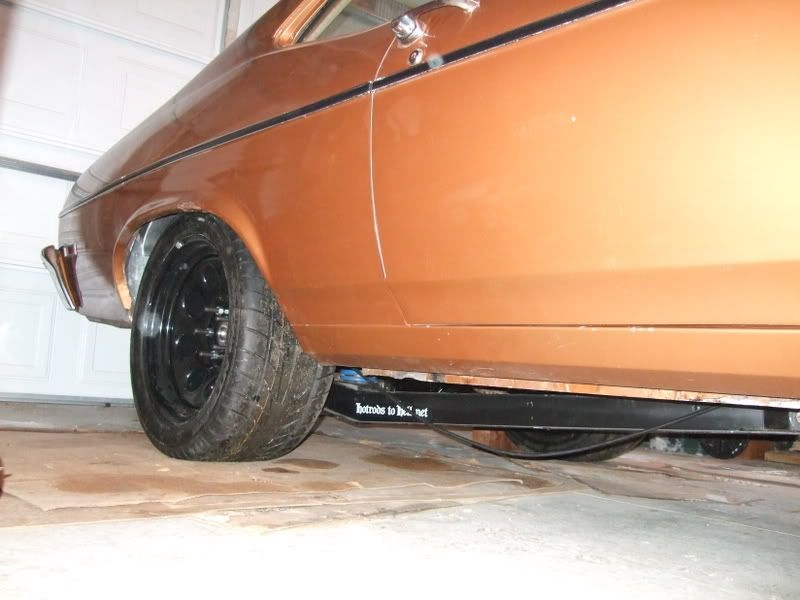
Front suspension
-Front subframe completely re-welded and attached with DSE half height body bushings.
-Hotrods to hell tubular lower control arms
-SPC adjustable upper arms
-Fatman Fabrications tall spindle with 2" drop
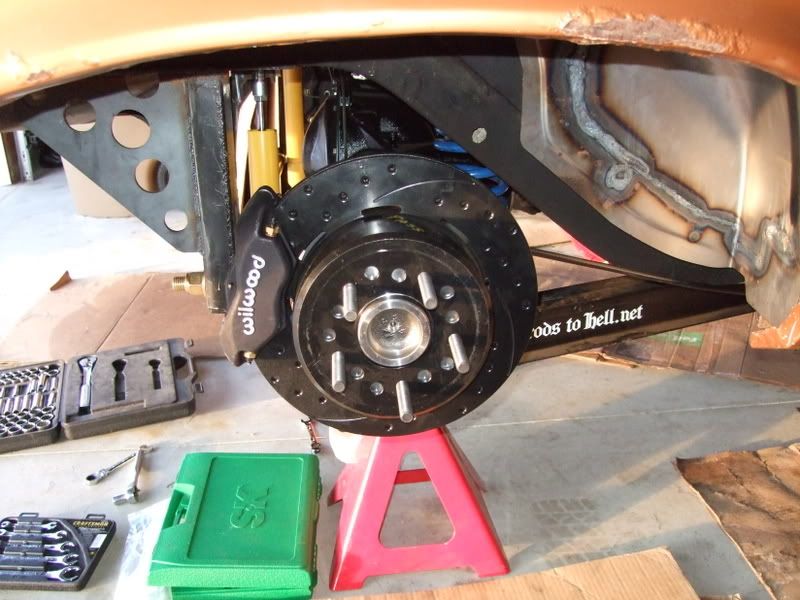
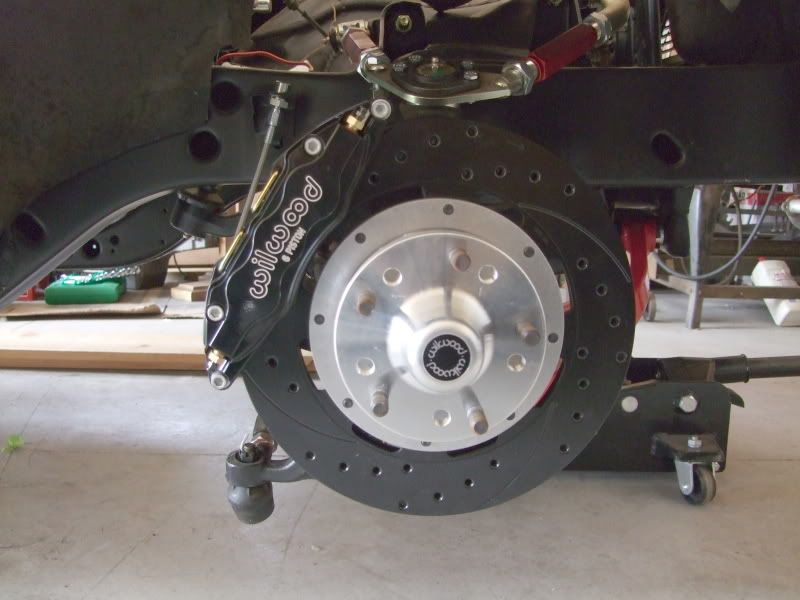
-Wilwood 12.2" rotor with 6 piston caliper
-Unisteer 600 series 12.7:1 box
-Moog steering components with DSE tie rod adjusters
-Hotrods to hell sway bar
-Crager Soft 8 17X8 with Nitto NT555 245/45/17
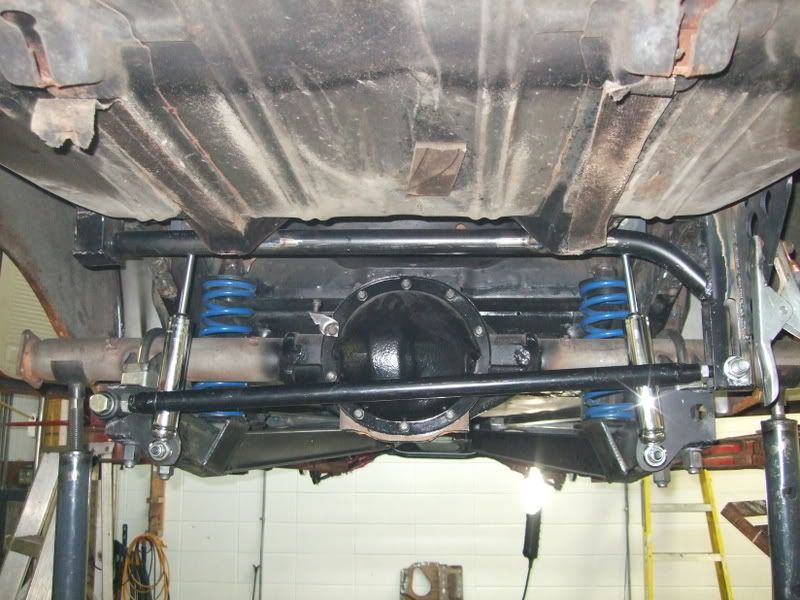
Rear suspension:
-Hotrods to hell truck arm rear suspension
-8.5" 10 bolt with Moser axles and C-clip eliminator
-Wilwood 12.2" rotor with 4 piston caliper
-Crager Soft 8 17X9 with Nitto NT555 285/40/17
-DSE mini-tubs
Interior:
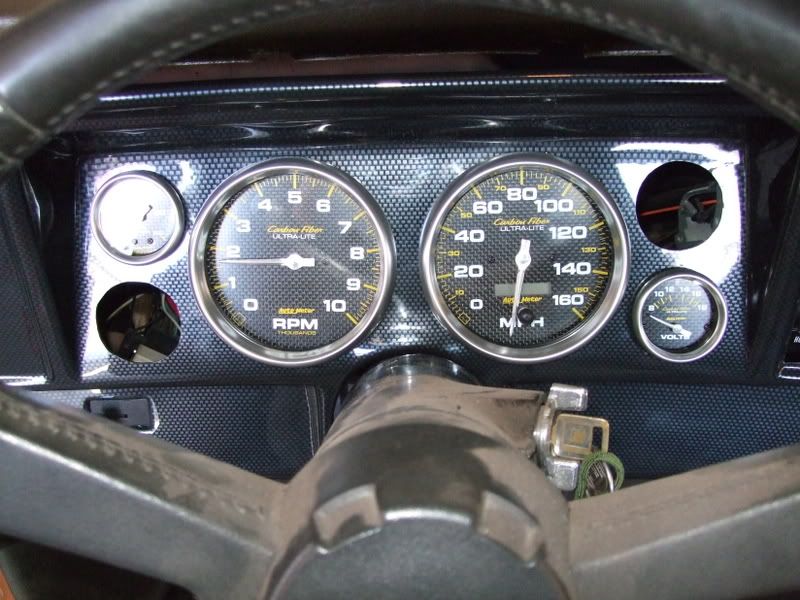
-Scat Pro-car buckets
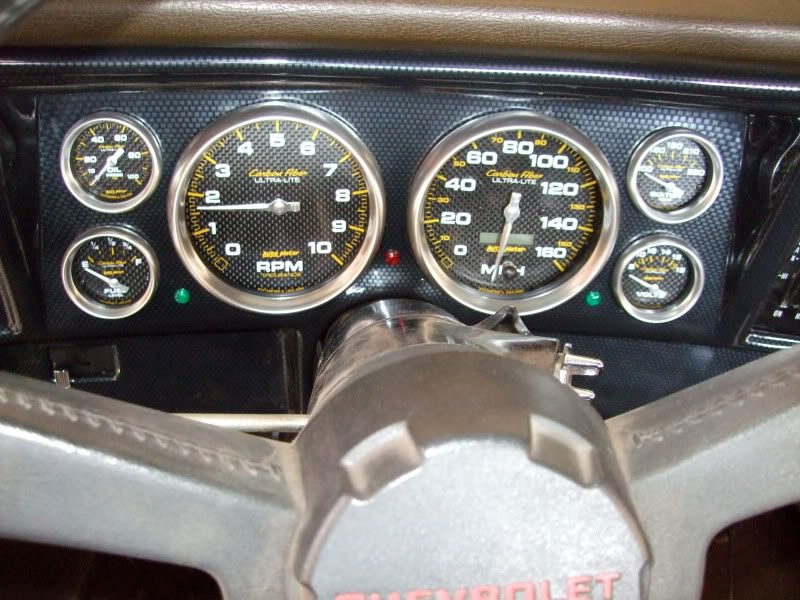
-Covans dash blank with 5" tach and speedo and 2 1/16" water temp, oil press., fuel, and volt gauges.
Ongoing:
Engine
Stock LQ4 with truck intake
Long tube Edlebrock headers
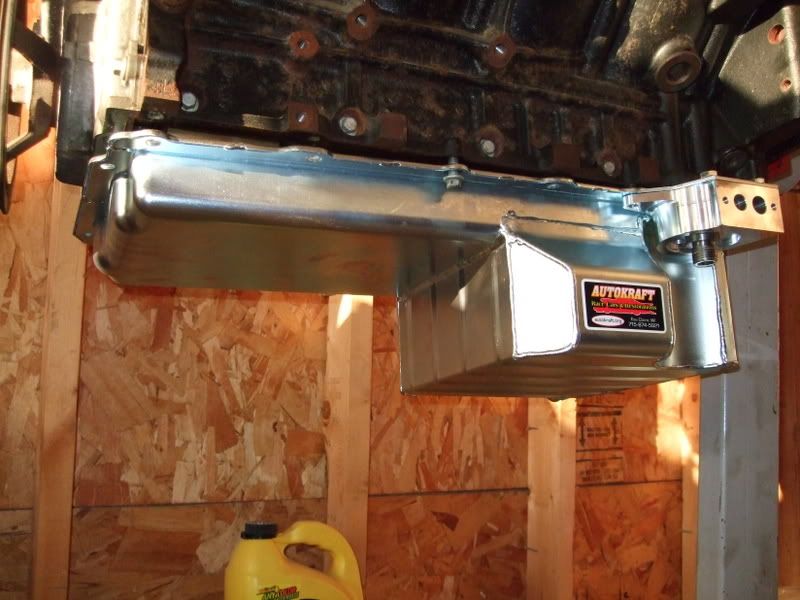
Autokraft Oil pan and mounts
Kwik Performance accessory drive
Unknown PCM and wiring harness (probably Speartech)
Tranny:
Richmond 5 speed with Long shifter
Here are some project pics:
To date modifications:
Front suspension
-Front subframe completely re-welded and attached with DSE half height body bushings.
-Hotrods to hell tubular lower control arms
-SPC adjustable upper arms
-Fatman Fabrications tall spindle with 2" drop
-Wilwood 12.2" rotor with 6 piston caliper
-Unisteer 600 series 12.7:1 box
-Moog steering components with DSE tie rod adjusters
-Hotrods to hell sway bar
-Crager Soft 8 17X8 with Nitto NT555 245/45/17
Rear suspension:
-Hotrods to hell truck arm rear suspension
-8.5" 10 bolt with Moser axles and C-clip eliminator
-Wilwood 12.2" rotor with 4 piston caliper
-Crager Soft 8 17X9 with Nitto NT555 285/40/17
-DSE mini-tubs
Interior:
-Scat Pro-car buckets
-Covans dash blank with 5" tach and speedo and 2 1/16" water temp, oil press., fuel, and volt gauges.
Ongoing:
Engine
Stock LQ4 with truck intake
Long tube Edlebrock headers
Autokraft Oil pan and mounts
Kwik Performance accessory drive
Unknown PCM and wiring harness (probably Speartech)
Tranny:
Richmond 5 speed with Long shifter
Here are some project pics:
Last edited by mikem77; 03-11-2009 at 10:06 AM.
 03-11-2009 | 10:39 AM
#3
Thread Starter
Teching In
Joined: Mar 2006
Posts: 35
Likes: 0
From: Wisconsin
Here are some more pics of the rear suspension going together.
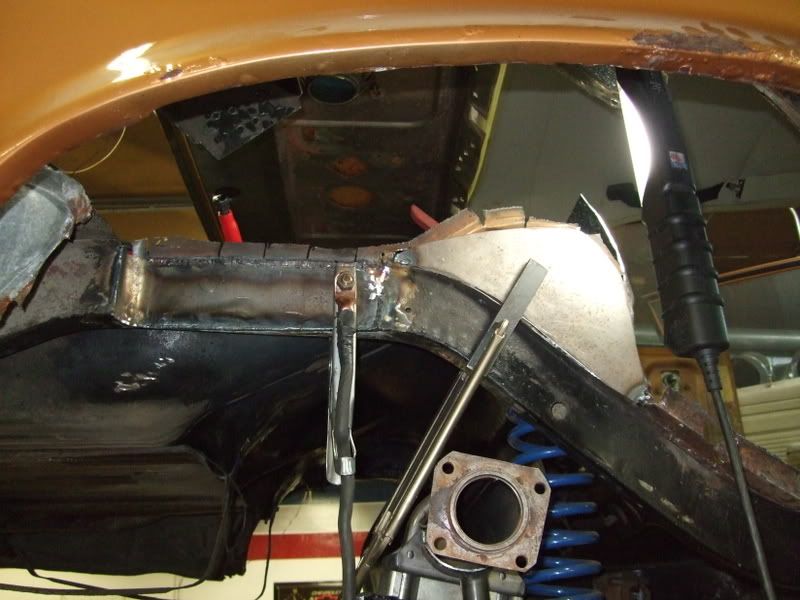
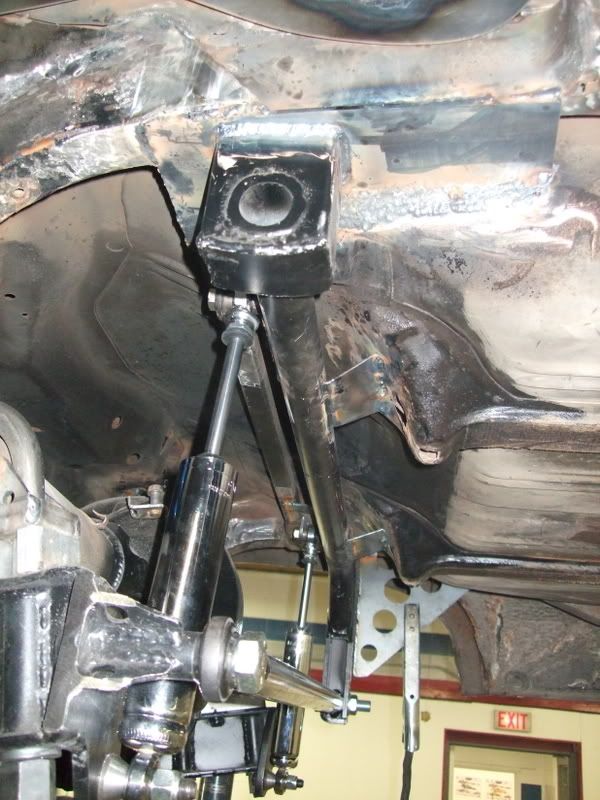
Here is a shot of the floor that was cut out to clearance the truck arms and the cross member that they mount to. The cross member welds to the front subframe and locates the suspension from there.
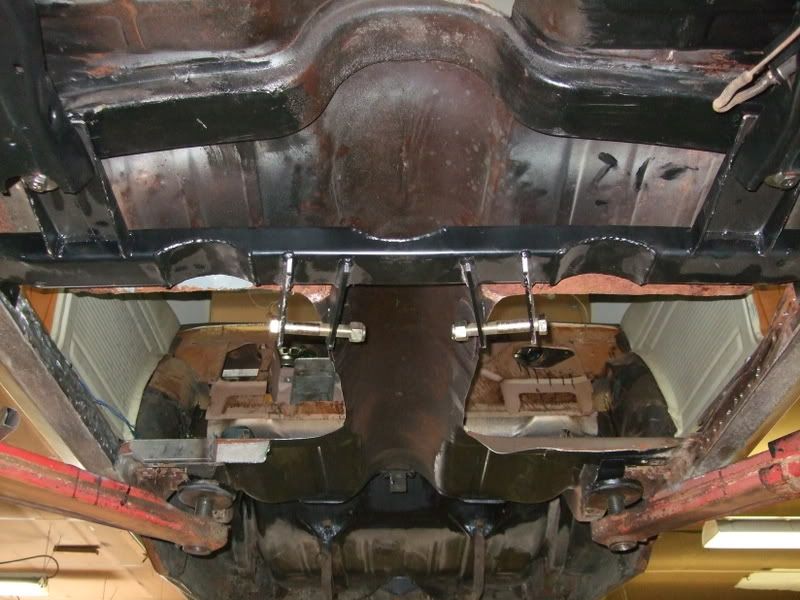
Here is the support that welds in right in front of where the front spring pocket was. The new floor is in here and the black piece angling towards the top of the pic goes all the way to the new cross member. It serves like a subframe connector.
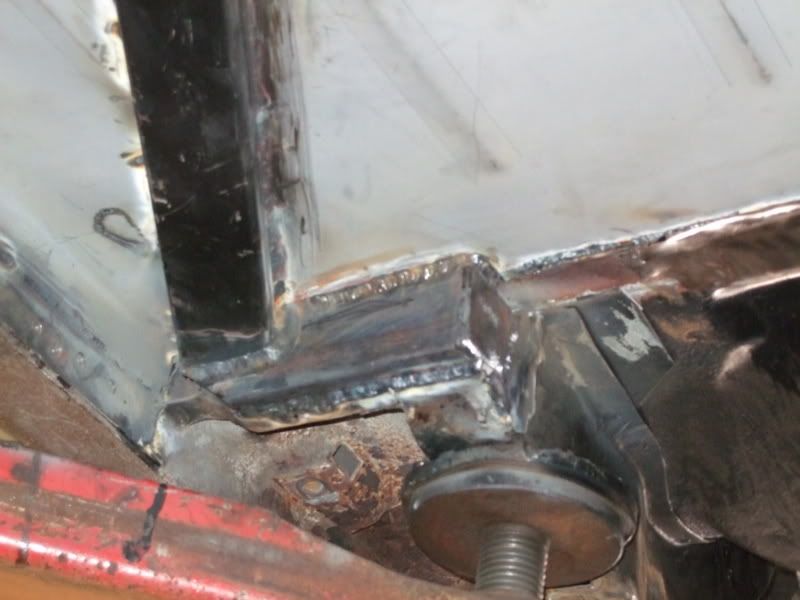
This shot is of the frame being notched for the mini-tub
This shot is up between the frame rails with the support for the panhard bar.
The only bad thing about the set-up is running exhaust/mufflers can be a bit tricky. There are other systems out there that are probably better handling.... Lateral Dynamics and maybe the DSE quad link but they are also a lot more money. I know this set-up will out perform the leaf springs and I am excited to get it together.
Here is a shot of the floor that was cut out to clearance the truck arms and the cross member that they mount to. The cross member welds to the front subframe and locates the suspension from there.
Here is the support that welds in right in front of where the front spring pocket was. The new floor is in here and the black piece angling towards the top of the pic goes all the way to the new cross member. It serves like a subframe connector.
This shot is of the frame being notched for the mini-tub
This shot is up between the frame rails with the support for the panhard bar.
The only bad thing about the set-up is running exhaust/mufflers can be a bit tricky. There are other systems out there that are probably better handling.... Lateral Dynamics and maybe the DSE quad link but they are also a lot more money. I know this set-up will out perform the leaf springs and I am excited to get it together.
 04-01-2009 | 02:28 PM
#5
Thread Starter
Teching In
Joined: Mar 2006
Posts: 35
Likes: 0
From: Wisconsin
I did a test fit of the motor the other day. There was some issues with the frame mounts and the Autokraft mounts not lining up. I have determined the original frame side motor mounts are different than what they were supposed to have come with. The Autokraft mounts were designed around the drivers side frame mount being 2 1/16" from frame to hole. Mine was 1.5" The passenger side mount was 1/8" off from what the replacement mounts measure out at. I replaced the frame side mounts and it all lined up.
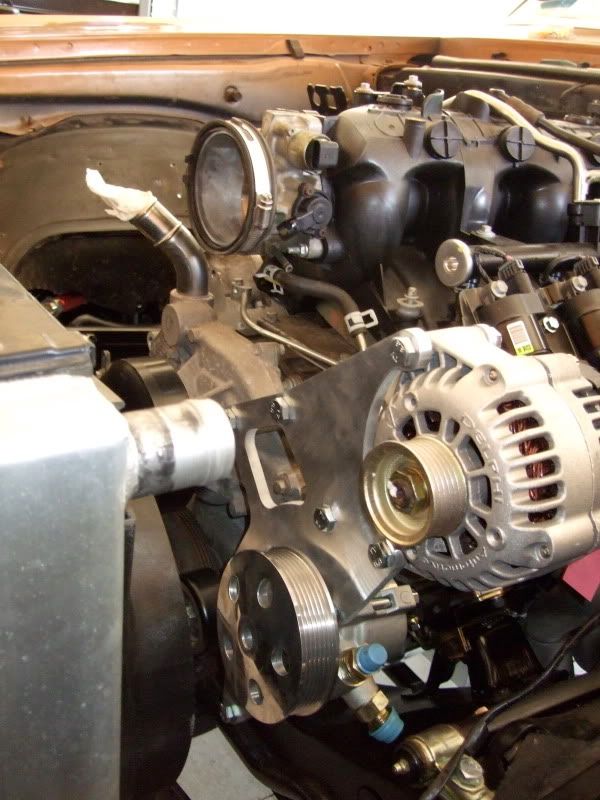
My Edelbrock LT's should be shipping tomorrow and my order has been placed with Speartech for the wiring harness and PCM. UPS should be bringing me my Kwik Performance brackets later this afternoon.
I need to get my flywheel on the engine and mount the clutch and bellhousing. I can take my measurements for the Hydraulic throw out bearing and get that ordered.
I hope to get brake lines bent on my weekend and sort out the last of the wiring in the dash.
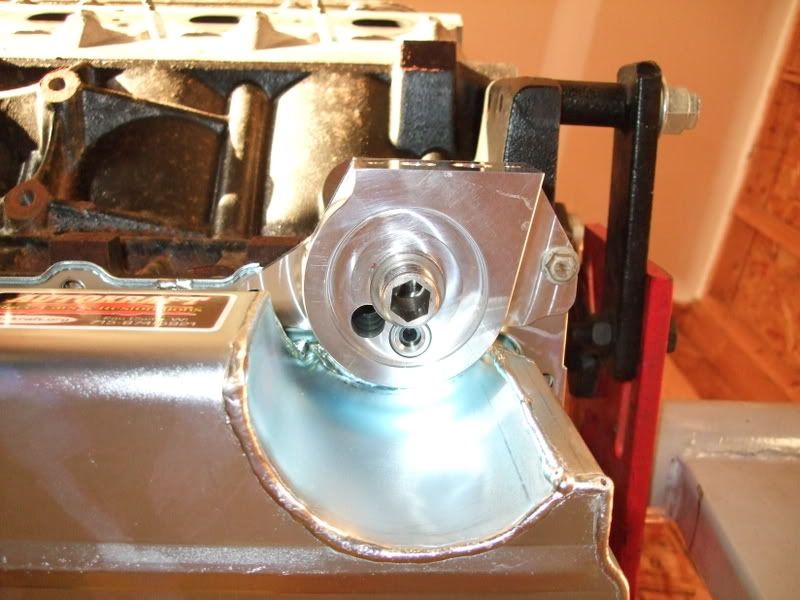
Here are some pics with the motor in.
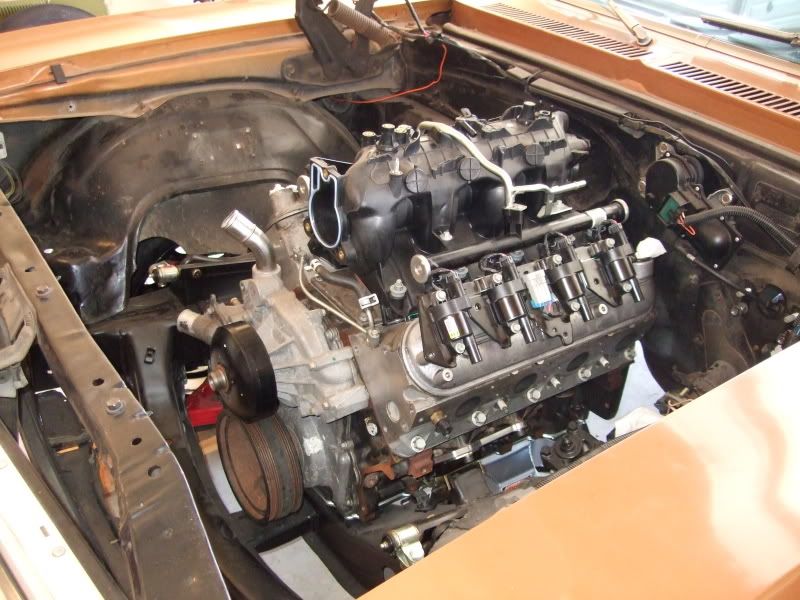
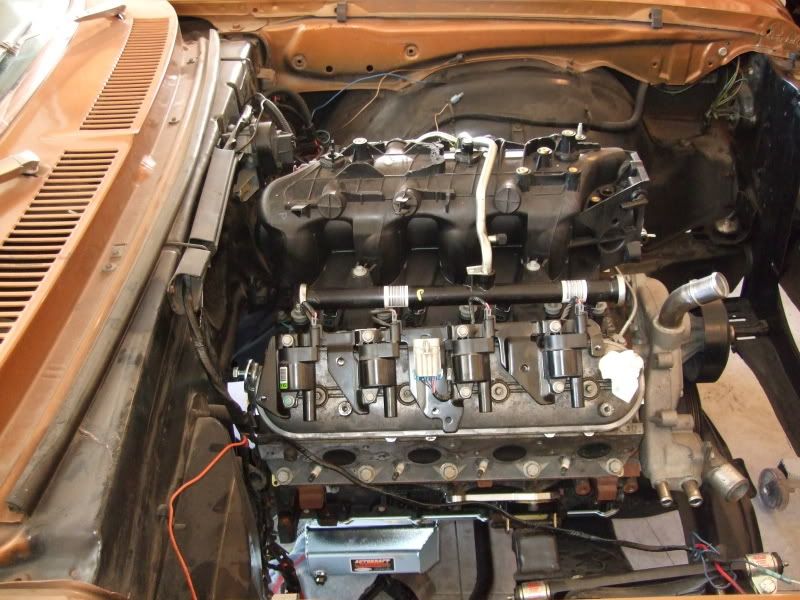
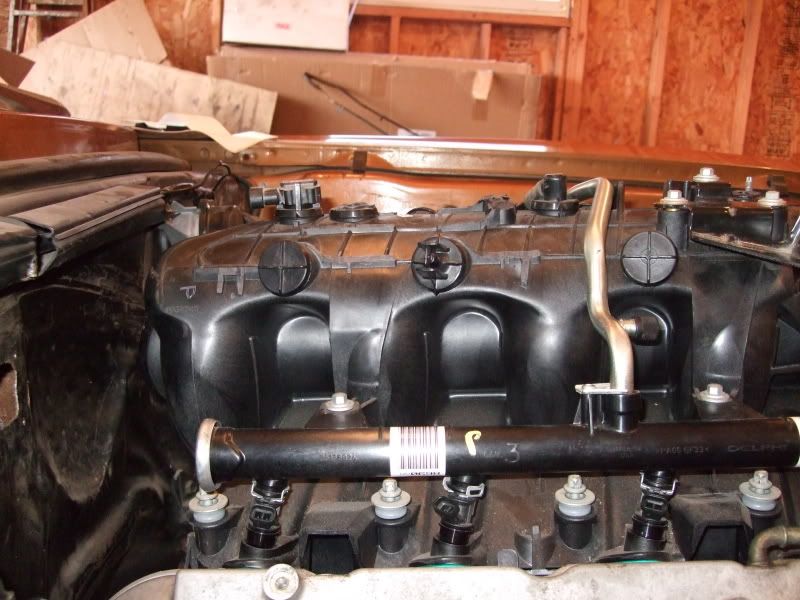
This one shows how I have been working to smooth off the truck intake.
And some shots of the front brakes and master

My Edelbrock LT's should be shipping tomorrow and my order has been placed with Speartech for the wiring harness and PCM. UPS should be bringing me my Kwik Performance brackets later this afternoon.
I need to get my flywheel on the engine and mount the clutch and bellhousing. I can take my measurements for the Hydraulic throw out bearing and get that ordered.
I hope to get brake lines bent on my weekend and sort out the last of the wiring in the dash.
Here are some pics with the motor in.
This one shows how I have been working to smooth off the truck intake.
And some shots of the front brakes and master
Trending Topics
04-09-2009 | 07:04 AM
#8
Thread Starter
Teching In
Joined: Mar 2006
Posts: 35
Likes: 0
From: Wisconsin
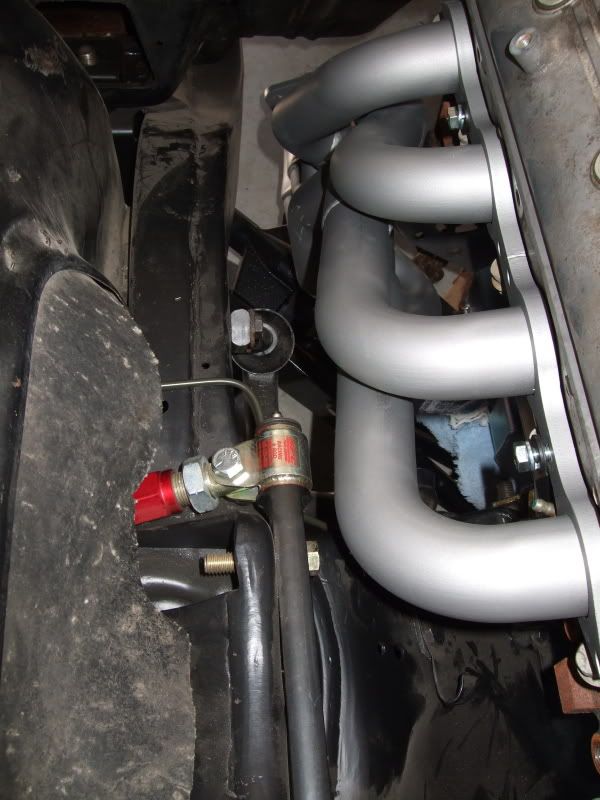
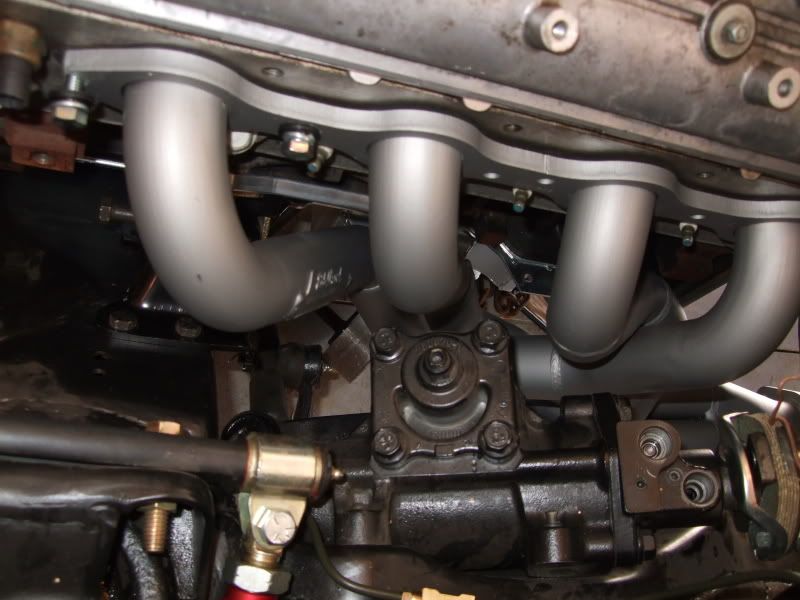
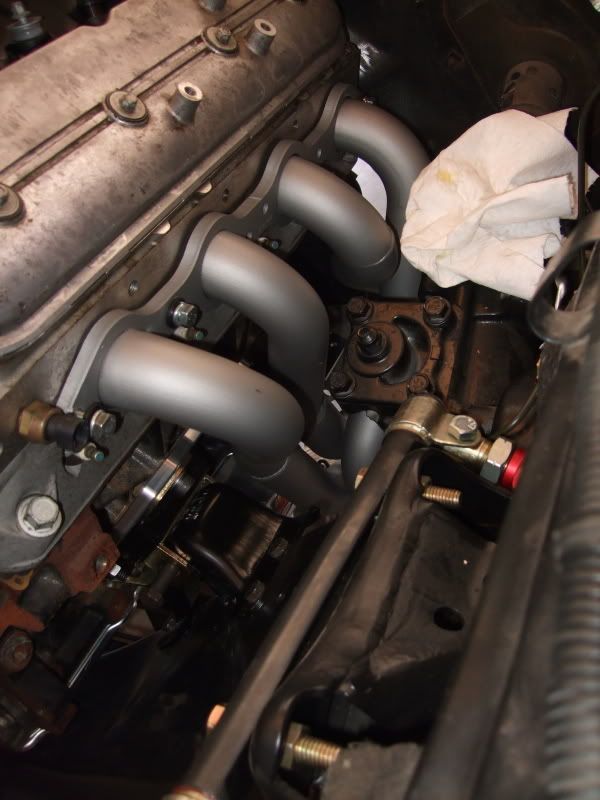
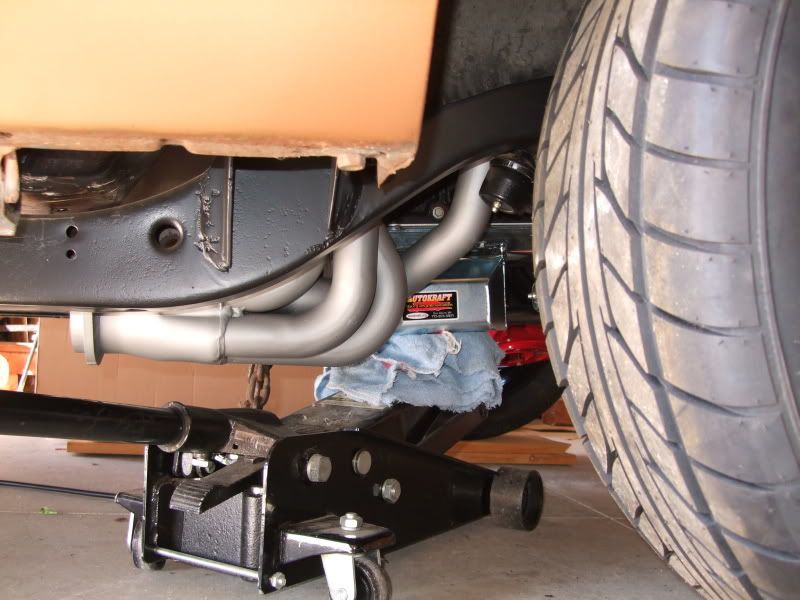
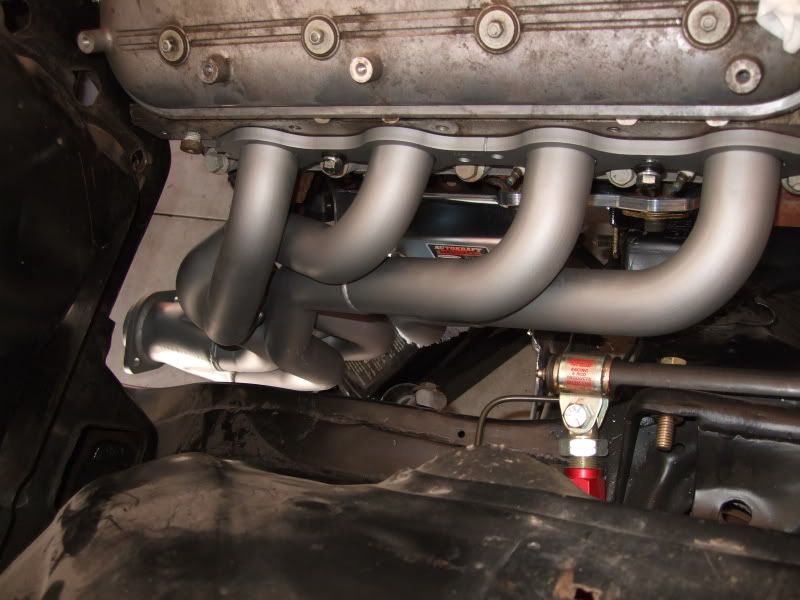
So I got my Edelbrock headers for my swap and I am fairly impressed. The flanges and tubes are nice and heavy and the weld quality looks nice too. The coating seems substantial enough to not get dinged on installation and has a flat gray color. We dropped the motor in last night and the headers fit without problems. There was over 1/2" of clearance around the steering box and they didn't hang down much below the oil pan or bellhousing (so about even with the front cross member.
My only complaint is the O2 bungs didn't come welded on. I wish they offered that as an option. That way I wouldn't have to weld through the coating and mess up the finish.
Here are some pics during the test fit.
My only complaint is the O2 bungs didn't come welded on. I wish they offered that as an option. That way I wouldn't have to weld through the coating and mess up the finish.
Here are some pics during the test fit.
04-09-2009 | 03:35 PM
#11
Thread Starter
Teching In
Joined: Mar 2006
Posts: 35
Likes: 0
From: Wisconsin
I didn't get any pictures from that angle. I am pretty sure there was a 1 or so of clearance but I didn't get it on film. I am working on the car at a shop about 20 minutes away so I will get better measurements next time I am down there.
Mike
Mike
 05-23-2009 | 09:56 PM
#15
Thread Starter
Teching In
Joined: Mar 2006
Posts: 35
Likes: 0
From: Wisconsin
I have been swamped at work lately but have gotten some work done. I have the motor and tranny connected and in. The cross member is still out because going to 1/2 height body bushings means I will need to slightly modify it to work.
My computer and harness showed up from Speartech and everything snapped right into place. I am still having a bit of an issue figuring out the wiring for the alternator (lots more threads to read apparently).
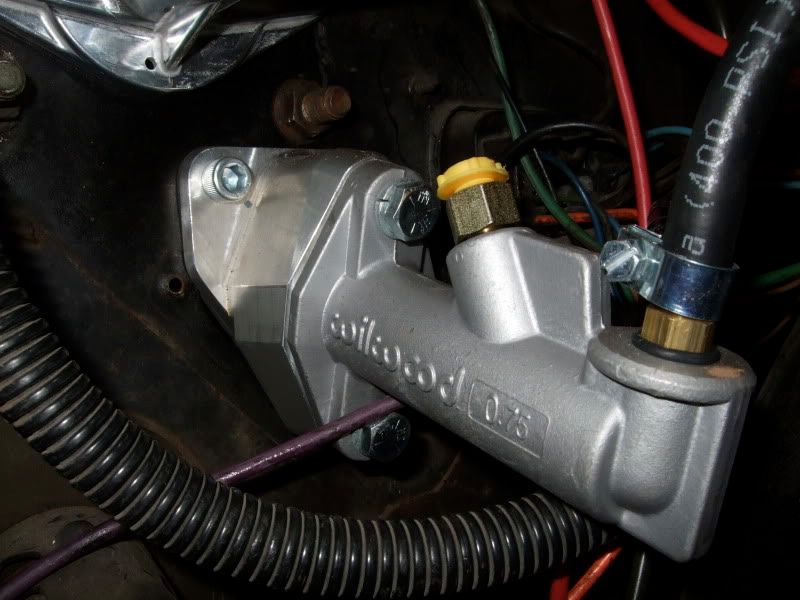
I have my clutch master hooked up and just need to run the power line and bleed it.
I need to finish wiring my fans but they are in and mounted.
Here are some pics.
Clutch master
My computer and harness showed up from Speartech and everything snapped right into place. I am still having a bit of an issue figuring out the wiring for the alternator (lots more threads to read apparently).
I have my clutch master hooked up and just need to run the power line and bleed it.
I need to finish wiring my fans but they are in and mounted.
Here are some pics.
Clutch master
06-11-2009 | 04:15 PM
#17

Teching In
Joined: Mar 2009
Posts: 10
Likes: 0
From: Shreveport, Louisiana
HElp!!!! i am doing the same swap... I ran into the same problem with the autokraft mounts not lining up right. I kinda get what your saying about the frame mounts then again i dont. I ordered stock v8 frame mounts because the car had a str8 6 in it. So do i just replace the passenger side frame mount with a drivers side or what do i do?? I guess i could just grind out the holes but i really dont wanna do all that.. Can you please explain to me what you did.
06-11-2009 | 06:53 PM
#18

Joined: Mar 2003
Posts: 10,221
Likes: 1,510
From: The City of Fountains
06-12-2009 | 06:31 AM
#19

Couple tips for you since I used similar parts on my build
Install the gaskets on the headers and torque them down to check true fitment. I had some issues after first startup that I did not notice because the headers appeared to fit loosely.
#2-Depending on your leverage ratio, the .750 master might be a little large. I had that one in my chevelle and the throw was way short making the engagement point a little tricky. I have the .700 and I think I would have liked the .650.
#3-Make sure you install the flanges on the collector tubes before you weld the O2 bungs on. Dont ask me how I know.
#4-Keep an eye on your clutch res inlet. I used this same setup with the o-ring and had problems with it leaking after I drove it. You would think no pressure it would be fine. Unfortuately after the booster is in place, its a bitch to get at. I broke down a purchased this. http://www.pegasusautoracing.com/pro....asp?RecID=902
06-12-2009 | 01:46 PM
#20
Joined: Mar 2003
Posts: 10,221
Likes: 1,510
From: The City of Fountains
Andrew