
48' Willys CJ2A Jeep LR4 4.8L swap and buildup.
 03-11-2009, 02:13 PM
#1
Teching In
Thread Starter

Join Date: Oct 2008
Location: Langley B.C. Canada
Posts: 29
Likes: 0
Received 0 Likes
on
0 Posts
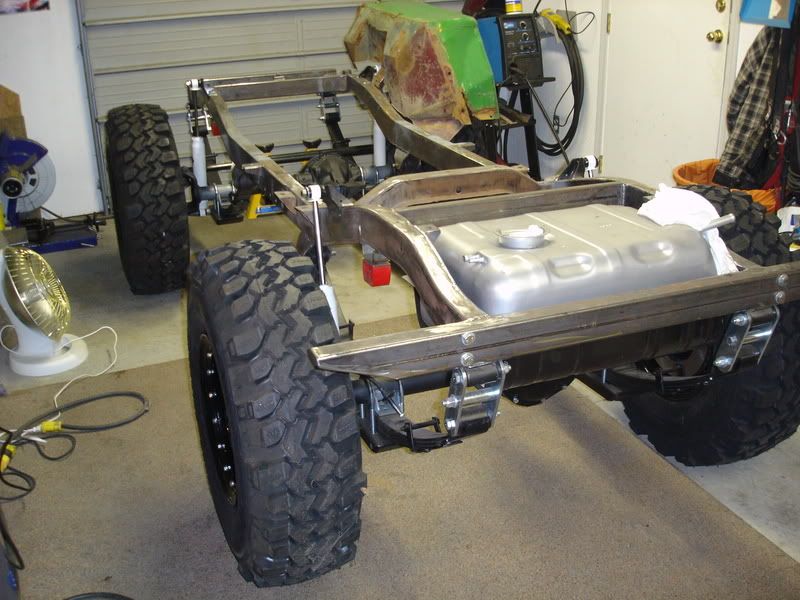
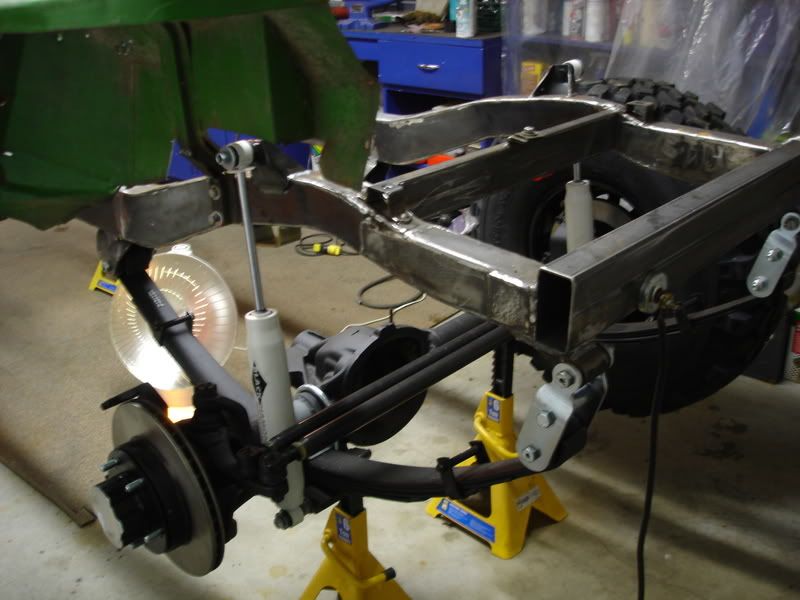
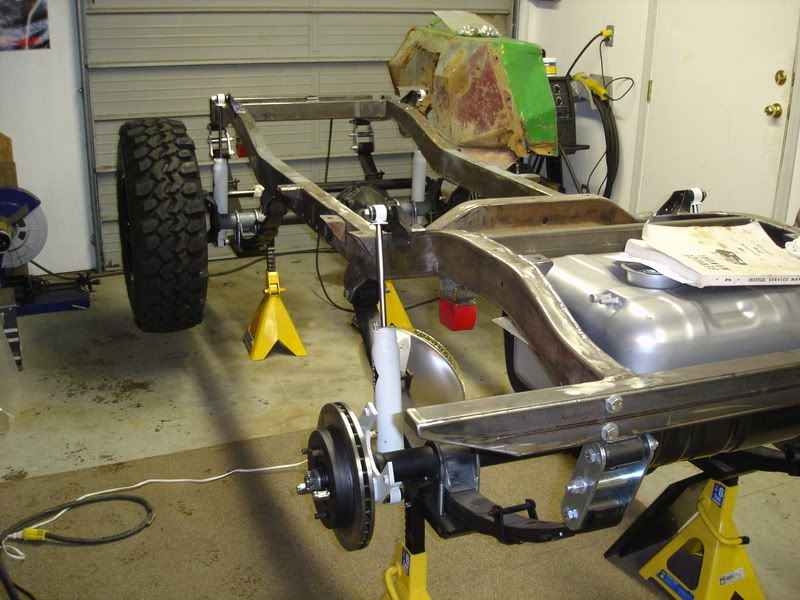
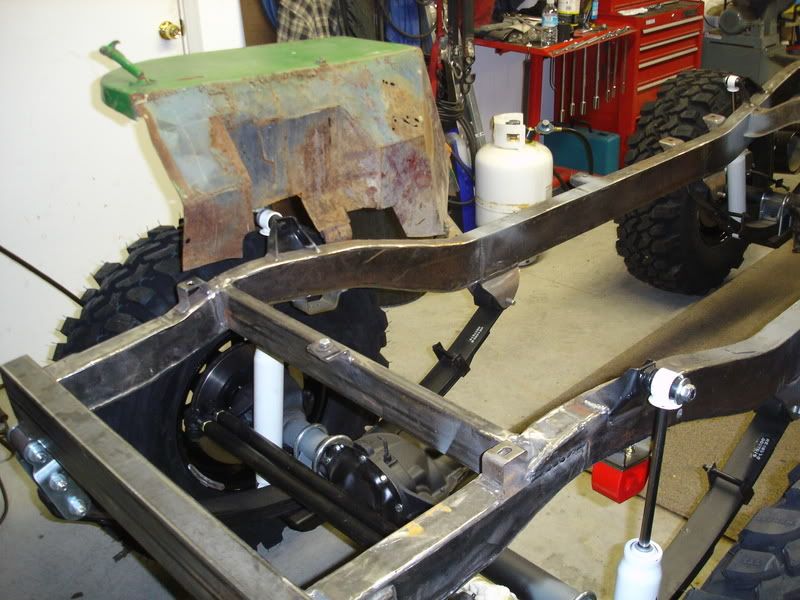
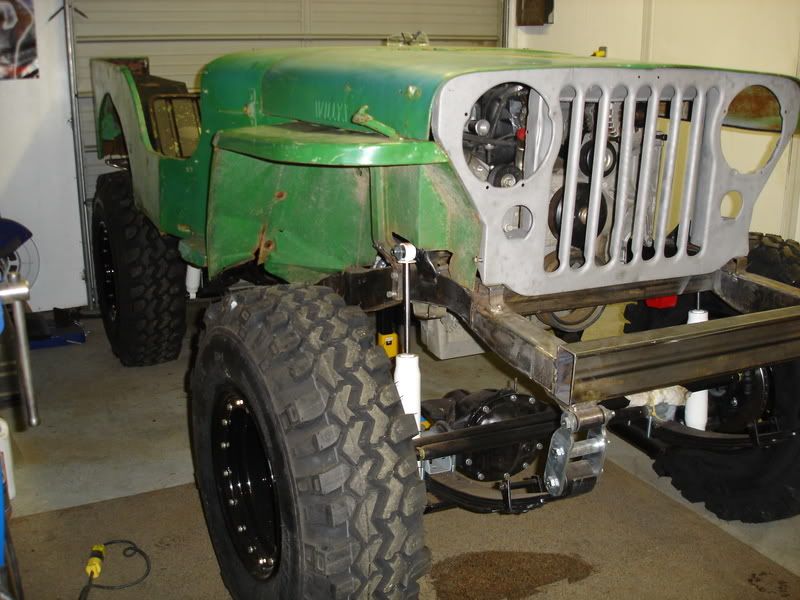
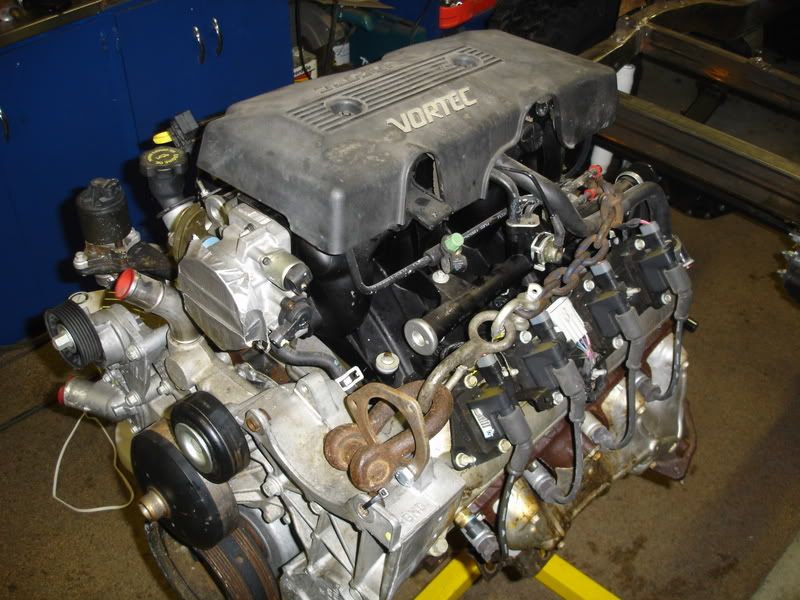
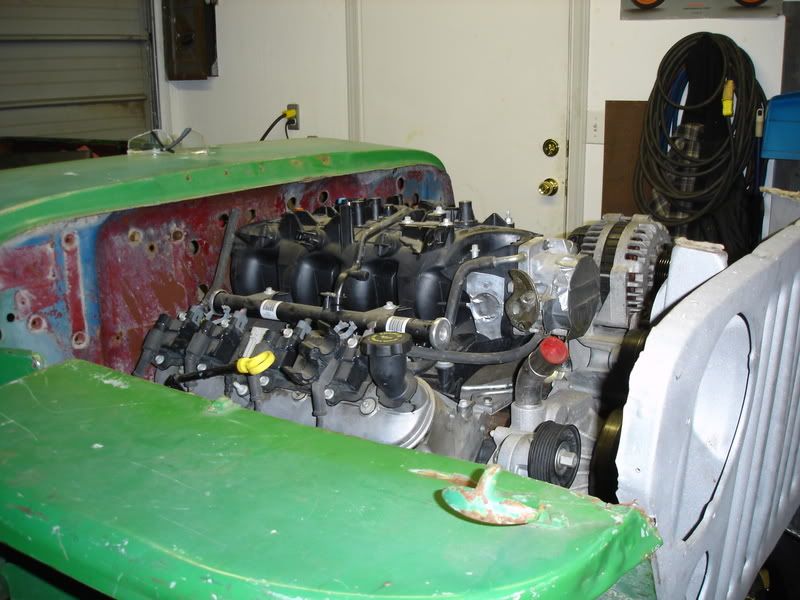
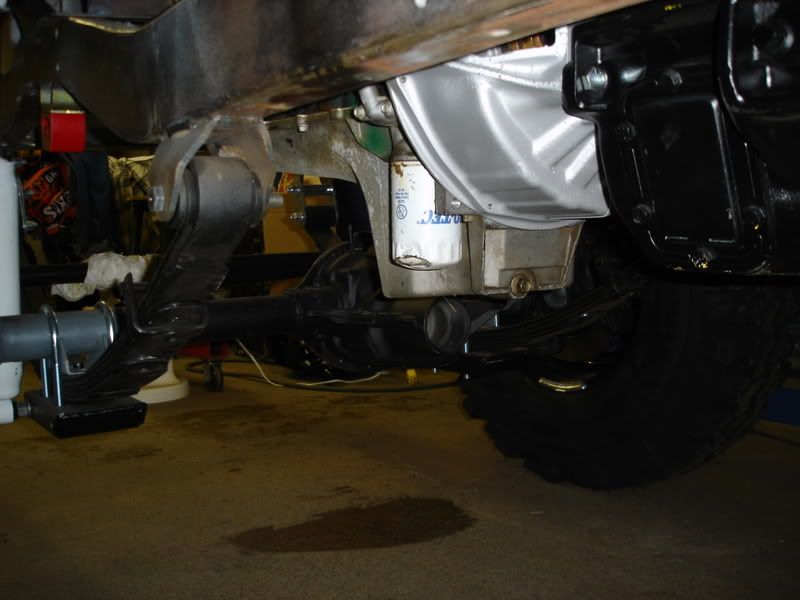
I have gotten far enough along on my project to talk about it and show some pictures so I though I might as well start my thread. I have a 48' ****** CJ2A Jeep that I am putting together as a kind of restified wheeler. I bought it as a project in pieces so I have never seen it assembled. I started by stripping down the sandblasted frame and boxing it as well as adding a couple new crossmembers and new suspension. I assembled the new springs and installed a AMC era narrow track Jeep Dana 30 front axle along with a 60's Jeep Dana 44 rear with 4:11 gears. I picked up a 35,000 Mile 4.8L LR4 from a 2000 Chevy Silverado P/U on ebay from LKQ for $300 it was dressed with accessories and injection but missing the starter, MAF sensor and harness. The other bonus was that this was a stick shift truck and the engine came with the flywheel and clutch. This works out well as I am installing a GM SM465 4 speed truck transmission behind it. I am not sure what parts GM used behind the engine in those trucks but I did some comparing to a traditional SB Chevy with the flywheel installed and everything seems to be the same dimensions.as far as the flywheel surface to the bellhousing flange and the pilot bearing works perfect with my transmission as well. The clutch is the same spline for the disk so I plan to use the clutch as is. I don't have a clutch fork or throwout bearing so I will still have to figure out what to do there. I had assumed that I would have to figure some clutch stuff out as I thought that the flywheel surface would be .400" to far away from the tranny to work correctly. Did GM use some conversion pieces for the older Std. trannys as well as the autos for the first couple of years? Anyway behind the tranny I am using an advanced adapters adapter to the Dana 18 transfer case. In the last couple of weeks I have been placing the engine in the frame and building the engine mounts as well as a tube frame crossmember to protect and support the tranny and transfer case. Here are some pictures so far. There is also a complete buildup located here. http://www.earlycj5.com/forums/showthread.php?t=60125
Greg
Greg
 03-11-2009, 02:44 PM
#2
Teching In
Thread Starter
Join Date: Oct 2008
Location: Langley B.C. Canada
Posts: 29
Likes: 0
Received 0 Likes
on
0 Posts
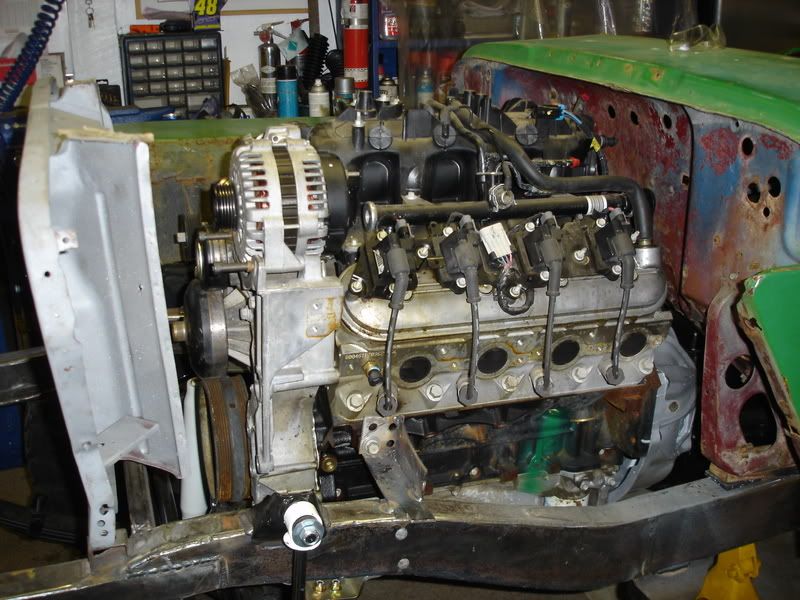
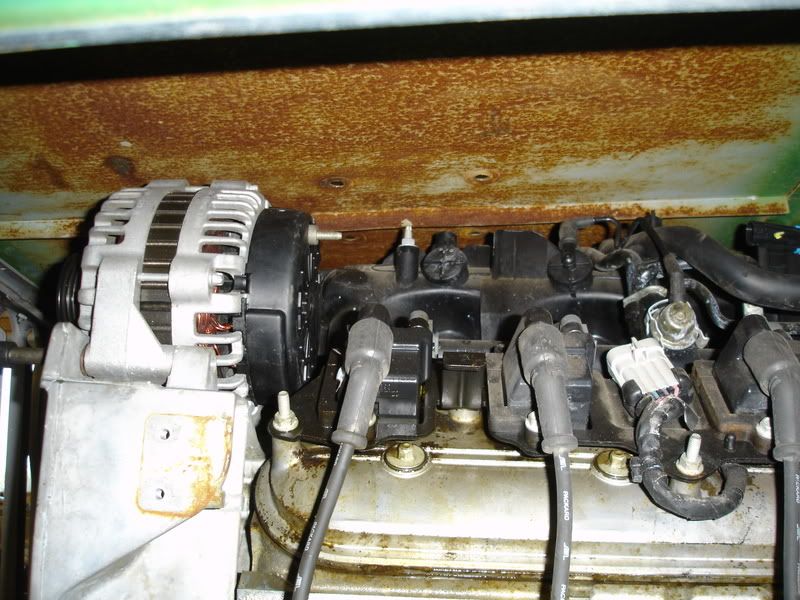
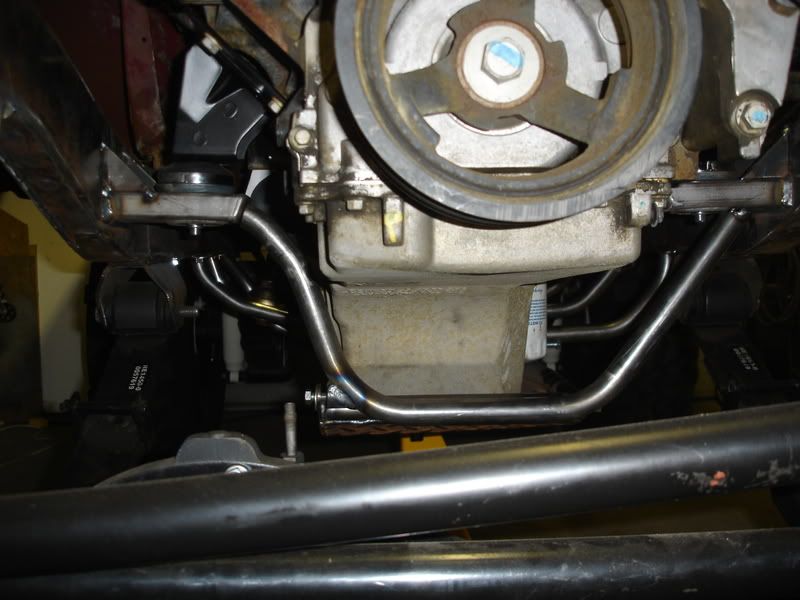
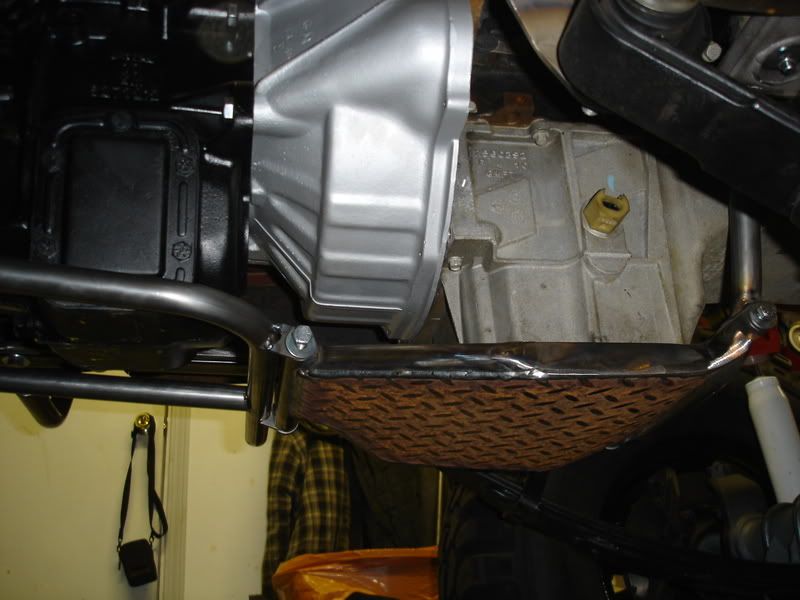
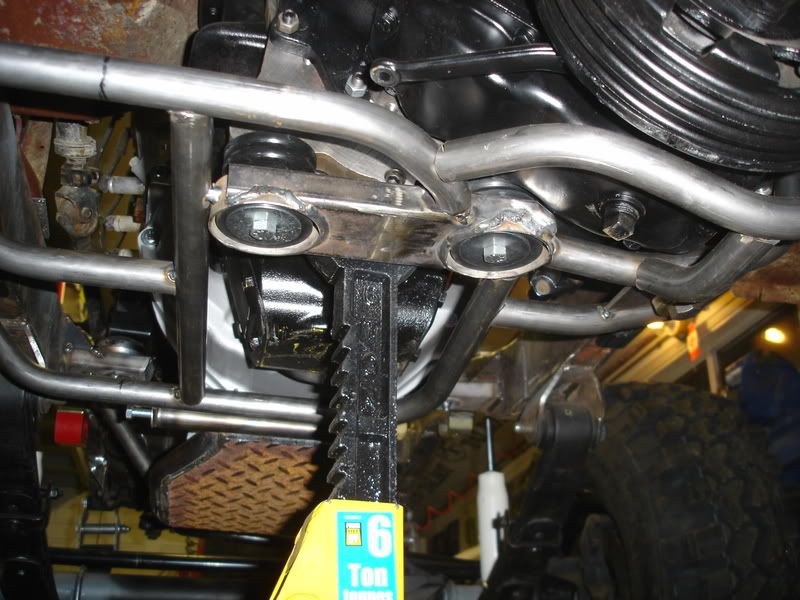
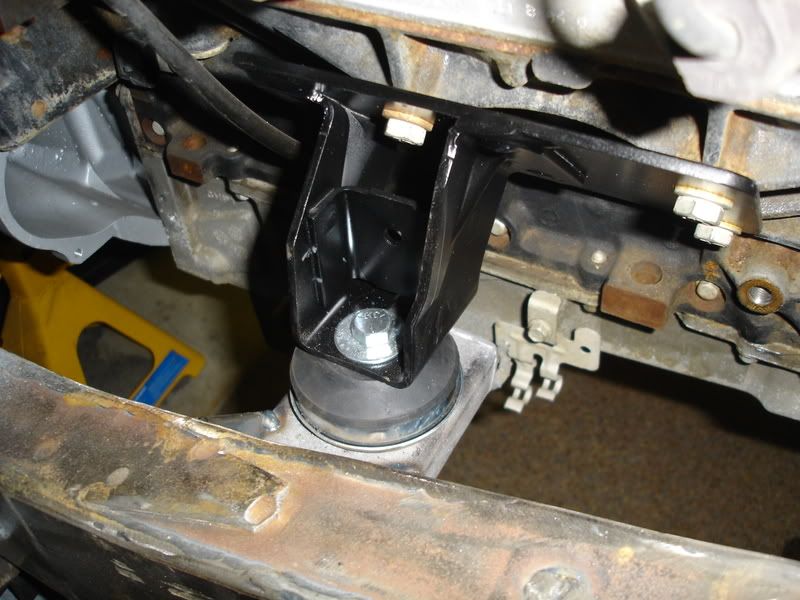
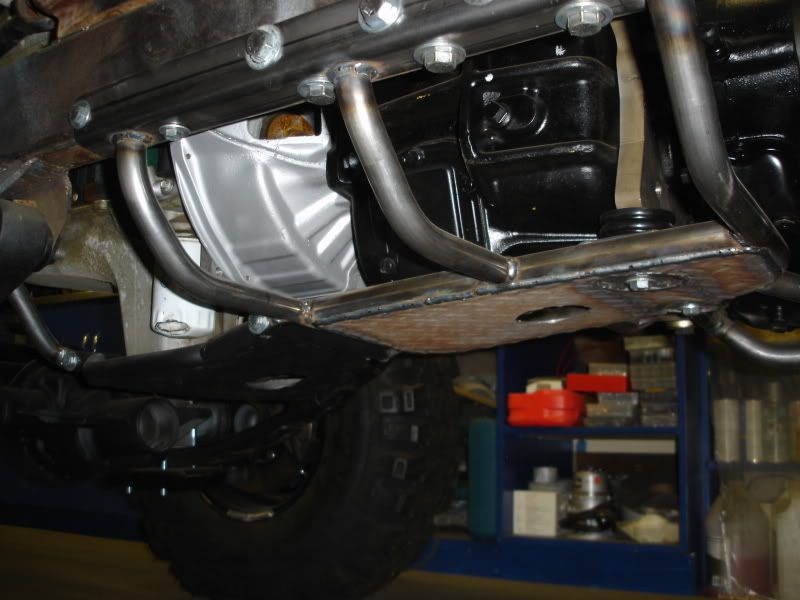
I am currently working on engine mounts and my crossmember as I have the driveline where I want it in the chassis. I ended up using street rod style biscuit engine isolators with my own fabbed brackets. I used some steel plate to bolt to the 4 bolts on the engine and then ended up using some frame brackets for a Mazda B2200 that I had laying around and welded them together. The frame brackets are made of 1x3" tubing. For my crossmember I used the rubber isolators that came with the adapter kit as well as a biscuit isolator for the torque mount on the far side of the Dana 18. Then I made a tube frame from 1"x .120" Dom tubing and a tubing bender to bend up a frame for support as well as for belly protection. I also built a bolt on skid plate that protects the engine oil pan. It all turned out pretty good but I still have some finishing to do as far as welding and plating. Here are my pictures of the engine install.
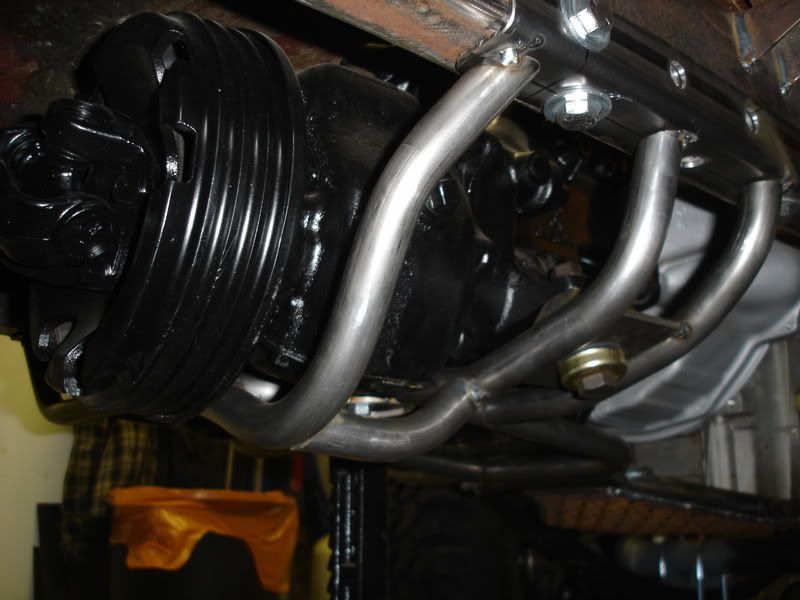
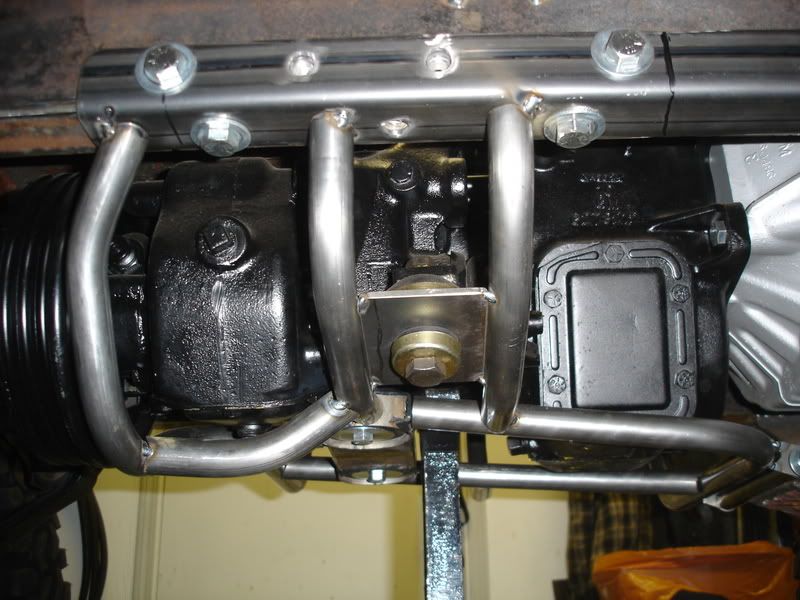
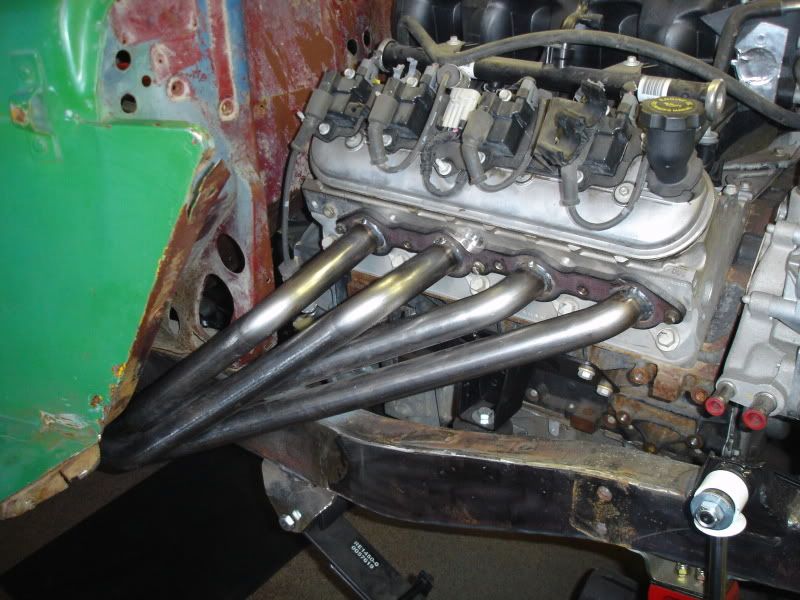
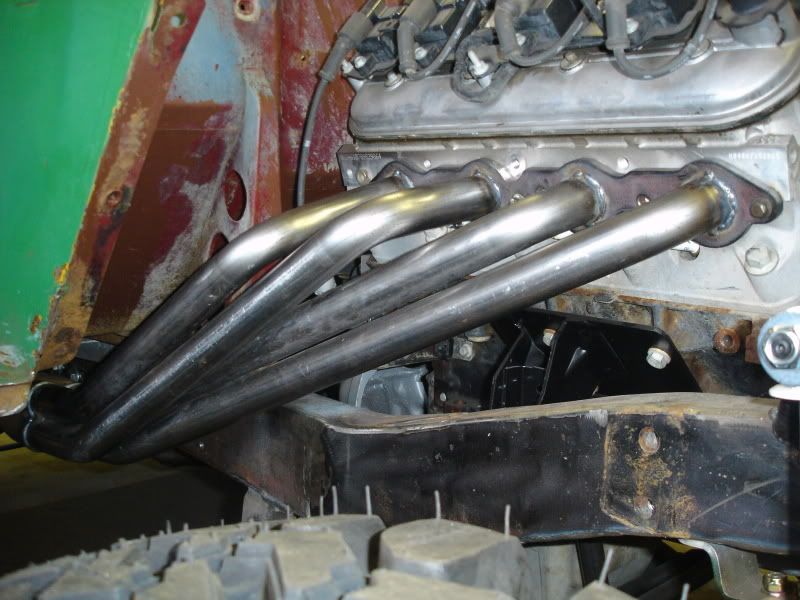
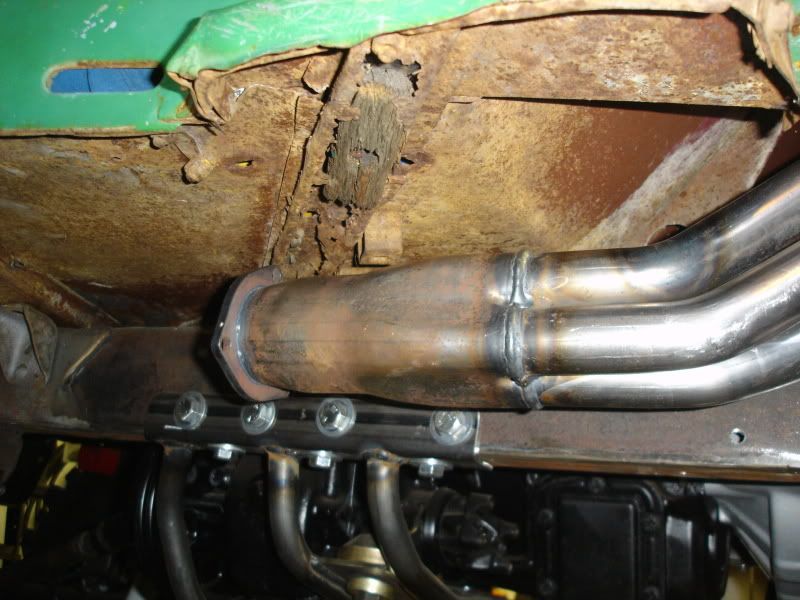
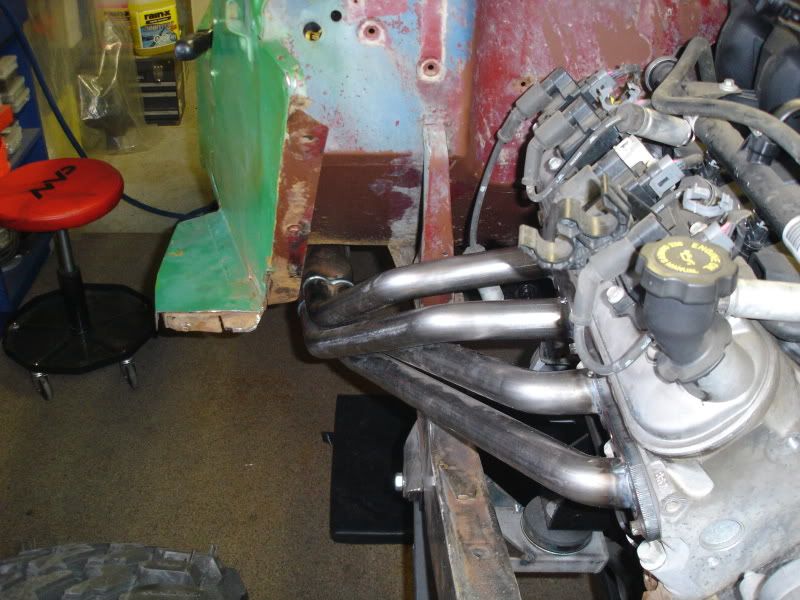
For exhaust I am planning on purchasing some Advanced Adapters Flatfender headers for a Small block Ford and just cutting the flanges off and installing LS1 style flanges. I love the fenderwell style headers and they will give me the most room for exhaust.
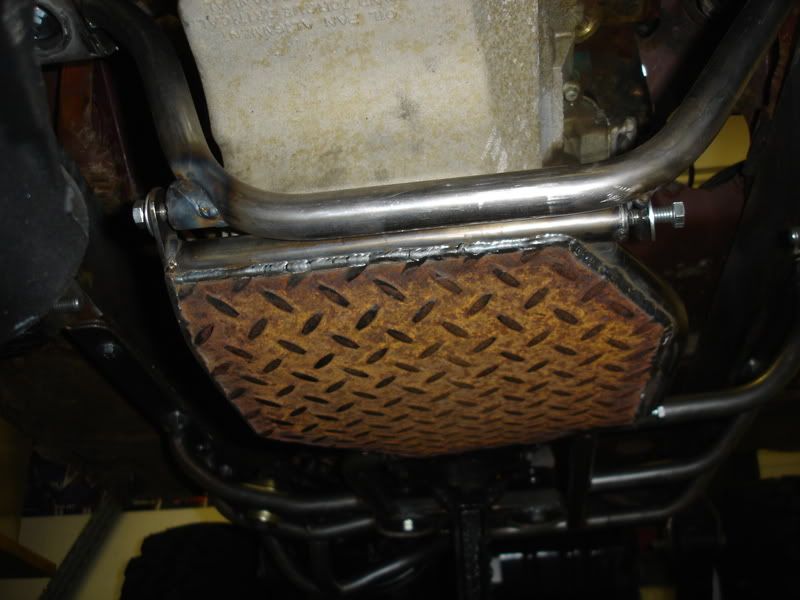
The center section of this will be filled with diamond plate like the forward section.

Greg
For exhaust I am planning on purchasing some Advanced Adapters Flatfender headers for a Small block Ford and just cutting the flanges off and installing LS1 style flanges. I love the fenderwell style headers and they will give me the most room for exhaust.
The center section of this will be filled with diamond plate like the forward section.
Greg
 03-11-2009, 03:04 PM
#4
Teching In
Thread Starter
Join Date: Oct 2008
Location: Langley B.C. Canada
Posts: 29
Likes: 0
Received 0 Likes
on
0 Posts
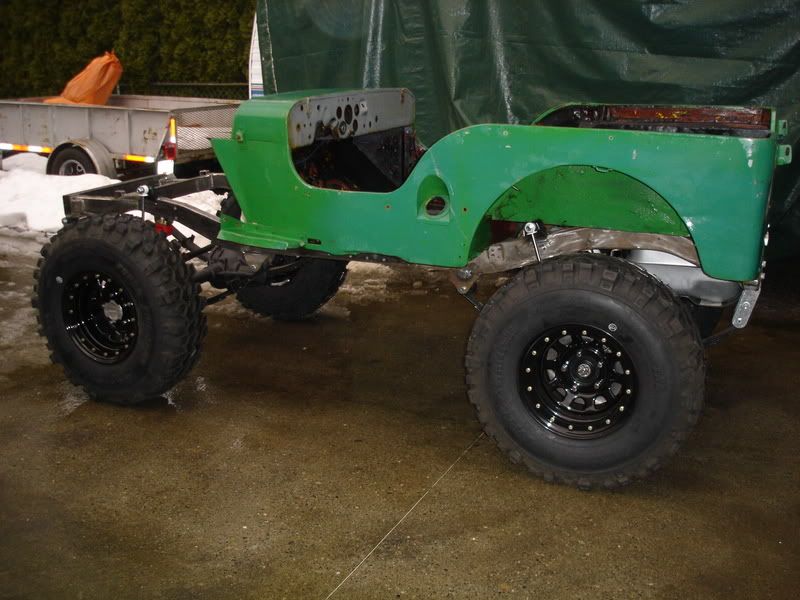
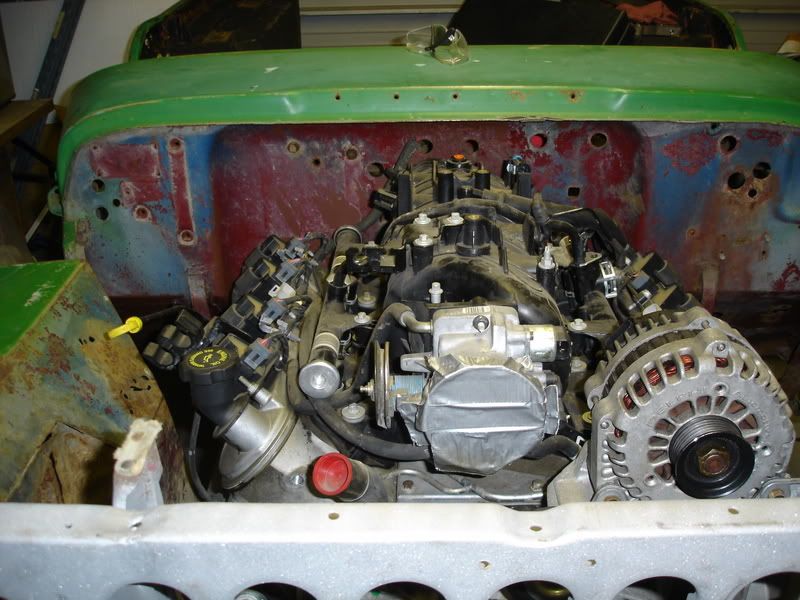
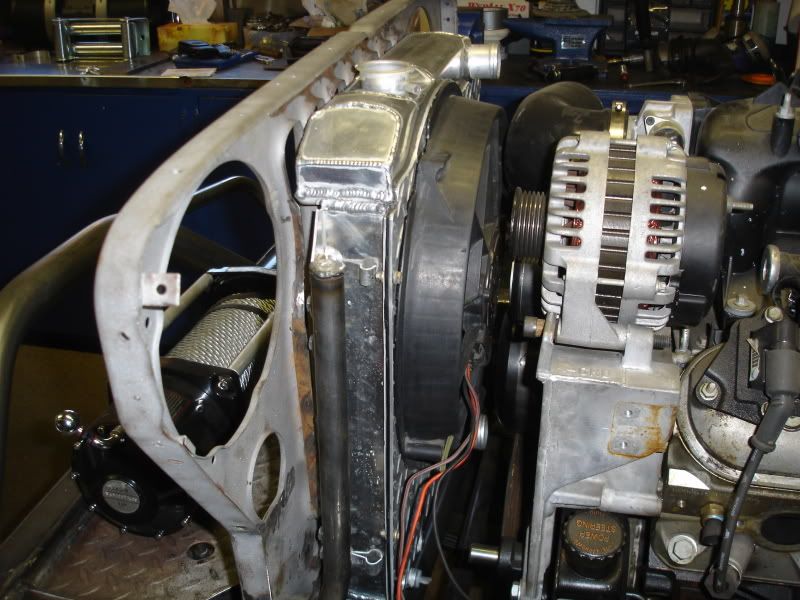
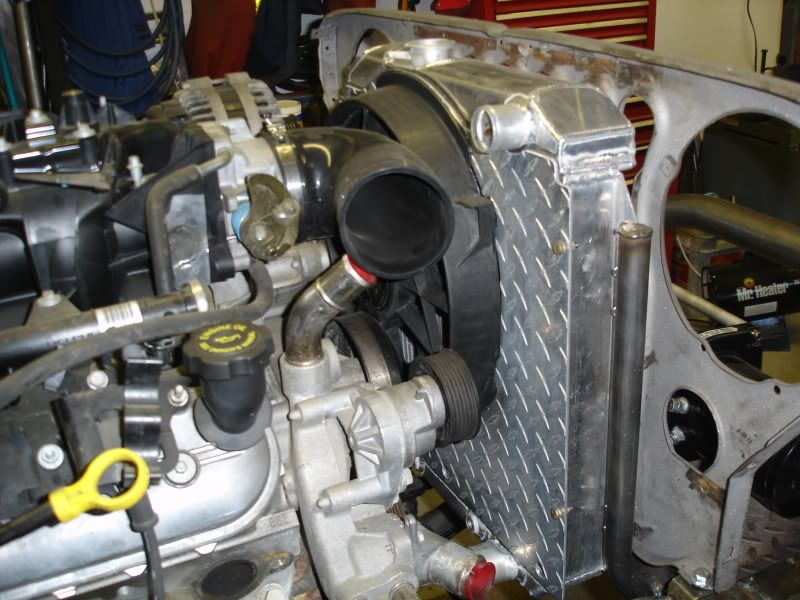
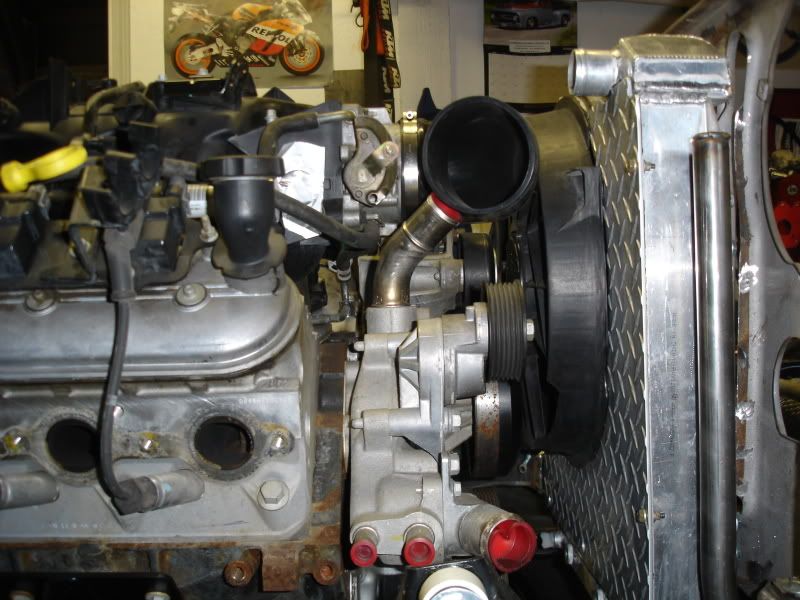
My plans for the engine are to run the truck intake, Oil pan and accessories. I am going to install a late LS1 cam that I picked up on ebay for $35 (I can't remember what the PN. is right now) with the fenderwell headers and modified K&N cold air kit from a Silverado that I have kicking around. I think that will be plenty for performance right now. I wanted a mild cam for good torque but wanted something a little more aggressive than the stock LR4 cam. I don't have the weight of a fullsize truck to get moving so this should work well. Then I am going to fit a 65/66 Mustang aluminum Rad tight to the Flatty grill and use an electric fan. I only have about 6" to fit a Rad and fan between the engine and grill so it will be a tight fit. I have a rad on order so i will probably work that out soon. I am also going to clean up and paint the engine before I install it for good in what will be a freshly painted chassis. Right now as I don't have a harness or computer I am planning on buying a one from Howell Engine Developments. For the fuel system I plan on running a feed and return line to the engine from the new rear tank that I installed. For a pump I am going to go with a Tanks Inc. pump and sump kit using the factory truck regulator on the rail. I am also going to have the original tank under the seat for extra fuel but I will just transfer it to the rear when needed. I have another year or so to go if I can keep finding money to move on the project. It has been fun so far. I can't wait to hear it run and drive it.
Greg
Greg
Last edited by avmechanic; 03-12-2009 at 01:06 PM. Reason: clarification
04-13-2009, 12:25 AM
#5
Teching In
Thread Starter
Join Date: Oct 2008
Location: Langley B.C. Canada
Posts: 29
Likes: 0
Received 0 Likes
on
0 Posts
I managed to find the time to get some more work done. I picked up my 65' Mustang rad off of ebay and it looks like it will work well. I like the position of the inlet and outlet both being on the passenger side. I will need to pick up a inlet thermostat housing from S&P or something that faces straight down, then it will be an easy short rad hose with a 90 deg bend. The upper hose looks like it will be a problem though with the truck water pump. The upper fitting turns right into my intake elbow. I don't think it will work using a car water pump either as the hose will come out below the intake elbow and then not be able to get to the rad. I think I will just cut the upper fitting and Tig weld it back together allowing clearance for my intake elbow. I made the rad mount directly to the frame with some 1" tubing. I also made a rad shroud and mounted a Ford Taurus electric fan to it. It seems to pull air through quite well. There is only about 1/2" between the shroud and rad core so the the bottom right of the rad flows a little less air because of the fan position. I ended up with about a 1/2" clearance between the fan motor and the water pump pulley so I think I used the space about as wisely as I could.
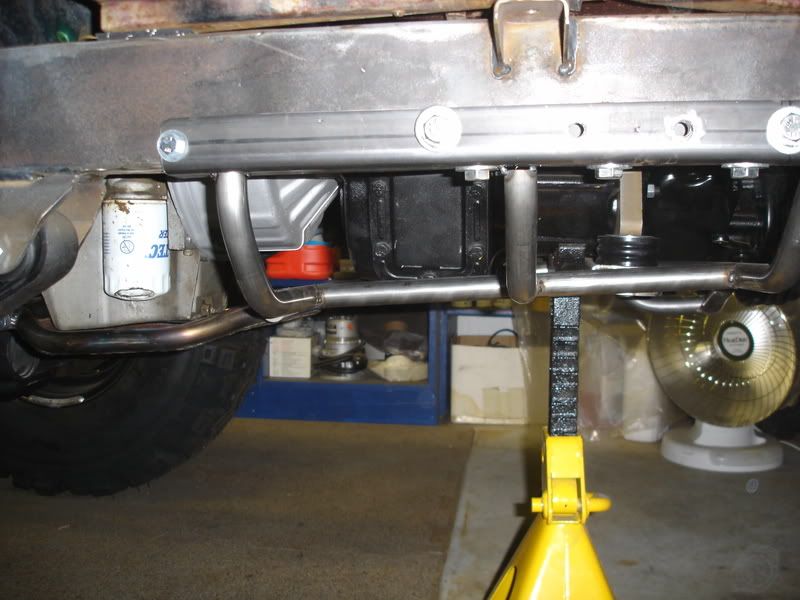
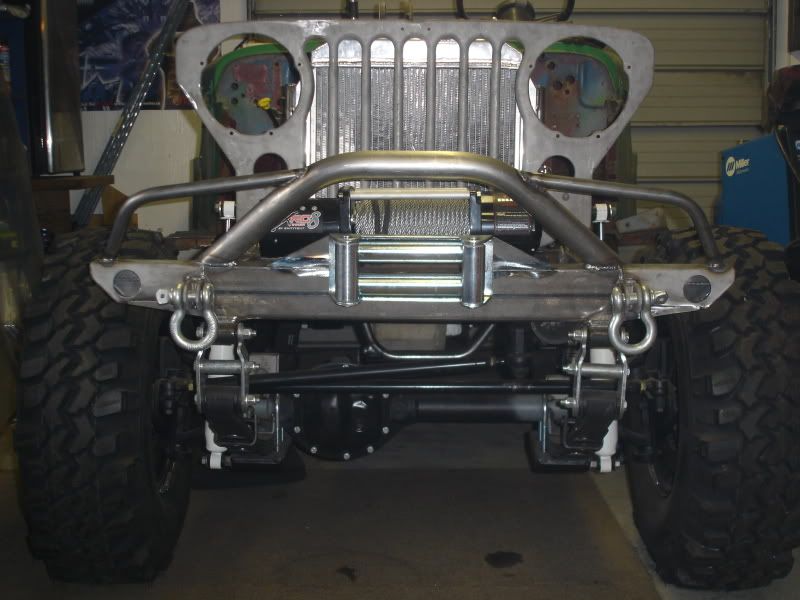
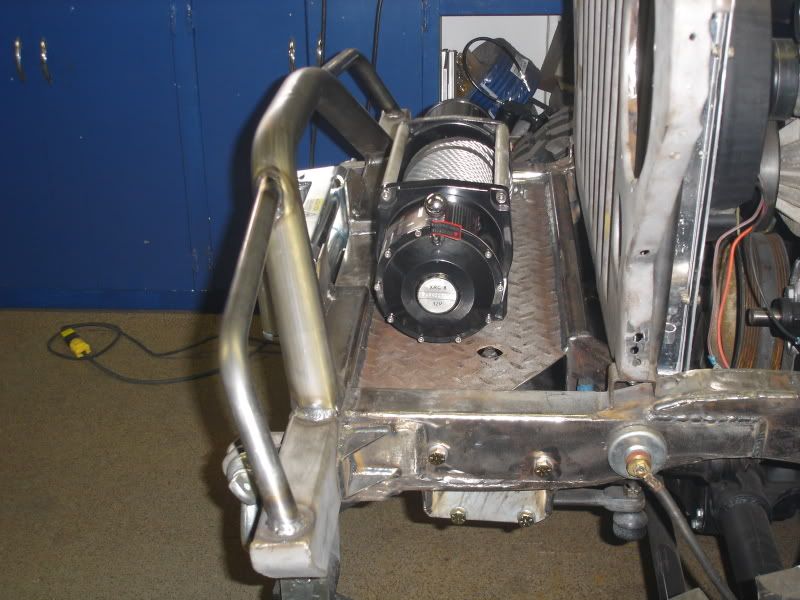
I also finished welding up my front bumper and crossmember which I feel turned out pretty good.

My next project that is engine related is to build my headers. I am going to order the Advanced Adapters headers for a Flatty with a small block Ford.

I am then going to cut the flanges off of them and weld LS flanges to them. Hopefully I won't need to do a whole lot of other mods to make them work. I will probably order the headers soon but first for my next weeks project will be to weld up a rear bumper and tire carrier.
Greg
I also finished welding up my front bumper and crossmember which I feel turned out pretty good.
My next project that is engine related is to build my headers. I am going to order the Advanced Adapters headers for a Flatty with a small block Ford.
I am then going to cut the flanges off of them and weld LS flanges to them. Hopefully I won't need to do a whole lot of other mods to make them work. I will probably order the headers soon but first for my next weeks project will be to weld up a rear bumper and tire carrier.
Greg
05-28-2009, 12:01 PM
#7
Teching In
Thread Starter
Join Date: Oct 2008
Location: Langley B.C. Canada
Posts: 29
Likes: 0
Received 0 Likes
on
0 Posts
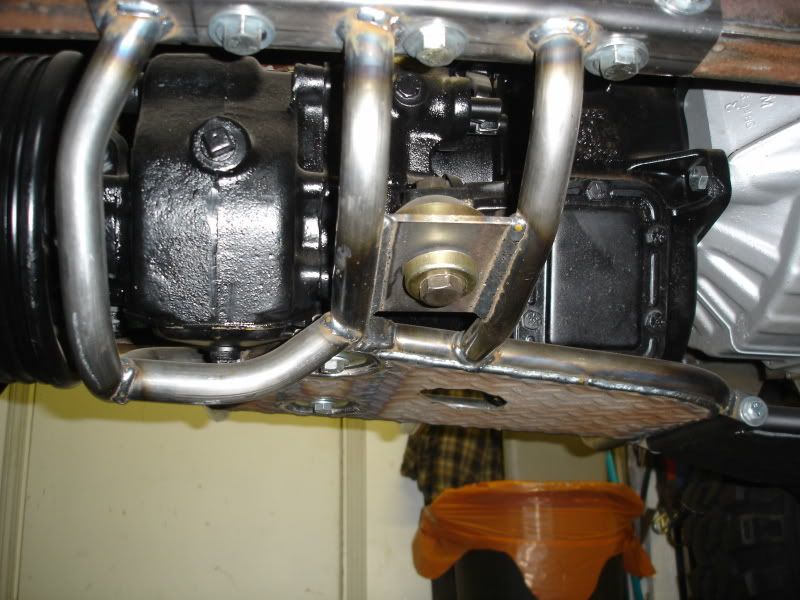
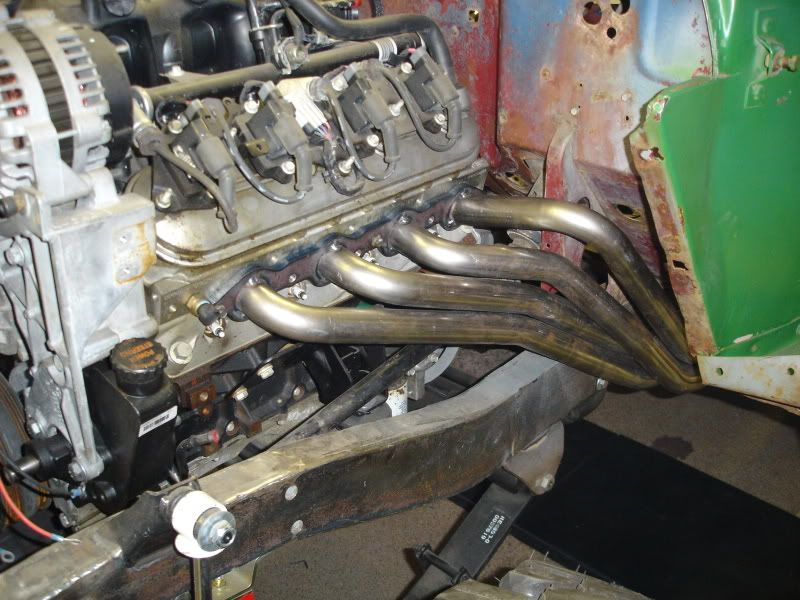
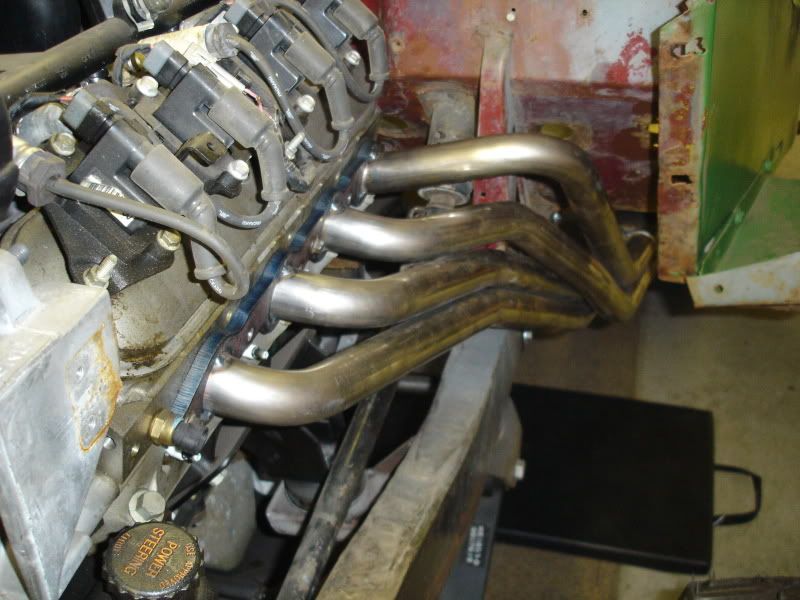
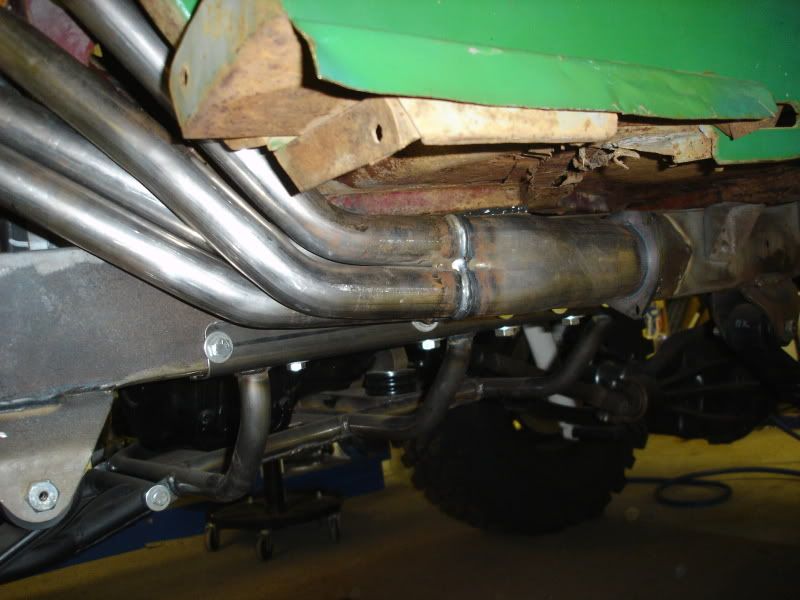
It's been a little while since I have posted any pictures and updates so I though I would pass on what I have been up to. I have had a lot going on at home so I don't have a lot to show. I have been working on my headers as well as building a back bumper and tire carrier. As I mentioned before I bought a pair of Advanced Adapters headers for a flatty with a Small Block Ford engine. I cut the SBF head flanges off of them and welded on GM LS1 style flanges on. I had my wife's cousin cut me some GM LS1 flanges on a pattern cutter oxy/acetylene system using the old exhaust gaskets as my pattern. He cut them out of 3/8" mild steel. They turned out great. I ended up trimming a 1/2" of the upper tubes away on the left side to have the outlet of the header end up where I wanted it. On the right side I cut about 3" off of the upper tubes before putting the flange back on to get the header outlet where I wanted it on that side. They are not exactly symmetrical but close enough. I think the headers are going to work out well. I just need to weld on some O2 bungs in the collectors and I will call them good. I will probably get them ceramic coated before they go on for good as well.
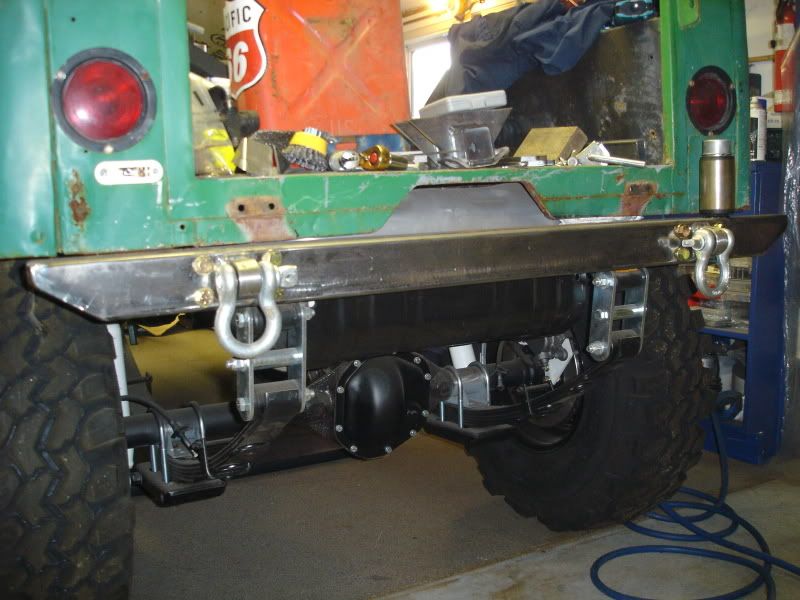
The other project that I have been working on is the back bumper and tire carrier. I have the basic bumper built out of 2"x3"x 1/8" HSS tubing and the tire carrier bearing installed as well as the shackle lugs made and welded in. I made the carrier bearing out of a trailer spindle and hub that I machined down on a lathe. I need to weld in the trailer hitch receiver, as well as add some back up lights into the bumper. Next up will be to build the tire carrier portion. Here is a picture of my progress so far.
Greg
Trending Topics

 06-14-2009, 09:32 PM
#10
Teching In

Join Date: Jan 2009
Location: missoula MT
Posts: 4
Likes: 0
Received 0 Likes
on
0 Posts
Thats an awesome build so far. Check mine out on youtube @ http://www.youtube.com/watch?v=QUSQoI_5n6g Let me know what ya think.
How much were the headers? I tried to make a set of long tube fords work 4 me but that was tom much hassle. I just got mine running but need exhaust figured out.
How much were the headers? I tried to make a set of long tube fords work 4 me but that was tom much hassle. I just got mine running but need exhaust figured out.
06-14-2009, 10:57 PM
#11
Teching In
Thread Starter
Join Date: Oct 2008
Location: Langley B.C. Canada
Posts: 29
Likes: 0
Received 0 Likes
on
0 Posts
Haha this is a cool build! Keep it up! What tubing bender you using, and nice fab work on the cradle!
Thats an awesome build so far. Check mine out on youtube @ http://www.youtube.com/watch?v=QUSQoI_5n6g Let me know what ya think.
How much were the headers? I tried to make a set of long tube fords work 4 me but that was tom much hassle. I just got mine running but need exhaust figured out.
How much were the headers? I tried to make a set of long tube fords work 4 me but that was tom much hassle. I just got mine running but need exhaust figured out.
Greg

 07-03-2009, 10:21 AM
#16
Teching In
Thread Starter
Join Date: Oct 2008
Location: Langley B.C. Canada
Posts: 29
Likes: 0
Received 0 Likes
on
0 Posts
 12-04-2010, 08:46 AM
#19
Teching In
Thread Starter
Join Date: Oct 2008
Location: Langley B.C. Canada
Posts: 29
Likes: 0
Received 0 Likes
on
0 Posts
I am still working at it when I can. I have had a busy fall with buying a new house and moving as well as working away from home and now have a baby due in December. I have just too much on the go for much time on the Jeep. Hopefully I will be back at it here and there over the winter or spring. I have gotten a fair bit done since my last reports here. I will try to do some updates. I have installed a reproduction body as well as a set of brake, clutch and gas pedals. I have also sorted out the top and am currently working on the roll cage and seating. I will post some pictures when I have a little time for a detailed post. Thanks for the interest.
Greg
Greg
12-04-2010, 09:08 AM
#20

I like the build! its going to be very nice. I plan to get one someday and do something similar. dont forget to pull the pan check it out. get that sucker primed good befor starting it! those things sit as it is and I like to fill the filter with oil so it gets oil flowing asap