


1997 Jeep Cherokee LS1 conversion

Thread Starter
On The Tree
Joined: Jun 2009
Posts: 194
Likes: 0
From: colorado Springs
New sparkplugs are installed and the headers are installed too...... Finally!
Too dark for pics, but the headers fit perfectly. The instructions for headers stated that no gasket is required but high temp RTV can be used. I installed a set of Fel-Pro- gaskets.
I'll start work on the rest of the exhaust after I find a shop that can mandrel bend some exhaust pipe for a reasonable price.
Thread Starter
On The Tree
Joined: Jun 2009
Posts: 194
Likes: 0
From: colorado Springs
I'm sorry that updates have been few and far between, but I've been busy with some other projects that are paying for this swap. Once I'm caught up I'll be able to make some more progress.
Finally decided on a shifter. I looked at the Lokar and Art Carr. I recently drove a TJ with a Lokar shifter and honestly I didn't like it at all.
Although the Art Carr is popular among the buddy crowd, I simply couldn't justify the cost...and they are fugly as well.
So opted for a shifter and cable from an 04 Blazer for under $40. Should be here in a few days. Gotta love Ebay!
Thread Starter
On The Tree
Joined: Jun 2009
Posts: 194
Likes: 0
From: colorado Springs
Well it turns out the ebay seller didn't know the difference between a Honda shifter and a GM floor shifter. No worries, he figured it out before shipping and I got my money back. Looking at few shifter options now.
Picked up some exhaust pipe today and should have pics of the new piping in a few days, weather and work permitting of course.
Decided to quit trying to re-invent the wheel and ordered a JB Conversions short shaft/SYE for an NP231C. This will allow me to keep the reluctor ring in the output of the t-case. It should be here in 5-7 business days.
Hopefully the PCM will be shipped out and returned in the next 7 to 10 days as well.
LS1 Tech Stories
The Best V8 Stories One Small Block at Time

6 Common C5 Corvette Failures and What's Involved In Repairing Them
Pouria Savadkouei
Retro Modern Bandit Pontiac Trans AM Comes With Burt Reynolds' Autograph
Verdad Gallardo
Top 10 Greatest Cadillac V Series Performance Models Ever, Ranked
Pouria Savadkouei
Top 10 Most Powerful Chevy Trucks Ever Made!

Hennessey's New Supercharged Silverado ZR2 Has 700 HP
Verdad Gallardo
Coachbuilt N2A Anteros Is an LS2-Powered C6 Corvette In Italian Clothes
Verdad Gallardo
Awesome K5 Blazer Restomod Comes With C7 Corvette Power
Verdad Gallardo
10 Camaros You Should Never Buy

10 LS Engine Myths That Refuse to Die
Verdad Gallardo Thread Starter
On The Tree
Joined: Jun 2009
Posts: 194
Likes: 0
From: colorado Springs
I spent the better part of today on the transfer case. Even though I had previously installed a 4 planetary low range from the Chevy NP231, I really wanted the increased strength of a 6 planetary. I could have scrounged around the junk yard for donor 231HD od a 241HD, I really wasn't to thrilled about the idea of tearing a t-case apart in the JY just for the low range. After getting some info from Pirate4x4 (http://www.pirate4x4.com/forum/showthread.php?t=854320) I opted to build my own use the parts I had on hand. I also received my JB Conversions NP231C Short Shaft SYE on Friday so the timing was right to do them both. A little walk-thru for those that might be interested...
Remove the t-case from the rig and find a spot to work on it.

Remove the tail shaft housing.

Note the difference in the VSS location. Jeep tail cone is in the foreground.

The VSS needs to come out in order to get to the bolt hidden behind it.


After removing the tail cone you'll find the 40 tooth reluctor ring for the VSS. Use a good quality set of snap-ring pliers to remove the lock-rings and slide the reluctor off.


Remove the oil pump making sure you don't lose the o-ring for the pick-up tube.

Remove all of the bolts holding the front and rear halves of the t-case together and then separate using a putty knife. This is a good time to pull the oil-screen and magnet for a thorough cleaning. Since my -t-case hasn't even had fluid in it yet I didn't need to do that.


Remove the front output shaft yoke.

Now the main shaft, chain, and front output can be removed.

Remove the mode fork, range fork, and the rail.

Remove the bolts holding the forward seal housing in place and pry the housing up.

Remove the t-case from the rig and find a spot to work on it.
Remove the tail shaft housing.
Note the difference in the VSS location. Jeep tail cone is in the foreground.
The VSS needs to come out in order to get to the bolt hidden behind it.
After removing the tail cone you'll find the 40 tooth reluctor ring for the VSS. Use a good quality set of snap-ring pliers to remove the lock-rings and slide the reluctor off.
Remove the oil pump making sure you don't lose the o-ring for the pick-up tube.
Remove all of the bolts holding the front and rear halves of the t-case together and then separate using a putty knife. This is a good time to pull the oil-screen and magnet for a thorough cleaning. Since my -t-case hasn't even had fluid in it yet I didn't need to do that.
Remove the front output shaft yoke.
Now the main shaft, chain, and front output can be removed.
Remove the mode fork, range fork, and the rail.
Remove the bolts holding the forward seal housing in place and pry the housing up.
Last edited by FrankZ; Jan 16, 2010 at 09:26 PM.
Thread Starter
On The Tree
Joined: Jun 2009
Posts: 194
Likes: 0
From: colorado Springs
Remove the snap-ring that retains the input shaft. Carefull! The input shaft and low range gear will fallout as soon as the snap-ring is removed.

Remove the large lock-ring in the low range housing in order to remove the input shaft.

At this point I had to use the pin and planetary gear as a makeshift jig so I could reinstall the two rows of needle bearings in the planetary. The two rows are seperated by a small washer.

After installing the planetary gears into the low range housing, use a cold chisel to stake the pins in place. Now you've got your own homebrew booty fab 6 planetary low range gear!
[IMG]http://i55.photobucket.com/albums/g138/FrankZ_2006/Vortec/IMG_3951.jpg[img]
Comparison pic of the OEM Chevy 32 spline main shaft and the JB Conversions short main shaft.
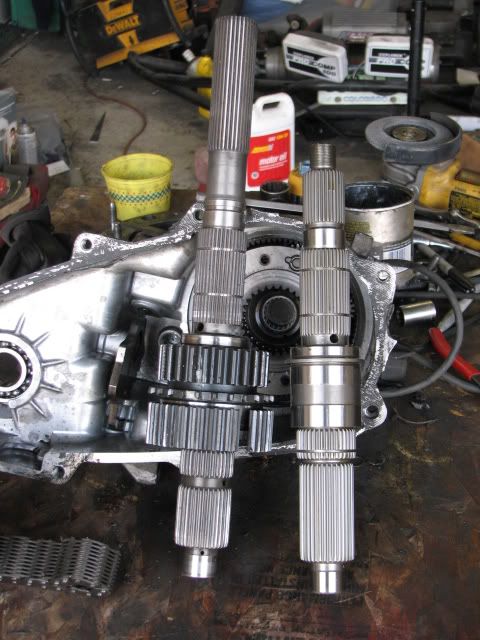
Remove the snap ring that retains the drive sprocket and the mode hub. Slip them off the the old shaft and onto the new short shaft.

Reinstall the input shaft into the lowrange, and then install those into the forward case half followed by the snap ring.

Re-install the mode fork, range fork, and the rail, followed by the front output shaft, chain and main shaft.


Re-install the magnet.

Don't forget that the oil pump goes on the outside of the rear half.
Hopefully you've been using a brass wire wheel in a drill to clean all of the mating surfaces. DO NOT USE STEEL WIRE WHEEL!!
Once your surfaces are clean it's time to add a little gasket maker. I strongly recommend.....

Re-assemble the two case halves.
Remove the large lock-ring in the low range housing in order to remove the input shaft.
At this point I had to use the pin and planetary gear as a makeshift jig so I could reinstall the two rows of needle bearings in the planetary. The two rows are seperated by a small washer.
After installing the planetary gears into the low range housing, use a cold chisel to stake the pins in place. Now you've got your own homebrew booty fab 6 planetary low range gear!
[IMG]http://i55.photobucket.com/albums/g138/FrankZ_2006/Vortec/IMG_3951.jpg[img]
Comparison pic of the OEM Chevy 32 spline main shaft and the JB Conversions short main shaft.
Remove the snap ring that retains the drive sprocket and the mode hub. Slip them off the the old shaft and onto the new short shaft.
Reinstall the input shaft into the lowrange, and then install those into the forward case half followed by the snap ring.
Re-install the mode fork, range fork, and the rail, followed by the front output shaft, chain and main shaft.
Re-install the magnet.
Don't forget that the oil pump goes on the outside of the rear half.
Hopefully you've been using a brass wire wheel in a drill to clean all of the mating surfaces. DO NOT USE STEEL WIRE WHEEL!!
Once your surfaces are clean it's time to add a little gasket maker. I strongly recommend.....
Re-assemble the two case halves.
Thread Starter
On The Tree
Joined: Jun 2009
Posts: 194
Likes: 0
From: colorado Springs
Install a snap-ring once the oilpump is in the proper position.

Now install the reluctor ring and the second snap-ring.

The JB kit comes with a new sealed bearing the replaces the OEM bearing in the outputshaft housing. Drive the old bearing out from the inside toward the outside.
The new bearing is easy to install but it must be installed with the protruding inner race towards the inside of the case.


The new bearing will protrude from the tailcone after it's driven all the way in.

Apply a liberal coat of grease to the new seal and then install the new seal housing onto the tail cone.
Install the new rubber gasket on the mainshaft, followed by yhr new yoke.

Finally, I re-installed my clocking ring onto the case and then re-installed the case in my heep.


Now install the reluctor ring and the second snap-ring.
The JB kit comes with a new sealed bearing the replaces the OEM bearing in the outputshaft housing. Drive the old bearing out from the inside toward the outside.
The new bearing is easy to install but it must be installed with the protruding inner race towards the inside of the case.
The new bearing will protrude from the tailcone after it's driven all the way in.
Apply a liberal coat of grease to the new seal and then install the new seal housing onto the tail cone.
Install the new rubber gasket on the mainshaft, followed by yhr new yoke.
Finally, I re-installed my clocking ring onto the case and then re-installed the case in my heep.

2 questions. What is that 231 out of. Is it the original from your jeep that you added the chevy output housing to? Also for the six gear planetary is that from a chevy case and if so which one. and lastly where did you get the extra planetary gears. Sorry more than 2 questions. If there is a link you can post to the info that would be awesome. Lookin good!
Thread Starter
On The Tree
Joined: Jun 2009
Posts: 194
Likes: 0
From: colorado Springs
Earlier in this thread I posted the original build of the hybred t-case (pages 3 & 4). I removed the planetaries from a spare NP231J lowrange and installed them in the 6 hole low range from the Chevy t-case (NP231C , mid 90's Blazer). HTH.
Thread Starter
On The Tree
Joined: Jun 2009
Posts: 194
Likes: 0
From: colorado Springs
Well it turns out that a Camaro shifter and cable was not the best choice. The shifter base plate needs severe modification to fit and the OEM cable is way to short. I'm going to scavange around the junky yard later today and see if I can find a cable in the 3-4' range.
Thread Starter
On The Tree
Joined: Jun 2009
Posts: 194
Likes: 0
From: colorado Springs
After trading a few PM's with a fellow XJ/V8 owner regarding his shifter/cable I opted to use a longer cable from a '01 Blazer. $10 at the JY. The cable is routed thru the firewall and makes a 180Deg turn near the bellcrank for the t-case. Once my shifter **** gets here I'll be able to bolt down the shifter. I'll post pics when thats done.
Finally got the exhaust pieced together.....it looks like ***, but I think it'll work.
Installed a front driveshaft from a V8 WJ onto the rear axle/t-case. Not sure if it's gonna work out though. It seems a bit short. I'll peel the rubber boot back tomorrow and have a closer look at the amount of exposed splines.
Found out my $25 dollar Engine Shield won't work on an 03 motor. Too bad, cuz it looked sweet proped up on the motor.
Thread Starter
On The Tree
Joined: Jun 2009
Posts: 194
Likes: 0
From: colorado Springs
A little more progress.
Got some more of the wiring cleaned up and the power stering lines connected. The module and harness for the DBW is also permanently mounted now as well.


Dual electric fans are installed and the radiator is back in place. I'll be picking the mating connector for the passenger side fan this week and fnishing the wiring for it.

Exhaust is done, extra booger welds enhance under vehicle turbulance......

Got some more of the wiring cleaned up and the power stering lines connected. The module and harness for the DBW is also permanently mounted now as well.
Dual electric fans are installed and the radiator is back in place. I'll be picking the mating connector for the passenger side fan this week and fnishing the wiring for it.
Exhaust is done, extra booger welds enhance under vehicle turbulance......
Thread Starter
On The Tree
Joined: Jun 2009
Posts: 194
Likes: 0
From: colorado Springs
Got started on the fuel system a few days ago.
I know that there are folks that have done 5.3L swaps and simply used their stock Jeep pump. I can't help but think that are missing out on some horses and torque as a result. I opted to use a Chevy pump ('03, 60 psi) in my heep vs. the stock pump (49psi).
I had a local machine shop mill a flange to allow the Chevy fuel pump assy. to be mounted in my stock gas tank using the OEM ring and pump seal. From left to right:
Clamping Ring, Fuel Pump Adapter Flange, OEM Jeep Pump Seal.

Made sure the seal was a good fit. Not too loose, not too tight.......juuuuusst right.

Applied a bead of Right Stuff gasket maker in the recess for the new pump assy.

Slip the flange onto the pump.

Install clamping ring using allen head bolts.

Install the pump into the tank and tighten down with the locking ring. (yes I did orient the nipples better before the final tightening of the ring.

Next up are the fuel lines, vapor canister, pump & pressure switch wiring, and installing the tank.
I know that there are folks that have done 5.3L swaps and simply used their stock Jeep pump. I can't help but think that are missing out on some horses and torque as a result. I opted to use a Chevy pump ('03, 60 psi) in my heep vs. the stock pump (49psi).
I had a local machine shop mill a flange to allow the Chevy fuel pump assy. to be mounted in my stock gas tank using the OEM ring and pump seal. From left to right:
Clamping Ring, Fuel Pump Adapter Flange, OEM Jeep Pump Seal.
Made sure the seal was a good fit. Not too loose, not too tight.......juuuuusst right.
Applied a bead of Right Stuff gasket maker in the recess for the new pump assy.
Slip the flange onto the pump.
Install clamping ring using allen head bolts.
Install the pump into the tank and tighten down with the locking ring. (yes I did orient the nipples better before the final tightening of the ring.
Next up are the fuel lines, vapor canister, pump & pressure switch wiring, and installing the tank.
Thread Starter
On The Tree
Joined: Jun 2009
Posts: 194
Likes: 0
From: colorado Springs
No pics this evening folks...sorry.
Spent a little time splicing wires and mating OEM Jeep tranny cooler lines to the 4l60 lines. Tranny is now ready for some fluid.
Fan belt is installed and a cheapy conical air cleaner is mounted to the MAF Sensor/throttle body. I had to put something on to protect the MAF and to give me an envelope to work within for routing the radiator hoses. More on that soon.
Hopefully the gas tank and fuel lines will go back in within the next couple of days.
Getting a little closer everyday.
On The Tree
Joined: Dec 2008
Posts: 165
Likes: 0
From: West Mich
That sender is a work of genius. Sounds like yours is coming along nicely. Mine had the pace of a glacier till recently. I'm wrapping loose ends up and going to start building the exhaust soon. I might be driving mine come summer. *Crosses fingers*