

Ls1 Miata
 11-01-2009, 08:18 AM
#21
Launching!
Thread Starter
iTrader: (3)

Join Date: Jul 2009
Location: New Jersey
Posts: 200
Likes: 0
Received 0 Likes
on
0 Posts

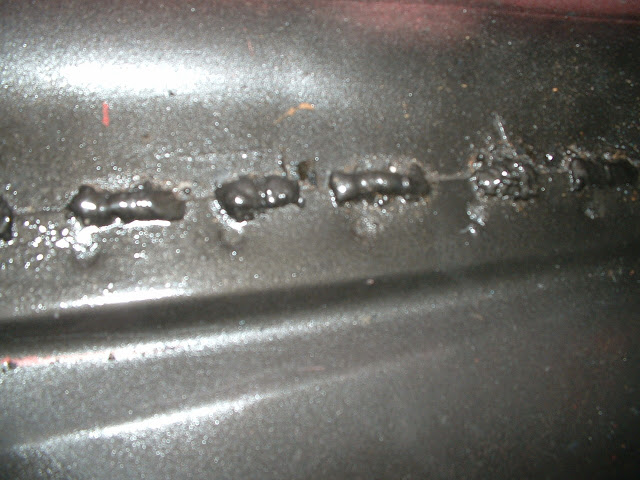
No I havent, but if that is the way it turns out then I dont want to, those look like crap. I would have atleast done some metal finishing to make them a little more astetically pleasing.
proper mig weld on 3/16 steel

the penetration from a proper weld, why would you need to weld again? all it does is weaken the metal

and incase you were wondering this is a tig weld

are you taking any classes on welding or are you just doing it yourself?
proper mig weld on 3/16 steel
the penetration from a proper weld, why would you need to weld again? all it does is weaken the metal
and incase you were wondering this is a tig weld
are you taking any classes on welding or are you just doing it yourself?
 11-01-2009, 09:10 AM
#22
11 Second Club
iTrader: (2)
Join Date: Dec 2008
Location: Hattiesburg, MS
Posts: 188
Likes: 0
Received 0 Likes
on
0 Posts
Okay, off of the weld topic. So far as the rear end setup- It seems to me that you are leaving a lot of area for flex in the torque arm. When you are transferring that much torque over that long of a distance, it is going to be hard to build something that isn't going to flex up into your gas tank. RX-7 guys use pinion snubbers in addition to solid delrin mounts in a lot of their builds. Even then they can have issues with wheel hop. You are almost certain to have flex like crazy.
I am actually about to go back and redesign my differential mounting, but i can assure you mine is way stronger as it sits right now. I simply built a crossmember to tie the 2 framerails together at the back and made a solid mount to extend forward 6" or so and bolt to it. It leaves you with the ability to adjust pinion angle and ease of removal... and my welds are better with a gasless MIG. lol Just picking on you. The part that i am re-doing is that i can't route my exhaust past the crossbar. I am going to be making a mounting point directly to the rear subframe, and incorporate a snubber type deal to help rid any possible upward flex in even a solid mounted setup.
Just wait til you drive the car. Right now you have no clue the stresses these parts are going to take.
11-01-2009, 11:05 AM
#23
Launching!
iTrader: (2)

Join Date: Nov 2004
Location: Newport Arkansas
Posts: 273
Likes: 0
Received 0 Likes
on
0 Posts
Thanks for the pics and the info, but if you read my other posts you'll know that I'm a very good welder when I'm using the proper equipment. Why grind down and weaken what people won't see? That second pic is an example some "extreme overkill penetration" that you were complaining about earlier. When you're using a bad welder and can't afford better, you have to compensate for it and work with what you have. Its not like I'm even jeopardizing the functionality of my welds or work, just the aesthetics part.
that is not extreme overkill penetration that is the proper amount. when you say extreme overkill penetration, i think extreme overkil undercut and falling out the back.....
you say you are very good but the welds I have seen, I wouldnt pay for, but that what seperates you from a backyard builder and a professional fabricator
11-01-2009, 06:58 PM
#24
Launching!
Thread Starter
iTrader: (3)
Join Date: Jul 2009
Location: New Jersey
Posts: 200
Likes: 0
Received 0 Likes
on
0 Posts
Okay, off of the weld topic. So far as the rear end setup- It seems to me that you are leaving a lot of area for flex in the torque arm. When you are transferring that much torque over that long of a distance, it is going to be hard to build something that isn't going to flex up into your gas tank. RX-7 guys use pinion snubbers in addition to solid delrin mounts in a lot of their builds. Even then they can have issues with wheel hop. You are almost certain to have flex like crazy.
I am actually about to go back and redesign my differential mounting, but i can assure you mine is way stronger as it sits right now. I simply built a crossmember to tie the 2 framerails together at the back and made a solid mount to extend forward 6" or so and bolt to it. It leaves you with the ability to adjust pinion angle and ease of removal... and my welds are better with a gasless MIG. lol Just picking on you. The part that i am re-doing is that i can't route my exhaust past the crossbar. I am going to be making a mounting point directly to the rear subframe, and incorporate a snubber type deal to help rid any possible upward flex in even a solid mounted setup.
Just wait til you drive the car. Right now you have no clue the stresses these parts are going to take.
I am actually about to go back and redesign my differential mounting, but i can assure you mine is way stronger as it sits right now. I simply built a crossmember to tie the 2 framerails together at the back and made a solid mount to extend forward 6" or so and bolt to it. It leaves you with the ability to adjust pinion angle and ease of removal... and my welds are better with a gasless MIG. lol Just picking on you. The part that i am re-doing is that i can't route my exhaust past the crossbar. I am going to be making a mounting point directly to the rear subframe, and incorporate a snubber type deal to help rid any possible upward flex in even a solid mounted setup.
Just wait til you drive the car. Right now you have no clue the stresses these parts are going to take.
that is not extreme overkill penetration that is the proper amount. when you say extreme overkill penetration, i think extreme overkil undercut and falling out the back.....
you say you are very good but the welds I have seen, I wouldnt pay for, but that what seperates you from a backyard builder and a professional fabricator
you say you are very good but the welds I have seen, I wouldnt pay for, but that what seperates you from a backyard builder and a professional fabricator
On another note, after sitting for easily 5-7 months, my Ls1 cranked for no more then 2 seconds before firing up. It ran like a champ, maintaining 40 psi of oil pressure at idle, and going up to 60 at around 1800-2000 rpm. It ran perfectly, and sounded real strong and healthy. I didn't run it for too long as it only had headers and I didn't want to burn the valves, but it ran long enough to display all the characteristics of an extremely well taken care of, high quality engine. Needless to say, I am more then satisfied
 . Again guys, thanks for all the comments, including the criticism. Its important to me to receive input, and I enjoy responding, and standing up for my good ideas and quality work.
11-01-2009, 07:24 PM
. Again guys, thanks for all the comments, including the criticism. Its important to me to receive input, and I enjoy responding, and standing up for my good ideas and quality work.
11-01-2009, 07:24 PM
#25
Launching!
Thread Starter
iTrader: (3)
Join Date: Jul 2009
Location: New Jersey
Posts: 200
Likes: 0
Received 0 Likes
on
0 Posts
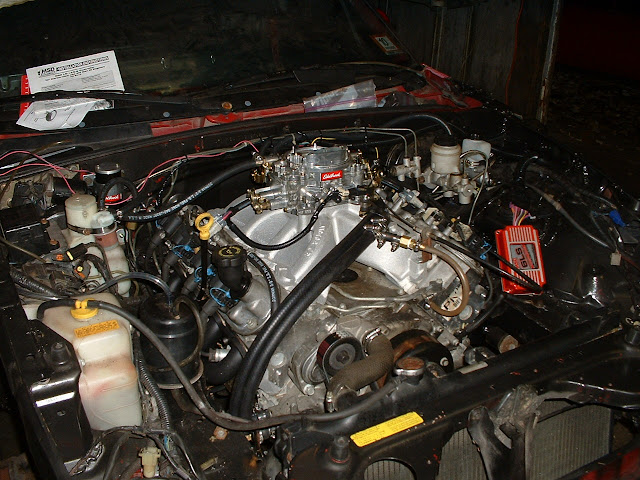
an example of some of my better gasless mig welds
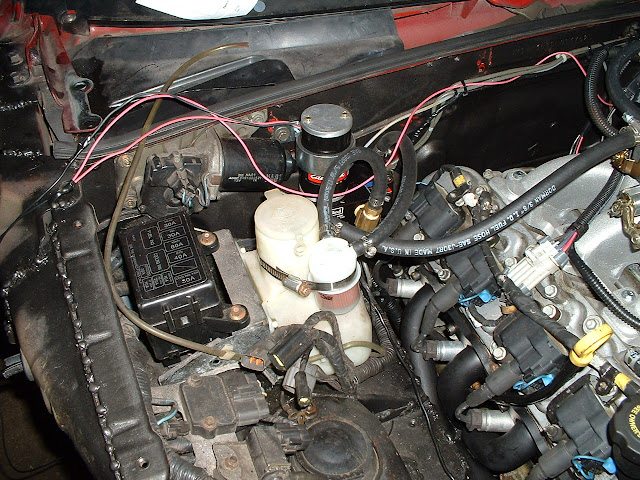
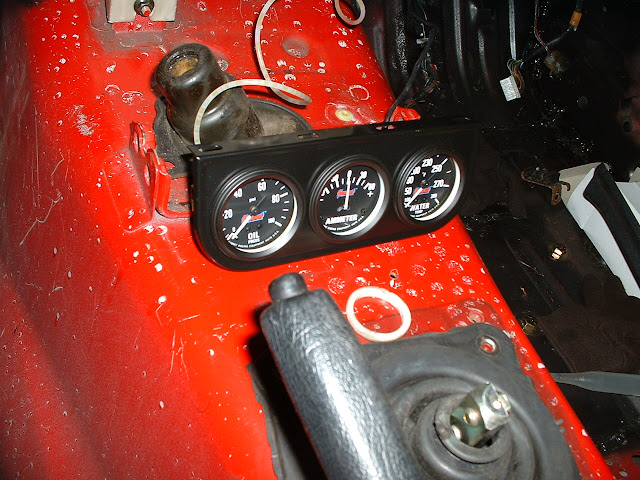
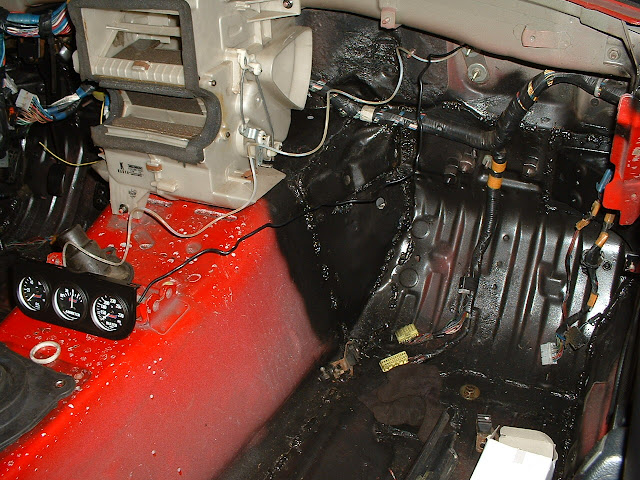
Summit gauges, the engine maintained 40 psi of oil pressure at idle. These should match the black interior nicely.
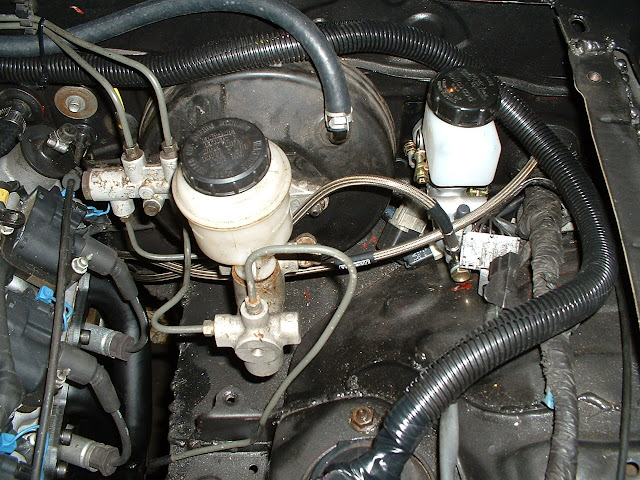
Brake, and v8roadsters clutch master cylinders.
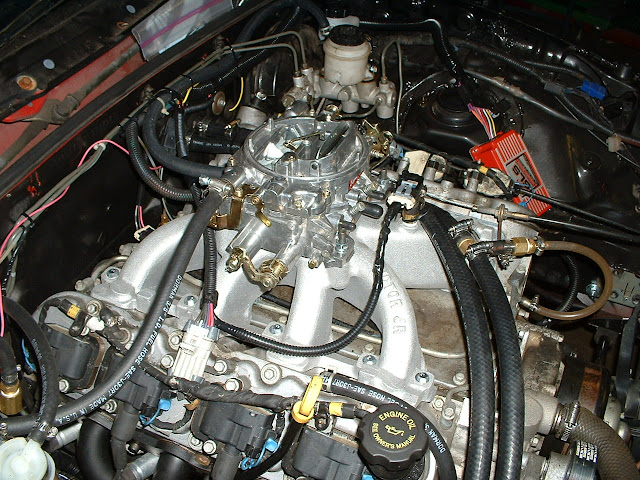
Had to extend the msd pn 6010 harness to work properly. Routing the 3 map sensor wires through the passage designated for the 2, 4, 6, 8 cyl coil pack wires worked great and looks clean.
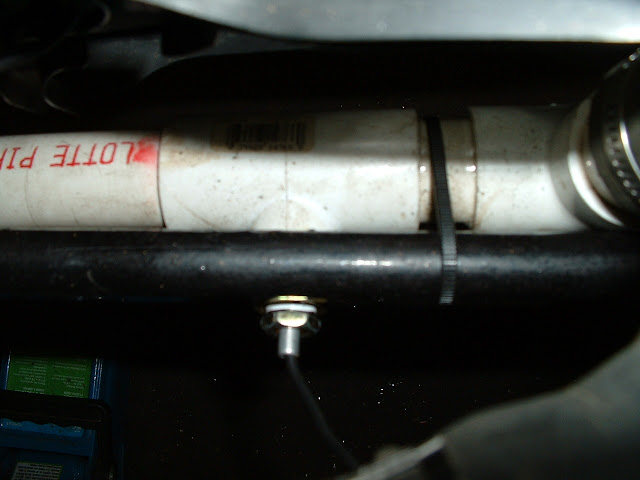
Oil pressure sensing tube and msd cam sensor wires.
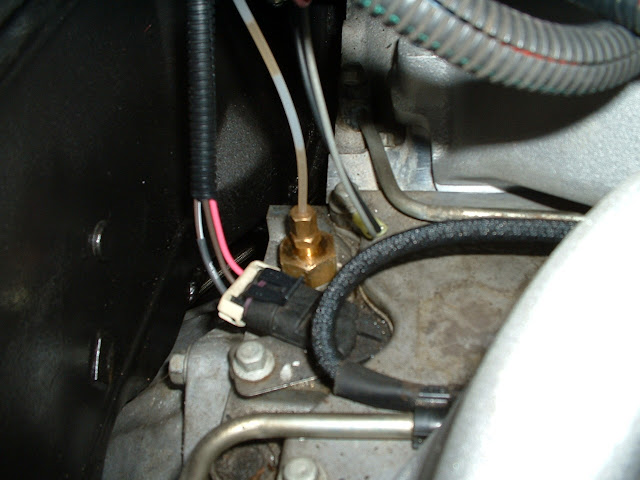
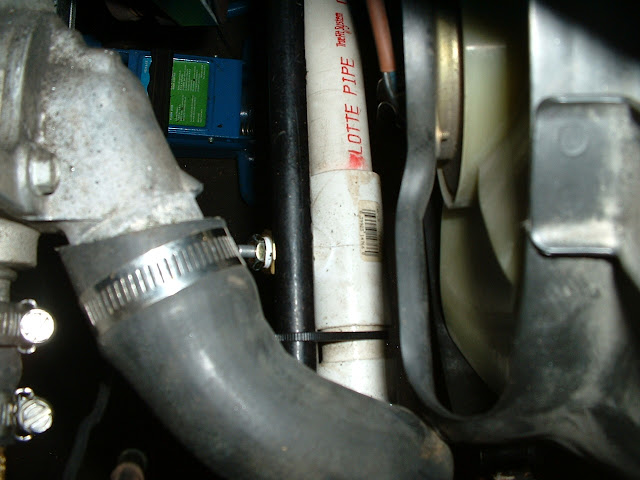
Water temp sensing device screwed into a coolent pipe mounted by wire ties to the sway bar.
Another pic
How the interior looks now
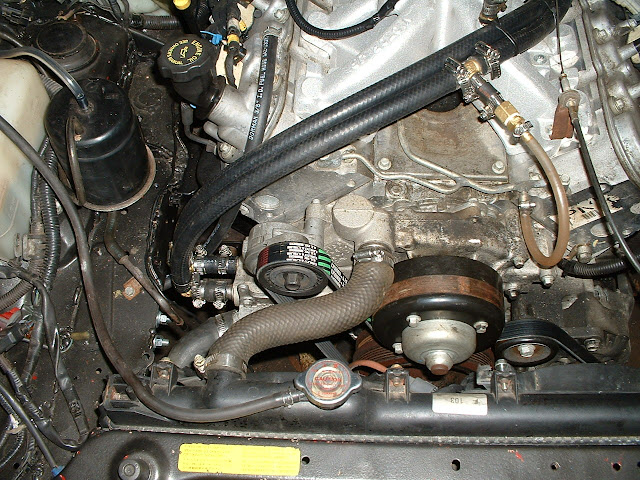
As for the fuel system, I forgot to mention that we simply removed the in tank pump, plugged the original tank outlet, and put the outlet filter onto the return inlet. Rubber hose goes from what was originally the return inlet (same size as the original inlet) to the single stock fuel line that goes to the engine bay, followed by another hose that leads to a fuel filter, Edelbrock self pressure regulated fuel pump, to the 750 carb. The stock fuel tank breather system aside from after-market clear hose is retained. As for the sway bar, the tabs had to be lengthened to clear the dampener. I MIG welded (with the REAL MIG welder) two tabs onto the original tabs to extend it 2 3/8". We also had to move foreword the sway bar mounts which are now held on by four bolts that go through the frame rails. Turned out real well.
11-01-2009, 09:12 PM
#27
11 Second Club
iTrader: (2)
Join Date: Dec 2008
Location: Hattiesburg, MS
Posts: 188
Likes: 0
Received 0 Likes
on
0 Posts
The torque arm you made will allow flex. If you want to use a physics example here ya go:
If you take a small pocket knife and try to bend the blade, it is going to take a lot force. Now take the same blade, but make it two feet longer. You would have to add so much thickness to the blade to avoid having it bend that you would do best to go with a different design all together.
So you see, by applying the same amount of torque over a longer distance, you are allowing more room for flex in the material. I know you can't bend it by hand. You also have no clue the torque that little bar is going to have to support. If you were to even take the same bar you made but cut it in half and attach it to another cross brace, you would be lessening the stress put on it. All i'm saying is that it would be easy to rebuild it now even stronger, rather than later after you have punched a hole in the bottom of your gas tank.
11-01-2009, 09:53 PM
#28
Launching!
Thread Starter
iTrader: (3)
Join Date: Jul 2009
Location: New Jersey
Posts: 200
Likes: 0
Received 0 Likes
on
0 Posts
The torque arm you made will allow flex. If you want to use a physics example here ya go:
If you take a small pocket knife and try to bend the blade, it is going to take a lot force. Now take the same blade, but make it two feet longer. You would have to add so much thickness to the blade to avoid having it bend that you would do best to go with a different design all together.
So you see, by applying the same amount of torque over a longer distance, you are allowing more room for flex in the material. I know you can't bend it by hand. You also have no clue the torque that little bar is going to have to support. If you were to even take the same bar you made but cut it in half and attach it to another cross brace, you would be lessening the stress put on it. All i'm saying is that it would be easy to rebuild it now even stronger, rather than later after you have punched a hole in the bottom of your gas tank.
If you take a small pocket knife and try to bend the blade, it is going to take a lot force. Now take the same blade, but make it two feet longer. You would have to add so much thickness to the blade to avoid having it bend that you would do best to go with a different design all together.
So you see, by applying the same amount of torque over a longer distance, you are allowing more room for flex in the material. I know you can't bend it by hand. You also have no clue the torque that little bar is going to have to support. If you were to even take the same bar you made but cut it in half and attach it to another cross brace, you would be lessening the stress put on it. All i'm saying is that it would be easy to rebuild it now even stronger, rather than later after you have punched a hole in the bottom of your gas tank.
11-02-2009, 10:05 AM
#29

I like the whole idea here, but I am concerned about the pvc pipe for the lower water hose.
Speaking from experience, that will deform with heat and you are going to lose the seal most likely at one clamp or another.
It may not happen sitting in the garage at idle, but it WILL happen.
Best of luck with the finsih!
Speaking from experience, that will deform with heat and you are going to lose the seal most likely at one clamp or another.
It may not happen sitting in the garage at idle, but it WILL happen.
Best of luck with the finsih!
11-02-2009, 12:53 PM
#30
11 Second Club
iTrader: (2)
Join Date: Dec 2008
Location: Hattiesburg, MS
Posts: 188
Likes: 0
Received 0 Likes
on
0 Posts
Easy there turbo. You obviously have your own ideas of what you are going to do. Some of us have been doing this for a while, and are trying to pass along some knowledge. You can't compare an f-body straight axle to an IRS Miata. Plain and simple. You have less room for ANY ammount of flex, and there will be some. That is all i was saying.
You are young. That means that most of the people on here can teach you a thing or two... if you would be willing to listen and learn. Now go back to school and be sure to actually pay attention in class next time. You obviously have a lot to learn.
You are young. That means that most of the people on here can teach you a thing or two... if you would be willing to listen and learn. Now go back to school and be sure to actually pay attention in class next time. You obviously have a lot to learn.

 11-02-2009, 07:59 PM
#34
Launching!
Thread Starter
iTrader: (3)
Join Date: Jul 2009
Location: New Jersey
Posts: 200
Likes: 0
Received 0 Likes
on
0 Posts
Easy there turbo. You obviously have your own ideas of what you are going to do. Some of us have been doing this for a while, and are trying to pass along some knowledge. You can't compare an f-body straight axle to an IRS Miata. Plain and simple. You have less room for ANY ammount of flex, and there will be some. That is all i was saying.
You are young. That means that most of the people on here can teach you a thing or two... if you would be willing to listen and learn. Now go back to school and be sure to actually pay attention in class next time. You obviously have a lot to learn.
You are young. That means that most of the people on here can teach you a thing or two... if you would be willing to listen and learn. Now go back to school and be sure to actually pay attention in class next time. You obviously have a lot to learn.
I drove over to my friends house to let him drive it with these tires on. We pulled out on a nice, straight road and he nailed it. 1st, 2nd, 3rd, and missed 4th... Really? Nope, he got it in 4th, but the differential urethane pulled apart from the metal which dropped that side of the diff down and yanked the axle apart. Oops. haha I guess now i will putting in those solid delrin diff mounts this weekend. I think i can put the axle back together. There didn't seem to be any damage done to it.
So far this is the only real problem i have had. I'm just glad it happened a mile away from his house, and not at the drag strip!
So far this is the only real problem i have had. I'm just glad it happened a mile away from his house, and not at the drag strip!
The differential breaking was mainly my fault. I didn't install the plates that go on the bottom of the rear "ears", so when i actually got traction the urethane bushing literally just separated and dropped. When it did that, my solid front mount was bent. I hammered it back for the time being, but do plan on building something a little more sturdy for the long run. For now, the solid delrin in the rear and a solid metal mount for the front seem to support the differential pretty well. Only time will tell though.
I like the whole idea here, but I am concerned about the pvc pipe for the lower water hose.
Speaking from experience, that will deform with heat and you are going to lose the seal most likely at one clamp or another.
It may not happen sitting in the garage at idle, but it WILL happen.
Best of luck with the finsih!
Speaking from experience, that will deform with heat and you are going to lose the seal most likely at one clamp or another.
It may not happen sitting in the garage at idle, but it WILL happen.
Best of luck with the finsih!

Thank you, I'll look into this.
11-02-2009, 11:03 PM
#35

I'd be taking the advice of people who have already put lsX's into their miata's or the like. If they say your torque arm wont hold, it probly wont. I would probly disreguard them and find out the hard way as well as I'm pretty stubborn when it comes to my fabricating. Just saying if you keep bashing others ideas, then you probly wont be welcome on this forum much longer. Good luck with the swap! I'd love to do an LS miata
11-03-2009, 12:00 AM
#36
11 Second Club
iTrader: (2)
Join Date: Dec 2008
Location: Hattiesburg, MS
Posts: 188
Likes: 0
Received 0 Likes
on
0 Posts
Edit: Taking it to PM's so as not to clutter up a good build thread. I think we all just want to see this thing on the road.
Last edited by dark_dementshun; 11-03-2009 at 01:30 PM.
11-03-2009, 04:02 PM
#38
Launching!
Thread Starter
iTrader: (3)
Join Date: Jul 2009
Location: New Jersey
Posts: 200
Likes: 0
Received 0 Likes
on
0 Posts
I'd be taking the advice of people who have already put lsX's into their miata's or the like. If they say your torque arm wont hold, it probly wont. I would probly disreguard them and find out the hard way as well as I'm pretty stubborn when it comes to my fabricating. Just saying if you keep bashing others ideas, then you probly wont be welcome on this forum much longer. Good luck with the swap! I'd love to do an LS miata
As i mentioned earlier I'm 18.
I brought my Torque arm to my shop class today and started mocking up a brace to go on top. Its a piece of 1/4" thick 2" wide flat STEEL that runs the length of the arm. I'll weld it along the entire top length of the arm upright (the 1/4" part flush with the arm) to make it look like a mohawk. With this on (correct me if I'm wrong) the question of whether it will flex shouldn't even be raised. Both my shop teacher and myself believe this is completely unnecessary, but why shouldn't I take full advantage of the resources provided for me by my school system. Furthermore some of you veterans on here seem to have a discordance with my design, so I'll take your advice. In any case it can't hurt to add strength.
Thanks again for all the input

Last edited by Ls1Mx-5; 11-03-2009 at 04:18 PM.
11-05-2009, 06:01 PM
#39
On The Tree
iTrader: (6)

Join Date: Jan 2009
Location: ABQ, NM
Posts: 116
Likes: 0
Received 0 Likes
on
0 Posts
I'm not trying to bash you man, just a couple quick words. Do yourself a favor and don't "rig" stuff. Just do it right the first time. You will thank yourself later when the car doesn't start falling apart everytime you go down the road. When you look back at some of these ideas 10 years down the road, you are going to say "What was I thinking??".
11-05-2009, 06:18 PM
#40
Launching!
Thread Starter
iTrader: (3)
Join Date: Jul 2009
Location: New Jersey
Posts: 200
Likes: 0
Received 0 Likes
on
0 Posts
I'm not trying to bash you man, just a couple quick words. Do yourself a favor and don't "rig" stuff. Just do it right the first time. You will thank yourself later when the car doesn't start falling apart everytime you go down the road. When you look back at some of these ideas 10 years down the road, you are going to say "What was I thinking??".
 . I'll post some pics of the way my torque arm looks now later on tonight. Its never going to even think about warping. But your comment is good advice to any car builder.
 Last edited by Ls1Mx-5; 11-05-2009 at 06:28 PM.