

1973 RS Camaro LSX Swap


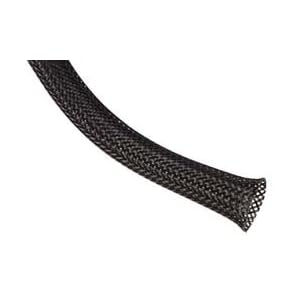
I know in this pic it looks like it is touching the a-arm, but it actually isn't and has decent clearance so far. When I first installed them the inner (smaller) hose was resting on the a-arm a little but I just kept trimming the water pump end of the hose until the 90 cleared the a-arm. Then to keep it well in place I secured them with the factory strap on the inner fender. So far, so good for now but I know this is one of those things that may change with time, heat, swelling, and engine movement so I'll be keeping my eye on it for sure. But for now the clearance is fine. However, I have thought about slipping some of that abraisive resistent PET braided sleeving over them for added insurance. Something like this......
On The Tree
Joined: Feb 2011
Posts: 116
Likes: 0
From: Katy, Texas
Have you decided what your going to do about the rear suspension? We have had good luck with caltrac bars and their two piece leafsprings. I have also used "sliders" for the rear leaf spring mounts. They move more freely than the stock rear mounts. They keep the suspension from "binding" you can find them on jegs. They are popular with the dirt track guys. With that combo I have seen cars with 28x10.5 slicks dip into the high 1.2 sixty foots.
Have you decided what your going to do about the rear suspension? We have had good luck with caltrac bars and their two piece leafsprings. I have also used "sliders" for the rear leaf spring mounts. They move more freely than the stock rear mounts. They keep the suspension from "binding" you can find them on jegs. They are popular with the dirt track guys. With that combo I have seen cars with 28x10.5 slicks dip into the high 1.2 sixty foots.
On The Tree
Joined: Feb 2011
Posts: 116
Likes: 0
From: Katy, Texas
Yeah, the plan is for Caltracs and split mono's. I haven't decided yet whether or not to lay down the extra cash for DA shocks or if I can make it work with SA's. I've never heard of the sliders you're talking about, so I'll have to check those out. Wow, 1.2 is really gittin it on leaf springs of any kind. Pretty light cars I assume?
http://www.jegs.com/i/AFCO/921/20236S/10002/-1
I have also used the subframe connectors that have 3 mounting choices for the leaf spring. This way you can move the leaf spring more inboard. Remember if you move them in the rear will be inside the frame and will need some support to the frame. Don't just weld the sliders to the floor pan. Also if you make the springs straight you have to ad a wishbone or a panhard rod to keep the rear end from moving side to side. From the factory the springs aim inward at the front and resist side to side but if you make them straight the rear end and springs will move.
Not really light they had to weight 3000 for the class. Here is a pic of the sliders. You weld them to the frame. I usually set mine up so that the back of the leafspring were the bushing is dead center of the slider so it will travel up and down smoothly.
http://www.jegs.com/i/AFCO/921/20236S/10002/-1
I have also used the subframe connectors that have 3 mounting choices for the leaf spring. This way you can move the leaf spring more inboard. Remember if you move them in the rear will be inside the frame and will need some support to the frame. Don't just weld the sliders to the floor pan. Also if you make the springs straight you have to ad a wishbone or a panhard rod to keep the rear end from moving side to side. From the factory the springs aim inward at the front and resist side to side but if you make them straight the rear end and springs will move.
Edit: I did some quick research and it looks like "Chrysler-type" leaf springs have a smaller eyelet than GM springs to allow for use with these sliders, and it also appears they have a little more arc to them. So all in all, I'd have to order a custom spring if I wanted to use the sliders, which is something I could probably talk to Calvert about when the time comes to order my split monos. I'm sure it's just a generic pic, but when I look up springs for my Camaro on Calvert's site, the picture that is displayed looks like the rear eyelet on it is "Chrysler-style".
http://calvertracing.com/cart/index....up_image&pID=5
Last edited by GC99TA; Feb 28, 2011 at 01:35 PM.
I haven’t made a lot of “progress” lately, but I got the car back from the chassis shop last Sunday and some more new parts have been showing up about every other day. So, I guess that means that once I have the time, I’ve got the potential for more progress. Anyway, here are some quick pictures of the additions to my 6-point roll bar to make it a full 8.5 cert 10-point cage. I’m pretty happy with how it turned out. I still have plenty of room in the car and everything fits well with the interior pieces intact. I’ll try and get some better shots of it once I get it painted.
Here’s the halo. It's tucked up nicely but still clears the headliner moldings. Since this was and "afterthought" and the 6-point was already in the car, the halo couldn't be fully welded where it meets the hoop, so gussets were added.

And the main hoop diagonals were added down to plates on the tunnel. Also note that the angle of the door bar "stub" was re-established. This is because the door bar angles were slightly changed to accomidate how they intersected with the a-pillar and rocker bars up front.

Here's the top of the a-pillar bars going down through the dash.....

……..and the intersection of the a-pillar bars, door bars, and rocker bars at the floor (excuse the wiring mess).

And in the parts department, my new carburetor showed up from Prosystems. It looks to be a really nice piece and came with full flow test and parts documentation.


Intake just resting in place for a photo-op here…….

Also my 3-row aluminum radiator from Champion Cooling Systems came in.

So I cleaned up my LS1 F-body electric fans that I bought used about a year ago……

And put it all together in the car.

I still have to build a simple bracket for the bottom of the fans, but all in all, they fit the 2nd Gen radiator very well. The top radiator support cover overlaps the fans and holds them in place pretty securely. Some more of my wiring items also came in like battery cable ends and other random plug ends. This weekend I’ll probably start out with painting the cage (again) and then finish off with mounting my battery in the trunk and routing some cables/wiring. Oh, and I also got a slip yoke for my TH400 and some solid body u-joints, so the car finally has a driveshaft in it. This stock shaft with 1310 joints will only be a temporary solution until I put a 9-inch and a good shaft in the car.
Here’s the halo. It's tucked up nicely but still clears the headliner moldings. Since this was and "afterthought" and the 6-point was already in the car, the halo couldn't be fully welded where it meets the hoop, so gussets were added.
And the main hoop diagonals were added down to plates on the tunnel. Also note that the angle of the door bar "stub" was re-established. This is because the door bar angles were slightly changed to accomidate how they intersected with the a-pillar and rocker bars up front.
Here's the top of the a-pillar bars going down through the dash.....
……..and the intersection of the a-pillar bars, door bars, and rocker bars at the floor (excuse the wiring mess).
And in the parts department, my new carburetor showed up from Prosystems. It looks to be a really nice piece and came with full flow test and parts documentation.
Intake just resting in place for a photo-op here…….
Also my 3-row aluminum radiator from Champion Cooling Systems came in.
So I cleaned up my LS1 F-body electric fans that I bought used about a year ago……
And put it all together in the car.
I still have to build a simple bracket for the bottom of the fans, but all in all, they fit the 2nd Gen radiator very well. The top radiator support cover overlaps the fans and holds them in place pretty securely. Some more of my wiring items also came in like battery cable ends and other random plug ends. This weekend I’ll probably start out with painting the cage (again) and then finish off with mounting my battery in the trunk and routing some cables/wiring. Oh, and I also got a slip yoke for my TH400 and some solid body u-joints, so the car finally has a driveshaft in it. This stock shaft with 1310 joints will only be a temporary solution until I put a 9-inch and a good shaft in the car.

Looks like it wont be long now. Parts look great! You just gave me an idea for my radiator mount. I bought a universal style radiator and the brackets to mount it with. I think I will try to fab something up similar to your upper bracket. The cage looks good. I was going to tell you the other day that Advance Auto sells the Epoxy paint in semi gloss black and other colors. The brand is VHT.
I guess I haven't updated this in quite a while, but most of what I've been doing has been tying up loose ends like wiring, mounting the battery in the trunk, more wiring, bolting down the intake and carb, and more wiring........but finally today.....IT'S ALIVE! Here's a really crappy open header start up video taken from my phone. The idle was really high, and so were the floats on the carb.....but it fired right up and ran. I've also got a few minor fuel leaks at the carb to take care of. I couldn't help but smart around and play like I was jacking the throttle wide open with my thumb on start up cause I've got a few good buddies that'll get a kick out of it. I'll try and get up a better video once I get the idle and floats set, put a decent timing tune in the 6012 box, and tie up some other loose ends.

I've had quite a few new parts show up recently and have a few more still on the way. I had to swap out my first K&N filter for a drob base model because it would just BARELY fit under my 4 inch cowl hood and there was no way I would have ever been able to get a nitrous plate or carb spacer of any kind to fit with it. I've also finished out my aluminum gauge panel with a 5 inch monster tach and speedometer and a fuel level gauge, but still have to get them all wired. I also bought a full 3 inch exhaust system from Torq Tech, but haven't gotten it installed just yet. Still to come next week are a posi unit for my 10-bolt, a set of Caltracs and some drag shocks, all picked up used on nasty28.com. I've basically got more parts than time right now, but at least I can finally start and run this motor that has been sitting FOREVER.
I've had quite a few new parts show up recently and have a few more still on the way. I had to swap out my first K&N filter for a drob base model because it would just BARELY fit under my 4 inch cowl hood and there was no way I would have ever been able to get a nitrous plate or carb spacer of any kind to fit with it. I've also finished out my aluminum gauge panel with a 5 inch monster tach and speedometer and a fuel level gauge, but still have to get them all wired. I also bought a full 3 inch exhaust system from Torq Tech, but haven't gotten it installed just yet. Still to come next week are a posi unit for my 10-bolt, a set of Caltracs and some drag shocks, all picked up used on nasty28.com. I've basically got more parts than time right now, but at least I can finally start and run this motor that has been sitting FOREVER.
Thanks Jim! I was concerned about the prelubing thing myself. If this had been a brand new build that had never been fired and run before, I would most certainly have built some sort of contraption to force oil directly into one of the oil galleries to prelube it before starting. But since it was a running engine that had just sat for a while, instead I removed all the plugs to relieve any pressure on the crank and rod bearings (and to get more cranking speed) and just whirlled it over with the starter for a while to let it pick up oil in a no load situation. Obviously making sure the filter is full of oil before installing it is always a good idea too, to make them pick up the oil quicker. I figured there are probably some vehicles that sit this long without starting and my actions were at least more than the average vehicle owner would have done after not starting a vehicle in a few years. Anyways, I was glued to the oil pressure gauge when I fired it up and it picked up pressure right away. As for the cam, it's a 228/230-114, so it'll idle fairly smoothly, but nothing like a stock cam. After the video I tamed the idle speed down some and the idle sounded pretty good, but definately tamer than my Trans Am which has almost the same cam (2 degrees more duration and on a 112), 18 less cubic inch, and almost a point and a half more compression.

TECH Senior Member


Joined: Jul 2009
Posts: 8,028
Likes: 660
GAry,
Glad to hear you pulled the plugs and all first ( knew you would). Knowing my LY6 sat around probably a while before I got it and 2 yrs more, I bought a Engine Quest preluber. I plan on pulling the top off of it to see how its designed so fellow LS1tech member can copy it with with a spare propane cylinder. I really thought it would have some sort of blader to seperate the oil from metal.
As far as idle quality......... I'm cluless on how it should sound. LOL. So I am glad its fairly smooth. I guess I am showing my age. I prefer the stock(ish) idle. Once you get your carb dialed in better, any chance of getting another idle clip?
thnaks,
Jim
 . And no problem on getting up a better idle vid. Just let me get a few more things sorted out, and maybe I'll even have the exhaust on it by then. As far as my personal standards for idle quality......they're pretty loose. My standards for a street car is that it should idle on it's own at 1000rpm or less without me having to keep my foot on the gas....especially in gear....LOL. Other than that, I like em nice and rough.
So just to catch up on pics a little, here’s a few shots of how I mounted my master disconnect switch and battery a few weeks ago. In the first shot you can also see one of my tail pipes I was mocking up.


And here’s how I routed the cables. Basically they go up and over the inside of the wheel well and then come out behind the interior quarter panel piece and run along the wire channel under the scuff plate before exiting through the plug in the passenger side floor board.


Today, there was a million things I probably “should” have been doing to the car, but I didn’t have much time or motivation for any of those things. So, I did what I actually felt like doing which was building a way to mount my shifter in the car. Since there are already four threaded holes in the floor for mounting the stock shifter, I really didn’t want to drill four more. Plus, the trans tunnel is rounded and doesn’t leave a real good flat surface for mounting the shifter. So, I decided to fabricate a mount by using the mounting tabs from my stock shifter. After drilling a few spot welds and making a few cuts, here’s what I started with.

I needed a flat piece for the shifter to actually mount to, so I took a couple of pieces of flat stock and butt welded them together. Don’t mind my welds….the sun was in my eyes :crazy:.

Next I ground the welds down and used this piece to connect the front and rear floor mount pieces, creating a platform for the shifter to mount to. I got kinda involved and didn’t take any more in progress pics, but here’s the finish product with the shifter bolted to it.


And here it is bolted in the car.


I still need to pull it back out and put a coat of paint on it to keep it from rusting, but so far I think it’s gonna work out well.
Last edited by GC99TA; Mar 27, 2011 at 08:54 PM.

Teching In
Joined: May 2010
Posts: 2
Likes: 0
From: Washington
I like what you have done. Gets me motivated for my LY6 swap. One thing I am curious about, is you have a good amount of talent when putting this all together, with the body work, and painting everything and doing it right, but why not buy a little powdercoater from eastwood or somewhere like that, and powdercoat some of the little parts yourself? It's super easy, and the prep work is the hardest, but you have a sandblaster, so you have that down no prob. All you need is a little toaster oven, or if you want to do big things, then buy a cheap oven off of a classified ad, and you can even do your own wheels in those. Just sayin' it may be something to look into as the powdercoaters are pretty cheap to buy, then you can just powdercoat things like your hinges or the shifter bracket and never worry about it again. But I love the car, and I love the documentation. Keep it up. And thanks again for giving me some drive to continue with mine.
I like what you have done. Gets me motivated for my LY6 swap. One thing I am curious about, is you have a good amount of talent when putting this all together, with the body work, and painting everything and doing it right, but why not buy a little powdercoater from eastwood or somewhere like that, and powdercoat some of the little parts yourself? It's super easy, and the prep work is the hardest, but you have a sandblaster, so you have that down no prob. All you need is a little toaster oven, or if you want to do big things, then buy a cheap oven off of a classified ad, and you can even do your own wheels in those. Just sayin' it may be something to look into as the powdercoaters are pretty cheap to buy, then you can just powdercoat things like your hinges or the shifter bracket and never worry about it again. But I love the car, and I love the documentation. Keep it up. And thanks again for giving me some drive to continue with mine.
robbcolecrabtree, I've definately considered trying my own powder coating on a very small scale, but it's just one of those things I guess I haven't gotten around to yet for a couple reasons. One thing for sure is that I would have to start small (oven wise) because I'm in a rental property and wouldn't be able to run 220V or gas to my garage to run a full sized oven. Space is also a factor for something that large. Plus, I'm active duty Army, so the prospect of moving every couple of years with an additional full size oven on an already limited weight allowance would just be added drama. It's definalty something I'm considering though for when I retire and can stay in one place and have a full size shop. Thanks again for the compliments and good luck on your LY6 swap!
Teching In
Joined: May 2010
Posts: 2
Likes: 0
From: Washington
Thanks, and I totally understand the whole army thing. Just got done with all of that, and I am glad to no longer be moving. When I started powdercoating, I started small, with a toaster oven from craigslist. I just bought one of the large ones that you can cook a turkey in, and it was perfect for my hinges and other little misc. parts. But a full size oven is so much better. But you gotta start somewhere. Glad to see the great progress, and I look forward to the rest of your updates. I will follow this thread closely as it gives me stuff to learn from. Thanks again.

Thanks! I'm glad you're enjoying the build. No, it's only on here and Nastyz28. I'm not a member of Lat-G or Pro-touring. I'm not sure if this build would interest members on those boards or not? I'm assuming they're more geared towards corner carvers and Pro-touring type builds where this is really more of a bare bones street/strip type build. Dunno though, maybe I'm mistaken. Either way, thanks a lot for the compliment and feel free to link guys over here that you think may be interested.