

1973 RS Camaro LSX Swap
 07-30-2010, 03:55 PM
#101

Have you looked into any of the wiring issues yet? Wondering how you tie in the new style alt to the older car wiring? Did you upgrade your fusebox at all? I was thinking of getting the new-style american autowire box that has the buss type fuses instead of the old glass ones. Thanks
Having said that, my plan for using the high amp LS alternator with an almost 40 year old wiring system designed for a much lower amp alternator is this: Instead of running the charge wire from the alt to the horn relay on the firewall (like stock; where all the 12v stuff seems to covnverge), I plan on running the charge wire all the way back to the trunk where the battery will be mounted. Before reaching the battery, the charge wire will also go through a cut off switch that will allow me to kill the alt when the battery is switched of, thus remaining NHRA/IHRA complient.
I guess my (uneducated) thought process is that if I run the charge wire all the way back to the battery in the trunk, the battery will be taking the bulk of the amperage up front (kinda what I want) and not the old wiring. I realize some of that extra amperage will still then make it's way from the battery, back up to the front of the car, but not as much. And since a the battery cable will run to the starter, and another heavy gauge wire will run from the same post on the starter to the horn relay (just like stock), then everything should still function as normal.
I don't know if any of that made any sence, but hopefully that somewhat answers your question...LOL. Oh, and no I haven't upgrade to a better fuse box, but if my plan doesn't work out....I'm sure I will be....LOL. That's probably a good forethought on your part to do it up front. Maybe someone smart on this stuff will chime in and give some thoughts.
 07-30-2010, 04:11 PM
#102
My "way down the road" plans for this car involve some sort of forced induction set up (turbo or SC). When I get to that point, I'll definately be converting to injection and will have to figure out the wiring for sure then. I'm hopefully doing at least my fuel system right the first time so that should already be up to par for injection and/or FI.
No, I'm not doing AC on this car. A little bit of background on the purpose of this car will explain why: I have had my 99TA for the past 11 years and have been modifying it, drag racing it, and playing on the street with it since it was brand new. That stuff has always been my vice. However, there came a point with that car that I felt like it was getting a little out of hand. I was starting to make sacrifices on that car that affected my ability to enjoy it on the street. For instance, I had removed the stereo and AC as weight reduction measures. I was already to the point that the car was fast enough on the motor that it needed a six point to run at any legit tracks (11.37); and forget about spraying it. I was even about a week away from putting a TH400 in it for more consitency and less parts breakage. Trust me....it was getting out of hand.
Then luckily the Camaro came along. I had wanted to do this kind of swap for quite a while and decided that if I were going to make those kinds of sacrifices, this Camaro would be the car to do it on. So, I put the stereo and AC back on the 99 Trans Am, and dubbed it to be my "fast enough" street cruiser. It already had a good stereo, AC, T-tops, good suspension/handling, good looks......all the good street cruiser stuff.
Don't get me wrong...the Camaro will be a street car too. I fully intend to drive this car, but with sacrifices. The car won't have AC, no stereo, and will have a loose converter and a six-point at a minum. I love taking my car to the track and going fast, but also want it to be safe and not get harrassed by the tech guys. Basically, this will be my "legal" fast street car.
Sorry for another long-winded answer. I guess I could have just said "No, no AC".....Lol....
Last edited by GC99TA; 07-30-2010 at 04:24 PM.
07-31-2010, 09:36 AM
#103

GC99TA,
I like your reasoning on your 73 build.
I like your reasoning on your 73 build.
07-31-2010, 08:00 PM
#104
Thanks Jim. It's not what a lot of people would do with an LS swap, but it's just what I want.
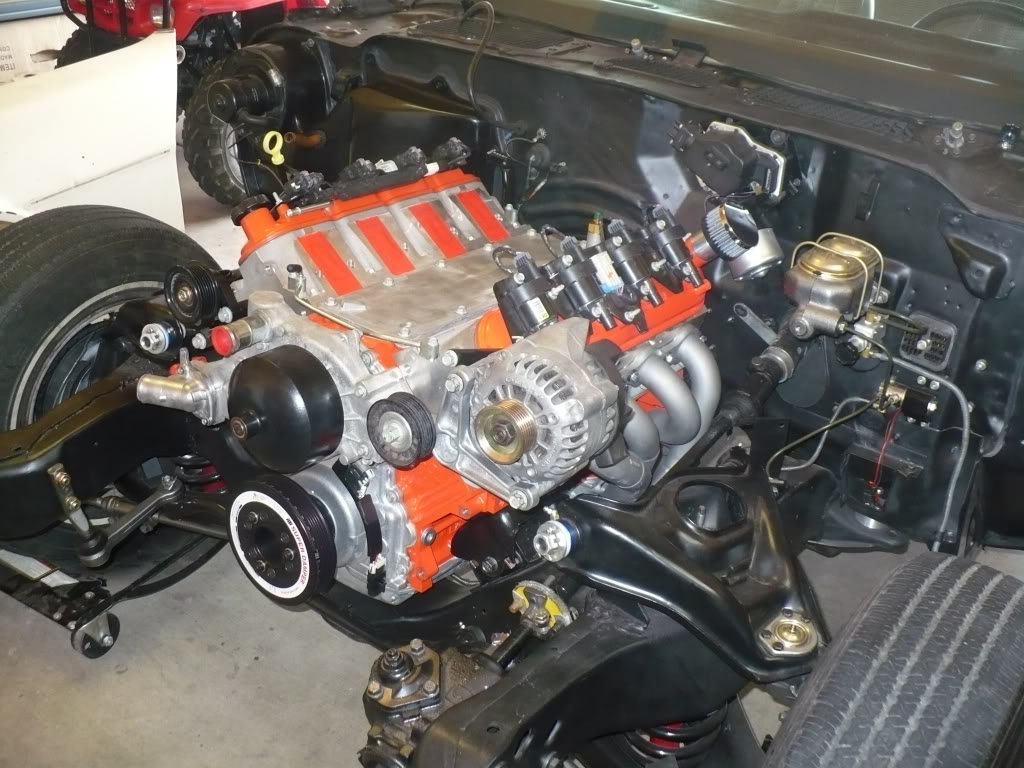
Well, here’s pic update from today. I got my other valve cover clearanced, sanded, and painted so here are a few shots of the motor in its new home (hopefully for a long time).

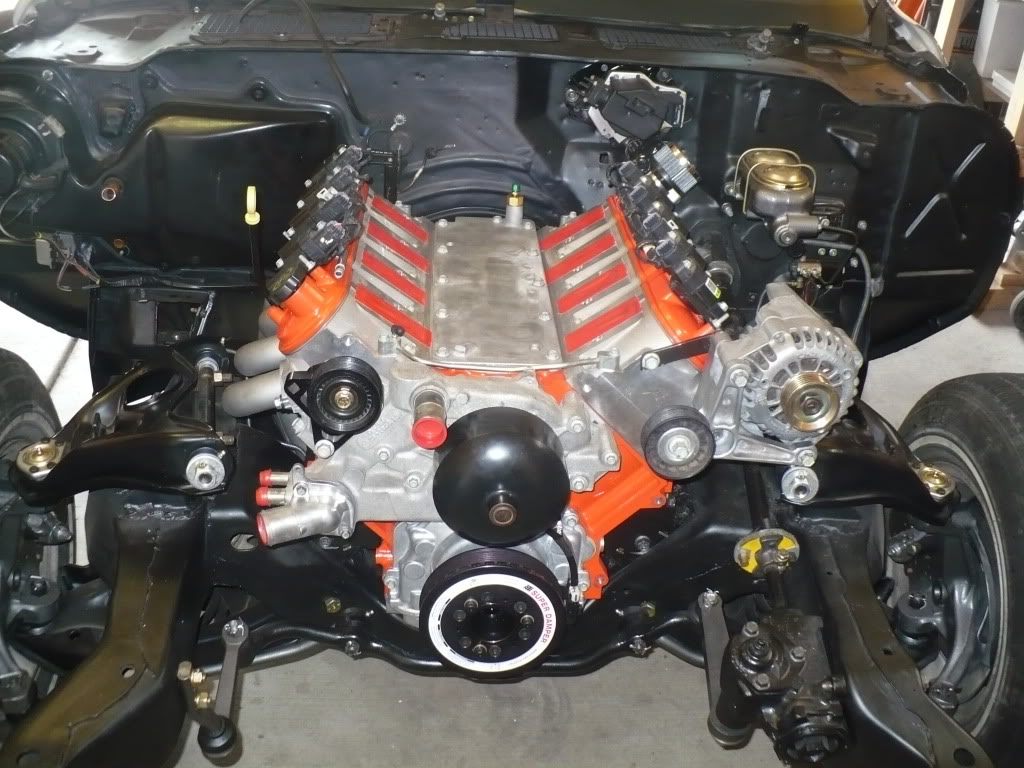
I also started disassembling the front clip so everything (engine compartment side) can be cleaned, painted and reassembled on the car.
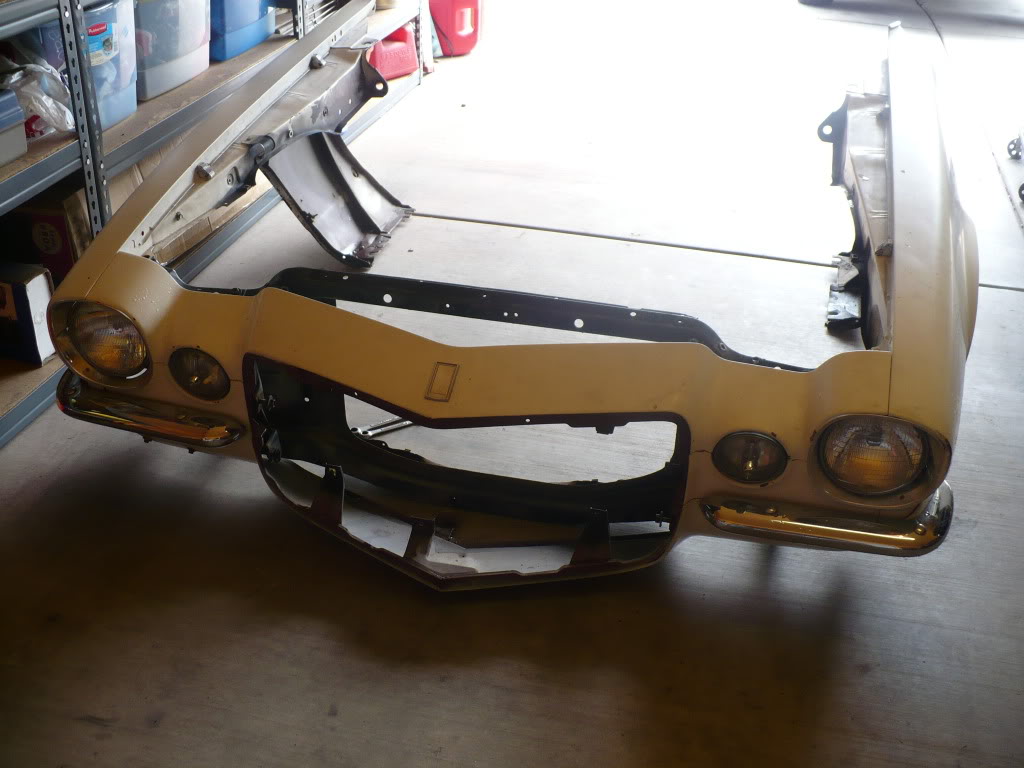
I pulled out the lights and removed the bumpers. Then I separated the core support from the front end sheet metal. The inside of all these panels will get cleaned up real good, probably coated in POR 15 and then top-coated in black satin. The inner fenders will get handled later….they’re just sitting there for now to keep them out of the way.
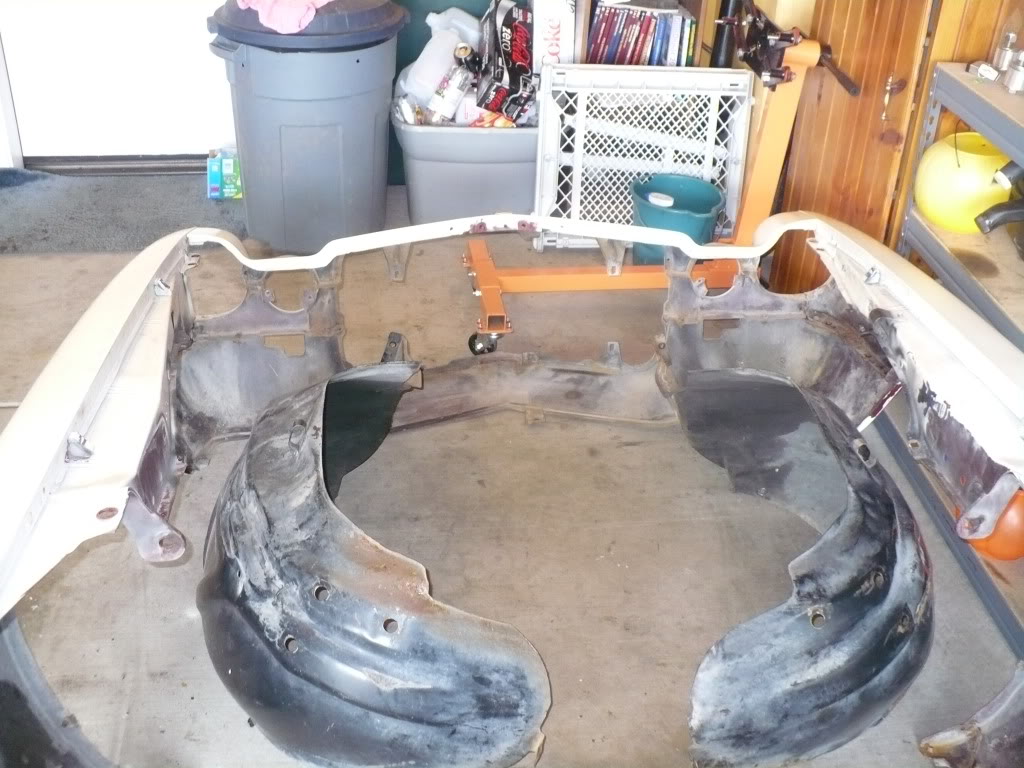
And then here’s the core support. It’s in really good shape still but has enough rust on it here and there that it really needs to be completely blasted. So, I opened up the body mount holes with a die-grinder enough to fit my PTFB aluminum body mount bushings (73 and earlier core supports have smaller mounting holes than 74-81) and then I dropped it off with the powder coater to be blasted and coated semi-gloss black like my control arms. The inner fenders will eventually get the same treatment when I’m closer to reinstalling them.

Well, here’s pic update from today. I got my other valve cover clearanced, sanded, and painted so here are a few shots of the motor in its new home (hopefully for a long time).
I also started disassembling the front clip so everything (engine compartment side) can be cleaned, painted and reassembled on the car.
I pulled out the lights and removed the bumpers. Then I separated the core support from the front end sheet metal. The inside of all these panels will get cleaned up real good, probably coated in POR 15 and then top-coated in black satin. The inner fenders will get handled later….they’re just sitting there for now to keep them out of the way.
And then here’s the core support. It’s in really good shape still but has enough rust on it here and there that it really needs to be completely blasted. So, I opened up the body mount holes with a die-grinder enough to fit my PTFB aluminum body mount bushings (73 and earlier core supports have smaller mounting holes than 74-81) and then I dropped it off with the powder coater to be blasted and coated semi-gloss black like my control arms. The inner fenders will eventually get the same treatment when I’m closer to reinstalling them.
08-01-2010, 10:00 AM
#105
GC99TA,
I love the detail you are putting into your entire build. ( are you tired of hearing that yet? LOL )
So did you replace the OEM oilpump? Susposedly, they are high presure and need to be replaced when DOD (which we all know you never had) or VVT is deleted.
I love the detail you are putting into your entire build. ( are you tired of hearing that yet? LOL )
So did you replace the OEM oilpump? Susposedly, they are high presure and need to be replaced when DOD (which we all know you never had) or VVT is deleted.
08-01-2010, 10:37 AM
#106
No, I'm running the OEM LY6 pump. With the way this motor is going to be ran (hard and high RPM), and the time of year it's gonna be ran (warm, not cold weather) I saw the factory high pressure pump as a benefit. In fact, if it had been a standard pressure pump, I would have shimmed the relief valve spring for more pressure. Since it was already a high pressure unit I left it alone. It may be a bit of a gamble without the additional relief valve in the pan, but I'm betting that my idea of too much oil pressure for a racing application and GM's idea of too much oil pressure for a daily driven truck or car application are two different things. Time will tell I guess.
08-01-2010, 11:06 AM
#107
GC99TA,
I only ask about the oilpump as I been disgussing the oil pressure regulator valve with John@ ScogginDickey and he has this to say.......Originally Posted by John@Scoggin I believe that valve is there to regulate the obscene amount of flow/pressure that the VVT/DOD oil pump puts out. I am not sure of the relief pressure though.
Unless you are using the VVT/DOD then there is no need for it, but you should also change out the oil pump to a standard one. We have seen way too many problems when people delete the dod and/or vvt and do not change the pump.
08-01-2010, 11:12 AM
#108
GC99TA,
how did you remove the valve cover bolts and seals? I tapped mine the first time I painted them and had to strip it due to a defective rattlecan screwed up the finish on half of it. I hastly ( as I was irked still from having to sand and repaint) & didn't retap them and painted over the bolts/seals thinking the coilpack covered them. Hey. you know what they say..... (my work) .... " if something is worth doing it twice........ it doesn't hurt to do it three times" LOL. thats a poke at the lack of craftmanship of some of my coworkers. LOL. mybad.
how did you remove the valve cover bolts and seals? I tapped mine the first time I painted them and had to strip it due to a defective rattlecan screwed up the finish on half of it. I hastly ( as I was irked still from having to sand and repaint) & didn't retap them and painted over the bolts/seals thinking the coilpack covered them.
Hey. you know what they say..... (my work) .... " if something is worth doing it twice........ it doesn't hurt to do it three times" LOL. thats a poke at the lack of craftmanship of some of my coworkers. LOL. mybad.
08-01-2010, 11:21 AM
#109
GC99TA,
how did you remove the valve cover bolts and seals? I tapped mine the first time I painted them and had to strip it due to a defective rattlecan screwed up the finish on half of it. I hastly ( as I was irked still from having to sand and repaint) & didn't retap them and painted over the bolts/seals thinking the coilpack covered them. Hey. you know what they say..... (my work) .... " if something is worth doing it twice........ it doesn't hurt to do it three times" LOL. thats a poke at the lack of craftmanship of some of my coworkers. LOL. mybad.
how did you remove the valve cover bolts and seals? I tapped mine the first time I painted them and had to strip it due to a defective rattlecan screwed up the finish on half of it. I hastly ( as I was irked still from having to sand and repaint) & didn't retap them and painted over the bolts/seals thinking the coilpack covered them.
Hey. you know what they say..... (my work) .... " if something is worth doing it twice........ it doesn't hurt to do it three times" LOL. thats a poke at the lack of craftmanship of some of my coworkers. LOL. mybad.I recommend spraying the seals from the bottom with WD40 if they aren't already oily from use. That should help; you may have to wiggle them around a little but you'll mostly pull them straight back and out of the covers. Hope that helps.
08-01-2010, 02:25 PM
#110
GC99TA,
I only ask about the oilpump as I been disgussing the oil pressure regulator valve with John@ ScogginDickey and he has this to say.......Originally Posted by John@Scoggin I believe that valve is there to regulate the obscene amount of flow/pressure that the VVT/DOD oil pump puts out. I am not sure of the relief pressure though.
Unless you are using the VVT/DOD then there is no need for it, but you should also change out the oil pump to a standard one. We have seen way too many problems when people delete the dod and/or vvt and do not change the pump.
I'm gonna keep a hold of the oil relief valve that goes in the pan and I'll drop the pan and put it in at some point if excessive oil pressure becomes an issue. My H3 pan has a spot for it; it would just need drilled through and tapped. Thats probably an easier (and cheaper) solution as opposed to pulling everything off the front of the motor to swap the oil pump out.
But I also don't want to run the oil relief valve until GM or someone else comes up with some type of deflector for them. I've read that they are causing excessive oil consumption/oil build up on the piston rings due to the bypass/relief valve spraying pressurized oil up at the cylinders. I guess this will just have to be one of those wait an see type things.
08-01-2010, 05:06 PM
#111
But I also don't want to run the oil relief valve until GM or someone else comes up with some type of deflector for them. I've read that they are causing excessive oil consumption/oil build up on the piston rings due to the bypass/relief valve spraying pressurized oil up at the cylinders. I guess this will just have to be one of those wait an see type things.
keep up the good work.
Jim
 08-02-2010, 04:38 PM
#113
Sounds like you're right on track Jim. I want to reinforce for the benefit of others that you are 100% correct on the 14x1.5mm threads on these things. I've seen others talk about using a 1/4in pipe plug to delete these valves in their pans, but that is incorrect. I had a 1/4in pipe plug laying around, so I loosley threaded it into the hole in the pan just to see. It will screw in and probably would tighten up "OK" if you had pipe tape on it, but when compared to the actual oil relief valve that is supposed to be in that hole, they are NOT the same thread. It may "work" for some, but I'd be afraid of the pipe plug backing out since it's not the correct thread.
08-02-2010, 04:48 PM
#114
Thanks!
It's actually great that "everyone" isn't a 2nd Gen fan and it makes it more of a compliment coming from someone who isn't. Less popularity keeps the prices down on them (for now) and you don't have 10 of them parked next to you at every event you attend. Swapping an LS motor into one should make it even less common, but there's still a good handfull of LS/2nd Gens out there and growing every day it seems.
It's actually great that "everyone" isn't a 2nd Gen fan and it makes it more of a compliment coming from someone who isn't. Less popularity keeps the prices down on them (for now) and you don't have 10 of them parked next to you at every event you attend. Swapping an LS motor into one should make it even less common, but there's still a good handfull of LS/2nd Gens out there and growing every day it seems.
08-02-2010, 06:25 PM
#115
Sounds like you're right on track Jim. I want to reinforce for the benefit of others that you are 100% correct on the 14x1.5mm threads on these things. I've seen others talk about using a 1/4in pipe plug to delete these valves in their pans, but that is incorrect. I had a 1/4in pipe plug laying around, so I loosley threaded it into the hole in the pan just to see. It will screw in and probably would tighten up "OK" if you had pipe tape on it, but when compared to the actual oil relief valve that is supposed to be in that hole, they are NOT the same thread. It may "work" for some, but I'd be afraid of the pipe plug backing out since it's not the correct thread.
I did see the 68problemchild (IIRC) used a 1/4 NPT and MINE was deff. different.
Jim
08-02-2010, 06:28 PM
#116
GC99TA,
I will get a 1/4 pipe plug to see how it fits the pan just to see. Remember, others have been using L92 pans. There *MIGHT* be a difference.
I will get a 1/4 pipe plug to see how it fits the pan just to see. Remember, others have been using L92 pans. There *MIGHT* be a difference.
08-03-2010, 06:37 PM
#117
OPR valve is deff 14x1.5mm. At least mine is.
08-04-2010, 11:19 AM
#118
On The Tree

Join Date: Oct 2008
Posts: 178
Likes: 0
Received 0 Likes
on
0 Posts
Can you guys take some pics of the valve you are talking about?
My motor is a 1999 6.0L, will I need to change the oil pump for one that is lower pressure?? Or change something else?
Mine is going to be a carbed setup with the MSD 6010 if that makes any difference.
My motor is a 1999 6.0L, will I need to change the oil pump for one that is lower pressure?? Or change something else?
Mine is going to be a carbed setup with the MSD 6010 if that makes any difference.
08-04-2010, 11:55 AM
#119
Can you guys take some pics of the valve you are talking about?
My motor is a 1999 6.0L, will I need to change the oil pump for one that is lower pressure?? Or change something else?
Mine is going to be a carbed setup with the MSD 6010 if that makes any difference.
My motor is a 1999 6.0L, will I need to change the oil pump for one that is lower pressure?? Or change something else?
Mine is going to be a carbed setup with the MSD 6010 if that makes any difference.
Your 99 pump is not a high pressure unit. They only came on engines equipped with VVT and/or AFM. Nor will you have one of these relief valves in your pan so nothing for you to worry about.
08-04-2010, 02:30 PM
#120
TECH Fanatic
iTrader: (37)
Join Date: May 2008
Location: ocala,fl--- forest-ocklawaha
Posts: 1,034
Likes: 0
Received 0 Likes
on
0 Posts

i looked at that thread "whats inside my oil pan" i have a stock ly6 pan and that is not in there.. thats for dod.... releaif plug im talking bout is the one where the oil filter goes.. not inside the pan.