

LS1 and 200-4r to L92 / T56 in 71 Chevelle convertible...now Gen V LT1 6L80e swapping
 10-30-2013 | 10:44 PM
#441
Thread Starter
TECH Fanatic
iTrader: (23)
Joined: Jul 2010
Posts: 1,764
Likes: 20
From: Nashville / Tampa
I had them in and wired enough to play around with them, it's just a power and ground. The AAW harness has provisions for them, in a more stock setup I'm not sure what I'd do, maybe set something up with a relay and draw power off the battery or an intermediate point between the alternator and battery? But as long as you get the plug that goes into the yellow part shown in the next-to-last picture here you should be good to go: https://ls1tech.com/forums/16918918-post414.html
All you need is red and brown.
All you need is red and brown.
12-25-2013 | 06:28 PM
#442
Thread Starter
TECH Fanatic
iTrader: (23)
Joined: Jul 2010
Posts: 1,764
Likes: 20
From: Nashville / Tampa
Been a long time since an update, but I just go into town and had a few minutes of daylight to play with. I had been considering getting my trunk and hood vinyl wrapped (and still might) to hold me over until paint time, but I found a can of plasti dip and some tape and thought I'd see what I could come up with. This is 100% proof of concept and coming off tomorrow, but I wanted to see if it would be possible to get both the thick and thin stripes done. It isn't perfect, but I rushed it just to see what might happen. I think the possibility of making it a solid 10-footer is definitely there, once it warms up I'll put more effort into a redo.
Throwing down some tape:
http://www.flickr.com/photos/21527394@N06/11555918543/
Making use of some wrapping paper
http://www.flickr.com/photos/21527394@N06/11555808514/
Test coat
http://www.flickr.com/photos/21527394@N06/11555898793/
Transition to the other side
http://www.flickr.com/photos/21527394@N06/11555754395/
"Finished" product.
http://www.flickr.com/photos/21527394@N06/11555923653/
I spent exactly zero time measuring anything, I just looked at a picture on my phone and guestimated so I'm aware it looks like ***, but it was pretty fun just messing around. The key seems to be to spray it on thick and if you are wanting the straightest lines pull up the tape while it's still a bit wet. It might also help to wait until it's above 40 degrees outside.
For something a bit more practical and useful to others - I picked up a set of kick panels to mount speakers in. I wanted some for a non-a/c car but without garbage flea market speakers preloaded into them. I couldn't find them so I contacted the guy at Roddoors, who said if I sent him some real panels he'd use them to fab up some meant for speakers. My goal was to get speaker pods AND the vents, but while I thought that would be obvious (if I didn't want vents I could just buy one of the many A/C versions) it appears it was not. Here is what I got.
http://www.flickr.com/photos/21527394@N06/11555895126/
http://www.flickr.com/photos/21527394@N06/11555892596/
These are basically the beta version that I'm testing out. If it is at least reasonably warm I'll get them in this week and send him suggestions for making them better. If anyone has any specific questions or needs measurements let me know. I think with some dynamat on the back they will work pretty well, certainly better than stock.
Last edited by chuckd71; 12-25-2013 at 06:47 PM.
04-06-2014 | 09:51 AM
#444
Thread Starter
TECH Fanatic
iTrader: (23)
Joined: Jul 2010
Posts: 1,764
Likes: 20
From: Nashville / Tampa
Well, slowly but surely. Between the weather and being out of town I've only spent an hour or so on it in the last few months. Once I get a place here in Atlanta with a garage things should speed up.
Until then I just do what I can.
Last week I sold my Chevelle buckets and the rear seat covers to along with them. I kept the rear seat frames just in case, as they seem to be pretty hard to replace. Getting them recovered and built up with foam to match the fronts was going to be at least $500, so I found a set of newer GTO rears on CL for $100. A leatherique dye kit runs $85, so for less than $200 I think I'll have a decent setup. Since I never put the top up, I don't want to spend a fortune on seats that will be getting sun all the time.
I know there are several other people that have done this swap, but I haven't seen too many pics of what the seats look like from behind or what the measurements are, so here are pics and some things I thought were interesting and or useful. There is of course some parallax when taking pictures of a ruler held a few inches above a surface, so the pics are just to illustrate where the measurement is made. For the sake of clarity, these are only numbers for the part of the seat your back would lean against, not the part you sit on (putting both in one post could get confusing), but I will add them later.
Black center section height = 29
Black center front width upper = 6.5-7
Black center front width lower = 3.5-4
Black center back width = 8
Single side back upper width = 17
Single side front upper width = 19
Total back upper width = 43.5-44
Total back lower width = 43
Total front lower width = 47
Total front upper width = 44
Single side front lower width = 22
Seat height, horizontal part of mounting bracket to top center = 31
This is the seat from behind. Rather than hang from hooks mounted in the car like the chevelle seats, these have the hooks mounted on them, meaning slots will need to be cut in the car. Should be easy enough.
The center section is just dense foam, which seems cheap, but I guess it works. It also just sort of pops in and out. The tops have zippers, so getting to and repairing the seam splits these seats always have shouldn't be hard. Finally, the covers do not use hog rings, they simply snap onto the frame rails. Very handy. The yellow foam is really thick in places, I'm not sure if some will have to be taken out or not.
[IMG] [/IMG]
In back, the black part is about 8 inches wide.
[IMG] [/IMG]
From the front, there is a space of about 4 inches between the seats near the bottom.
[IMG] [/IMG]
And closer to 7 up top.
[IMG] [/IMG]
The total width at the bottom of the front is about 47 inches. I don't have a picture, but they taper in a bit toward the top and close to about 44 inches.
[IMG] [/IMG]
The back side is narrower than the front at the bottom, around 43 inches.
[IMG] [/IMG]
Near the top, the back side is about the same width as the front side, 44.
[IMG] [/IMG]
For those ditching the black middle part, each side is about 19 inches wide near the top in front.
[IMG] [/IMG]
And about 22 near the bottom front.
[IMG] [/IMG]
A single side is just over 17 inches wide near the top in back. Before seeing the seats, I was concerned that if the tops stuck up too much there would just be an exposed section of ugly foam and seat frame exposed to everyone driving behind me. Fortunately the leather covers a decent amount of the area up top and once dyed I think it will look fine.
[IMG] [/IMG]
The lower mounts
[IMG] [/IMG]
I hope the numbers and pics makes sense. I realize it looks like 1 + 1 = 3 in places, but there is a lot of tapering from both bottom to top and front to back, so this is just for getting a rough idea.
In a couple weeks (assuming it doesn't rain) I should get these roughly into place and have a better idea of what might need to be trimmed and where. I'll also get some solid measurements of the original seat and the car itself.
Until then I just do what I can.
Last week I sold my Chevelle buckets and the rear seat covers to along with them. I kept the rear seat frames just in case, as they seem to be pretty hard to replace. Getting them recovered and built up with foam to match the fronts was going to be at least $500, so I found a set of newer GTO rears on CL for $100. A leatherique dye kit runs $85, so for less than $200 I think I'll have a decent setup. Since I never put the top up, I don't want to spend a fortune on seats that will be getting sun all the time.
I know there are several other people that have done this swap, but I haven't seen too many pics of what the seats look like from behind or what the measurements are, so here are pics and some things I thought were interesting and or useful. There is of course some parallax when taking pictures of a ruler held a few inches above a surface, so the pics are just to illustrate where the measurement is made. For the sake of clarity, these are only numbers for the part of the seat your back would lean against, not the part you sit on (putting both in one post could get confusing), but I will add them later.
Black center section height = 29
Black center front width upper = 6.5-7
Black center front width lower = 3.5-4
Black center back width = 8
Single side back upper width = 17
Single side front upper width = 19
Total back upper width = 43.5-44
Total back lower width = 43
Total front lower width = 47
Total front upper width = 44
Single side front lower width = 22
Seat height, horizontal part of mounting bracket to top center = 31
This is the seat from behind. Rather than hang from hooks mounted in the car like the chevelle seats, these have the hooks mounted on them, meaning slots will need to be cut in the car. Should be easy enough.
The center section is just dense foam, which seems cheap, but I guess it works. It also just sort of pops in and out. The tops have zippers, so getting to and repairing the seam splits these seats always have shouldn't be hard. Finally, the covers do not use hog rings, they simply snap onto the frame rails. Very handy. The yellow foam is really thick in places, I'm not sure if some will have to be taken out or not.
[IMG]
[/IMG]In back, the black part is about 8 inches wide.
[IMG]
[/IMG]From the front, there is a space of about 4 inches between the seats near the bottom.
[IMG]
[/IMG]And closer to 7 up top.
[IMG]
[/IMG]The total width at the bottom of the front is about 47 inches. I don't have a picture, but they taper in a bit toward the top and close to about 44 inches.
[IMG]
[/IMG]The back side is narrower than the front at the bottom, around 43 inches.
[IMG]
[/IMG]Near the top, the back side is about the same width as the front side, 44.
[IMG]
[/IMG]For those ditching the black middle part, each side is about 19 inches wide near the top in front.
[IMG]
[/IMG]And about 22 near the bottom front.
[IMG]
[/IMG]A single side is just over 17 inches wide near the top in back. Before seeing the seats, I was concerned that if the tops stuck up too much there would just be an exposed section of ugly foam and seat frame exposed to everyone driving behind me. Fortunately the leather covers a decent amount of the area up top and once dyed I think it will look fine.
[IMG]
[/IMG]The lower mounts
[IMG]
[/IMG]I hope the numbers and pics makes sense. I realize it looks like 1 + 1 = 3 in places, but there is a lot of tapering from both bottom to top and front to back, so this is just for getting a rough idea.
In a couple weeks (assuming it doesn't rain) I should get these roughly into place and have a better idea of what might need to be trimmed and where. I'll also get some solid measurements of the original seat and the car itself.
Last edited by chuckd71; 04-06-2014 at 10:24 AM.
05-17-2014 | 12:12 AM
#445
Thread Starter
TECH Fanatic
iTrader: (23)
Joined: Jul 2010
Posts: 1,764
Likes: 20
From: Nashville / Tampa
Small update. Ordered one of these http://cgi.ebay.com/ws/eBayISAPI.dll...m=251526532465 ($17) and got the crank pulley back on. Before I did I took my angle grinder, cut a couple slits down an old crank bolt and used it to chase/ clean the crank threads; worked fine.
The tool itself is just a threaded rod and some bolts, but it was less than a third the cost of buying a whole grade 8 (or similar) rod at fastenal. It came with two washers but I ended up needing about an inch or so more which I was lucky enough to have on hand. Just throwing that out there. Regardless, it worked much better than the "longer bolt pulling the pulley on" method. Once summer break rolls around I'll get the AAW stuff finished and the motor in. Wires are still a mess but it's getting better.
I got the back seats cleaned up and dyed today, and it turned out better than I had expected. Got the kit from this guy, offered $58. http://www.ebay.com/itm/301176818838...84.m1439.l2649
Old.
 IMG_20140516_134916
Half way.
 IMG_20140516_152512
 IMG_20140516_152504
Finished.
 IMG_20140516_164157
 IMG_20140516_164204
It isn't perfect, but it's a lot better than before. I tried to use a preval or whatever it's called sprayer to apply the dye but I guess I didn't thin it enough and/ or the harder clogged it. Either way, the included sponges probably worked better in the long run. With the heat gun it took less than 3 hours start to finish, working on other things between coats.
The tool itself is just a threaded rod and some bolts, but it was less than a third the cost of buying a whole grade 8 (or similar) rod at fastenal. It came with two washers but I ended up needing about an inch or so more which I was lucky enough to have on hand. Just throwing that out there. Regardless, it worked much better than the "longer bolt pulling the pulley on" method. Once summer break rolls around I'll get the AAW stuff finished and the motor in. Wires are still a mess but it's getting better.
I got the back seats cleaned up and dyed today, and it turned out better than I had expected. Got the kit from this guy, offered $58. http://www.ebay.com/itm/301176818838...84.m1439.l2649
Old.
IMG_20140516_134916 Half way.
IMG_20140516_152512IMG_20140516_152504Finished.
IMG_20140516_164157IMG_20140516_164204 It isn't perfect, but it's a lot better than before. I tried to use a preval or whatever it's called sprayer to apply the dye but I guess I didn't thin it enough and/ or the harder clogged it. Either way, the included sponges probably worked better in the long run. With the heat gun it took less than 3 hours start to finish, working on other things between coats.
Last edited by chuckd71; 05-18-2014 at 03:34 PM.
05-17-2014 | 06:08 AM
#446
Chuck--
My rear GTO seats are out right now cuz I'm fixing a rear quarter glass misalignment w/my top so here are some pics that might help. When I put mine in years ago, the upholstery guy made a plywood backing for the center section that was 1.5" wider than stock, and ended up cutting 3" off the back part so my convertible top would clear going up and down. The rear section will catch on the original factory hooks, and the bottoms he put little tabs (see pic) that I have a screw going thru the floor to hold it in. They fit nice in the back.
My rear GTO seats are out right now cuz I'm fixing a rear quarter glass misalignment w/my top so here are some pics that might help. When I put mine in years ago, the upholstery guy made a plywood backing for the center section that was 1.5" wider than stock, and ended up cutting 3" off the back part so my convertible top would clear going up and down. The rear section will catch on the original factory hooks, and the bottoms he put little tabs (see pic) that I have a screw going thru the floor to hold it in. They fit nice in the back.
05-17-2014 | 10:37 AM
#447
Thread Starter
TECH Fanatic
iTrader: (23)
Joined: Jul 2010
Posts: 1,764
Likes: 20
From: Nashville / Tampa
Hmm, that is useful, thanks.
You are hanging them from the hooks built into the car, not the ones on the seat backs?
Also, do you know where he took the 3 inches from? It looks like he still used the factory black ends to secure the material over the metal frame, so I'm guessing it came from the middle and he cut/ rewelded the frame?
I can't weld, but maybe I can find someone that can. Thanks for the pics, if I can't do this myself I can take them to an interior guy and show him what I need.
Instead of widening the middle I was considering adding some side bolsters with shoulder belts built in. I found some in a Volvo that were pretty narrow which might work. If that won't work I might try what you did but put a 6.5 inch sub in it. Doing so would clean up the trunk a bit. I've considered putting my component speakers there as well, I know it will mess up the soundstage (which is crap in a vert anyway) but then I could replace my hacked up sail panels with new ones.
Last edited by chuckd71; 05-17-2014 at 10:43 AM.
08-04-2014 | 10:01 PM
#448
Thread Starter
TECH Fanatic
iTrader: (23)
Joined: Jul 2010
Posts: 1,764
Likes: 20
From: Nashville / Tampa
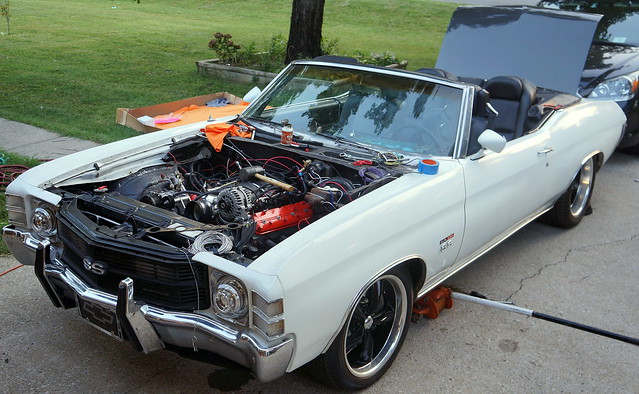
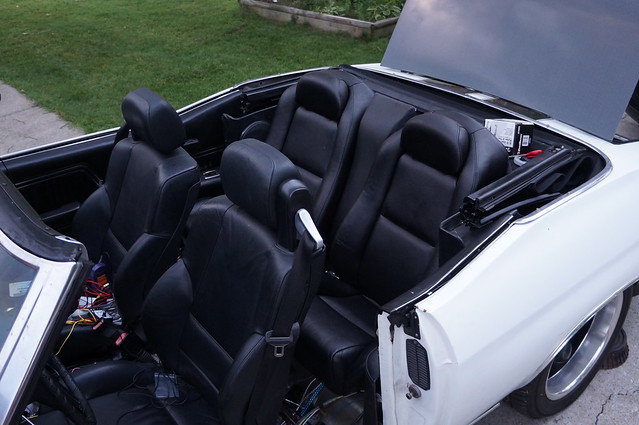
Been a long time since any time away from work, but I finally got two weeks of break so I've been making it count. I finished up the AAW rewire, got the seats, windows and gauges in and wired, fixed the holes in the back sail panels where the previous owner put speakers, redyed the carpet and have almost finished getting the interior in. Oh, also got the motor in and wired up. Doesn't sound like much, but each of these things have about a million little aspects that just eat time. Trying to to get it all to work together has been an absolute blast, but it's a good feeling when things actually work like they should.
This was the end result after a day of getting the engine and trans lined up and fighting header bolts. Still not running, but a long way from where it started Saturday.
A shot of the interior, which is super comfortable and way better looking (opinion of course).
 DSC02979
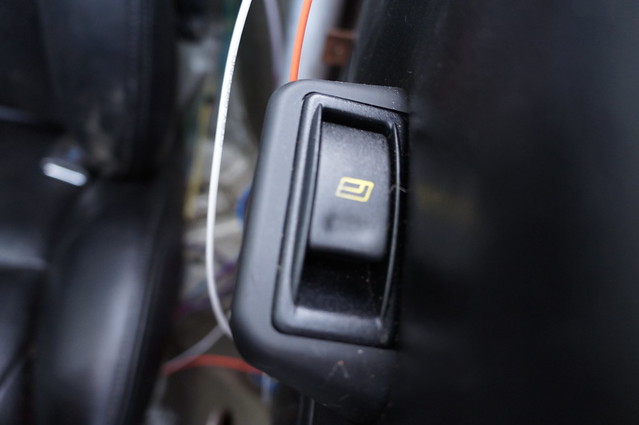
Making 50 changes at once it gets hard to keep up with things, but so far almost everything has worked as planned. The power windows and illuminated switches worked right off the bat, and so did the exterior lights, seats and ignition. Had some troubleshooting to do with the dash and interior lights, but as always it was an issue with bad grounds.
 DSC02977 by chuckd85032, on Flickr
All told I've probably made more progress in the last few days than I have in the last year or two. Assuming I can get the brakes bled (and the engine starts of course) I'm hoping to be able to drive this to the exhaust shop by the end of the week.
 DSC02973
This was the end result after a day of getting the engine and trans lined up and fighting header bolts. Still not running, but a long way from where it started Saturday.
A shot of the interior, which is super comfortable and way better looking (opinion of course).
DSC02979 Making 50 changes at once it gets hard to keep up with things, but so far almost everything has worked as planned. The power windows and illuminated switches worked right off the bat, and so did the exterior lights, seats and ignition. Had some troubleshooting to do with the dash and interior lights, but as always it was an issue with bad grounds.
DSC02977 by chuckd85032, on FlickrAll told I've probably made more progress in the last few days than I have in the last year or two. Assuming I can get the brakes bled (and the engine starts of course) I'm hoping to be able to drive this to the exhaust shop by the end of the week.
DSC02973 Last edited by chuckd71; 08-04-2014 at 10:26 PM.
 08-05-2014 | 08:55 PM
#450
Thread Starter
TECH Fanatic
iTrader: (23)
Joined: Jul 2010
Posts: 1,764
Likes: 20
From: Nashville / Tampa
Thanks, it's nice to see some outward signs of progress.
Spent most of my time today playing with the hp efi software and setting up relays to run the electric fans. Until today I had been using a tiny mad electrical firewall power distribution thing, but I dumped it in favor of one sourced from a 5 or 7 series BMW (I can't recall which). As a side note, if anyone is looking to move their battery to the trunk, stripping one of these from a wreck in a junk yard would be the way to go. The cables on it are thick but really flexible, almost to the point of being soft.
Anyway, last summer I dug a fuse box from some GM car, and today I yanked the maxi-fuses out to use the shell to hide my relays.
This is all proof of concept at this point, so the wires are left long until I know it works.
The thing from the BMW (the fattest cable runs the length of the donor car).
 DSC03034
Tons of fused power options.
 DSC03038
And this is it so far, it isn't pretty but it works.
 DSC03039
Spent most of my time today playing with the hp efi software and setting up relays to run the electric fans. Until today I had been using a tiny mad electrical firewall power distribution thing, but I dumped it in favor of one sourced from a 5 or 7 series BMW (I can't recall which). As a side note, if anyone is looking to move their battery to the trunk, stripping one of these from a wreck in a junk yard would be the way to go. The cables on it are thick but really flexible, almost to the point of being soft.
Anyway, last summer I dug a fuse box from some GM car, and today I yanked the maxi-fuses out to use the shell to hide my relays.
This is all proof of concept at this point, so the wires are left long until I know it works.
The thing from the BMW (the fattest cable runs the length of the donor car).
DSC03034Tons of fused power options.
DSC03038And this is it so far, it isn't pretty but it works.
DSC03039
08-09-2014 | 12:35 PM
#451
Thread Starter
TECH Fanatic
iTrader: (23)
Joined: Jul 2010
Posts: 1,764
Likes: 20
From: Nashville / Tampa
Now that everything is done I've been spending the last couple days trying to get this thing to start, but of course it won't.
Went and bought a leak down tester - results were not good.
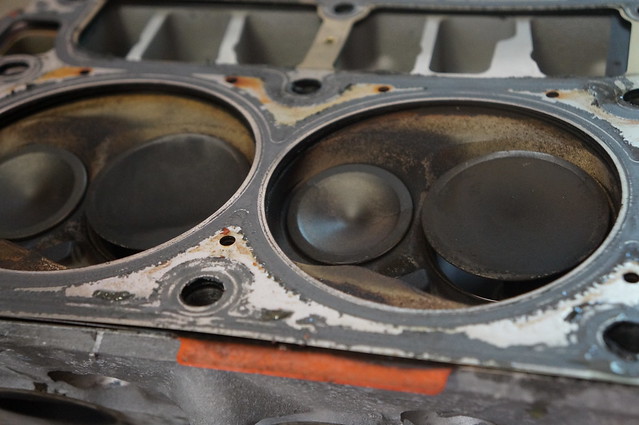
Pulled the passenger head off and, in what passes for good news these days, I found the source of my troubles.
Bent valves. Pretty shitty, but I'm happy I at least have a problem I can solve. Buying some new intake valves.
 DSC03048
 DSC03049
 DSC03050
 DSC03051
Went and bought a leak down tester - results were not good.
Pulled the passenger head off and, in what passes for good news these days, I found the source of my troubles.
Bent valves. Pretty shitty, but I'm happy I at least have a problem I can solve. Buying some new intake valves.
DSC03048DSC03049DSC03050 DSC03051 Last edited by chuckd71; 08-11-2014 at 01:34 PM.
08-11-2014 | 01:42 PM
#453
Thread Starter
TECH Fanatic
iTrader: (23)
Joined: Jul 2010
Posts: 1,764
Likes: 20
From: Nashville / Tampa
222/230 ..597/.573" 113LSA +2 are the cam specs, nothing crazy. Double checked with Pat G this morning (who got back to me super quickly) and he said it's fine.
Based on my track record so far I'm willing to chalk this one up to installer error and move forward.
For now I have the heads off waiting for head gaskets and the new valves to come (some guy just happened to be selling some new take outs on ebay). On the plus side I got the air ride calibrated and was able to raise the car up enough to bleed the brakes, though I'll do it again once I can drive the car up on ramps and have some vacuum.
Right now I'm just doing random things, trying to decide whether or not to have it taken to the exhaust shop during this down time. I have to be in Atlanta at 8am on Tuesday so I'm sort of pressed for time. If thing doesn't get moving by then it'll be mothballed Christmas. After that it's potentially 3 years until I get another chance to work on it.
08-11-2014 | 02:20 PM
#454

Hey Chuck...nice to see some progress...(This is 72 Greenbrier from the Chevelle board)...Your seats look bitchin'!...Just for reference...what actually happened to your valves...???
08-11-2014 | 02:38 PM
#455
Thread Starter
TECH Fanatic
iTrader: (23)
Joined: Jul 2010
Posts: 1,764
Likes: 20
From: Nashville / Tampa
Thanks, I picked up some welding ground magnets from harbor freight (still hate that place but not sure where else to get them) to use to anchor the bottoms down; working on a spacer for the backs and might or might not try make a fiberglass center section with cup holders. We'll see how the day goes.
As for the valves, I would guess that during one of the many start working on car-stop working for 3 months-start again situations I overlooked something. Who knows. At this point as long as I double check everything I figure it'll all work out.
As for the valves, I would guess that during one of the many start working on car-stop working for 3 months-start again situations I overlooked something. Who knows. At this point as long as I double check everything I figure it'll all work out.
08-12-2014 | 07:56 PM
#456

Registered User
Joined: Aug 2014
Posts: 6
Likes: 0
Wow, this has been quite an adventure for you. Somewhat scares me and encourages me at the same time, lol (currently searching for a good Chevelle or 1st Gen Camaro to be my project vehicle for LS swap)... I did wonder, did you not consider a ready-built 7" projector bulb replacement instead of the setup you used? I've seen a couple different setups, but I suppose modification to the factory headlight buckets might be required.
Started reading this thread two days ago, and in the weee hours of this morning I finally finished... whew! Glad to see you're back at it.... I was quite surprised to see the bent valves, but after thinking it over today, I do wonder if the pushrods needed to shorter with the new cam.
Started reading this thread two days ago, and in the weee hours of this morning I finally finished... whew! Glad to see you're back at it.... I was quite surprised to see the bent valves, but after thinking it over today, I do wonder if the pushrods needed to shorter with the new cam.
08-13-2014 | 07:50 AM
#457
Thread Starter
TECH Fanatic
iTrader: (23)
Joined: Jul 2010
Posts: 1,764
Likes: 20
From: Nashville / Tampa
I wouldn't let my experience deter you, I'm sure there is a right way to build a car I just haven't found it yet.
The cam has a smaller base circle than stock so the longer push rods prevent that sewing-machine sound.
I've seen the prebuilt projectors and kits offered a variety of places, but most look like they are just random guys assembling ebay parts and charging $300 in labor for doing so. Some guy uses decent morimoto projectors, but everything else looks like ebay stuff. I originally bought cheap parts myself to do the same thing then came across the starr projector housings on ebay. They are big and stick out a bit but the quality is there when compared to the $12 ebay housings. The bulbs and etc from the cheap projectors more or less dropped right in so I went with it. I generally prefer to build things myself, but as you can see there are pros and cons to that approach.
08-14-2014 | 12:55 PM
#458
Thread Starter
TECH Fanatic
iTrader: (23)
Joined: Jul 2010
Posts: 1,764
Likes: 20
From: Nashville / Tampa
Valves and head gasket (not gaskets) came in yesterday so I got them switched out. The Lingenfelter spring tool and some magnets made it a breeze.
Leak down test looks good. Obviously good compression when turning motor over by hand.
Random notes -
When I ordered head gaskets I again forgot they were sold individually. Dumb.
I tried to start it up, and it was *this* close to turning over. It actually did for a half-second, but the voltage was dropping down to 6-8 volts during cranking and the hp efi was cutting on and off. No backfires or effortless spinning like before though.
Starter began smoking, I wasn't cranking it long, but I guess these years of beating on it caught up to me. I think it came used with a block anyway. New one will be here in 3 hours.
It's always something. On the bright side, it at least appears everything inside the motor is working as it should. I am of course fully prepared to be proven wrong. Guess I'll find out after dinner. In the mean time I'm going to try to hook up the back up cam and super el-cheapo cd player.
08-14-2014 | 07:36 PM
#459
Thread Starter
TECH Fanatic
iTrader: (23)
Joined: Jul 2010
Posts: 1,764
Likes: 20
From: Nashville / Tampa
New starter and voila, it runs. Smoked like a bastard as oil and god knows what else burned off of the headers but other than no major issues. Even the piece of **** Kwik bracket isn't squealing. The idle is a bit uneven, but I'd bet there are ways to work that through. Brakes are soft as **** so I think I'm going to just get it hauled to a shop and let them do it while I do other things. I'll post a video of the first start once it finishes converting from Sony's BS AVCHD format. Still a lot to do to iron out the kinks, but thanks to everyone who helped along the way.